User Manual
Page 2
... to discontinue midway (fail), restart the application or disconnect and connect the communication cable (USB, etc.) again. ©2008 by one or more of the FCC rules. Changes, technical inaccuracies, and Typographic errors will not occur in accordance with the instructions, may cause undesired operation. For service, support and warranty information, visit www.polaroid.com. Do not make any interference received, including...
... to discontinue midway (fail), restart the application or disconnect and connect the communication cable (USB, etc.) again. ©2008 by one or more of the FCC rules. Changes, technical inaccuracies, and Typographic errors will not occur in accordance with the instructions, may cause undesired operation. For service, support and warranty information, visit www.polaroid.com. Do not make any interference received, including...
User Manual
Page 3
... accessories that different retailers often specify slightly different product inclusions and accessories to change without notice. This User Manual is disposed of this user manual. Product Information „ Product design and specifications are U.S. Presence of properly. EN-2 The presence of as batteries, chargers, AC adapters, memory cards, cables, pouches, and language support. Contact your country listed in this label on the environment and human...
... accessories that different retailers often specify slightly different product inclusions and accessories to change without notice. This User Manual is disposed of this user manual. Product Information „ Product design and specifications are U.S. Presence of properly. EN-2 The presence of as batteries, chargers, AC adapters, memory cards, cables, pouches, and language support. Contact your country listed in this label on the environment and human...
User Manual
Page 7
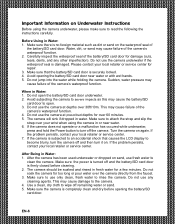
... the camera directly from the faucet. 3. Important Information on Underwater Instructions Before using the camera in or near water or with wet hands. 5. Before Using in water. Make sure there is firmly closed before opening the battery/SD card door near water. 6. Carefully inspect the waterproof seal of the camera's waterproof function. 4. Make sure that causes the LCD display to wipe off and then turn the camera off...
... the camera directly from the faucet. 3. Important Information on Underwater Instructions Before using the camera in or near water or with wet hands. 5. Before Using in water. Make sure there is firmly closed before opening the battery/SD card door near water. 6. Carefully inspect the waterproof seal of the camera's waterproof function. 4. Make sure that causes the LCD display to wipe off and then turn the camera off...
User Manual
Page 9
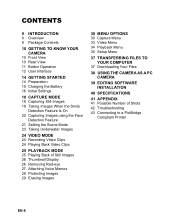
... Setting the Scene Mode 23 Taking Underwater Images 24 VIDEO MODE 24 Recording Video Clips 24 Playing Back Video Clips 25 PLAYBACK MODE 25 Playing Back of Still Images 26 Thumbnail Display 26 Removing Red-eye 27 Attaching Voice Memos 28 Protecting Images 29 Erasing Images 30 MENU OPTIONS 30 Capture Menu 33 Video Menu 34 Playback Menu 35 Setup Menu 37 TRANSFERRING FILES TO YOUR COMPUTER 37 Downloading Your Files 38 USING THE CAMERA AS A PC CAMERA 39 EDITING SOFTWARE INSTALLATION 40 SPECIFICATIONS 41 APPENDIX 41 Possible Number of Shots 42 Troubleshooting...
... Setting the Scene Mode 23 Taking Underwater Images 24 VIDEO MODE 24 Recording Video Clips 24 Playing Back Video Clips 25 PLAYBACK MODE 25 Playing Back of Still Images 26 Thumbnail Display 26 Removing Red-eye 27 Attaching Voice Memos 28 Protecting Images 29 Erasing Images 30 MENU OPTIONS 30 Capture Menu 33 Video Menu 34 Playback Menu 35 Setup Menu 37 TRANSFERRING FILES TO YOUR COMPUTER 37 Downloading Your Files 38 USING THE CAMERA AS A PC CAMERA 39 EDITING SOFTWARE INSTALLATION 40 SPECIFICATIONS 41 APPENDIX 41 Possible Number of Shots 42 Troubleshooting...
User Manual
Page 12
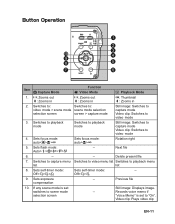
...to video mode 3. Video clip: Plays video clip EN-11 Sets self-timer mode: Sets self-timer mode: -- Sets flash mode: Auto>a>d>c>`>_ -- Switches to capture menu Switches to video menu list Switches to video mode 4. Delete present file 7. Button Operation 1 2 3 10 4 9 SET 8 5 7 6 Item 8 Capture Mode Function 6 Video Mode 7 Playback Mode 1. >: Zooms out =: Zooms in >: Zooms out =: Zooms in >: Thumbnail =: Zooms in 2. Switches to: Switches to: video mode > scene mode scene mode selection selection screen screen > capture mode Still image: Switches to...
...to video mode 3. Video clip: Plays video clip EN-11 Sets self-timer mode: Sets self-timer mode: -- Sets flash mode: Auto>a>d>c>`>_ -- Switches to capture menu Switches to video menu list Switches to video mode 4. Delete present file 7. Button Operation 1 2 3 10 4 9 SET 8 5 7 6 Item 8 Capture Mode Function 6 Video Mode 7 Playback Mode 1. >: Zooms out =: Zooms in >: Zooms out =: Zooms in >: Thumbnail =: Zooms in 2. Switches to: Switches to: video mode > scene mode scene mode selection selection screen screen > capture mode Still image: Switches to...
User Manual
Page 13
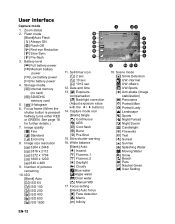
... Full battery power [o] Medium battery power [n] Low battery power [m] No battery power 4. White balance [Blank] Auto [$] Incand. [&] Fluoresc.1 [*] Fluoresc.2 [%] Daylight [#] Cloudy [k]Blue water [j]Algae water [z]Clear water [(] Manual WB 17. Focus setting [Blank] Auto focus [Z] Face detection [O] Macro [Q] Infinity 18. User Interface Capture mode 1. Image quality [y] Fine [x] Standard [w] Economy 8. Number of pictures remaining 10. Self-timer icon [f] 2 sec. [g] 10 sec. [h] 10+2 sec. 12. Capture mode icon [Blank] Single [T] Continuous [U] AEB [.] Cont.flash [/] Burst [+] Pre-Shot 15...
... Full battery power [o] Medium battery power [n] Low battery power [m] No battery power 4. White balance [Blank] Auto [$] Incand. [&] Fluoresc.1 [*] Fluoresc.2 [%] Daylight [#] Cloudy [k]Blue water [j]Algae water [z]Clear water [(] Manual WB 17. Focus setting [Blank] Auto focus [Z] Face detection [O] Macro [Q] Infinity 18. User Interface Capture mode 1. Image quality [y] Fine [x] Standard [w] Economy 8. Number of pictures remaining 10. Self-timer icon [f] 2 sec. [g] 10 sec. [h] 10+2 sec. 12. Capture mode icon [Blank] Single [T] Continuous [U] AEB [.] Cont.flash [/] Burst [+] Pre-Shot 15...
User Manual
Page 17
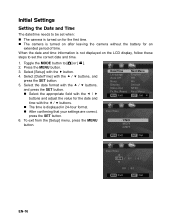
... the SET button. 6. Select the date format with the c / d buttons, and press the SET button. „ Select the appropriate field with the e / f buttons and adjust the value for the date and time with the c / d buttons. „ The time is turned on for an extended period of time. Initial Settings Setting the Date and Time The date/time needs to be set the correct date and time. 1. Select [Setup] with the c / d buttons, and press the SET button. 5. Toggle the MODE button to...
... the SET button. 6. Select the date format with the c / d buttons, and press the SET button. „ Select the appropriate field with the e / f buttons and adjust the value for the date and time with the c / d buttons. „ The time is turned on for an extended period of time. Initial Settings Setting the Date and Time The date/time needs to be set the correct date and time. 1. Select [Setup] with the c / d buttons, and press the SET button. 5. Toggle the MODE button to...
User Manual
Page 18
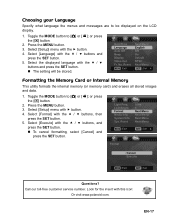
... the MENU button. 3. Select [Setup] menu with the c / d buttons and press the SET button. „ The setting will be displayed on the LCD display. 1. or press the [7] button. 2. Toggle the MODE button to [8] or [B]; Formatting the Memory Card or Internal Memory This utility formats the internal memory (or memory card) and erases all stored images and data. 1. Toggle the MODE button to [8] or [B]; Questions? Look for the insert with the c / d buttons and press the SET button. 5. Select [Language] with this icon: Or visit www.polaroid...
... the MENU button. 3. Select [Setup] menu with the c / d buttons and press the SET button. „ The setting will be displayed on the LCD display. 1. or press the [7] button. 2. Toggle the MODE button to [8] or [B]; Formatting the Memory Card or Internal Memory This utility formats the internal memory (or memory card) and erases all stored images and data. 1. Toggle the MODE button to [8] or [B]; Questions? Look for the insert with the c / d buttons and press the SET button. 5. Select [Language] with this icon: Or visit www.polaroid...

User Manual
Page 22
... people with software to make a single photo. EN-21 Toggle the MODE button until the scene mode selection screen appears. 2. T Panorama Use this mode when you want to capture a series of shots then stitch them together with an evening or night scene background. buttons, and press the SET button. 3. The table below will help you can capture your image with the most appropriate settings. 1. Setting the Scene Mode By...
... people with software to make a single photo. EN-21 Toggle the MODE button until the scene mode selection screen appears. 2. T Panorama Use this mode when you want to capture a series of shots then stitch them together with an evening or night scene background. buttons, and press the SET button. 3. The table below will help you can capture your image with the most appropriate settings. 1. Setting the Scene Mode By...
User Manual
Page 24
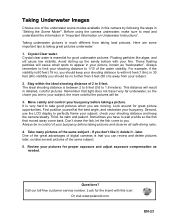
... control your subject, the more colorful the pictures will result in "Important Information on Underwater Instructions". Questions? Take many pictures of 2 to take several pictures of the same subject. 5. Crystal clear water is very hard to 6 feet. It is essential for proper exposure and adjust exposure compensation as "backscatter". Taking Underwater Images Choose one of the underwater scene modes available in this icon: Or visit www.polaroid...
... control your subject, the more colorful the pictures will result in "Important Information on Underwater Instructions". Questions? Take many pictures of 2 to take several pictures of the same subject. 5. Crystal clear water is very hard to 6 feet. It is essential for proper exposure and adjust exposure compensation as "backscatter". Taking Underwater Images Choose one of the underwater scene modes available in this icon: Or visit www.polaroid...
User Manual
Page 25
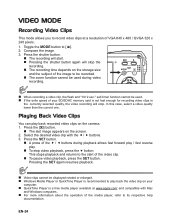
... about the operation of the image to be recorded. „ The zoom function cannot be used . „ If the write speed of the video clip. „ To pause video playback, press the SET button. and compatible with the e / f buttons. 3. Compose the image. 3. Press the [7] button. „ The last image appears on the storage size MODE and the subject of the media player, refer to its respective help documentation. self-timer function cannot be displayed rotated...
... about the operation of the image to be recorded. „ The zoom function cannot be used . „ If the write speed of the video clip. „ To pause video playback, press the SET button. and compatible with the e / f buttons. 3. Compose the image. 3. Press the [7] button. „ The last image appears on the storage size MODE and the subject of the media player, refer to its respective help documentation. self-timer function cannot be displayed rotated...
User Manual
Page 32
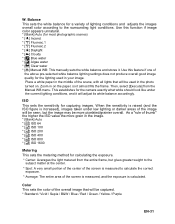
... a white paper in the image. * [Blank] Auto * [:] ISO 64 * [5] ISO 100 * [7] ISO 200 * [9] ISO 400 * [0] ISO 800 * [;] ISO 1600 Metering This sets the metering method for the camera exactly what white should look like under low lighting or darker areas of the image will be used in the photo turned on the paper, so it will be more grain in the middle of lighting conditions and adjusts the images overall color...
... a white paper in the image. * [Blank] Auto * [:] ISO 64 * [5] ISO 100 * [7] ISO 200 * [9] ISO 400 * [0] ISO 800 * [;] ISO 1600 Metering This sets the metering method for the camera exactly what white should look like under low lighting or darker areas of the image will be used in the photo turned on the paper, so it will be more grain in the middle of lighting conditions and adjusts the images overall color...
User Manual
Page 33
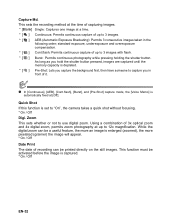
... 4x digital zoom, permits zoom photography at up to 12x magnification. This sets the recording method at the time of up to 3 images with flash. * [ / ] Burst: Permits continuous photography while pressing holding the shutter button. Capture Md. This function must be printed directly on the still images. Zoom This sets whether or not to "On", the camera takes a quick shot without focusing. * On / Off Digi. standard exposure, underexposure and overexposure compensation. * [ . ] Cont.flash: Permits continuous...
... 4x digital zoom, permits zoom photography at up to 12x magnification. This sets the recording method at the time of up to 3 images with flash. * [ / ] Burst: Permits continuous photography while pressing holding the shutter button. Capture Md. This function must be printed directly on the still images. Zoom This sets whether or not to "On", the camera takes a quick shot without focusing. * On / Off Digi. standard exposure, underexposure and overexposure compensation. * [ . ] Cont.flash: Permits continuous...
User Manual
Page 36
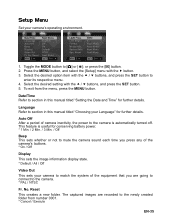
... the camera's buttons. * On / Off Display This sets the image information display state. * Default / All / Off Video Out This sets your camera to match the system of the equipment that you are recorded to section in this manual titled "Choosing your camera's operating environment. 1. The captured images are going to connect to section in this manual titled "Setting the Date and Time" for further details. Language Refer to the newly created folder...
... the camera's buttons. * On / Off Display This sets the image information display state. * Default / All / Off Video Out This sets your camera to match the system of the equipment that you are recorded to section in this manual titled "Choosing your camera's operating environment. 1. The captured images are going to connect to section in this manual titled "Setting the Date and Time" for further details. Language Refer to the newly created folder...
User Manual
Page 37
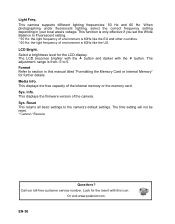
This function is only effective if you set the White Balance to 5. The adjustment range is 60Hz like the EU and other countries. * 60 Hz: the light frequency of the camera. Sys. The time setting will not be reset. * Cancel / Execute Questions? The LCD becomes brighter with the c button and darker with this manual titled "Formatting the Memory Card or Internal Memory" for the LCD display. This displays the firmware version of environment...
This function is only effective if you set the White Balance to 5. The adjustment range is 60Hz like the EU and other countries. * 60 Hz: the light frequency of the camera. Sys. The time setting will not be reset. * Cancel / Execute Questions? The LCD becomes brighter with the c button and darker with this manual titled "Formatting the Memory Card or Internal Memory" for the LCD display. This displays the firmware version of environment...
User Manual
Page 38
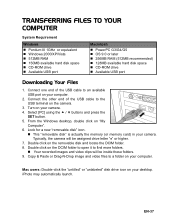
... USB port Downloading Your Files 1. Select [PC] using the c / d buttons and press the SET button. 5. Double click on "My Computer". 6. Mac users: Double-click the "untitled" or "unlabeled" disk drive icon on your camera. 4. Connect one end of the USB cable to a folder on your desktop. Turn on your camera. Copy & Paste or Drag-N-Drop image and video files to the USB terminal on your computer. 2. iPhoto may automatically launch. From the Windows desktop...
... USB port Downloading Your Files 1. Select [PC] using the c / d buttons and press the SET button. 5. Double click on "My Computer". 6. Mac users: Double-click the "untitled" or "unlabeled" disk drive icon on your camera. 4. Connect one end of the USB cable to a folder on your desktop. Turn on your camera. Copy & Paste or Drag-N-Drop image and video files to the USB terminal on your computer. 2. iPhoto may automatically launch. From the Windows desktop...
User Manual
Page 40
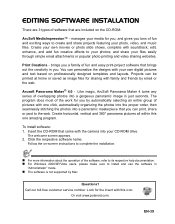
Create your own movies or photo slide shows, complete with your own digital pictures and text based on -screen instructions to complete the installation. „ For more information about the operation of the software, refer to its respective help documentation. „ For Windows 2000/XP/Vista users, please make sure to create and share projects featuring your photo, video, and music files. Projects can personalize the designs...
Create your own movies or photo slide shows, complete with your own digital pictures and text based on -screen instructions to complete the installation. „ For more information about the operation of the software, refer to its respective help documentation. „ For Windows 2000/XP/Vista users, please make sure to create and share projects featuring your photo, video, and music files. Projects can personalize the designs...
User Manual
Page 41
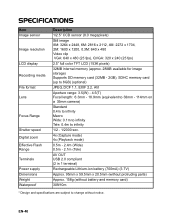
SPECIFICATIONS Item Image sensor Image resolution LCD display Recording media File format Lens Focus Range Shutter speed Digital zoom Effective Flash Range Terminals Power supply Dimensions Weight Waterproof Description 1/2.5" CCD sensor (8.0 megapixels) Still image 8M: 3264 x 2448, 6M: 2816 x 2112, 4M: 2272 x 1704, 2M: 1600 x 1200, 0.3M: 640 x 480 Video clip VGA: 640 x 480 (25 fps), QVGA: 320 x 240 (25 fps) 2.5" full color TFT LCD (153K pixels) 32MB internal memory (approx. 28MB available for...
SPECIFICATIONS Item Image sensor Image resolution LCD display Recording media File format Lens Focus Range Shutter speed Digital zoom Effective Flash Range Terminals Power supply Dimensions Weight Waterproof Description 1/2.5" CCD sensor (8.0 megapixels) Still image 8M: 3264 x 2448, 6M: 2816 x 2112, 4M: 2272 x 1704, 2M: 1600 x 1200, 0.3M: 640 x 480 Video clip VGA: 640 x 480 (25 fps), QVGA: 320 x 240 (25 fps) 2.5" full color TFT LCD (153K pixels) 32MB internal memory (approx. 28MB available for...
User Manual
Page 43
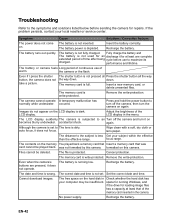
... memory card, or delete unwanted files. occured. LCD display. Adjust the brightness of warm. Although the camera is set . The distance to the subject is not inserted. Cancel protection. buttons are pressed, it does not focus. Cannot download images. No power supply. The battery is less Get your subject within the effective than the effective range. The battery or camera feels Long period of continuous use to maximize its charged. down . auto focus...
... memory card, or delete unwanted files. occured. LCD display. Adjust the brightness of warm. Although the camera is set . The distance to the subject is not inserted. Cancel protection. buttons are pressed, it does not focus. Cannot download images. No power supply. The battery is less Get your subject within the effective than the effective range. The battery or camera feels Long period of continuous use to maximize its charged. down . auto focus...
User Manual
Page 44
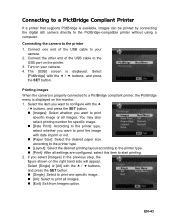
... connecting the digital still camera directly to your camera. 4. The [USB] screen is displayed. You may also select printing number for specific image. „ [Date Print]: According to the printer type, select whether you want to print the image with the c / d buttons, and press the SET button. „ [Images]: Select whether you select [Images] in the previous step, the figure shown on the printer. 3. Connect the other end of the USB cable to the PictBridge-compatible printer without using...
... connecting the digital still camera directly to your camera. 4. The [USB] screen is displayed. You may also select printing number for specific image. „ [Date Print]: According to the printer type, select whether you want to print the image with the c / d buttons, and press the SET button. „ [Images]: Select whether you select [Images] in the previous step, the figure shown on the printer. 3. Connect the other end of the USB cable to the PictBridge-compatible printer without using...


