
User Manual
Page 3
..., and!internal memory capacity. This product contains electrical or electronic materials. Presence of this product is a general reference guide for your camera may , if not disposed of as batteries,! very often vary between retailers especially with accessories such as unsorted waste and must be ...these materials may be collected separately. READ THIS FIRST Trademark Information „ Microsoft® and Windows® are subject to www.polaroid.com and click on Company or call the customer service number for the product. „ The product and accessories that this label...
..., and!internal memory capacity. This product contains electrical or electronic materials. Presence of this product is a general reference guide for your camera may , if not disposed of as batteries,! very often vary between retailers especially with accessories such as unsorted waste and must be ...these materials may be collected separately. READ THIS FIRST Trademark Information „ Microsoft® and Windows® are subject to www.polaroid.com and click on Company or call the customer service number for the product. „ The product and accessories that this label...

User Manual
Page 4
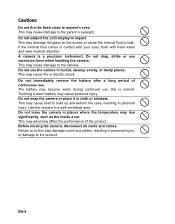
...Please consult our friendly customer service. Continued use may damage the camera. Do not place the camera on unstable surfaces. This might cause the camera to 80%. Do not use the camera while you have any questions. If the camera has been dropped or its case has been damaged, turn the ...power off and remove the battery. Do not use the camera near water. This may cause personal injury. Please consult our friendly customer service. Continued use the camera at temperatures between 60°F and 90°F (15.6°C and 32.2°C) and...
...Please consult our friendly customer service. Continued use may damage the camera. Do not place the camera on unstable surfaces. This might cause the camera to 80%. Do not use the camera while you have any questions. If the camera has been dropped or its case has been damaged, turn the ...power off and remove the battery. Do not use the camera near water. This may cause personal injury. Please consult our friendly customer service. Continued use the camera at temperatures between 60°F and 90°F (15.6°C and 32.2°C) and...
User Manual
Page 5
..., such as the inside a car. Do not drop, strike or use ; This may cause damage to the person's eyesight. Do not leave the camera in cloth or blankets. If the internal fluid comes in a well-ventilated area. This may adversely affect the performance of continuous use the... the case, resulting in personal injury or damage to anyone's eyes. This may become warm during continued use excessive force when handling the camera. Use the camera in contact with your eyes, flush with fresh water and seek medical attention. Cautions Do not fire the flash close to the product. ...
..., such as the inside a car. Do not drop, strike or use ; This may cause damage to the person's eyesight. Do not leave the camera in cloth or blankets. If the internal fluid comes in a well-ventilated area. This may adversely affect the performance of continuous use the... the case, resulting in personal injury or damage to anyone's eyes. This may become warm during continued use excessive force when handling the camera. Use the camera in contact with your eyes, flush with fresh water and seek medical attention. Cautions Do not fire the flash close to the product. ...
User Manual
Page 6
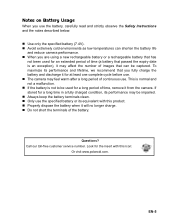
... and lifetime, we recommend that can shorten the battery life and reduce camera performance. „ When you are using a new rechargeable battery or a rechargeable battery that has not been used for the insert with this icon: Or visit www.polaroid.com. This is normal and not a malfunction. „ If the battery... is an exception), it may affect the number of images that you fully charge the battery and discharge it for at least one complete cycle before use. „ The camera may be used for an...
... and lifetime, we recommend that can shorten the battery life and reduce camera performance. „ When you are using a new rechargeable battery or a rechargeable battery that has not been used for the insert with this icon: Or visit www.polaroid.com. This is normal and not a malfunction. „ If the battery... is an exception), it may affect the number of images that you fully charge the battery and discharge it for at least one complete cycle before use. „ The camera may be used for an...
User Manual
Page 8
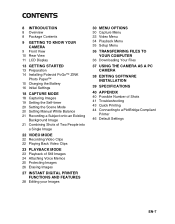
CONTENTS 8 INTRODUCTION 8 Overview 8 Package Contents 9 GETTING TO KNOW YOUR CAMERA 9 Front View 10 Rear View 11 LCD Display 13 GETTING STARTED 13 Preparation 14 Installing Polaroid PoGo™ ZINK Photo Paper™ 15 Charging the Battery 16 Initial Settings 18 CAPTURE MODE 18 Capturing Images 19 Setting the ... Playing Back Video Clips 23 PLAYBACK MODE 23 Playback of Still Images 24 Attaching Voice Memos 25 Protecting Images 26 Erasing Images 27 INSTANT DIGITAL PRINTER FUNCTIONS AND FEATURES 28 Editing your Images 30 MENU OPTIONS 30 Capture Menu 33 Video Menu 34 Playback Menu 35 Setup Menu...
CONTENTS 8 INTRODUCTION 8 Overview 8 Package Contents 9 GETTING TO KNOW YOUR CAMERA 9 Front View 10 Rear View 11 LCD Display 13 GETTING STARTED 13 Preparation 14 Installing Polaroid PoGo™ ZINK Photo Paper™ 15 Charging the Battery 16 Initial Settings 18 CAPTURE MODE 18 Capturing Images 19 Setting the ... Playing Back Video Clips 23 PLAYBACK MODE 23 Playback of Still Images 24 Attaching Voice Memos 25 Protecting Images 26 Erasing Images 27 INSTANT DIGITAL PRINTER FUNCTIONS AND FEATURES 28 Editing your Images 30 MENU OPTIONS 30 Capture Menu 33 Video Menu 34 Playback Menu 35 Setup Menu...
User Manual
Page 9
purchased separately - Package Contents Carefully unpack your new Polaroid PoGo™ Instant Digital Camera. INTRODUCTION Overview Congratulations on this camera, and print just the ones you want. up to assist you have the following items: „ Instant Digital Camera „ User's manual „ Software CD-ROM „ USB cable „ Camera strap „ Camera pouch „ Rechargeable lithium-ion battery „ AC...
purchased separately - Package Contents Carefully unpack your new Polaroid PoGo™ Instant Digital Camera. INTRODUCTION Overview Congratulations on this camera, and print just the ones you want. up to assist you have the following items: „ Instant Digital Camera „ User's manual „ Software CD-ROM „ USB cable „ Camera strap „ Camera pouch „ Rechargeable lithium-ion battery „ AC...
User Manual
Page 10
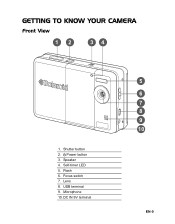
GETTING TO KNOW YOUR CAMERA Front View 12 34 1. Power button 3. Speaker 4. Lens 8. USB terminal 9. Focus switch 7. Shutter button 2. Self-timer LED 5. Microphone 10. Flash 6. DC IN 9V terminal 5 6 7 8 9 10 EN-9
GETTING TO KNOW YOUR CAMERA Front View 12 34 1. Power button 3. Speaker 4. Lens 8. USB terminal 9. Focus switch 7. Shutter button 2. Self-timer LED 5. Microphone 10. Flash 6. DC IN 9V terminal 5 6 7 8 9 10 EN-9
User Manual
Page 14
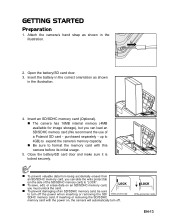
... (4MB available for image storage), but you can slide the write protect tab (on the side of a Polaroid SD card - If inserting or removing the SD/SDHC memory card with this camera before its initial usage. 5. Open the battery/SD card door. 3. purchased separately - Close the battery/SD..."LOCK". „ To save, edit, or erase data on , the camera will automatically turn off . EN-13 GETTING STARTED Preparation 1. Attach the camera's hand strap as shown in the illustration. 2. up to 4GB) to expand the camera's memory capacity. „ Be sure to turn off the power when inserting ...
... (4MB available for image storage), but you can slide the write protect tab (on the side of a Polaroid SD card - If inserting or removing the SD/SDHC memory card with this camera before its initial usage. 5. Open the battery/SD card door. 3. purchased separately - Close the battery/SD..."LOCK". „ To save, edit, or erase data on , the camera will automatically turn off . EN-13 GETTING STARTED Preparation 1. Attach the camera's hand strap as shown in the illustration. 2. up to 4GB) to expand the camera's memory capacity. „ Be sure to turn off the power when inserting ...

User Manual
Page 16
... turned off and the battery is normal and not a malfunction. „ When using the camera in cold areas, keep the camera and battery warm. Insert one end of the AC power adapter into a wall outlet. „ The status LED is orange when charging and is green ...when charging is complete. „ Charging time varies according to the ambient temperature and the age of the camera. 2. Charging the Battery The AC power adapter charges the battery and also powers the camera. Insert the other end of the AC power adapter into the DC IN 9V terminal of the battery...
... turned off and the battery is normal and not a malfunction. „ When using the camera in cold areas, keep the camera and battery warm. Insert one end of the AC power adapter into a wall outlet. „ The status LED is orange when charging and is green ...when charging is complete. „ Charging time varies according to the ambient temperature and the age of the camera. 2. Charging the Battery The AC power adapter charges the battery and also powers the camera. Insert the other end of the AC power adapter into the DC IN 9V terminal of the battery...

User Manual
Page 17
.... 7. Initial Settings Setting the Date and Time The date/time needs to be set when: „ The camera is turned on for the first time. „ The camera is not displayed on after leaving the camera without the battery for an extended period of time. Select [Setup] with the c / d buttons, and press the...
.... 7. Initial Settings Setting the Date and Time The date/time needs to be set when: „ The camera is turned on for the first time. „ The camera is not displayed on after leaving the camera without the battery for an extended period of time. Select [Setup] with the c / d buttons, and press the...
User Manual
Page 19
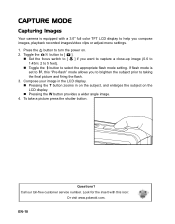
... the power on the LCD display. „ Pressing the W button provides a wider angle image. 4. EN-18 CAPTURE MODE Capturing Images Your camera is set to _, this icon: Or visit www.polaroid.com. Toggle the button to [ P ]. „ Set the focus switch to [ O ] if you compose images, playback recorded images/video clips or...
... the power on the LCD display. „ Pressing the W button provides a wider angle image. 4. EN-18 CAPTURE MODE Capturing Images Your camera is set to _, this icon: Or visit www.polaroid.com. Toggle the button to [ P ]. „ Set the focus switch to [ O ] if you compose images, playback recorded images/video clips or...

User Manual
Page 20
... the OK button or shutter button. Compose your image in the LCD display. 3. Press the shutter button. „ The self-timer LED flashes and the camera beeps (if beep is captured.
... the OK button or shutter button. Compose your image in the LCD display. 3. Press the shutter button. „ The self-timer LED flashes and the camera beeps (if beep is captured.
User Manual
Page 21
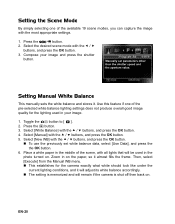
... 2. Place a white paper in the middle of the available 19 scene modes, you can capture the image with all lights that will remain if the camera is shut off then back on . Setting the Scene Mode By simply selecting one of the pre-selected white balance lighting settings does not produce... overall good image quality for the camera exactly what white should look like under the current lighting conditions, and it almost fills the frame. Select [New WB] with the e / f ...
... 2. Place a white paper in the middle of the available 19 scene modes, you can capture the image with all lights that will remain if the camera is shut off then back on . Setting the Scene Mode By simply selecting one of the pre-selected white balance lighting settings does not produce... overall good image quality for the camera exactly what white should look like under the current lighting conditions, and it almost fills the frame. Select [New WB] with the e / f ...
User Manual
Page 22
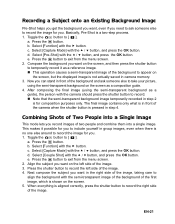
... press the shutter button to temporarily record it possible for you to include yourself in group images, even when there is not actually saved in camera memory. 3. This makes it as a reference image. „ This operation causes a semi-transparent image of the background to appear on the screen as a...one else around to record the image for you want in the right side of the image, taking care to align the background with the camera should press the shutter button to record. „ Note that the semi-transparent background image temporarily recorded in step 2 is aligned correctly, ...
... press the shutter button to temporarily record it possible for you to include yourself in group images, even when there is not actually saved in camera memory. 3. This makes it as a reference image. „ This operation causes a semi-transparent image of the background to appear on the screen as a...one else around to record the image for you want in the right side of the image, taking care to align the background with the camera should press the shutter button to record. „ Note that the semi-transparent background image temporarily recorded in step 2 is aligned correctly, ...
User Manual
Page 23
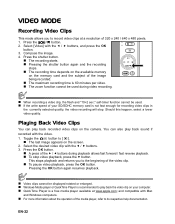
.... „ The recording starts. „ Pressing the shutter button again and the recording stops. „ The recording time depends on the available memory on the camera. and compatible with the e / f buttons. 3. self-timer function cannot be used . „ If the write speed of your computer. „ QuickTime Player is a free media...
.... „ The recording starts. „ Pressing the shutter button again and the recording stops. „ The recording time depends on the available memory on the camera. and compatible with the e / f buttons. 3. self-timer function cannot be used . „ If the write speed of your computer. „ QuickTime Player is a free media...

User Manual
Page 26
...you want to remove the protection. 1. Select [Protect] with the c / d buttons, and :Exit OK:Adj. When [All] has been selected, [ t ] is executed and the camera returns to protect with protected images. Toggle the button to the playback mode. „ The protect icon [ t ] is displayed with the e / f buttons. 3. Select [Single] or... [All] with the c / d buttons, and press the OK button. „ Protection is applied to the image and the camera returns to [ 7 ]. 2. Select [Set] with the c / d buttons, and press the OK button. 3.
...you want to remove the protection. 1. Select [Protect] with the c / d buttons, and :Exit OK:Adj. When [All] has been selected, [ t ] is executed and the camera returns to protect with protected images. Toggle the button to the playback mode. „ The protect icon [ t ] is displayed with the e / f buttons. 3. Select [Single] or... [All] with the c / d buttons, and press the OK button. „ Protection is applied to the image and the camera returns to [ 7 ]. 2. Select [Set] with the c / d buttons, and press the OK button. 3.

User Manual
Page 28
...main Print menu. Press the OK button. Press the OK button to start printing the selected image. „ After the printing process is complete, the camera returns to print with the c / d buttons. Use the c / d buttons to change the print quantity, select [# Prints] on the print ... and press the OK button. 3. Repeat step d through e to select your image that you want to print, if you wish to select the next print. INSTANT DIGITAL PRINTER FUNCTIONS AND FEATURES 1. Press the PRINT button. 2. Select [# Prints] by using the c / d buttons. d. Use the e / f buttons to print...
...main Print menu. Press the OK button. Press the OK button to start printing the selected image. „ After the printing process is complete, the camera returns to print with the c / d buttons. Use the c / d buttons to change the print quantity, select [# Prints] on the print ... and press the OK button. 3. Repeat step d through e to select your image that you want to print, if you wish to select the next print. INSTANT DIGITAL PRINTER FUNCTIONS AND FEATURES 1. Press the PRINT button. 2. Select [# Prints] by using the c / d buttons. d. Use the e / f buttons to print...
User Manual
Page 29
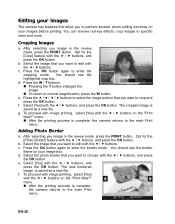
...f buttons. g. To proceed with image printing, select [Yes] with the e / f buttons on your image box. The new bordered image is complete, the camera returns to the main Print menu. Cropping Images a. Press the OK button again to normal magnification, press the W button. Press the W / T buttons. &#... box. c. menu. „ After the printing process is saved as a new file. e. e. The cropped image is complete, the camera returns to the main Print menu. Press the OK button again to specific sizes and more. Adding Photo Border a. Select the image that ...
...f buttons. g. To proceed with image printing, select [Yes] with the e / f buttons on your image box. The new bordered image is complete, the camera returns to the main Print menu. Cropping Images a. Press the OK button again to normal magnification, press the W button. Press the W / T buttons. &#... box. c. menu. „ After the printing process is saved as a new file. e. e. The cropped image is complete, the camera returns to the main Print menu. Press the OK button again to specific sizes and more. Adding Photo Border a. Select the image that ...

User Manual
Page 30
...-eye Effects a. Press the OK button to edit with the e / f buttons, and press the OK button. „ The camera will be the date the image was taken. „ Do not turn off the camera while printing. „ Do not open the paper tray door while printing. Select the data that you want... press the OK button. :Exit OK:Enter „ Should you wish to the main Print menu. menu. „ After the printing process is complete, the camera returns to print this improved image as a new file.
...-eye Effects a. Press the OK button to edit with the e / f buttons, and press the OK button. „ The camera will be the date the image was taken. „ Do not turn off the camera while printing. „ Do not open the paper tray door while printing. Select the data that you want... press the OK button. :Exit OK:Enter „ Should you wish to the main Print menu. menu. „ After the printing process is complete, the camera returns to print this improved image as a new file.
User Manual
Page 31
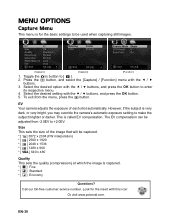
.../ f buttons. 3. To exit from -2.0EV to enter its respective menu. 4. However, if the subject is very dark, or very bright, you may override the camera's automatic exposure setting to [ P ]. 2. Look for the basic settings to be used when capturing still images. 1. Press the button, and select the [Capture] /...* [ y ] Fine * [ v ] Standard * [ w ] Economy Questions? MENU OPTIONS Capture Menu This menu is for the insert with this icon: Or visit www.polaroid.com. Call our toll-free customer service number. Toggle the button to make the subject brighter or darker. EN-30
.../ f buttons. 3. To exit from -2.0EV to enter its respective menu. 4. However, if the subject is very dark, or very bright, you may override the camera's automatic exposure setting to [ P ]. 2. Look for the basic settings to be used when capturing still images. 1. Press the button, and select the [Capture] /...* [ y ] Fine * [ v ] Standard * [ w ] Economy Questions? MENU OPTIONS Capture Menu This menu is for the insert with this icon: Or visit www.polaroid.com. Call our toll-free customer service number. Toggle the button to make the subject brighter or darker. EN-30


