
User Guide
Page 2
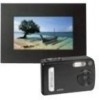
Self-timer LED 5. Microphone Product Overview POLAR OID DIGITAL CA MERA 7. Zoom in button 8. 1. LCD Screen 12.Left button 13.Menu button 14.Wrist strap holder 15.Mode button 16.Flash / Up button 17. ...; �� � �� �� �� �� �� �� �� �� �� �� Back View Polaroid Digital Camera User Guide www.polaroid.com Lens 6.
Self-timer LED 5. Microphone Product Overview POLAR OID DIGITAL CA MERA 7. Zoom in button 8. 1. LCD Screen 12.Left button 13.Menu button 14.Wrist strap holder 15.Mode button 16.Flash / Up button 17. ...; �� � �� �� �� �� �� �� �� �� �� �� Back View Polaroid Digital Camera User Guide www.polaroid.com Lens 6.
User Guide
Page 4
...; Attaching the Wrist Strap 9 • Installing and Removing the Battery 9 • Turning the Camera On and Off 10 • Checking the Battery Power Level 10 • Using Your Battery 11 2 Camera Setting 12 • Checking Camera Status 12 • Camera Modes 14 • How to Navigate Menus 14 • Setup Menu 15 • Formatting... • Zoom Feature 26 • Setting the Image Size and Quality 27 • Setting Exposure Compensation 28 • Setting the White Balance for Pictures 29 4 Polaroid Digital Camera User Guide www...
...; Attaching the Wrist Strap 9 • Installing and Removing the Battery 9 • Turning the Camera On and Off 10 • Checking the Battery Power Level 10 • Using Your Battery 11 2 Camera Setting 12 • Checking Camera Status 12 • Camera Modes 14 • How to Navigate Menus 14 • Setup Menu 15 • Formatting... • Zoom Feature 26 • Setting the Image Size and Quality 27 • Setting Exposure Compensation 28 • Setting the White Balance for Pictures 29 4 Polaroid Digital Camera User Guide www...
User Guide
Page 5
... Order Format 45 7 Using the SD (Secure Digital) Card 48 • Using the SD Card 48 • To Copy Pictures and Video Clips from Internal Memory to a Memory Card 51 8 Installing the Software onto a Computer 52 • Software Included with Your Camera 54 • Computer System Requirements 55 9 Transferring Pictures and Video... Computer 56 • Transferring Pictures and Video Clips 57 • PhotoImpression® 5 Hot Plug Function (PC Only 58 10 Troubleshooting Problems 60 • Troubleshooting 60 Polaroid Digital Camera User Guide 5 www...
... Order Format 45 7 Using the SD (Secure Digital) Card 48 • Using the SD Card 48 • To Copy Pictures and Video Clips from Internal Memory to a Memory Card 51 8 Installing the Software onto a Computer 52 • Software Included with Your Camera 54 • Computer System Requirements 55 9 Transferring Pictures and Video... Computer 56 • Transferring Pictures and Video Clips 57 • PhotoImpression® 5 Hot Plug Function (PC Only 58 10 Troubleshooting Problems 60 • Troubleshooting 60 Polaroid Digital Camera User Guide 5 www...
User Guide
Page 6
11 Getting Help 64 • Polaroid Online Services 64 • Customer Support 64 • ArcSoft Software Help 64 12 Appendix 65 • Technical Specifications 65 • Storage Capacities 67 • Uninstalling Polaroid Digital driver (PC Only 70 • Camera Default Settings 71 • Tips, Your Safety & Maintenance 72 • Regulatory Information 73 6 Polaroid Digital Camera User Guide www.polaroid.com
11 Getting Help 64 • Polaroid Online Services 64 • Customer Support 64 • ArcSoft Software Help 64 12 Appendix 65 • Technical Specifications 65 • Storage Capacities 67 • Uninstalling Polaroid Digital driver (PC Only 70 • Camera Default Settings 71 • Tips, Your Safety & Maintenance 72 • Regulatory Information 73 6 Polaroid Digital Camera User Guide www.polaroid.com
User Guide
Page 7
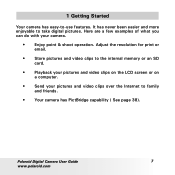
Adjust the resolution for print or email. • Store pictures and video clips to family and friends. • Your camera has PictBridge capability ( See page 38). Here are a few examples of what you can do with your pictures and video clips ...SD card. • Playback your pictures and video clips on the LCD screen or on a computer. • Send your camera. • Enjoy point & shoot operation. Polaroid Digital Camera User Guide 7 www.polaroid.com 1 Getting Started Your camera has easy-to take digital pictures. It has never been easier and more enjoyable to -use features.
Adjust the resolution for print or email. • Store pictures and video clips to family and friends. • Your camera has PictBridge capability ( See page 38). Here are a few examples of what you can do with your pictures and video clips ...SD card. • Playback your pictures and video clips on the LCD screen or on a computer. • Send your camera. • Enjoy point & shoot operation. Polaroid Digital Camera User Guide 7 www.polaroid.com 1 Getting Started Your camera has easy-to take digital pictures. It has never been easier and more enjoyable to -use features.

User Guide
Page 9
Open the camera battery door by pressing it downwards then slide it outwards as illustrated. 2. To remove the battery, slide the battery lock in the direction of the arrow. 5. Close the battery door by pushing it back to lock. 1 2 3 1 2 1 2 4. Take out the battery as shown. 3. Insert the battery as shown. 4 5 1 2 Polaroid Digital Camera User Guide 9 www.polaroid.com • Attaching the Wrist Strap • Installing and Removing the Battery 1.
Open the camera battery door by pressing it downwards then slide it outwards as illustrated. 2. To remove the battery, slide the battery lock in the direction of the arrow. 5. Close the battery door by pushing it back to lock. 1 2 3 1 2 1 2 4. Take out the battery as shown. 3. Insert the battery as shown. 4 5 1 2 Polaroid Digital Camera User Guide 9 www.polaroid.com • Attaching the Wrist Strap • Installing and Removing the Battery 1.

User Guide
Page 10
... • When battery power is designed with new ones immediately. 10 Polaroid Digital Camera User Guide www.polaroid.com OID DIGITAL CA NOTE: • The camera is exhausted, the icon appears on the LCD screen and then the camera will turn on the camera, fully press and hold the Power button again and the... camera will power off. Turn the camera on the LCD screen. Check ...
... • When battery power is designed with new ones immediately. 10 Polaroid Digital Camera User Guide www.polaroid.com OID DIGITAL CA NOTE: • The camera is exhausted, the icon appears on the LCD screen and then the camera will turn on the camera, fully press and hold the Power button again and the... camera will power off. Turn the camera on the LCD screen. Check ...

User Guide
Page 11
These instructions should be retained for future reference. Polaroid Digital Camera User Guide 11 www.polaroid.com WARNINGS! • Batteries should be replaced by an adult. • Insert the battery with the correct polarity. • Remove exhausted battery from the camera immediately. • Do not short the supply terminals. • Do not diapose the battery in...
These instructions should be retained for future reference. Polaroid Digital Camera User Guide 11 www.polaroid.com WARNINGS! • Batteries should be replaced by an adult. • Insert the battery with the correct polarity. • Remove exhausted battery from the camera immediately. • Do not short the supply terminals. • Do not diapose the battery in...
User Guide
Page 12
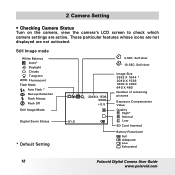
... Low SD Card Inserted Battery PowerLevel Full Adequate Low Exhausted 12 Polaroid Digital Camera User Guide www.polaroid.com Those particular features whose icons are not displayed are active. 2 Camera Setting • Checking Camera Status Turn on the camera, view the camera's LCD screen to check which camera settings are not activated. Still Image mode White Balance Auto* Daylight...
... Low SD Card Inserted Battery PowerLevel Full Adequate Low Exhausted 12 Polaroid Digital Camera User Guide www.polaroid.com Those particular features whose icons are not displayed are active. 2 Camera Setting • Checking Camera Status Turn on the camera, view the camera's LCD screen to check which camera settings are not activated. Still Image mode White Balance Auto* Daylight...

User Guide
Page 13
Video mode Video Mode Recording Indicator White Balance For Video Clips Auto* Daylight Cloudy Tungsten Fluorescent * Default Setting Playback Mode Picture Locked File Time Date File Number 640 X 480 00:00:28 X2.0 160 0 x 1 20 0 07:55 01/01/06 0024-0023 Video Clip Play Pause 0 0 : 02 :10 07:55 01/01/06 0024-0023 Polaroid Digital Camera User Guide www.polaroid.com Resolution 640 X 480 * 320 X 240 Remaining Time Histogram Video Length 13
Video mode Video Mode Recording Indicator White Balance For Video Clips Auto* Daylight Cloudy Tungsten Fluorescent * Default Setting Playback Mode Picture Locked File Time Date File Number 640 X 480 00:00:28 X2.0 160 0 x 1 20 0 07:55 01/01/06 0024-0023 Video Clip Play Pause 0 0 : 02 :10 07:55 01/01/06 0024-0023 Polaroid Digital Camera User Guide www.polaroid.com Resolution 640 X 480 * 320 X 240 Remaining Time Histogram Video Length 13
User Guide
Page 14
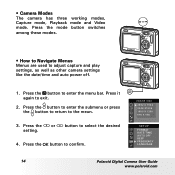
...2592 X 1944 2048 X1536 1600 X 1200 640 X 480 SETUP FORMAT DATE/TIME AUTO OFF BEEP SETUP FREQUENCY LANGUAGE 14 Polaroid Digital Camera User Guide www.polaroid.com • Camera Modes The camera has three working modes, Capture mode, Playback mode and Video mode. Press the button to enter the submenu or press the...the desired setting. 4. Press the or button to the meun. 3. Press it again to adjust capture and play settings, as well as other camera settings like the date/time and auto power off. 1. Press the mode button switches among these modes. • How to Navigate Menus Menus...
...2592 X 1944 2048 X1536 1600 X 1200 640 X 480 SETUP FORMAT DATE/TIME AUTO OFF BEEP SETUP FREQUENCY LANGUAGE 14 Polaroid Digital Camera User Guide www.polaroid.com • Camera Modes The camera has three working modes, Capture mode, Playback mode and Video mode. Press the button to enter the submenu or press the...the desired setting. 4. Press the or button to the meun. 3. Press it again to adjust capture and play settings, as well as other camera settings like the date/time and auto power off. 1. Press the mode button switches among these modes. • How to Navigate Menus Menus...

User Guide
Page 15
... LANGUAGE 4. Content FORMAT DATE/TIME AUTO OFF BEEP FREQUENCY LANGUAGE DATE STAMP DEFAULT Refer Page 16 17 18 19 19 20 20 21 Polaroid Digital Camera User Guide 15 www.polaroid.com Press the Mode button until you see the or on the display. 2. Press the button. 3. Press the button. 5. Press the or button...
... LANGUAGE 4. Content FORMAT DATE/TIME AUTO OFF BEEP FREQUENCY LANGUAGE DATE STAMP DEFAULT Refer Page 16 17 18 19 19 20 20 21 Polaroid Digital Camera User Guide 15 www.polaroid.com Press the Mode button until you see the or on the display. 2. Press the button. 3. Press the button. 5. Press the or button...
User Guide
Page 16
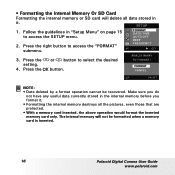
... FREQUENCY submenu. : SET 3. FORMAT CANCEL OK:SET NOTE: • Data deleted by a format operation cannot be formatted when a memory card is inserted. 16 Polaroid Digital Camera User Guide www.polaroid.com Make sure you do not have any useful data currently stored in the internal memory before you format it . The internal memory will...
... FREQUENCY submenu. : SET 3. FORMAT CANCEL OK:SET NOTE: • Data deleted by a format operation cannot be formatted when a memory card is inserted. 16 Polaroid Digital Camera User Guide www.polaroid.com Make sure you do not have any useful data currently stored in the internal memory before you format it . The internal memory will...
User Guide
Page 17
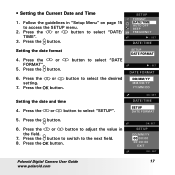
... Menu" on page 15 to the next field. OK: SET SETUP DD/MM/YY 00/00/00 00:00:00 EXIT OK : SET Polaroid Digital Camera User Guide 17 www.polaroid.com Follow the guidelines in button to switch to access the SETUP menu. 2. Press the or FORMAT". 5. Press the button. 6. Press the or...
... Menu" on page 15 to the next field. OK: SET SETUP DD/MM/YY 00/00/00 00:00:00 EXIT OK : SET Polaroid Digital Camera User Guide 17 www.polaroid.com Follow the guidelines in button to switch to access the SETUP menu. 2. Press the or FORMAT". 5. Press the button. 6. Press the or...

User Guide
Page 18
... the desired button. : SET AUTO OFF OFF 1 MIN 3 MIN 5 MIN OK:SET NOTE: • Auto power off automatically to re-activate the LCD screen. 18 Polaroid Digital Camera User Guide www.polaroid.com You can change the power save setting according to the following power save feature is not activated. 1/3/5 MIN The...
... the desired button. : SET AUTO OFF OFF 1 MIN 3 MIN 5 MIN OK:SET NOTE: • Auto power off automatically to re-activate the LCD screen. 18 Polaroid Digital Camera User Guide www.polaroid.com You can change the power save setting according to the following power save feature is not activated. 1/3/5 MIN The...

User Guide
Page 19
... Menu" on page 15 FORMAT to access the SETUP menu. 2. Press the or button to suit the correct lighting frequency. FREQUENCY 50 Hz 60 hz Polaroid Digital Camera User Guide www.polaroid.com OK : SET 19 • Setting the Beep Sound On/Off You can turn the beep sound on , the... camera will beep when you press the buttons. 1. Press the setting. 5. Press the button. Press the or button to select "BEEP". 3. Press the setting. 5. Follow the ...
... Menu" on page 15 FORMAT to access the SETUP menu. 2. Press the or button to suit the correct lighting frequency. FREQUENCY 50 Hz 60 hz Polaroid Digital Camera User Guide www.polaroid.com OK : SET 19 • Setting the Beep Sound On/Off You can turn the beep sound on , the... camera will beep when you press the buttons. 1. Press the setting. 5. Press the button. Press the or button to select "BEEP". 3. Press the setting. 5. Follow the ...
User Guide
Page 20
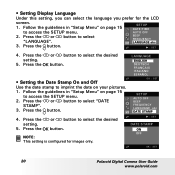
...; Setting Display Language Under this setting, you can select the language you prefer for images only. : SET DATE STAMP ON OFF OK : SET 20 Polaroid Digital Camera User Guide www.polaroid.com BEEP FREQUENCY SETUP LANGUAGE abc : SET 4. Press the setting. 5. Press the button. Press the or button to select "DATE SETUP AUTO OFF...
...; Setting Display Language Under this setting, you can select the language you prefer for images only. : SET DATE STAMP ON OFF OK : SET 20 Polaroid Digital Camera User Guide www.polaroid.com BEEP FREQUENCY SETUP LANGUAGE abc : SET 4. Press the setting. 5. Press the button. Press the or button to select "DATE SETUP AUTO OFF...

User Guide
Page 21
... 71 for more details. Please refer to select "DEFAULT". Still Image Mode 2048 X 1536 0005 H X1.0 Press X1.0 2048 X 1536 0005 H Press Press Polaroid Digital Camera User Guide 21 www.polaroid.com SETUP 1. Follow the guidelines in the following steps. Press the button. Press the or button to select the desired setting. : SET DEFAULT...
... 71 for more details. Please refer to select "DEFAULT". Still Image Mode 2048 X 1536 0005 H X1.0 Press X1.0 2048 X 1536 0005 H Press Press Polaroid Digital Camera User Guide 21 www.polaroid.com SETUP 1. Follow the guidelines in the following steps. Press the button. Press the or button to select the desired setting. : SET DEFAULT...

User Guide
Page 23
...camera steady. MERA Polaroid Digital Camera User Guide 23 www.polaroid.com Frame your scene. • Taking a Picture Taking pictures at approximately 3.2 feet to infinity (1 meter to infinity). 1. Set the camera to take pictures directly into the sun as they may cause spots in your pictures. • Make sure that the sun is taken. POLAR OID DIGITAL... CA A beep will sound (if the beep sound is turned on) when a picture is behind the camera to properly light up your subject using the LCD screen. 3. Press...
...camera steady. MERA Polaroid Digital Camera User Guide 23 www.polaroid.com Frame your scene. • Taking a Picture Taking pictures at approximately 3.2 feet to infinity (1 meter to infinity). 1. Set the camera to take pictures directly into the sun as they may cause spots in your pictures. • Make sure that the sun is taken. POLAR OID DIGITAL... CA A beep will sound (if the beep sound is turned on) when a picture is behind the camera to properly light up your subject using the LCD screen. 3. Press...

User Guide
Page 24
... provide fill-light or use it indoors in Video mode. • Never touch or block the flash with the correct flash operation. 24 Polaroid Digital Camera User Guide www.polaroid.com The flash fires for outdoor pictures, or where flash is not enough light when using the flash mode you take pictures using this... recharge after each flashed picture. Use this mode Icon shown on the LCD screen. If there is prohibited or may be too dark. Set the camera to avoid "red eye" in heavy shadows. Doing so can now take pictures at night, indoors, or outdoors in your fingers.
... provide fill-light or use it indoors in Video mode. • Never touch or block the flash with the correct flash operation. 24 Polaroid Digital Camera User Guide www.polaroid.com The flash fires for outdoor pictures, or where flash is not enough light when using the flash mode you take pictures using this... recharge after each flashed picture. Use this mode Icon shown on the LCD screen. If there is prohibited or may be too dark. Set the camera to avoid "red eye" in heavy shadows. Doing so can now take pictures at night, indoors, or outdoors in your fingers.


