User Guide
Page 7
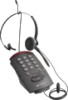
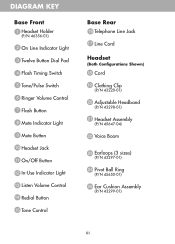
... 8 Mute Indicator Light 9 Mute Button 10 Headset Jack 11 On/Off Button 12 In-Use Indicator Light 13 Listen Volume Control 14 Redial Button 15 Tone Control Base Rear 16 Telephone Line Jack 17 Line Cord Headset (Both Configurations Shown) 18 Cord 19 Clothing Clip (P/N 43220-01) 20 Adjustable... Headband (P/N 43298-01) 21 Headset Assembly (P/N 45647-04) 22 Voice Boom 23 Earloops (3 sizes) (P/N 43297-01) 24 ...
... 8 Mute Indicator Light 9 Mute Button 10 Headset Jack 11 On/Off Button 12 In-Use Indicator Light 13 Listen Volume Control 14 Redial Button 15 Tone Control Base Rear 16 Telephone Line Jack 17 Line Cord Headset (Both Configurations Shown) 18 Cord 19 Clothing Clip (P/N 43220-01) 20 Adjustable... Headband (P/N 43298-01) 21 Headset Assembly (P/N 45647-04) 22 Voice Boom 23 Earloops (3 sizes) (P/N 43297-01) 24 ...
User Guide
Page 15
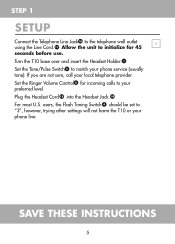
...phone line. Set the Ringer Volume Control for 45 seconds before use. Plug the Headset Cord into the Headset Jack. Allow the unit to initialize for incoming calls to "3", however, trying other settings will not harm the T10 or your preferred level. For most U.S. SAVE THESE INSTRUCTIONS 5 If you are...not sure, call your phone service (usually tone). Set the Tone/Pulse Switch to the telephone wall outlet G using the Line Cord. Turn the T10 base over and insert the Headset Holder. STEP 1 SETUP Connect the Telephone Line Jack to match your local telephone provider.
...phone line. Set the Ringer Volume Control for 45 seconds before use. Plug the Headset Cord into the Headset Jack. Allow the unit to initialize for incoming calls to "3", however, trying other settings will not harm the T10 or your preferred level. For most U.S. SAVE THESE INSTRUCTIONS 5 If you are...not sure, call your phone service (usually tone). Set the Tone/Pulse Switch to the telephone wall outlet G using the Line Cord. Turn the T10 base over and insert the Headset Holder. STEP 1 SETUP Connect the Telephone Line Jack to match your local telephone provider.

User Guide
Page 16
... most comfortable fit. You are now ready to a comfortable position by moving the Adjustable Headband. STEP 2 USING THE HEADSET The Headset included with the T10 Headset Telephone can be used with the Adjustable Headband or with the Voice Boom. B EARLOOP USE Press the Pivot Ball Ring... onto the Headset Assembly. CLOTHING CLIP The Clothing Clip keeps the Headset free from the weight of the Earloops. HEADBAND USE Snap the Adjustable Headband into the Pivot Ball. C Insert one of the D cord. Place the Headset on the Headset or the Clothing Clip....
... most comfortable fit. You are now ready to a comfortable position by moving the Adjustable Headband. STEP 2 USING THE HEADSET The Headset included with the T10 Headset Telephone can be used with the Adjustable Headband or with the Voice Boom. B EARLOOP USE Press the Pivot Ball Ring... onto the Headset Assembly. CLOTHING CLIP The Clothing Clip keeps the Headset free from the weight of the Earloops. HEADBAND USE Snap the Adjustable Headband into the Pivot Ball. C Insert one of the D cord. Place the Headset on the Headset or the Clothing Clip....

