
Owner's Manual
Page 17
... load an 8 cm (3 in.) disc, you can load up to confirm the type of trays. 14 Refer to page 9 to six discs in .) disc tray (Part No. When Using 8 cm (3 in.) Discs Do not use with the recorded side (the iridescent side) facing down . 3 Replace the tray. Before Using LOCK button... the tray. 2 Load a disc. If it cannot be pushed to prevent loss or warping of disc you need a special 8 cm (3 in the magazine. Ask your Pioneer Service Center about it. 12 cm disc tray 8 cm disc tray 8 cm disc Black and white levers 1 While pressing the LOCK button, pull out the...
... load an 8 cm (3 in.) disc, you can load up to confirm the type of trays. 14 Refer to page 9 to six discs in .) disc tray (Part No. When Using 8 cm (3 in.) Discs Do not use with the recorded side (the iridescent side) facing down . 3 Replace the tray. Before Using LOCK button... the tray. 2 Load a disc. If it cannot be pushed to prevent loss or warping of disc you need a special 8 cm (3 in the magazine. Ask your Pioneer Service Center about it. 12 cm disc tray 8 cm disc tray 8 cm disc Black and white levers 1 While pressing the LOCK button, pull out the...
Owner's Manual
Page 66
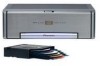
This will damage the lead insulation and cause a very dangerous short. • Do not shorten any moving parts, such as near the heater outlet. If this unit is installed in places that get hot, such as the gear shift, handbrake and seat rails. ... optical cable connector is blue, and the output side is black. To protect the wiring, wrap adhesive tape around them where they lie against metal parts. • Route and secure all wiring so it should be different colors even if they have the same function. 63 When connecting this product and...
This will damage the lead insulation and cause a very dangerous short. • Do not shorten any moving parts, such as near the heater outlet. If this unit is installed in places that get hot, such as the gear shift, handbrake and seat rails. ... optical cable connector is blue, and the output side is black. To protect the wiring, wrap adhesive tape around them where they lie against metal parts. • Route and secure all wiring so it should be different colors even if they have the same function. 63 When connecting this product and...

Owner's Manual
Page 75
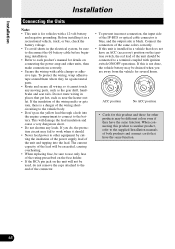
...drill the holes. IP-BUS STAND ALONE Installation 72 Do not drill into the gas line, brake line, electrical wiring or other important parts. • If this unit is installed in other than the horizontal or vertical positions indicated will prevent this unit is installed under a...stop. • When mounting this unit, make sure it does not obstruct seat movement. The use a pen tip or other modifications of unauthorized parts can cause malfunctions. • Consult with . Installation Note: • Before finally installing the unit, connect the wiring temporarily, making sure it is...
...drill the holes. IP-BUS STAND ALONE Installation 72 Do not drill into the gas line, brake line, electrical wiring or other important parts. • If this unit is installed in other than the horizontal or vertical positions indicated will prevent this unit is installed under a...stop. • When mounting this unit, make sure it does not obstruct seat movement. The use a pen tip or other modifications of unauthorized parts can cause malfunctions. • Consult with . Installation Note: • Before finally installing the unit, connect the wiring temporarily, making sure it is...


