Owner's Manual
Page 12
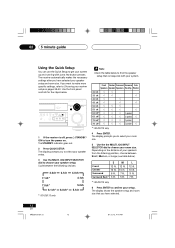
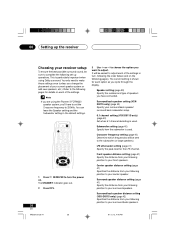
... Speakers Back Sp. Surround Back* 3 ft. Depending on pages 38-43. L 12 ft. 10 ft. 9 ft. 7 ft. * VSX-D811S only 6 Press ENTER to get your system up and running with your system. The receiver automatically makes the necessary settings after you have selected...choose your speakers from the listening position, choose between the following choices: 3.0ch 7.1ch* 3.1ch 4.0ch 4.1ch 7.0ch* 6.1ch* 6.0ch* * VSX-D811S only 5.0ch 5.1ch Check the table below to turn the power on. S Front 12 ft. Woofer 3.0 ch √ √ 3.1 ch √ √ √ 4.0 ch √ ...
... Speakers Back Sp. Surround Back* 3 ft. Depending on pages 38-43. L 12 ft. 10 ft. 9 ft. 7 ft. * VSX-D811S only 6 Press ENTER to get your system up and running with your system. The receiver automatically makes the necessary settings after you have selected...choose your speakers from the listening position, choose between the following choices: 3.0ch 7.1ch* 3.1ch 4.0ch 4.1ch 7.0ch* 6.1ch* 6.0ch* * VSX-D811S only 5.0ch 5.1ch Check the table below to turn the power on. S Front 12 ft. Woofer 3.0 ch √ √ 3.1 ch √ √ √ 4.0 ch √ ...
Owner's Manual
Page 14
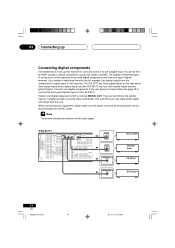
The VSX-D711 has three digital inputs on the VSX-D811S. Connect your equipment, always make direct digital recordings with like (for surround... connect the front panel optical input on the rear panel (two coaxial inputs and a optical input) and the VSX-D811S has four (two coaxial inputs and two optical inputs). If you connect this receiver for example, the coaxial...coaxial or optical connections (you can make sure the power is turned off and the power cord is disconnected from the component to coaxial input on the receiver). VSX-D711 IN ANTENNA IN AM LOOP FM UNBAL IN 75 ‰ IN...
The VSX-D711 has three digital inputs on the VSX-D811S. Connect your equipment, always make direct digital recordings with like (for surround... connect the front panel optical input on the rear panel (two coaxial inputs and a optical input) and the VSX-D811S has four (two coaxial inputs and two optical inputs). If you connect this receiver for example, the coaxial...coaxial or optical connections (you can make sure the power is turned off and the power cord is disconnected from the component to coaxial input on the receiver). VSX-D711 IN ANTENNA IN AM LOOP FM UNBAL IN 75 ‰ IN...
Owner's Manual
Page 16
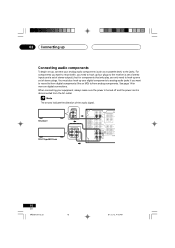
... audio signal. When connecting your digital components to analog audio jacks if you need to hook up your equipment, always make sure the power is turned off and the power cord is disconnected from digital components (like an MD) to the jacks. For components you want to record with, you want...
... audio signal. When connecting your digital components to analog audio jacks if you need to hook up your equipment, always make sure the power is turned off and the power cord is disconnected from digital components (like an MD) to the jacks. For components you want to record with, you want...

Owner's Manual
Page 17
...-channel decoder with 7.1 channel analog output jacks • The multi-channel input can connect a decoder or a DVD player with 5.1 channel analog output jacks VSX-D711 IN ANTENNA IN AM LOOP FM UNBAL IN 75 ‰ IN IN IN R AUDIO DIGITAL IN COAX OPT ASSIGNABLE AUX DVD 5.1CH INPUT CENTER SUB... W. When connecting your equipment, always make sure the power is turned off and the power cord is selected (see page 37). • If the component you can only be used when DVD 5.1 CH (or DVD ...
...-channel decoder with 7.1 channel analog output jacks • The multi-channel input can connect a decoder or a DVD player with 5.1 channel analog output jacks VSX-D711 IN ANTENNA IN AM LOOP FM UNBAL IN 75 ‰ IN IN IN R AUDIO DIGITAL IN COAX OPT ASSIGNABLE AUX DVD 5.1CH INPUT CENTER SUB... W. When connecting your equipment, always make sure the power is turned off and the power cord is selected (see page 37). • If the component you can only be used when DVD 5.1 CH (or DVD ...

Owner's Manual
Page 18
... TV (monitor) Connecting to the front panel video terminal Front video connections are accessed via the front panel input selector as an S-video jack (the VSX-D811S also has an optical input jack). For better quality video, you should hook up the audio to the jacks as shown below. There are... digital video components (like a DVD) you can hook up using the same kind of connection. When connecting your equipment, always make sure the power is turned off and the power cord is also a good idea to hook up your video components to a digital input (see page 16). REO/ ECT SIGNAL MIDNIGHT...
... TV (monitor) Connecting to the front panel video terminal Front video connections are accessed via the front panel input selector as an S-video jack (the VSX-D811S also has an optical input jack). For better quality video, you should hook up the audio to the jacks as shown below. There are... digital video components (like a DVD) you can hook up using the same kind of connection. When connecting your equipment, always make sure the power is turned off and the power cord is also a good idea to hook up your video components to a digital input (see page 16). REO/ ECT SIGNAL MIDNIGHT...
Owner's Manual
Page 25
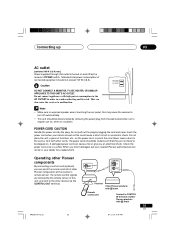
... 03 AC outlet [switched 100 W (0.8 A) max] Power supplied through this outlet is touching the rear panel, this may cause the receiver to turn off by the receiver's POWER switch. Total electrical power consumption of this unit, and sent to the other cords. Do not place the unit, ... shock. Do not connect appliances with other devices via the CONTROL OUT terminal. A damaged power cord can point the remote controls of other Pioneer products with Î mark Remote control unit Connect to CONTROL IN terminal of furniture, etc., on . XRB3013A.13.25 25 OUT CONTROL...
... 03 AC outlet [switched 100 W (0.8 A) max] Power supplied through this outlet is touching the rear panel, this may cause the receiver to turn off by the receiver's POWER switch. Total electrical power consumption of this unit, and sent to the other cords. Do not place the unit, ... shock. Do not connect appliances with other devices via the CONTROL OUT terminal. A damaged power cord can point the remote controls of other Pioneer products with Î mark Remote control unit Connect to CONTROL IN terminal of furniture, etc., on . XRB3013A.13.25 25 OUT CONTROL...
Owner's Manual
Page 29
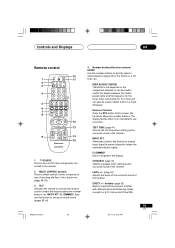
... STANDARD ADV.SURR. TEST TONE (page 44) Sounds the test tone when setting up the surround sound of the receiver. Also use this button to turn on a CD, DVD, etc.
... STANDARD ADV.SURR. TEST TONE (page 44) Sounds the test tone when setting up the surround sound of the receiver. Also use this button to turn on a CD, DVD, etc.
Owner's Manual
Page 31
Use the TUNE +/- Select radio station presets. Use to turn on/off the power of the TV. 10 LED DISPLAY This display flashes when a command is sent from the remote control. 11 RECEIVER This switches ...
Use the TUNE +/- Select radio station presets. Use to turn on/off the power of the TV. 10 LED DISPLAY This display flashes when a command is sent from the remote control. 11 RECEIVER This switches ...
Owner's Manual
Page 36
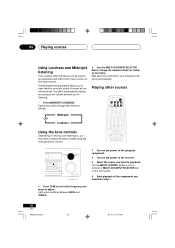
...;,, SPEAKERS MONITOR TONE QUICK SETUP MULTI JOG VIDEO INPUT S-VIDEO VIDEO L AUDIO R MULTI JOG ENTER INPUT SELECTOR MASTER VOLUME DOWN UP R 1 Turn on the power of the playback component. 2 Turn on the front panel). 4 Start playback of bass or treble as follows: Midnight Off Loudness Using the tone controls Depending on what...
...;,, SPEAKERS MONITOR TONE QUICK SETUP MULTI JOG VIDEO INPUT S-VIDEO VIDEO L AUDIO R MULTI JOG ENTER INPUT SELECTOR MASTER VOLUME DOWN UP R 1 Turn on the power of the playback component. 2 Turn on the front panel). 4 Start playback of bass or treble as follows: Midnight Off Loudness Using the tone controls Depending on what...
Owner's Manual
Page 38
...The current setting is particularly important when using the Pioneer S-FCRW220 speaker system, you cycle through the display....41) Specify the distance from your listening position to your front speakers. Surround back speaker distance setting (VSX-D811S only) (page 42) Specifies the distance from your listening position to your center speaker. Center ...SEL MIDNIGHT/ LOUDNESS MUTE RECEIVER CONTROL TUNE ST SET P U ST ENTER TUNE CHANNEL 1 Press RECEIVER to turn , following set the Crossover frequency to make these settings once (unless you change the placement of the ...
...The current setting is particularly important when using the Pioneer S-FCRW220 speaker system, you cycle through the display....41) Specify the distance from your listening position to your front speakers. Surround back speaker distance setting (VSX-D811S only) (page 42) Specifies the distance from your listening position to your center speaker. Center ...SEL MIDNIGHT/ LOUDNESS MUTE RECEIVER CONTROL TUNE ST SET P U ST ENTER TUNE CHANNEL 1 Press RECEIVER to turn , following set the Crossover frequency to make these settings once (unless you change the placement of the ...
Owner's Manual
Page 44
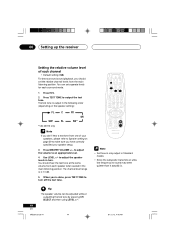
...Default setting: 0db For best surround sound playback, you should set seperate levels for each surround mode. 1 Press RCV. 2 Press TEST TONE to turn . 06 Setting up the receiver Setting the relative volume level of your speaker setup. 3 Press MASTER VOLUME +/- SIGNAL SEL MIDNIGHT/ LOUDNESS MUTE RECEIVER... ± 10 dB. 5 When you have correctly specified your speakers, please refer to Speaker setting on the speaker setting): FL C SW SL *VSX-D811S only FR SR SB* If you don't hear a test tone from the main listening position. to an appropriate level. 4 Use LEVEL +/- ...
...Default setting: 0db For best surround sound playback, you should set seperate levels for each surround mode. 1 Press RCV. 2 Press TEST TONE to turn . 06 Setting up the receiver Setting the relative volume level of your speaker setup. 3 Press MASTER VOLUME +/- SIGNAL SEL MIDNIGHT/ LOUDNESS MUTE RECEIVER... ± 10 dB. 5 When you have correctly specified your speakers, please refer to Speaker setting on the speaker setting): FL C SW SL *VSX-D811S only FR SR SB* If you don't hear a test tone from the main listening position. to an appropriate level. 4 Use LEVEL +/- ...
Owner's Manual
Page 50
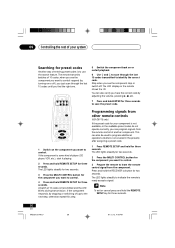
...want to control. 3 Prepare the remote to learn the remote control signal from the component. This can program signals from other remote controls (VSX-D811S only) If the preset code for three seconds. The LED lights steadily to indicate the remote is transmitted and the LED blinks during ...7 38 CLASS ¡ DTV ON/OFF DTV MENU 4¢ TOP MENU AUDIO SUBTITLE ANGLE REMOTE SETUP STANDARD ADV.SURR. If the component responds, by turning on the component you have the correct code by adjusting the volume, pressing 3, 7, etc. 7 Press and hold for preset codes Another way of 10...
...want to control. 3 Prepare the remote to learn the remote control signal from the component. This can program signals from other remote controls (VSX-D811S only) If the preset code for three seconds. The LED lights steadily to indicate the remote is transmitted and the LED blinks during ...7 38 CLASS ¡ DTV ON/OFF DTV MENU 4¢ TOP MENU AUDIO SUBTITLE ANGLE REMOTE SETUP STANDARD ADV.SURR. If the component responds, by turning on the component you have the correct code by adjusting the volume, pressing 3, 7, etc. 7 Press and hold for preset codes Another way of 10...
Owner's Manual
Page 52
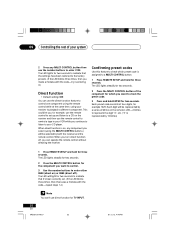
... without affecting the receiver. The LED will be represented by a series of the component for which preset code is on ) or 9995 (direct off , you turn direct function off ). The LED lights steadily for two seconds. 2 Press the MULTI CONTROL button of blinks on the receiver and then use the remote...
... without affecting the receiver. The LED will be represented by a series of the component for which preset code is on ) or 9995 (direct off , you turn direct function off ). The LED lights steadily for two seconds. 2 Press the MULTI CONTROL button of blinks on the receiver and then use the remote...
Owner's Manual
Page 68
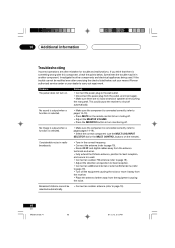
... Select the correct component (use the MULTI JOG/INPUT SELECTOR dial or the MULTI CONTROL buttons on . Remedy • Connect the power plug to turn on the remote). No sound is output when a function is selected. • Make sure the component is something wrong with this component, check the... points below , ask your nearest Pioneer authorized service center or your dealer to page 19). selected automatically. 68 En XRB3013A.68.74 68 01.12.12, 5:13 PM 10 Additional ...
... Select the correct component (use the MULTI JOG/INPUT SELECTOR dial or the MULTI CONTROL buttons on . Remedy • Connect the power plug to turn on the remote). No sound is output when a function is selected. • Make sure the component is something wrong with this component, check the... points below , ask your nearest Pioneer authorized service center or your dealer to page 19). selected automatically. 68 En XRB3013A.68.74 68 01.12.12, 5:13 PM 10 Additional ...
Owner's Manual
Page 69
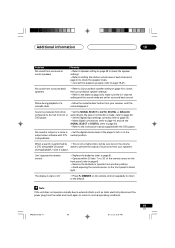
When a search is performed by • This is produced from other components, but be sure to turn the volume a DTS compatible CD player down to the instruction manual supplied with DTS neutral position. Sound is not a malfunction, but not from LD or ...
When a search is performed by • This is produced from other components, but be sure to turn the volume a DTS compatible CD player down to the instruction manual supplied with DTS neutral position. Sound is not a malfunction, but not from LD or ...


