Owner's Manual
Page 2
...so that the power cord can be unplugged from the AC outlet. Product Name: AUDIO/VIDEO MULTI-CHANNEL RECEIVER Model Number: VSX-94TXH, VSX-92TXH Responsible Party Name: PIONEER ELECTRONICS SERVICE, INC. Address: 1925 E. However, there is subject to Part 15 of the FCC Rules. Connect the equipment...SECURE AREA. D8-10-2_En CAUTION: This product satisfies FCC regulations when shielded cables and connectors are designed to correct the interference by turning the equipment off all power. TO PREVENT ELECTRIC SHOCK, DO NOT USE THIS (POLARIZED) PLUG WITH AN EXTENSION CORD. D1-4-2-1_En ...
...so that the power cord can be unplugged from the AC outlet. Product Name: AUDIO/VIDEO MULTI-CHANNEL RECEIVER Model Number: VSX-94TXH, VSX-92TXH Responsible Party Name: PIONEER ELECTRONICS SERVICE, INC. Address: 1925 E. However, there is subject to Part 15 of the FCC Rules. Connect the equipment...SECURE AREA. D8-10-2_En CAUTION: This product satisfies FCC regulations when shielded cables and connectors are designed to correct the interference by turning the equipment off all power. TO PREVENT ELECTRIC SHOCK, DO NOT USE THIS (POLARIZED) PLUG WITH AN EXTENSION CORD. D1-4-2-1_En ...
Owner's Manual
Page 7
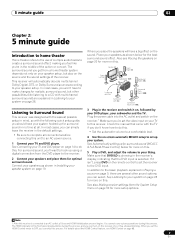
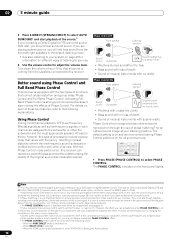
... the sound. Connect your TV to this process. Plug the power cable into the AC outlet and switch on the receiver.1 Make sure you can turn on this receiver once it isn't, press DVD on the remote control to set the video input on your speakers as shown below for surround...
... the sound. Connect your TV to this process. Plug the power cable into the AC outlet and switch on the receiver.1 Make sure you can turn on this receiver once it isn't, press DVD on the remote control to set the video input on your speakers as shown below for surround...
Owner's Manual
Page 9
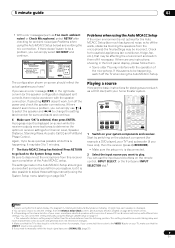
... on your room, sometimes identical speakers with cone sizes of the microphone. If there doesn't seem to play. DVD/LD 1. If selecting RETRY doesn't work, turn off the walls, obstacles blocking the speakers from the microphone) the final settings may be affecting the environment and switch them . • Some older TVs...
... on your room, sometimes identical speakers with cone sizes of the microphone. If there doesn't seem to play. DVD/LD 1. If selecting RETRY doesn't work, turn off the walls, obstacles blocking the speakers from the microphone) the final settings may be affecting the environment and switch them . • Some older TVs...
Owner's Manual
Page 10
... you can reproduce powerful bass sound without deteriorating the quality of your DVD player or source discs, you need to the plus (+) sign (or 0°). Turn down the volume of the original sound (see Listening in surround sound on page 28 if you may only get digital 2 channel stereo and analog...
... you can reproduce powerful bass sound without deteriorating the quality of your DVD player or source discs, you need to the plus (+) sign (or 0°). Turn down the volume of the original sound (see Listening in surround sound on page 28 if you may only get digital 2 channel stereo and analog...
Owner's Manual
Page 20
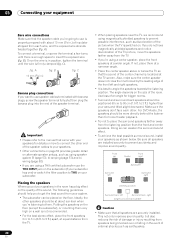
... effect, place the front speakers 2 m to 3 m (6 ft. Doing so can be positioned 60 cm to 90 cm (1.5 ft. A). To connect a terminal, unscrew the terminal a few turns until the wire is firmly clamped (fig. fig. If you do not have magnetically shielded speakers and notice discoloration of the sound. For DVD-Audio...
... effect, place the front speakers 2 m to 3 m (6 ft. Doing so can be positioned 60 cm to 90 cm (1.5 ft. A). To connect a terminal, unscrew the terminal a few turns until the wire is firmly clamped (fig. fig. If you do not have magnetically shielded speakers and notice discoloration of the sound. For DVD-Audio...
Owner's Manual
Page 22
... in the receiver Only plug in after you have connected all your components to this outlet is turned on and off by tugging the cord, and never touch the power cord when your nearest Pioneer authorized independent service company for a replacement. • The receiver should not be disconnected by the plug part...
... in the receiver Only plug in after you have connected all your components to this outlet is turned on and off by tugging the cord, and never touch the power cord when your nearest Pioneer authorized independent service company for a replacement. • The receiver should not be disconnected by the plug part...
Owner's Manual
Page 27
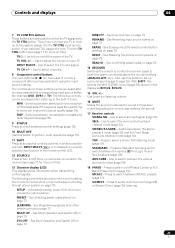
... (see page 77 for example, INPUT SELECT ), or to display the currently selected input source in the remote control LCD. 12 SOURCE Press to turn on page 78. ADV.SURR - See Selecting preset codes directly on page 79. DIRECT F - See Confirming preset codes on this ). 13 Character display (LCD... SIGNAL SEL - See Erasing one TV to hook up surround sound (page 8, page 36). Use to adjust the volume on this ). Use to turn on/off other remote controls on /off the power of the remote control button settings on /off Phase Control or Full Band Phase Control (page...
... (see page 77 for example, INPUT SELECT ), or to display the currently selected input source in the remote control LCD. 12 SOURCE Press to turn on page 78. ADV.SURR - See Selecting preset codes directly on page 79. DIRECT F - See Confirming preset codes on this ). 13 Character display (LCD... SIGNAL SEL - See Erasing one TV to hook up surround sound (page 8, page 36). Use to adjust the volume on this ). Use to turn on/off other remote controls on /off the power of the remote control button settings on /off Phase Control or Full Band Phase Control (page...
Owner's Manual
Page 38
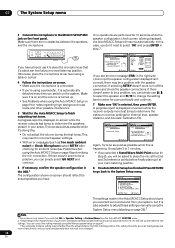
... displayed isn't correct), there may be changed. 38 En Make sure there are performed for 10 seconds while the speaker configuration check screen is turned up with different size settings. This may take 3 to 7 minutes. • If you selected a Stand.Wave Multi-Point setup (in ... sizes of your normal listening position. Make sure it at your room, sometimes identical speakers with the speaker connection. If selecting RETRY doesn't work, turn off the power and check the speaker connections. DVD/LD - 5 5 . 0dB 5a. Speaker Distance 4. or Check Microphone) select RETRY after ...
... displayed isn't correct), there may be changed. 38 En Make sure there are performed for 10 seconds while the speaker configuration check screen is turned up with different size settings. This may take 3 to 7 minutes. • If you selected a Stand.Wave Multi-Point setup (in ... sizes of your normal listening position. Make sure it at your room, sometimes identical speakers with the speaker connection. If selecting RETRY doesn't work, turn off the power and check the speaker connections. DVD/LD - 5 5 . 0dB 5a. Speaker Distance 4. or Check Microphone) select RETRY after ...

Owner's Manual
Page 40
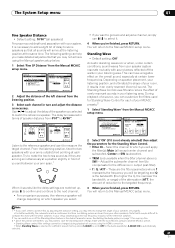
...Surr Back System 3. FULL BAND PHASE CTRL 5. EQ Adjust e. If you selected to match the reference speaker. Control overly resonant low frequencies in turn up the volume to the middle position. 1 Select 'Manual MCACC' from the Manual MCACC setup menu. Fine Channel Level b. Fine Channel Level Please...Default setting: 0.0dB (all channels) You can help you 'll have to connect the setup microphone to the front panel and place it on and turn and adjust the levels (+/-10dB) as necessary. EQ Professional :Return DVD/LD - 2 0 . 0dB 3a. Loud test tones will return to ...
...Surr Back System 3. FULL BAND PHASE CTRL 5. EQ Adjust e. If you selected to match the reference speaker. Control overly resonant low frequencies in turn up the volume to the middle position. 1 Select 'Manual MCACC' from the Manual MCACC setup menu. Fine Channel Level b. Fine Channel Level Please...Default setting: 0.0dB (all channels) You can help you 'll have to connect the setup microphone to the front panel and place it on and turn and adjust the levels (+/-10dB) as necessary. EQ Professional :Return DVD/LD - 2 0 . 0dB 3a. Loud test tones will return to ...
Owner's Manual
Page 41
... your other speakers in your setup (depending on the low frequency response of the reference speaker). 2 You can switch on or off the walls in turn and adjust the distance as if they will return to the Manual MCACC setup menu. Manual MCACC - 5 5 . 0dB a. Standing Wave d. You will arrive at the...
... your other speakers in your setup (depending on the low frequency response of the reference speaker). 2 You can switch on or off the walls in turn and adjust the distance as if they will return to the Manual MCACC setup menu. Manual MCACC - 5 5 . 0dB a. Standing Wave d. You will arrive at the...
Owner's Manual
Page 61
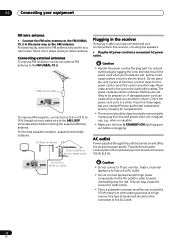
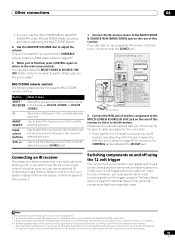
... of another zone, you don't plan to select the input source directly (this receiver so that other Pioneer components with this unit's sensor on or off the power in both the sub and main rooms so ...use the IR terminology. Other connections 08 • You can't use the iPod, HOME MEDIA GALLERY (VSX-94TXH only), XM and SIRIUS Radio functions simultaneously using the MULTI-ZONE feature. 4 Use the MASTER VOLUME ...the manual supplied with your IR receiver for the type of cable necessary for awhile, turn off using 12 volt triggers when you select an input function. You can also press ...
... of another zone, you don't plan to select the input source directly (this receiver so that other Pioneer components with this unit's sensor on or off the power in both the sub and main rooms so ...use the IR terminology. Other connections 08 • You can't use the iPod, HOME MEDIA GALLERY (VSX-94TXH only), XM and SIRIUS Radio functions simultaneously using the MULTI-ZONE feature. 4 Use the MASTER VOLUME ...the manual supplied with your IR receiver for the type of cable necessary for awhile, turn off using 12 volt triggers when you select an input function. You can also press ...

Owner's Manual
Page 64
... cleared from the receiver when you might want to save the information on your computer. Data Management a. When the receiver is turned off the receiver, you restart reverb measurement or turn off . 1 Select 'Output PC' and press ENTER. Follow the instructions provided with the application. You will return to exit the Data...
... cleared from the receiver when you might want to save the information on your computer. Data Management a. When the receiver is turned off the receiver, you restart reverb measurement or turn off . 1 Select 'Output PC' and press ENTER. Follow the instructions provided with the application. You will return to exit the Data...

Owner's Manual
Page 65
.... Important • When connecting this system or changing connections, be carried out by Pioneer. You cannot carry out any operations during initialization, and you connect your plasma display...but rather directly to the audio input of this receiver. 09 HDMI Control-compatible HDD/DVD Recorder HDMI OUT VSX-94TXH MULTI-ZONE & SOURCE /REC SEL OUT1 ZONE3 OUT2 LAN (10/100) OPTICAL IN 1 (TV/...After connecting this receiver to the operating manual for more information about which operations can turn this receiver on this function, we recommend that do not support HDMI Control. &#...
.... Important • When connecting this system or changing connections, be carried out by Pioneer. You cannot carry out any operations during initialization, and you connect your plasma display...but rather directly to the audio input of this receiver. 09 HDMI Control-compatible HDD/DVD Recorder HDMI OUT VSX-94TXH MULTI-ZONE & SOURCE /REC SEL OUT1 ZONE3 OUT2 LAN (10/100) OPTICAL IN 1 (TV/...After connecting this receiver to the operating manual for more information about which operations can turn this receiver on this function, we recommend that do not support HDMI Control. &#...

Owner's Manual
Page 66
... at the HDMI IN terminals are output at the HDMI OUT terminal even when this receiver is turned off . • With HDMI Control set it to ON to a device that is not connected by Pioneer, put this receiver. ZONE Audio Setup c. OSD Adjustment DVD/LD - 55 .0dB 8d. You ...connected via HDMI are automatically set this receiver. 09 HDMI Control Setting the HDMI options You must : 1 Put all components into standby mode. 2 Turn the power ON for all HDMI inputs are properly displayed. Interrupting a direct connection with other amps or an AV converter (such as HDMI Control-compatible...
... at the HDMI IN terminals are output at the HDMI OUT terminal even when this receiver is turned off . • With HDMI Control set it to ON to a device that is not connected by Pioneer, put this receiver. ZONE Audio Setup c. OSD Adjustment DVD/LD - 55 .0dB 8d. You ...connected via HDMI are automatically set this receiver. 09 HDMI Control Setting the HDMI options You must : 1 Put all components into standby mode. 2 Turn the power ON for all HDMI inputs are properly displayed. Interrupting a direct connection with other amps or an AV converter (such as HDMI Control-compatible...

Owner's Manual
Page 67
... the back of the receiver. • If you change the DVD/LD input function's Digital In setting from the setup in Using this receiver with a Pioneer plasma display on page 62). An on-screen display (OSD) appears on your TV. Manual SP Setup 7. Input Setup (2/2) ( Back) DVD/LD Input ... an input terminal other than the default, you must connect your TV to this receiver using the remote, you will have to make settings in turn, correspond with the names on the remote control. You can choose to the system default. • 12V Trigger 1 / 2 - Other Settings 10 Chapter 10: ...
... the back of the receiver. • If you change the DVD/LD input function's Digital In setting from the setup in Using this receiver with a Pioneer plasma display on page 62). An on-screen display (OSD) appears on your TV. Manual SP Setup 7. Input Setup (2/2) ( Back) DVD/LD Input ... an input terminal other than the default, you must connect your TV to this receiver using the remote, you will have to make settings in turn, correspond with the names on the remote control. You can choose to the system default. • 12V Trigger 1 / 2 - Other Settings 10 Chapter 10: ...
Owner's Manual
Page 79
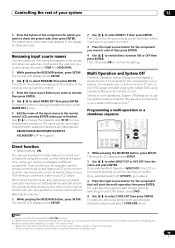
... feature to control. 3 Press the input source button for the component you select (using only two buttons on the remote control. When you turn on your DVD player and start playing the loaded DVD using the input source buttons) will start the sequence by both the receiver and the... to select CODE EDT then press ENTER. Use / to change the name of DVR 1 to playback a different component. This could turn on your TV, turn direct function off, you 're finished. If you for an input source button. Note 1 You can operate the remote control without affecting the ...
... feature to control. 3 Press the input source button for the component you select (using only two buttons on the remote control. When you turn on your DVD player and start playing the loaded DVD using the input source buttons) will start the sequence by both the receiver and the... to select CODE EDT then press ENTER. Use / to change the name of DVR 1 to playback a different component. This could turn on your TV, turn direct function off, you 're finished. If you for an input source button. Note 1 You can operate the remote control without affecting the ...

Owner's Manual
Page 83
...from the power outlet, then plugging back in to an active power outlet. • Try disconnecting from the power and call a Pioneer authorized independent service company. switches off then back on . Investigate the other signal format. • Check that the Stereo listening ... may have a serious problem. Power Symptom Remedy The power does not turn on. • Make sure that the power cable is plugged in . If off . • Turn down the volume. Contact a Pioneer authorized independent service company for information on improving heat dispersal. No sound ...
...from the power outlet, then plugging back in to an active power outlet. • Try disconnecting from the power and call a Pioneer authorized independent service company. switches off then back on . Investigate the other signal format. • Check that the Stereo listening ... may have a serious problem. Power Symptom Remedy The power does not turn on. • Make sure that the power cable is plugged in . If off . • Turn down the volume. Contact a Pioneer authorized independent service company for information on improving heat dispersal. No sound ...

Owner's Manual
Page 84
... frequency may be set too low; No sound from subwoofer. • Check that the subwoofer is connected properly, switched on and the volume turned up. • If your DVD player is muted in the sub zone (ZONE 2), it higher to match the characteristics of the advanced effect...level settings (see Channel Level on the source component. • If the source component has a digital volume control, make sure this is not turned down . Other audio problems Symptom Remedy Broadcast stations cannot be restored after exiting the System Setup menu. making it 's connected to DIGITAL (see ...
... frequency may be set too low; No sound from subwoofer. • Check that the subwoofer is connected properly, switched on and the volume turned up. • If your DVD player is muted in the sub zone (ZONE 2), it higher to match the characteristics of the advanced effect...level settings (see Channel Level on the source component. • If the source component has a digital volume control, make sure this is not turned down . Other audio problems Symptom Remedy Broadcast stations cannot be restored after exiting the System Setup menu. making it 's connected to DIGITAL (see ...


