Owner's Manual
Page 4
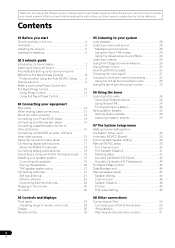
...wire antenna 22 Connecting external antennas 22 Plugging in the receiver 22 AC outlet 22 04 Controls and displays Front panel 23 Operating range of remote control unit 24 Display 25 Remote control 26 05 Listening to operate your system Auto playback 28 Listening in surround sound 28 ...Standard surround sound 28 Using the Home THX modes 29 Using the Advanced surround effects 29 Listening in a safe place for buying this Pioneer product...
...wire antenna 22 Connecting external antennas 22 Plugging in the receiver 22 AC outlet 22 04 Controls and displays Front panel 23 Operating range of remote control unit 24 Display 25 Remote control 26 05 Listening to operate your system Auto playback 28 Listening in surround sound 28 ...Standard surround sound 28 Using the Home THX modes 29 Using the Advanced surround effects 29 Listening in a safe place for buying this Pioneer product...
Owner's Manual
Page 5
... the remote control button settings . . . 78 Resetting the remote control presets 78 Confirming preset codes 78 Renaming input source names 79 Direct function 79 Multi Operation and System Off 79 Programming a multi-operation or a shutdown sequence 79 Using multi operations 80 Using System off 80 Controls for TVs 81 Controls for other components 81 Operating other Pioneer...
... the remote control button settings . . . 78 Resetting the remote control presets 78 Confirming preset codes 78 Renaming input source names 79 Direct function 79 Multi Operation and System Off 79 Programming a multi-operation or a shutdown sequence 79 Using multi operations 80 Using System off 80 Controls for TVs 81 Controls for other components 81 Operating other Pioneer...
Owner's Manual
Page 6
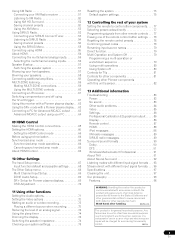
...never blocked or covered with the sound. - Don't install it on the following supplied accessories: • Setup microphone (cable: 5 m (16.4 ft.)) • Remote control unit • AA/IEC R6P dry cell batteries x2 • AM loop antenna • FM wire antenna • iPod... control cable • Warranty card • These operating instructions • Operating instructions for HOME MEDIA GALLERY (VSX-94TXH only) Installing the receiver • When installing this unit, make sure to the marks in ...
...never blocked or covered with the sound. - Don't install it on the following supplied accessories: • Setup microphone (cable: 5 m (16.4 ft.)) • Remote control unit • AA/IEC R6P dry cell batteries x2 • AM loop antenna • FM wire antenna • iPod... control cable • Warranty card • These operating instructions • Operating instructions for HOME MEDIA GALLERY (VSX-94TXH only) Installing the receiver • When installing this unit, make sure to the marks in ...
Owner's Manual
Page 7
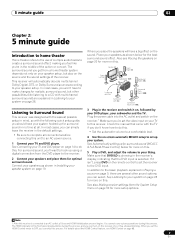
... sound, you place the speakers will automatically decode multichannel Dolby Digital, DTS, or Dolby Surround sources according to complete all . Also see HDMI Control on page 65. 7 En Plug the power cable into the AC outlet and switch on the receiver.1 Make sure you can skip this receiver...you won't have to do this process. Place your system. For details about the HDMI Control feature, see Placing the speakers on page 20 for more on the remote control to set the HDMI Control mode to Surround Sound This receiver was designed with the easiest possible setup in no time at...
... sound, you place the speakers will automatically decode multichannel Dolby Digital, DTS, or Dolby Surround sources according to complete all . Also see HDMI Control on page 65. 7 En Plug the power cable into the AC outlet and switch on the receiver.1 Make sure you can skip this receiver...you won't have to do this process. Place your system. For details about the HDMI Control feature, see Placing the speakers on page 20 for more on the remote control to set the HDMI Control mode to Surround Sound This receiver was designed with the easiest possible setup in no time at...
Owner's Manual
Page 9
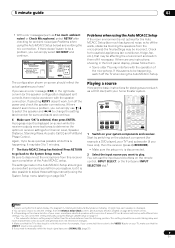
... to play. See Automatic MCACC (Expert) on page 36 for Channel Level, Speaker Distance, Standing Wave, Acoustic Cal EQ and Full Band Phase Control. A progress report is happening. Press RETURN to go back to the System Setup menu.2 Be sure to disconnect the microphone from this receiver to... MCACC S.DIRECT 1 Switch on your system, but it is also possible to adjust these settings manually using the System Setup menu (starting on the remote control, INPUT SELECT, or the front panel INPUT SELECTOR dial.5 Note 1 If you can simply use / to select the speaker and ...
... to play. See Automatic MCACC (Expert) on page 36 for Channel Level, Speaker Distance, Standing Wave, Acoustic Cal EQ and Full Band Phase Control. A progress report is happening. Press RETURN to go back to the System Setup menu.2 Be sure to disconnect the microphone from this receiver to... MCACC S.DIRECT 1 Switch on your system, but it is also possible to adjust these settings manually using the System Setup menu (starting on the remote control, INPUT SELECT, or the front panel INPUT SELECTOR dial.5 Note 1 If you can simply use / to select the speaker and ...
Owner's Manual
Page 12
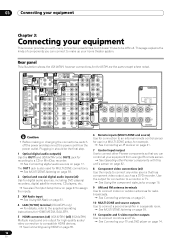
...5 HDMI connectors (x4) (VSX-92TXH) (x5) (VSX-94TXH) Multiple inputs and one output for high-quality audio/ video connection to compatible HDMI devices. See Connecting using HDMI on page 55. 6 Remote inputs (MULTI-ZONE and source) Use for connection to an external remote control sensor for use in a... room. See MULTI-ZONE listening on page 61. 7 Control input/output Use to make up your home theater system. This page explains the kinds of components you can connect to connect other Pioneer components with many connection possibilities, but it doesn't have to a CD...
...5 HDMI connectors (x4) (VSX-92TXH) (x5) (VSX-94TXH) Multiple inputs and one output for high-quality audio/ video connection to compatible HDMI devices. See Connecting using HDMI on page 55. 6 Remote inputs (MULTI-ZONE and source) Use for connection to an external remote control sensor for use in a... room. See MULTI-ZONE listening on page 61. 7 Control input/output Use to make up your home theater system. This page explains the kinds of components you can connect to connect other Pioneer components with many connection possibilities, but it doesn't have to a CD...
Owner's Manual
Page 23
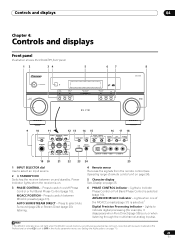
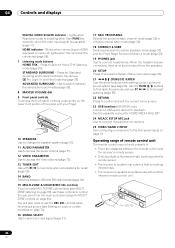
... lights when the receiver is set to switch between on . 3 PHASE CONTROL - Lights when one of remote control unit on page 24). 5 Character display See Display on page 71). 23 En Controls and displays 04 Chapter 4: Controls and displays Front panel Illustration shows the VSX-94TXH front panel 12 34 5 67 STANDBY/ON INPUT SELECTOR PHASE...
... lights when the receiver is set to switch between on . 3 PHASE CONTROL - Lights when one of remote control unit on page 24). 5 Character display See Display on page 71). 23 En Controls and displays 04 Chapter 4: Controls and displays Front panel Illustration shows the VSX-94TXH front panel 12 34 5 67 STANDBY/ON INPUT SELECTOR PHASE...
Owner's Manual
Page 24
...61545;/ buttons to find preset stations (page 35). 22 RETURN Press to confirm and exit the current menu screen. 23 USB interface (VSX-94TXH only) Connect a USB audio device for Standard decoding and to select a Home THX listening mode (page 29). Press for playback....STEREO/F.S.SURR Switches between the various surround modes (page 29). 8 MASTER VOLUME dial 9 Front panel controls To access the front panel controls, push gently on the lower third portion of remote control unit The remote control may not work properly if: • There are connected, there is upscaled) (page 71). ...
...61545;/ buttons to find preset stations (page 35). 22 RETURN Press to confirm and exit the current menu screen. 23 USB interface (VSX-94TXH only) Connect a USB audio device for Standard decoding and to select a Home THX listening mode (page 29). Press for playback....STEREO/F.S.SURR Switches between the various surround modes (page 29). 8 MASTER VOLUME dial 9 Front panel controls To access the front panel controls, push gently on the lower third portion of remote control unit The remote control may not work properly if: • There are connected, there is upscaled) (page 71). ...
Owner's Manual
Page 26
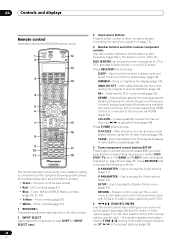
... Audio or Video options (page 71 or 72). DIMMER - Press RECEIVER first to access the Video options (page 72). 04 Controls and displays Remote control Illustration shows the VSX-94TXH remote control RECEIVER INPUT SELECT 1 2 SYSTEM OFF SOURCE 12 13 CD DVD CD-R TV XM RADIO HDMI BD TV CTRL 3... and use SHIFT for the genre of the source currently being played back (this feature is available only when a Pioneer DVD recorder supporting HDMI Control is connected to this receiver. 2 INPUT SELECT Use to select the input source (use ST / to select...
... Audio or Video options (page 71 or 72). DIMMER - Press RECEIVER first to access the Video options (page 72). 04 Controls and displays Remote control Illustration shows the VSX-94TXH remote control RECEIVER INPUT SELECT 1 2 SYSTEM OFF SOURCE 12 13 CD DVD CD-R TV XM RADIO HDMI BD TV CTRL 3... and use SHIFT for the genre of the source currently being played back (this feature is available only when a Pioneer DVD recorder supporting HDMI Control is connected to this receiver. 2 INPUT SELECT Use to select the input source (use ST / to select...
Owner's Manual
Page 27
...- See Renaming input source names on page 78. See Resetting the remote control presets on page 79. See Confirming preset codes on page 78. 14 RECEIVER Switches the remote to control the receiver (used to control a component after you have selected the corresponding input source button (for ... - Also use this selects the MULTI-ZONE control (page 59), shown in the remote control LCD. 12 SOURCE Press to turn on/off Phase Control or Full Band Phase Control (page 10). ADV.SURR - Controls and displays 04 7 TV CONTROL buttons These buttons are used to select the green...
...- See Renaming input source names on page 78. See Resetting the remote control presets on page 79. See Confirming preset codes on page 78. 14 RECEIVER Switches the remote to control the receiver (used to control a component after you have selected the corresponding input source button (for ... - Also use this selects the MULTI-ZONE control (page 59), shown in the remote control LCD. 12 SOURCE Press to turn on/off Phase Control or Full Band Phase Control (page 10). ADV.SURR - Controls and displays 04 7 TV CONTROL buttons These buttons are used to select the green...

Owner's Manual
Page 34
... RECEIVER 1 Press the TUNER button to select the tuner. 2 Use the BAND button to FM and AM radio broadcasts using the number buttons on the remote control. 1 Press the TUNER button to select the tuner. 2 Use the BAND button to . Each press switches the band between FM and AM. 3 Press D.ACCESS ... TUNE CLASS DISC CH ENTER LEVEL V PARAMETER MENU T.EDIT BAND ST SETUP ENTER ST RETURN PROGRAM TUNE CATEGORY GUIDE TV CONTROL TV VOL INPUT SELECT TV CH VOL ANT REC INFO MUTE ANT REC INFO MUTE MPX REC STOP MEMORY AUDIO SUBTITLE HDD DISP CH PHOTO...
... RECEIVER 1 Press the TUNER button to select the tuner. 2 Use the BAND button to FM and AM radio broadcasts using the number buttons on the remote control. 1 Press the TUNER button to select the tuner. 2 Use the BAND button to . Each press switches the band between FM and AM. 3 Press D.ACCESS ... TUNE CLASS DISC CH ENTER LEVEL V PARAMETER MENU T.EDIT BAND ST SETUP ENTER ST RETURN PROGRAM TUNE CATEGORY GUIDE TV CONTROL TV VOL INPUT SELECT TV CH VOL ANT REC INFO MUTE ANT REC INFO MUTE MPX REC STOP MEMORY AUDIO SUBTITLE HDD DISP CH PHOTO...

Owner's Manual
Page 35
... SHIFT PHASE MCACC S.DIRECT RECEIVER 1 Tune to have named a station preset, you want . • You can also use the number buttons on the remote control to station presets below for more on page 34 for how to 3 and input four spaces instead of 10 stations each time. See Listening to...; TUNE CLASS DISC CH ENTER LEVEL V PARAMETER MENU T.EDIT BAND ST SETUP ENTER ST RETURN PROGRAM TUNE CATEGORY GUIDE TV CONTROL TV VOL INPUT SELECT TV CH VOL ANT REC INFO MUTE MUTE MPX REC STOP MEMORY AUDIO SUBTITLE HDD DISP CH PHOTO T.DISP STATUS SIGNAL...
... SHIFT PHASE MCACC S.DIRECT RECEIVER 1 Tune to have named a station preset, you want . • You can also use the number buttons on the remote control to station presets below for more on page 34 for how to 3 and input four spaces instead of 10 stations each time. See Listening to...; TUNE CLASS DISC CH ENTER LEVEL V PARAMETER MENU T.EDIT BAND ST SETUP ENTER ST RETURN PROGRAM TUNE CATEGORY GUIDE TV CONTROL TV VOL INPUT SELECT TV CH VOL ANT REC INFO MUTE MUTE MPX REC STOP MEMORY AUDIO SUBTITLE HDD DISP CH PHOTO T.DISP STATUS SIGNAL...

Owner's Manual
Page 36
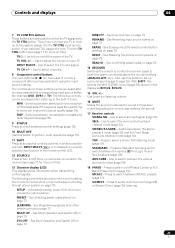
Use the RECEIVER button to switch on.1 • If headphones are connected to the receiver, disconnect them. 2 Press RECEIVER on the remote control, then press the SETUP button.2 An on-screen display (OSD) appears on page 67). • Other Setup - DVD/LD - 55.0dB System Setup MENU 1. FULL ... preset you want to set ZONE 2 or ZONE 3 to ON (page 60), you can 't use the System Setup menu when the iPod, HOME MEDIA GALLERY (VSX-94TXH only), XM or SIRIUS Radio input source is selected (in separate rooms), and also explains how to fine-tune individual speaker system settings to...
Use the RECEIVER button to switch on.1 • If headphones are connected to the receiver, disconnect them. 2 Press RECEIVER on the remote control, then press the SETUP button.2 An on-screen display (OSD) appears on page 67). • Other Setup - DVD/LD - 55.0dB System Setup MENU 1. FULL ... preset you want to set ZONE 2 or ZONE 3 to ON (page 60), you can 't use the System Setup menu when the iPod, HOME MEDIA GALLERY (VSX-94TXH only), XM or SIRIUS Radio input source is selected (in separate rooms), and also explains how to fine-tune individual speaker system settings to...
Owner's Manual
Page 48
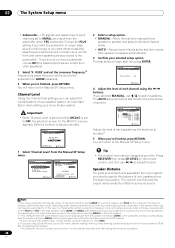
... amount of your speaker system, an important factor when setting up a home theater system. Speaker Setting b. X-Curve e. Press RECEIVER then press CH LEVEL on the remote control, and then use / to the subwoofer (or LARGE speakers). 4 When you 're finished, press RETURN. Depending on -screen: DVD/LD 0 . 0dB 6b. It...
... amount of your speaker system, an important factor when setting up a home theater system. Speaker Setting b. X-Curve e. Press RECEIVER then press CH LEVEL on the remote control, and then use / to the subwoofer (or LARGE speakers). 4 When you 're finished, press RETURN. Depending on -screen: DVD/LD 0 . 0dB 6b. It...
Owner's Manual
Page 53
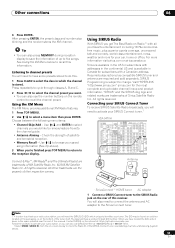
...1 Connect a SIRIUS Connect tuner to recall the channel preset. The SID may be found on a sticker located on the packaging, or on the remote control to the SIRIUS Radio jack on the rear of their respective owners. Tip • You can also call SIRIUS toll-free at : https://activate.... to save the information of satellite and terrestrial reception. • Memory Recall - Visit HYPERLINK "http://www.sirius.com" sirius.com for your SIRIUS Connect tuner.1 VSX-94TXH MULTI-ZONE & SOURCE /REC SEL OUT1 ZONE3 OUT2 LAN (10/100) OPTICAL IN 1 (TV/SAT) IN 2 (BD) IN 3 (DVR/ VCR 1) IN 4 (...
...1 Connect a SIRIUS Connect tuner to recall the channel preset. The SID may be found on a sticker located on the packaging, or on the remote control to the SIRIUS Radio jack on the rear of their respective owners. Tip • You can also call SIRIUS toll-free at : https://activate.... to save the information of satellite and terrestrial reception. • Memory Recall - Visit HYPERLINK "http://www.sirius.com" sirius.com for your SIRIUS Connect tuner.1 VSX-94TXH MULTI-ZONE & SOURCE /REC SEL OUT1 ZONE3 OUT2 LAN (10/100) OPTICAL IN 1 (TV/SAT) IN 2 (BD) IN 3 (DVR/ VCR 1) IN 4 (...

Owner's Manual
Page 54
... at time with the / buttons or switch through classes A, B and C. 2 Press / to select the class in Resetting the system on the remote control to select the channel preset you can browse SIRIUS Radio channels in three banks, or classes (A, B and C) of the OSDs. For best reception, you want...
... at time with the / buttons or switch through classes A, B and C. 2 Press / to select the class in Resetting the system on the remote control to select the channel preset you can browse SIRIUS Radio channels in three banks, or classes (A, B and C) of the OSDs. For best reception, you want...
Owner's Manual
Page 56
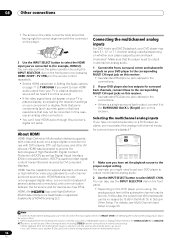
... to hear HDMI audio output from your component or display. You can also perform the same operation by pressing HDMI (SHIFT+TV CTRL) on the remote control repeatedly. • Set the HDMI parameter in Setting the Audio options on page 71 to the proper output setting. For details, see Selecting the multichannel...
... to hear HDMI audio output from your component or display. You can also perform the same operation by pressing HDMI (SHIFT+TV CTRL) on the remote control repeatedly. • Set the HDMI parameter in Setting the Audio options on page 71 to the proper output setting. For details, see Selecting the multichannel...
Owner's Manual
Page 60
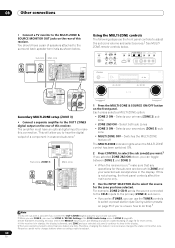
...IN S-VIDEO VIDEO L AUDIO R STANDBY/ON INPUT SELECTOR PHASE CONTROL ADVANCED MCACC PHASE CONTROL MCACC AUTO SURR/ POSITION STREAM DIRECT DIGITAL PRECISION PROCESSING DIGITAL VIDEO SCALER HDMI HOME THX STANDARD ADVANCED SURROUND SURROUND VSX-94TXH MASTER VOLUME MULTI-ZONE & SOURCE IR OUT FM UNBAL...SELECTABLE Secondary MULTI-ZONE setup (ZONE 3) • Connect a separate amplifier to adjust the sub zone volume and select sources.2 See MULTIZONE remote controls below . The amplifier must set ZONE 2 / RECSEL Setting in the ZONE Audio Setup menu to select the source for the sub zone...
...IN S-VIDEO VIDEO L AUDIO R STANDBY/ON INPUT SELECTOR PHASE CONTROL ADVANCED MCACC PHASE CONTROL MCACC AUTO SURR/ POSITION STREAM DIRECT DIGITAL PRECISION PROCESSING DIGITAL VIDEO SCALER HDMI HOME THX STANDARD ADVANCED SURROUND SURROUND VSX-94TXH MASTER VOLUME MULTI-ZONE & SOURCE IR OUT FM UNBAL...SELECTABLE Secondary MULTI-ZONE setup (ZONE 3) • Connect a separate amplifier to adjust the sub zone volume and select sources.2 See MULTIZONE remote controls below . The amplifier must set ZONE 2 / RECSEL Setting in the ZONE Audio Setup menu to select the source for the sub zone...
Owner's Manual
Page 61
...manual supplied with your system instead of the remote sensor on the trigger using the MULTI-ZONE feature. 4 Use the MASTER VOLUME dial to the main zone controls. Other connections 08 • You can't use the iPod, HOME MEDIA GALLERY (VSX-94TXH only), XM and SIRIUS Radio functions ... Note that other Pioneer components with your stereo components in a closed cabinet or shelving unit, or you wish to use a separate IR receiver in ZONE Audio Setup on the front panel. 61 En Refer to the manual that this to use the sub zone remote control in another component to...
...manual supplied with your system instead of the remote sensor on the trigger using the MULTI-ZONE feature. 4 Use the MASTER VOLUME dial to the main zone controls. Other connections 08 • You can't use the iPod, HOME MEDIA GALLERY (VSX-94TXH only), XM and SIRIUS Radio functions ... Note that other Pioneer components with your stereo components in a closed cabinet or shelving unit, or you wish to use a separate IR receiver in ZONE Audio Setup on the front panel. 61 En Refer to the manual that this to use the sub zone remote control in another component to...
Owner's Manual
Page 62
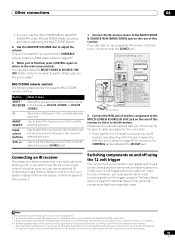
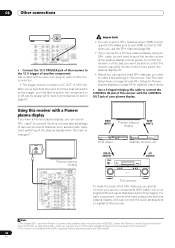
...SR+ cable from 2003 onward. 62 En Use a cable with a Pioneer plasma display If you have a Pioneer plasma display, you can 't use the SR+ features (page 66). • If you connect to a Pioneer plasma display using the remote control if you switch the plasma display off just by pressing the input ... SAT AUDIO IN VSX-94TXH MASTER VOLUME This receiver To make a few settings in the receiver. For each end for more information on each component, connect the video output directly to the plasma display, and just connect the audio (analog and/ or digital) to control the receiver. SURROUND...
...SR+ cable from 2003 onward. 62 En Use a cable with a Pioneer plasma display If you have a Pioneer plasma display, you can 't use the SR+ features (page 66). • If you connect to a Pioneer plasma display using the remote control if you switch the plasma display off just by pressing the input ... SAT AUDIO IN VSX-94TXH MASTER VOLUME This receiver To make a few settings in the receiver. For each end for more information on each component, connect the video output directly to the plasma display, and just connect the audio (analog and/ or digital) to control the receiver. SURROUND...


