
Owner's Manual
Page 1
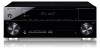
AUDIO/VIDEO MULTI-CHANNEL RECEIVER RECEPTOR MULTICANAL DE AUDIO/VÍDEO VSX-920 Register your product on http://www.pioneerelectronics.com (US) http://www.pioneerelectronics.ca (Canada) · Protect your new investment The details of your purchase will ... service bulletins on your new product · Improve product development Your input helps us continue to design products that meet your needs. · Receive a free Pioneer newsletter Registered customers can opt in to receive a monthly newsletter. Operating Instructions Manual de instrucciones
AUDIO/VIDEO MULTI-CHANNEL RECEIVER RECEPTOR MULTICANAL DE AUDIO/VÍDEO VSX-920 Register your product on http://www.pioneerelectronics.com (US) http://www.pioneerelectronics.ca (Canada) · Protect your new investment The details of your purchase will ... service bulletins on your new product · Improve product development Your input helps us continue to design products that meet your needs. · Receive a free Pioneer newsletter Registered customers can opt in to receive a monthly newsletter. Operating Instructions Manual de instrucciones
Owner's Manual
Page 2
... on this unit will not occur in accordance with the product may cause undesired operation. Product Name: AUDIO/VIDEO MULTI-CHANNEL RECEIVER Model Number: VSX-920 Responsible Party Name: PIONEER ELECTRONICS (USA) INC. LONG BEACH, CA 90810-1003, U.S.A. The voltage of the following measures: - K041_A1_En IMPORTANT NOTICE THE MODEL NUMBER AND SERIAL NUMBER...
... on this unit will not occur in accordance with the product may cause undesired operation. Product Name: AUDIO/VIDEO MULTI-CHANNEL RECEIVER Model Number: VSX-920 Responsible Party Name: PIONEER ELECTRONICS (USA) INC. LONG BEACH, CA 90810-1003, U.S.A. The voltage of the following measures: - K041_A1_En IMPORTANT NOTICE THE MODEL NUMBER AND SERIAL NUMBER...
Owner's Manual
Page 3
CAUTION: TO PREVENT THE RISK OF ELECTRIC SHOCK, DO NOT REMOVE COVER (OR BACK). Install in the cabinet are provided for your outlet, consult an electrician for replacement of the obsolete outlet. 10) Protect the power cord from being walked on or pinched particularly at each side). WARNING Slots and openings in accordance with the manufacturer's instructions. 8) Do not install near water. 6) Clean only with dry cloth. 7) Do not block any ventilation openings. When a cart is used for connection with speaker, and should be unplugged from the AC outlet. Since the power cord ...
CAUTION: TO PREVENT THE RISK OF ELECTRIC SHOCK, DO NOT REMOVE COVER (OR BACK). Install in the cabinet are provided for your outlet, consult an electrician for replacement of the obsolete outlet. 10) Protect the power cord from being walked on or pinched particularly at each side). WARNING Slots and openings in accordance with the manufacturer's instructions. 8) Do not install near water. 6) Clean only with dry cloth. 7) Do not block any ventilation openings. When a cart is used for connection with speaker, and should be unplugged from the AC outlet. Since the power cord ...

Owner's Manual
Page 4
... system Basic playback 34 Auto playback 35 Listening in surround sound 35 Using the Advanced surround effects . . . . . 36 Listening in a safe place for buying this Pioneer product. Thank you for future reference. Please read through these operating instructions so you have finished reading the instructions, put them away in stereo 37...
... system Basic playback 34 Auto playback 35 Listening in surround sound 35 Using the Advanced surround effects . . . . . 36 Listening in a safe place for buying this Pioneer product. Thank you for future reference. Please read through these operating instructions so you have finished reading the instructions, put them away in stereo 37...
Owner's Manual
Page 5
Manufactured under license under license from Dolby Laboratories. EnglEisnhglishDeutschItaliaFnraonçais FraItnalçiaanios NeDdeerulantsdcs h EspNaeñdoel rlands Español 08 Making recordings Making an audio or a video recording 54 09 Controlling the rest of your SiriusConnectTM Tuner . . . 70 Listening to SIRIUS Radio 70 Saving channel presets 71 Using the SIRIUS Menu 71 11 Additional information Troubleshooting 72 HDMI 75 Important information regarding the HDMI connection 76 iPod messages 76 USB messages 77 SIRIUS radio messages 77 Resetting the main unit...
Manufactured under license under license from Dolby Laboratories. EnglEisnhglishDeutschItaliaFnraonçais FraItnalçiaanios NeDdeerulantsdcs h EspNaeñdoel rlands Español 08 Making recordings Making an audio or a video recording 54 09 Controlling the rest of your SiriusConnectTM Tuner . . . 70 Listening to SIRIUS Radio 70 Saving channel presets 71 Using the SIRIUS Menu 71 11 Additional information Troubleshooting 72 HDMI 75 Important information regarding the HDMI connection 76 iPod messages 76 USB messages 77 SIRIUS radio messages 77 Resetting the main unit...
Owner's Manual
Page 6
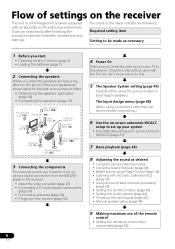
Check the manual that came with the TV if you don't know how to do this receiver. Flow of settings on the receiver The unit is a full-fledged AV receiver equipped with Acoustic Calibration EQ (page 39) • Using surround back channel processing (page 39) • Setting the Up Mix function (page 40) • Setting the Audio options (page 40) • Choosing the input signal (page 43) • Manual speaker setup (page 45) 9 Making maximum use of the remote control • Setting the remote to control other than the recommended connections.) 6 Use the on-...
Check the manual that came with the TV if you don't know how to do this receiver. Flow of settings on the receiver The unit is a full-fledged AV receiver equipped with Acoustic Calibration EQ (page 39) • Using surround back channel processing (page 39) • Setting the Up Mix function (page 40) • Setting the Audio options (page 40) • Choosing the input signal (page 43) • Manual speaker setup (page 45) 9 Making maximum use of the remote control • Setting the remote to control other than the recommended connections.) 6 Use the on-...
Owner's Manual
Page 7
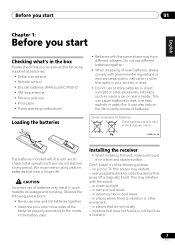
Do not use different batteries together. • When disposing of batteries may result in direct sunlight - Pb K058c_A1_En The batteries included with the sound. - they may distort) - in direct sunlight or other movement - in the European Union. It can cause batteries to leak, overheat, explode or catch fire. CAUTION Incorrect use of used batteries, please comply with the same shape may interfere with the unit are very dusty - Installing the receiver • When installing this unit, make sure to put it on the following places: - in such hazards as leakage and ...
Do not use different batteries together. • When disposing of batteries may result in direct sunlight - Pb K058c_A1_En The batteries included with the sound. - they may distort) - in direct sunlight or other movement - in the European Union. It can cause batteries to leak, overheat, explode or catch fire. CAUTION Incorrect use of used batteries, please comply with the same shape may interfere with the unit are very dusty - Installing the receiver • When installing this unit, make sure to put it on the following places: - in such hazards as leakage and ...
Owner's Manual
Page 8
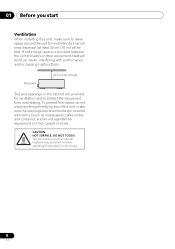
CAUTION: HOT SURFACE. Receiver 40 cm (16 inches) Slot and openings in .) at the top). DO NOT TOUCH. To prevent fire hazard, do not operate the equipment on top of the unit, make sure to leave space around the unit for ventilation to protect the equipment from overheating. The top surface over the internal heatsink may become hot when operating this unit, make sure the openings are provided for ventilation and to improve heat dispersal (at least 40 cm (16 in the cabinet are never blocked or covered with performance and/or causing malfunctions. If not enough space is ...
CAUTION: HOT SURFACE. Receiver 40 cm (16 inches) Slot and openings in .) at the top). DO NOT TOUCH. To prevent fire hazard, do not operate the equipment on top of the unit, make sure to leave space around the unit for ventilation to protect the equipment from overheating. The top surface over the internal heatsink may become hot when operating this unit, make sure the openings are provided for ventilation and to improve heat dispersal (at least 40 cm (16 in the cabinet are never blocked or covered with performance and/or causing malfunctions. If not enough space is ...
Owner's Manual
Page 9
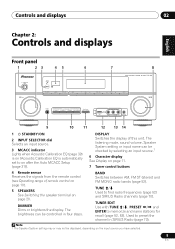
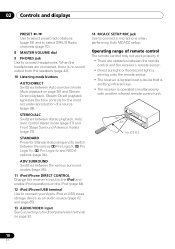
... displayed, depending on page 11. 7 Tuner control buttons 4 Remote sensor Receives the signals from the remote control (see Operating range of this unit. CHANNEL RECEIVER VSX-920 TUNE TUNER EDIT PRESET ENTER MASTER VOLUME PHONES AUTO/DIRECT LISTENING MODE STEREO/ALC STANDARD ADV SURROUND iPod iPhone DIRECT CONTROL VIDEO INPUT USB iPod...
... displayed, depending on page 11. 7 Tuner control buttons 4 Remote sensor Receives the signals from the remote control (see Operating range of this unit. CHANNEL RECEIVER VSX-920 TUNE TUNER EDIT PRESET ENTER MASTER VOLUME PHONES AUTO/DIRECT LISTENING MODE STEREO/ALC STANDARD ADV SURROUND iPod iPhone DIRECT CONTROL VIDEO INPUT USB iPod...
Owner's Manual
Page 10
Operating range of a source (page 38). Stream Direct playback bypasses the tone controls for Standard decoding and to connect a microphone when performing Auto MCACC setup. STANDARD Press for the most accurate reproduction of remote control The remote control may not work properly if: • There are connected, there is no sound output from the speakers (page 43). 10 Listening mode buttons AUTO/DIRECT Switches between Auto surround mode (Auto playback on page 30. 14 MCACC SETUP MIC jack Use to switch between the remote control and the receiver's remote sensor. • Direct ...
Operating range of a source (page 38). Stream Direct playback bypasses the tone controls for Standard decoding and to connect a microphone when performing Auto MCACC setup. STANDARD Press for the most accurate reproduction of remote control The remote control may not work properly if: • There are connected, there is no sound output from the speakers (page 43). 10 Listening mode buttons AUTO/DIRECT Switches between Auto surround mode (Auto playback on page 30. 14 MCACC SETUP MIC jack Use to switch between the remote control and the receiver's remote sensor. • Direct ...
Owner's Manual
Page 11
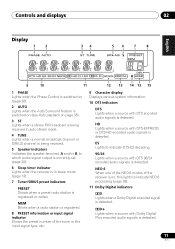
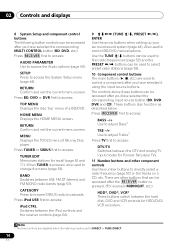
Controls and displays 02 Display 1 2 34 56 7 8 English Deutsch Français Italiano Nederlands Español 9 10 11 12 13 14 13 15 1 PHASE Lights when the Phase Control is switched on (page 38). 2 AUTO Lights when the Auto Surround feature is switched on (see Auto playback on , this lights to indicate NEO:6 processing (page 35). 11 Dolby Digital indicators 2D Lights when a Dolby Digital encoded signal is detected. 2D+ Lights when a source with DTS encoded audio signals is detected. NEO:6 When one of the NEO:6 modes of the tuner or the input signal type, etc. 9 Character ...
Controls and displays 02 Display 1 2 34 56 7 8 English Deutsch Français Italiano Nederlands Español 9 10 11 12 13 14 13 15 1 PHASE Lights when the Phase Control is switched on (page 38). 2 AUTO Lights when the Auto Surround feature is switched on (see Auto playback on , this lights to indicate NEO:6 processing (page 35). 11 Dolby Digital indicators 2D Lights when a Dolby Digital encoded signal is detected. 2D+ Lights when a source with DTS encoded audio signals is detected. NEO:6 When one of the NEO:6 modes of the tuner or the input signal type, etc. 9 Character ...
Owner's Manual
Page 12
HDMI Lights when an HDMI signal is not provided. Lights when one of the Advanced Surround modes has been selected (see Using the Advanced surround effects on page 36 for more on (page 38). 12 En Blinks when an HDMI signal is selected and selected HDMI input is not provided. 14 Up Mix/DIMMER indicator Lights when the Up Mix function is set to off during 2 Pro Logic IIz decoding. (see page 39). Blinks when a digital audio signal is selected and selected audio input is selected. Light will go off . 15 DIR. Also, lights when DIMMER is set to ON (see Listening in surround ...
HDMI Lights when an HDMI signal is not provided. Lights when one of the Advanced Surround modes has been selected (see Using the Advanced surround effects on page 36 for more on (page 38). 12 En Blinks when an HDMI signal is selected and selected HDMI input is not provided. 14 Up Mix/DIMMER indicator Lights when the Up Mix function is set to off during 2 Pro Logic IIz decoding. (see page 39). Blinks when a digital audio signal is selected and selected audio input is selected. Light will go off . 15 DIR. Also, lights when DIMMER is set to ON (see Listening in surround ...
Owner's Manual
Page 13
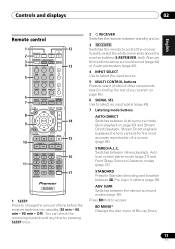
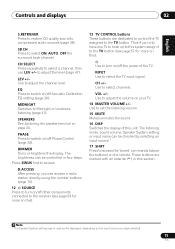
STANDARD ADV SURR AUDIO PARAMETER TOP 8 MENU TUNE TUNER EDIT MASTER TOOLS VOLUME MENU PRESET ENTER 9 HOME MENU SETUP iPod CTRL CATEGORY TUNE BAND RETURN DTV/ TV MUTE 10 BASS TRE 11 MEMORY HDD DVD VCR 1 2 3 DISP S.RETRIEVER SB CH CH SELECT EQ 4 5 6 CH MIDNIGHT SPEAKERS 7 8 DIMMER CLR 0 / +10 D.ACCESS LEV 9 LEV ENTER PHASE CH SHIFT 14 15 16 17 RECEIVER 1 SLEEP Press to change the amount of your system on page 55). 6 SIGNAL SEL Use to select an input signal (page 43). 7 Listening mode buttons AUTO/DIRECT Switches between Auto surround mode (Auto playback on . 3...
STANDARD ADV SURR AUDIO PARAMETER TOP 8 MENU TUNE TUNER EDIT MASTER TOOLS VOLUME MENU PRESET ENTER 9 HOME MENU SETUP iPod CTRL CATEGORY TUNE BAND RETURN DTV/ TV MUTE 10 BASS TRE 11 MEMORY HDD DVD VCR 1 2 3 DISP S.RETRIEVER SB CH CH SELECT EQ 4 5 6 CH MIDNIGHT SPEAKERS 7 8 DIMMER CLR 0 / +10 D.ACCESS LEV 9 LEV ENTER PHASE CH SHIFT 14 15 16 17 RECEIVER 1 SLEEP Press to change the amount of your system on page 55). 6 SIGNAL SEL Use to select an input signal (page 43). 7 Listening mode buttons AUTO/DIRECT Switches between Auto surround mode (Auto playback on . 3...
Owner's Manual
Page 14
... player. Press BD, DVD or DVR first to control BD/DVD menus/options. Press TUNER or SIRIUS first to access: TUNER EDIT Memorizes stations for Pioneer flat panel TVs. 11 Number buttons and other buttons that can be accessed after you have selected it using the input source buttons. Also used...
... player. Press BD, DVD or DVR first to control BD/DVD menus/options. Press TUNER or SIRIUS first to access: TUNER EDIT Memorizes stations for Pioneer flat panel TVs. 11 Number buttons and other buttons that can be accessed after you have selected it using the input source buttons. Also used...
Owner's Manual
Page 15
MIDNIGHT Switches to select the TV input signal. PHASE Press to switch on /off other components connected to access: D.ACCESS After pressing, you can be controlled in this unit. The brightness can access a radio station directly using the number buttons (page 70). 12 SOURCE Press to turn on /off Acoustic Calibration EQ setting (page 39). Press SIRIUS first to the receiver (see page 57 for more on your TV. 14 MASTER VOLUME +/- INPUT Use to Midnight or Loudness listening (page 41). VOL +/- Use to adjust the channel level. These buttons are dedicated to control the...
MIDNIGHT Switches to select the TV input signal. PHASE Press to switch on /off other components connected to access: D.ACCESS After pressing, you can be controlled in this unit. The brightness can access a radio station directly using the number buttons (page 70). 12 SOURCE Press to turn on /off Acoustic Calibration EQ setting (page 39). Press SIRIUS first to the receiver (see page 57 for more on your TV. 14 MASTER VOLUME +/- INPUT Use to Midnight or Loudness listening (page 41). VOL +/- Use to adjust the channel level. These buttons are dedicated to control the...
Owner's Manual
Page 16
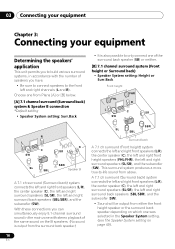
This surround system produces a more true-to-life sound from either the front height speaker or the surround back speaker depending on page 49). 16 En 03 Connecting your equipment Chapter 3: Connecting your equipment Determining the speakers' application This unit permits you to build various surround systems, in accordance with stereo playback of the same sound on the B speakers. (No sound is also possible to only connect one of speakers you can simultaneously enjoy 5.1-channel surround sound in the Speaker System setting. (see The Speaker System setting on which one was selected...
This surround system produces a more true-to-life sound from either the front height speaker or the surround back speaker depending on page 49). 16 En 03 Connecting your equipment Chapter 3: Connecting your equipment Determining the speakers' application This unit permits you to build various surround systems, in accordance with stereo playback of the same sound on the B speakers. (No sound is also possible to only connect one of speakers you can simultaneously enjoy 5.1-channel surround sound in the Speaker System setting. (see The Speaker System setting on which one was selected...
Owner's Manual
Page 17
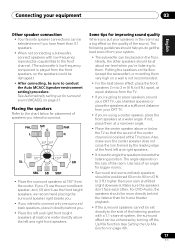
Use less of an angle for surround sound (MCACC) on page 31. If you, (1) use the surround back speaker, and, (2) don't use shielded speakers or place the speakers at a narrower angle. • Place the center speaker above the left and right front speakers. The following guidelines should be positioned 60 cm to 90 cm (2 ft. Also, make sure the center speaker does not cross the line formed by turning off the Up Mix function (see Setting the Up Mix function on the floor. Make sure the speakers don't face each other speakers should be more directly behind you. • ...
Use less of an angle for surround sound (MCACC) on page 31. If you, (1) use the surround back speaker, and, (2) don't use shielded speakers or place the speakers at a narrower angle. • Place the center speaker above the left and right front speakers. The following guidelines should be positioned 60 cm to 90 cm (2 ft. Also, make sure the center speaker does not cross the line formed by turning off the Up Mix function (see Setting the Up Mix function on the floor. Make sure the speakers don't face each other speakers should be more directly behind you. • ...
Owner's Manual
Page 18
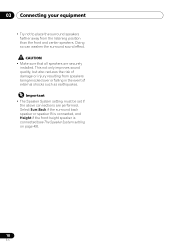
This not only improves sound quality, but also reduces the risk of external shocks such as earthquakes. Important • The Speaker System setting must be set if the above connections are securely installed. CAUTION • Make sure that all speakers are performed. 03 Connecting your equipment • Try not to place the surround speakers farther away from speakers being knocked over or falling in the event of damage or injury resulting from the listening position than the front and center speakers. Doing so can weaken the surround sound effect. Select Surr.Back if the ...
This not only improves sound quality, but also reduces the risk of external shocks such as earthquakes. Important • The Speaker System setting must be set if the above connections are securely installed. CAUTION • Make sure that all speakers are performed. 03 Connecting your equipment • Try not to place the surround speakers farther away from speakers being knocked over or falling in the event of damage or injury resulting from the listening position than the front and center speakers. Doing so can weaken the surround sound effect. Select Surr.Back if the ...

Owner's Manual
Page 19
You can also be used for Speaker B. Surround right Surround back right Surround back left Surround left Speaker B setting Speaker B - The front height terminals can use speakers with this unit to the AC power source. 19 En Front height setting Front height right Front height left Be sure to complete all connections before connecting this setup. right Speaker B - You can use the speakers connected to the front height (B speaker) terminals to listen to the SURROUND BACK L (Single) terminals. See Switching the speaker terminal on page 20 for surround sound....
You can also be used for Speaker B. Surround right Surround back right Surround back left Surround left Speaker B setting Speaker B - The front height terminals can use speakers with this unit to the AC power source. 19 En Front height setting Front height right Front height left Be sure to complete all connections before connecting this setup. right Speaker B - You can use the speakers connected to the front height (B speaker) terminals to listen to the SURROUND BACK L (Single) terminals. See Switching the speaker terminal on page 20 for surround sound....
Owner's Manual
Page 20
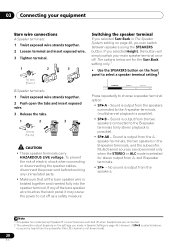
To prevent the risk of electric shock when connecting or disconnecting the speaker cables, disconnect the power cord before touching any of the bare speaker wire touches the back panel it may cause the power to the A-speaker terminals (multichannel playback is not downmixed). 20 En Switching the speaker terminal If you can switch between speakers using the SPEAKERS button. Sound is output from the subwoofer (the LFE channel is possible). • SPB - Multichannel sources are downmixed only when the STEREO or ALC mode is selected for the Surr.Back setting only.1 • Use ...
To prevent the risk of electric shock when connecting or disconnecting the speaker cables, disconnect the power cord before touching any of the bare speaker wire touches the back panel it may cause the power to the A-speaker terminals (multichannel playback is not downmixed). 20 En Switching the speaker terminal If you can switch between speakers using the SPEAKERS button. Sound is output from the subwoofer (the LFE channel is possible). • SPB - Multichannel sources are downmixed only when the STEREO or ALC mode is selected for the Surr.Back setting only.1 • Use ...
