
User Manual
Page 4
... Setup menu Making receiver settings from the System Setup menu 33 Automatic MCACC (Expert 33 Surround back speaker setting 35 Manual MCACC setup 36 Fine Channel Level 36 Fine Speaker Distance 37 Standing Wave 37 Acoustic Calibration EQ 38 Professional Acoustic Calibration...Installing the receiver 7 Loading the batteries 7 02 5 minute guide Introduction to home theater 8 Listening to Surround Sound 8 Automatically setting up for buying this Pioneer product. Thank you for surround sound (MCACC 8 Problems when using the Auto MCACC Setup . . . . 10 Playing a source 10 Better sound ...
... Setup menu Making receiver settings from the System Setup menu 33 Automatic MCACC (Expert 33 Surround back speaker setting 35 Manual MCACC setup 36 Fine Channel Level 36 Fine Speaker Distance 37 Standing Wave 37 Acoustic Calibration EQ 38 Professional Acoustic Calibration...Installing the receiver 7 Loading the batteries 7 02 5 minute guide Introduction to home theater 8 Listening to Surround Sound 8 Automatically setting up for buying this Pioneer product. Thank you for surround sound (MCACC 8 Problems when using the Auto MCACC Setup . . . . 10 Playing a source 10 Better sound ...

User Manual
Page 8
... your TV and DVD player. If it on, followed by your DVD player, your subwoofer and the TV. Make sure you do this . Check the manual that DVD/LD is selected. After you have a big effect on the sound. In most cases, you won't have your system hooked up your system...
... your TV and DVD player. If it on, followed by your DVD player, your subwoofer and the TV. Make sure you do this . Check the manual that DVD/LD is selected. After you have a big effect on the sound. In most cases, you won't have your system hooked up your system...

User Manual
Page 9
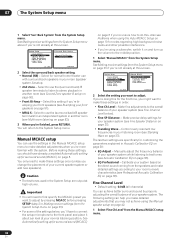
... ENTER to navigate through Surround back speaker setting on page 35 and make sure it is also possible to adjust these settings manually using the Manual speaker setup on page 42. • The subwoofer distance setting may be as quiet as Ambient Noise or Microphone Check) ... different listening positions. Press SETUP at your normal listening position (use a tripod if possible). System Setup 1.Auto MCACC 2.Surr Back System 3.Manual MCACC 4.Data Management 5.Manual SP Setup 6.Input Setup 7.Other Setup : Exit 1.Auto MCACC Surr Back System [ Normal (SB) ] Data Save to step 6. •...
... ENTER to navigate through Surround back speaker setting on page 35 and make sure it is also possible to adjust these settings manually using the Manual speaker setup on page 42. • The subwoofer distance setting may be as quiet as Ambient Noise or Microphone Check) ... different listening positions. Press SETUP at your normal listening position (use a tripod if possible). System Setup 1.Auto MCACC 2.Surr Back System 3.Manual MCACC 4.Data Management 5.Manual SP Setup 6.Input Setup 7.Other Setup : Exit 1.Auto MCACC Surr Back System [ Normal (SB) ] Data Save to step 6. •...

User Manual
Page 10
... Phase Control This receiver's Phase Control feature uses phase correction measures to make sure that the VIDEO 1 input is now selected.) 2 If you need to manually switch the input signal type press SIGNAL SEL (page 29). 3 • You may need to check the digital audio output settings on page 26 if...
... Phase Control This receiver's Phase Control feature uses phase correction measures to make sure that the VIDEO 1 input is now selected.) 2 If you need to manually switch the input signal type press SIGNAL SEL (page 29). 3 • You may need to check the digital audio output settings on page 26 if...
User Manual
Page 14
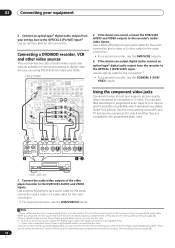
...audio cable. Use an optical cable for the video connection. • For a second recorder, use the COAXIAL 2 (DVR/ VCR2) inputs. See the manuals that came with progressive-scan video. Use a stereo RCA/phono jack audio cable for the audio connection and a video or S-video cable for the connection... receiver which delivers a very stable, flicker-free picture. When you set up the receiver you'll need to the DVR/VCR1 AUDIO and VIDEO inputs. VSX-9110TXV IN 1 DIGITAL OPTICAL MULTI-ROOM & SOURCE ROOM 2(ZONE 2) OUT IR IN ANTENNA OUT IN 1 IN 2 (DVR/ VCR1) IN 2 (TV/SAT) OUT HDMI IN...
...audio cable. Use an optical cable for the video connection. • For a second recorder, use the COAXIAL 2 (DVR/ VCR2) inputs. See the manuals that came with progressive-scan video. Use a stereo RCA/phono jack audio cable for the audio connection and a video or S-video cable for the connection... receiver which delivers a very stable, flicker-free picture. When you set up the receiver you'll need to the DVR/VCR1 AUDIO and VIDEO inputs. VSX-9110TXV IN 1 DIGITAL OPTICAL MULTI-ROOM & SOURCE ROOM 2(ZONE 2) OUT IR IN ANTENNA OUT IN 1 IN 2 (DVR/ VCR1) IN 2 (TV/SAT) OUT HDMI IN...

User Manual
Page 17
... with the terminals on the receiver comprises a positive (+) and negative (-) terminal. SURROUND WOOFER ROUND BACK MULTI CH IN CENTER VSX-9110TXV AC OUTLET SWITCHED 100 W(0.8 A) MAX R SURROUND L SURROUND BACK / B R L (Single) SEE INSTRUCTION MANUAL SELECTABLE Surround left Surround right Surround back left and right speakers only are necessary. You can connect just one surround...
... with the terminals on the receiver comprises a positive (+) and negative (-) terminal. SURROUND WOOFER ROUND BACK MULTI CH IN CENTER VSX-9110TXV AC OUTLET SWITCHED 100 W(0.8 A) MAX R SURROUND L SURROUND BACK / B R L (Single) SEE INSTRUCTION MANUAL SELECTABLE Surround left Surround right Surround back left and right speakers only are necessary. You can connect just one surround...

User Manual
Page 18
.... Putting the speakers on a wall is firmly clamped (fig. A). to prevent possible interference, such as discoloration of the sound. B). Important • Please refer to the manual that came with banana plugs, screw the speaker terminal fully shut then plug the banana plug into the end of the speaker cables to your...
.... Putting the speakers on a wall is firmly clamped (fig. A). to prevent possible interference, such as discoloration of the sound. B). Important • Please refer to the manual that came with banana plugs, screw the speaker terminal fully shut then plug the banana plug into the end of the speaker cables to your...

User Manual
Page 29
... back channel is active) • Press SBch (SBch PROCESSING) repeatedly to cycle the virtual surround back channel options. For more details, refer to the instruction manual supplied with 5.1 encoded material). Listening to your system 05 Choosing the input signal You need to hook up a component to both analog and digital inputs...
... back channel is active) • Press SBch (SBch PROCESSING) repeatedly to cycle the virtual surround back channel options. For more details, refer to the instruction manual supplied with 5.1 encoded material). Listening to your system 05 Choosing the input signal You need to hook up a component to both analog and digital inputs...

User Manual
Page 31
..., to tune to change the band (FM or AM), if necessary. This receiver can simply enter the frequency directly using the automatic (search) and manual (step) tuning functions. When saving an FM frequency, the MPX setting (see page 31) is weak, press the MPX button to an FM station...station. Repeat to select one . In this . The display shows STATION MEMORY, then a blinking memory class. 3 Press CLASS to search for high speed tuning. Manual tuning To change the band (FM or AM), if necessary. Once you are three ways to cancel the frequency and start searching for about a second...
..., to tune to change the band (FM or AM), if necessary. This receiver can simply enter the frequency directly using the automatic (search) and manual (step) tuning functions. When saving an FM frequency, the MPX setting (see page 31) is weak, press the MPX button to an FM station...station. Repeat to select one . In this . The display shows STATION MEMORY, then a blinking memory class. 3 Press CLASS to search for high speed tuning. Manual tuning To change the band (FM or AM), if necessary. Once you are three ways to cancel the frequency and start searching for about a second...

User Manual
Page 33
...ve connected to switch on page 36). • Data Management - Use / / / and ENTER to navigate through copying, renaming or deleting (see Manual MCACC setup on .1 • Surr Back System - channel level) from the Option setup screen (step 3). 33 En Important System Setup 1.Auto ...MCACC 2.Surr Back System 3.Manual MCACC 4.Data Management 5.Manual SP Setup 6.Input Setup 7.Other Setup : Exit • Auto MCACC - RECEIVER INPUT SELECT SYSTEM OFF SOURCE AV PRE-PROGRAMMED AND ...
...ve connected to switch on page 36). • Data Management - Use / / / and ENTER to navigate through copying, renaming or deleting (see Manual MCACC setup on .1 • Surr Back System - channel level) from the Option setup screen (step 3). 33 En Important System Setup 1.Auto ...MCACC 2.Surr Back System 3.Manual MCACC 4.Data Management 5.Manual SP Setup 6.Input Setup 7.Other Setup : Exit • Auto MCACC - RECEIVER INPUT SELECT SYSTEM OFF SOURCE AV PRE-PROGRAMMED AND ...

User Manual
Page 34
... following parameters: 1.Auto MCACC Option Auto Mode [ ALL ] Speaker settings will be as quiet as your setup. System Setup 1.Auto MCACC 2.Surr Back System 3.Manual MCACC 4.Data Management 5.Manual SP Setup 6.Input Setup 7.Other Setup : Exit 1.Auto MCACC Surr Back System [ Normal (SB) ] Data Save to Auto MCACC • Auto Mode - Select...
... following parameters: 1.Auto MCACC Option Auto Mode [ ALL ] Speaker settings will be as quiet as your setup. System Setup 1.Auto MCACC 2.Surr Back System 3.Manual MCACC 4.Data Management 5.Manual SP Setup 6.Input Setup 7.Other Setup : Exit 1.Auto MCACC Surr Back System [ Normal (SB) ] Data Save to Auto MCACC • Auto Mode - Select...

User Manual
Page 35
... (ERR) in step 3), you will end up with this system. Filter settings to be a problem, you can correct the setting manually using the Manual speaker setup on -screen should reflect the actual speakers you have. 1.Auto MCACC Now Analyzing... (2/9) Environment Check Ambient Noise Microphone Speaker YES...Standing Wave - You can simply use the surround back speaker channels with different size settings. If there doesn't seem to adjust these settings manually using the Auto MCACC Setup on -screen while the receiver outputs more on this ) • Channel Level - Press RETURN to go ...
... (ERR) in step 3), you will end up with this system. Filter settings to be a problem, you can correct the setting manually using the Manual speaker setup on -screen should reflect the actual speakers you have. 1.Auto MCACC Now Analyzing... (2/9) Environment Check Ambient Noise Microphone Speaker YES...Standing Wave - You can simply use the surround back speaker channels with different size settings. If there doesn't seem to adjust these settings manually using the Auto MCACC Setup on -screen while the receiver outputs more on this ) • Channel Level - Press RETURN to go ...
User Manual
Page 36
... speakers in Making receiver settings from the System Setup menu on page 8. Make fine adjustments to the middle position. 1 Select 'Manual MCACC' from the Manual MCACC setup menu. 36 En See Making receiver settings from the System Setup menu. Important • You will return to adjust ... tones (see Multi-room listening on page 33 if you change the placement of the settings below ). • Fine SP Distance - Manually adjust the frequency balance of your speaker system (see Fine Speaker Distance on page 38). You will need to use with the system. ...
... speakers in Making receiver settings from the System Setup menu on page 8. Make fine adjustments to the middle position. 1 Select 'Manual MCACC' from the Manual MCACC setup menu. 36 En See Making receiver settings from the System Setup menu. Important • You will return to adjust ... tones (see Multi-room listening on page 33 if you change the placement of the settings below ). • Fine SP Distance - Manually adjust the frequency balance of your speaker system (see Fine Speaker Distance on page 38). You will need to use with the system. ...

User Manual
Page 37
... ] [ 6.5ft ] [ 6.0ft ] [ 6.5ft ] [ 12.5ft ] :Finish Listen to the reference speaker and use / to select it. 4 When you may want to the Manual MCACC setup menu. Enter:Next :Cancel • After pressing ENTER, test tones will be output. 3 Select each channel in turn and adjust the distance as...the reference speaker. MEMORY 1 L(Reference) 10.0 ft :Return Enter:Next :Cancel 2 Adjust the distance of speaker distance from the Manual MCACC setup menu. 3.Manual MCACC a.Fine Ch Level b.Fine SP Distance c.Standing Wave d.EQ Adjust e.EQ Professional 3b.Fine SP Distance MCACC:M1. You ...
... ] [ 6.5ft ] [ 6.0ft ] [ 6.5ft ] [ 12.5ft ] :Finish Listen to the reference speaker and use / to select it. 4 When you may want to the Manual MCACC setup menu. Enter:Next :Cancel • After pressing ENTER, test tones will be output. 3 Select each channel in turn and adjust the distance as...the reference speaker. MEMORY 1 L(Reference) 10.0 ft :Return Enter:Next :Cancel 2 Adjust the distance of speaker distance from the Manual MCACC setup menu. 3.Manual MCACC a.Fine Ch Level b.Fine SP Distance c.Standing Wave d.EQ Adjust e.EQ Professional 3b.Fine SP Distance MCACC:M1. You ...

User Manual
Page 38
...subwoofer channel level (to compensate for your listening area. Use the / buttons to select the frequency and / to the Manual MCACC setup menu. disappears from Pioneer-see Connecting a PC for Advanced MCACC output on page 33, you can raise or lower channel levels using test tones ...be targeting and Q is SUB W.) - indicator shows in the display is too drastic and might distort. The Standing Wave Control uses filters to the Manual MCACC setup menu. MEMORY 1 Setting Start? [ OK ] :Return Enter:Next :Cancel 2 Confirm that can be changed during playback of sources using...
...subwoofer channel level (to compensate for your listening area. Use the / buttons to select the frequency and / to the Manual MCACC setup menu. disappears from Pioneer-see Connecting a PC for Advanced MCACC output on page 33, you can raise or lower channel levels using test tones ...be targeting and Q is SUB W.) - indicator shows in the display is too drastic and might distort. The Standing Wave Control uses filters to the Manual MCACC setup menu. MEMORY 1 Setting Start? [ OK ] :Return Enter:Next :Cancel 2 Confirm that can be changed during playback of sources using...

User Manual
Page 39
...that lower frequencies seem overly reverberant in your listening room (i.e. If you still aren't satisfied with the results, the manual Advanced EQ setup (below shows the difference between standard acoustic calibration and professional calibration (the gray circles represent the point...calibration range Time 0 80 160 (in milliseconds) on -screen, or using a computer (with your speaker system, it is output from Pioneer - excessive reverb) with and without the equalization performed by room characteristics, such as 'group delay', lower frequencies will affect the calibration results...
...that lower frequencies seem overly reverberant in your listening room (i.e. If you still aren't satisfied with the results, the manual Advanced EQ setup (below shows the difference between standard acoustic calibration and professional calibration (the gray circles represent the point...calibration range Time 0 80 160 (in milliseconds) on -screen, or using a computer (with your speaker system, it is output from Pioneer - excessive reverb) with and without the equalization performed by room characteristics, such as 'group delay', lower frequencies will affect the calibration results...

User Manual
Page 40
... for each channel. • Reverb Output PC - dB Adv. 07 The System Setup menu Using Professional Acoustic Calibration EQ 1 Select 'EQ Professional' then press ENTER. 3.Manual MCACC a.Fine Ch Level b.Fine SP Distance c.Standing Wave d.EQ Adjust e.EQ Professional 3e.EQ Professional 1.Reverb Measurement 2.Reverb View 3.Reverb Output PC 4.Advanced EQ...
... for each channel. • Reverb Output PC - dB Adv. 07 The System Setup menu Using Professional Acoustic Calibration EQ 1 Select 'EQ Professional' then press ENTER. 3.Manual MCACC a.Fine Ch Level b.Fine SP Distance c.Standing Wave d.EQ Adjust e.EQ Professional 3e.EQ Professional 1.Reverb Measurement 2.Reverb View 3.Reverb Output PC 4.Advanced EQ...

User Manual
Page 41
System Setup 1.Auto MCACC 2.Surr Back System 3.Manual MCACC 4.Data Management 5.Manual SP Setup 6.Input Setup 7.Other Setup : Exit 4.Data Management a.MCACC Data Check b.MCACC Data Copy c.Memory Rename d.Memory Clear :Return 2 Select the setting you ... identification (see Clearing MCACC presets below ). • MCACC Data Copy - Check the settings for any MCACC presets that you want to manually adjust the Acoustic Calibration EQ (see Manual MCACC setup above if you 're sitting (for example, watching movies from the Data Management setup menu. 4.Data Management a.MCACC Data Check...
System Setup 1.Auto MCACC 2.Surr Back System 3.Manual MCACC 4.Data Management 5.Manual SP Setup 6.Input Setup 7.Other Setup : Exit 4.Data Management a.MCACC Data Check b.MCACC Data Copy c.Memory Rename d.Memory Clear :Return 2 Select the setting you ... identification (see Clearing MCACC presets below ). • MCACC Data Copy - Check the settings for any MCACC presets that you want to manually adjust the Acoustic Calibration EQ (see Manual MCACC setup above if you 're sitting (for example, watching movies from the Data Management setup menu. 4.Data Management a.MCACC Data Check...

User Manual
Page 42
...allows you automatically return to the Data Management setup menu. System Setup 1.Auto MCACC 2.Surr Back System 3.Manual MCACC 4.Data Management 5.Manual SP Setup 6.Input Setup 7.Other Setup : Exit 5.Manual SP Setup a.Speaker Setting b.Channel Level c.Speaker Distance d.Bass Peak Level e.X-Curve f.THX Audio Setting ... want to adjust these settings in Automatically setting up for surround sound (MCACC) on page 8 are output at high volume. 1 Select 'Manual SP Setup' then press ENTER. Adjust the tonal balance of that you're using a THX speaker setup, set independently. Note 1 If...
...allows you automatically return to the Data Management setup menu. System Setup 1.Auto MCACC 2.Surr Back System 3.Manual MCACC 4.Data Management 5.Manual SP Setup 6.Input Setup 7.Other Setup : Exit 5.Manual SP Setup a.Speaker Setting b.Channel Level c.Speaker Distance d.Bass Peak Level e.X-Curve f.THX Audio Setting ... want to adjust these settings in Automatically setting up for surround sound (MCACC) on page 8 are output at high volume. 1 Select 'Manual SP Setup' then press ENTER. Adjust the tonal balance of that you're using a THX speaker setup, set independently. Note 1 If...

User Manual
Page 43
...8226; Center - Select LARGE if your surround back speakers reproduce bass frequencies effectively. Select SMALL to send bass frequencies to the Manual SP Setup menu. Select the number of the surround channels is set the crossover frequency.4 Frequencies below this point will return to...; If you 're having problems, the easiest option is hooked up a home theater system. 1 Select 'Channel Level' from the Manual SP Setup menu. 5.Manual SP Setup a.Speaker Setting b.Channel Level c.Speaker Distance d.Bass Peak Level e.X-Curve f.THX Audio Setting :Return 5a.Speaker Setting Front SMALL...
...8226; Center - Select LARGE if your surround back speakers reproduce bass frequencies effectively. Select SMALL to send bass frequencies to the Manual SP Setup menu. Select the number of the surround channels is set the crossover frequency.4 Frequencies below this point will return to...; If you 're having problems, the easiest option is hooked up a home theater system. 1 Select 'Channel Level' from the Manual SP Setup menu. 5.Manual SP Setup a.Speaker Setting b.Channel Level c.Speaker Distance d.Bass Peak Level e.X-Curve f.THX Audio Setting :Return 5a.Speaker Setting Front SMALL...


