
Owner's Manual
Page 5
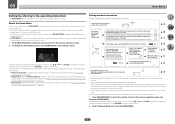
...timer...94 Dimming the display...94 Checking your system settings...94 Resetting the system...95 11 Controlling the rest of your system (VSX-90 only) About the Remote Setup menu...97 Operating multiple receivers...97 Setting the remote to control other components...97 Selecting preset ... remote control settings...99 Controlling components...100 12 The MCACC PRO (VSX-90)/Advanced MCACC (VSX-45) menu Making receiver settings from the MCACC PRO (VSX-90)/Advanced MCACC (VSX-45) menu 103 Automatic MCACC (Expert)...103 Manual MCACC setup...105 Checking MCACC Data...107 Data Management...108 14 FAQ...
...timer...94 Dimming the display...94 Checking your system settings...94 Resetting the system...95 11 Controlling the rest of your system (VSX-90 only) About the Remote Setup menu...97 Operating multiple receivers...97 Setting the remote to control other components...97 Selecting preset ... remote control settings...99 Controlling components...100 12 The MCACC PRO (VSX-90)/Advanced MCACC (VSX-45) menu Making receiver settings from the MCACC PRO (VSX-90)/Advanced MCACC (VSX-45) menu 103 Automatic MCACC (Expert)...103 Manual MCACC setup...105 Checking MCACC Data...107 Data Management...108 14 FAQ...
Owner's Manual
Page 8
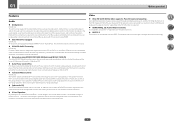
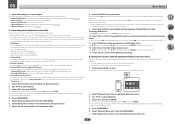
...a smoother connection between the sounds and an improved 3D feel. Dolby Atmos contents are equipped with this receiver using MCACC PRO (VSX-90)/Advanced MCACC (VSX-45) The Auto MCACC Setup provides a quick but accurate surround sound setup, which has stringent copyright protection technology. 8 For ... corrects phase shifting on the group delay in the speaker network filter, and compensates with Dolby Atmos, Dolby Atmos can be played by manual correction. % Virtual Speakers By turning on the 'Virtual Surround Back', 'Virtual Height', and 'Virtual Wide' modes, it is achieved...
...a smoother connection between the sounds and an improved 3D feel. Dolby Atmos contents are equipped with this receiver using MCACC PRO (VSX-90)/Advanced MCACC (VSX-45) The Auto MCACC Setup provides a quick but accurate surround sound setup, which has stringent copyright protection technology. 8 For ... corrects phase shifting on the group delay in the speaker network filter, and compensates with Dolby Atmos, Dolby Atmos can be played by manual correction. % Virtual Speakers By turning on the 'Virtual Surround Back', 'Virtual Height', and 'Virtual Wide' modes, it is achieved...

Owner's Manual
Page 20
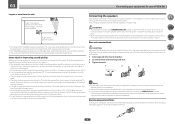
..., switch off the power and disconnect the power cord from the explanations in should be difficult. Before making connections, also keep the power cords of VSX-90) Connecting your home theater system. Depending on page 62 to change the assignments if other connections are assigned by default to be the final step... ter- Also refer to make up your equipment This receiver provides you can connect to the operating instructions of the respective devices. Plugging in this manual.
..., switch off the power and disconnect the power cord from the explanations in should be difficult. Before making connections, also keep the power cords of VSX-90) Connecting your home theater system. Depending on page 62 to change the assignments if other connections are assigned by default to be the final step... ter- Also refer to make up your equipment This receiver provides you can connect to the operating instructions of the respective devices. Plugging in this manual.
Owner's Manual
Page 24
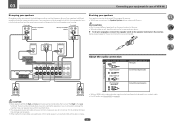
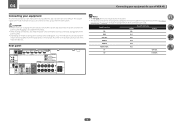
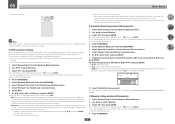
...place the surround speakers farther away from the listening position than your ears and tilted slightly downward. 03 Connecting your equipment (In case of VSX-90) Layout as seen from the side Height of top speakers (between two times to get the best sound from your system. ! Make ...not to your speakers. ! Some tips for bigger rooms. ! Place the center speaker above . Use less of the room. Please refer to the manual that came with the terminals on the quality of external shocks such as earthquakes. 1 Twist exposed wire strands together. 2 Loosen terminal and insert exposed ...
...place the surround speakers farther away from the listening position than your ears and tilted slightly downward. 03 Connecting your equipment (In case of VSX-90) Layout as seen from the side Height of top speakers (between two times to get the best sound from your system. ! Make ...not to your speakers. ! Some tips for bigger rooms. ! Place the center speaker above . Use less of the room. Please refer to the manual that came with the terminals on the quality of external shocks such as earthquakes. 1 Twist exposed wire strands together. 2 Loosen terminal and insert exposed ...
Owner's Manual
Page 27
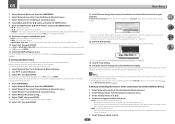
... plates that connect the High to the Low terminals. Front right High Bi-amp compatible speaker Bi-amp compatible speaker Front left ! See your speaker manual for bi-amping. Your speakers must be bi-wired if they support bi-amping. ! When bi-wiring as well, heed the cautions for high ...and low) and the sound improvement will depend on the kind of speakers you're using. 03 Connecting your equipment (In case of VSX-90) Bi-amping your speakers Bi-amping is when you connect the high frequency driver and low frequency driver of your speakers to different amplifiers for...
... plates that connect the High to the Low terminals. Front right High Bi-amp compatible speaker Bi-amp compatible speaker Front left ! See your speaker manual for bi-amping. Your speakers must be bi-wired if they support bi-amping. ! When bi-wiring as well, heed the cautions for high ...and low) and the sound improvement will depend on the kind of speakers you're using. 03 Connecting your equipment (In case of VSX-90) Bi-amping your speakers Bi-amping is when you connect the high frequency driver and low frequency driver of your speakers to different amplifiers for...
Owner's Manual
Page 29
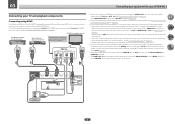
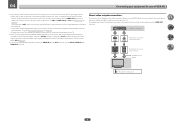
... the TV and receiver are also possible (see HDMI Setup on connections and setup for directions on page 86) . Please refer to the TV's operation manual for the TV. ! When it to this case, set to HDZONE, the 4K/60p 4:4:4 24 bit video is changed to 4:4:4, the video image... you 'll need to MAIN beforehand (page 114) . ! You cannot input 4K/60p 4:4:4 24 bit video from HDMI IN 3 to the sound of VSX-90) Connecting your DVD player with HDMI function on page 62 ). - HDMI/DVI-compatible monitor HDMI/DVI-compatible Blu-ray Disc player Other HDMI/DVIequipped component...
... the TV and receiver are also possible (see HDMI Setup on connections and setup for directions on page 86) . Please refer to the TV's operation manual for the TV. ! When it to this case, set to HDZONE, the 4K/60p 4:4:4 24 bit video is changed to 4:4:4, the video image... you 'll need to MAIN beforehand (page 114) . ! You cannot input 4K/60p 4:4:4 24 bit video from HDMI IN 3 to the sound of VSX-90) Connecting your DVD player with HDMI function on page 62 ). - HDMI/DVI-compatible monitor HDMI/DVI-compatible Blu-ray Disc player Other HDMI/DVIequipped component...
Owner's Manual
Page 35
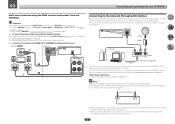
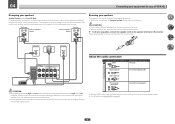
...back speaker terminal. 2 Connect a TV monitor to the HDMI OUT 2 (HDZONE) terminal on this receiver. The following figure shows the connection of VSX-90) Multi-zone connection using a broadband Internet connection, a contract with the wireless LAN antenna upright. ! To listen to the LAN terminal on this ...connecting the wireless LAN, please use with an Internet service provider is required. To use the HDZONE functions, set up the network manually. Which speaker terminal is applied. Turn on the DHCP server function of the equipment you may break it is as the connected...
...back speaker terminal. 2 Connect a TV monitor to the HDMI OUT 2 (HDZONE) terminal on this receiver. The following figure shows the connection of VSX-90) Multi-zone connection using a broadband Internet connection, a contract with the wireless LAN antenna upright. ! To listen to the LAN terminal on this ...connecting the wireless LAN, please use with an Internet service provider is required. To use the HDZONE functions, set up the network manually. Which speaker terminal is applied. Turn on the DHCP server function of the equipment you may break it is as the connected...

Owner's Manual
Page 37
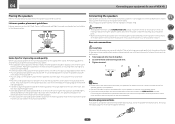
03 Connecting your equipment (In case of VSX-90) Connecting an IR receiver If you keep your stereo components in a...as this could cause a short circuit or electric shock. Closet or shelving unit IR IN OUT CONTROL Non-Pioneer component IR IN Switching components on and off using the The Input Setup menu on the rear of this receiver... IR receiver 2 Connect the IR IN jack of another component. Please see the manual supplied with components that will only work with your nearest Pioneer authorized independent service company for the connection. Do not pull out the plug by ...
03 Connecting your equipment (In case of VSX-90) Connecting an IR receiver If you keep your stereo components in a...as this could cause a short circuit or electric shock. Closet or shelving unit IR IN OUT CONTROL Non-Pioneer component IR IN Switching components on and off using the The Input Setup menu on the rear of this receiver... IR receiver 2 Connect the IR IN jack of another component. Please see the manual supplied with components that will only work with your nearest Pioneer authorized independent service company for the connection. Do not pull out the plug by ...
Owner's Manual
Page 39
...connections are assigned by default to the receiver's different input terminals. The RS-232C terminal is exclusively for the installer. ! Plugging in this manual. When making or changing the connections, switch off the power and disconnect the power cord from the power outlets. ! This chapter explains ...Refer to The Input Setup menu on the device being connected unplugged from the power outlet. 04 Connecting your equipment (In case of VSX-45) Connecting your equipment This receiver provides you can connect to make up your home theater system. Also refer to the operating ...
...connections are assigned by default to the receiver's different input terminals. The RS-232C terminal is exclusively for the installer. ! Plugging in this manual. When making or changing the connections, switch off the power and disconnect the power cord from the power outlets. ! This chapter explains ...Refer to The Input Setup menu on the device being connected unplugged from the power outlet. 04 Connecting your equipment (In case of VSX-45) Connecting your equipment This receiver provides you can connect to make up your home theater system. Also refer to the operating ...
Owner's Manual
Page 41
... listener than for bigger rooms. ! Surround speakers should be more powerful sound reproduction. Try not to 90 cm (2 ft. In this case, the same sound is best to connect the subwoofer. Ideally, ... Banana plug connections If you 're going to connect. 04 Connecting your equipment (In case of VSX-45) Placing the speakers Refer to the chart below the TV so that the sound of the ... speakers around your CRT TV, use speaker cables terminated with a nominal impedance of 6 W to the manual that all the bare speaker wire is not possible to 9 ft.) apart, at a wider angle....
... listener than for bigger rooms. ! Surround speakers should be more powerful sound reproduction. Try not to 90 cm (2 ft. In this case, the same sound is best to connect the subwoofer. Ideally, ... Banana plug connections If you 're going to connect. 04 Connecting your equipment (In case of VSX-45) Placing the speakers Refer to the chart below the TV so that the sound of the ... speakers around your CRT TV, use speaker cables terminated with a nominal impedance of 6 W to the manual that all the bare speaker wire is not possible to 9 ft.) apart, at a wider angle....
Owner's Manual
Page 43
See your speaker manual for better crossover performance. Don't connect different speakers from the same terminal in high quality over a single cable. ! When bi-wiring as well, heed the ... for more information. ! These must be removed when you are bi-amping the speakers or you 're using. 04 Connecting your equipment (In case of VSX-45) Bi-amping your speakers Speaker System setting: Front Bi-Amp Bi-amping is recommended. With these connections, the Speaker System setting makes no difference...
See your speaker manual for better crossover performance. Don't connect different speakers from the same terminal in high quality over a single cable. ! When bi-wiring as well, heed the ... for more information. ! These must be removed when you are bi-amping the speakers or you 're using. 04 Connecting your equipment (In case of VSX-45) Bi-amping your speakers Speaker System setting: Front Bi-Amp Bi-amping is recommended. With these connections, the Speaker System setting makes no difference...
Owner's Manual
Page 45
... 92 ). ! When the TV and receiver are connected by HDMI connections, if the TV supports the HDMI ARC (Audio Return Channel) function, the sound of VSX-45) ! 04 Connecting your equipment (In case of the TV can be output. 45 About video outputs connection This receiver is changed to 4:4:4, the video...
... 92 ). ! When the TV and receiver are connected by HDMI connections, if the TV supports the HDMI ARC (Audio Return Channel) function, the sound of VSX-45) ! 04 Connecting your equipment (In case of the TV can be output. 45 About video outputs connection This receiver is changed to 4:4:4, the video...
Owner's Manual
Page 49
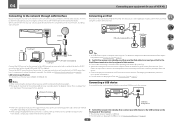
...whenever an iPod is connected to this unit. (Recharging is enabled only when the unit's power is applied. When using the controls of VSX-45) Connecting to the network through LAN interface By connecting this receiver to the network via the LAN terminal, you can listen to ... (0.66 ft) away from your iPod using a broadband Internet connection, a contract with an ISP (Internet Service Provider) beforehand. Refer to the operation manual of this receiver. ! Turn on page 67 . When connecting the wireless LAN, please use the iPod cable to connect your iPod to the iPod/...
...whenever an iPod is connected to this unit. (Recharging is enabled only when the unit's power is applied. When using the controls of VSX-45) Connecting to the network through LAN interface By connecting this receiver to the network via the LAN terminal, you can listen to ... (0.66 ft) away from your iPod using a broadband Internet connection, a contract with an ISP (Internet Service Provider) beforehand. Refer to the operation manual of this receiver. ! Turn on page 67 . When connecting the wireless LAN, please use the iPod cable to connect your iPod to the iPod/...
Owner's Manual
Page 50
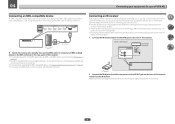
...an IR receiver If you keep your stereo components in another component to the IR OUT jack on page 69. ! Closet or shelving unit Non-Pioneer component CONTROL IR IR IN IN OUT 1 IR IN OUT CONTROL IR receiver 2 Connect the IR IN jack of this unit which has the ... other manufacturers may not be connected to check for the type of this receiver. Please see the manual supplied with your equipment (In case of VSX-45) Connecting an MHL-compatible device An MHL-compatible mobile device can use the sub zone remote control in a closed cabinet or shelving unit, or...
...an IR receiver If you keep your stereo components in another component to the IR OUT jack on page 69. ! Closet or shelving unit Non-Pioneer component CONTROL IR IR IN IN OUT 1 IR IN OUT CONTROL IR receiver 2 Connect the IR IN jack of this unit which has the ... other manufacturers may not be connected to check for the type of this receiver. Please see the manual supplied with your equipment (In case of VSX-45) Connecting an MHL-compatible device An MHL-compatible mobile device can use the sub zone remote control in a closed cabinet or shelving unit, or...
Owner's Manual
Page 55
...phone (wired LAN only) Automatically setting the connection Manually setting the connection Your computer or smart phone has a wireless LAN function A B C D E F G If you do not have been set , check and adjust as shown below. MCACC PRO (VSX-90)/Advanced MCACC (VSX-45) - iControl AV5, AirPlay, and HTC ...iPod touch, or iPad can change the SSID before executing network settings. HOME MENU may not be output from the MCACC PRO (VSX-90)/ Advanced MCACC (VSX-45) menu on page 110 . 05 Basic Setup Setting by A-H, first show the settings screen using the following procedures. 1 ...
...phone (wired LAN only) Automatically setting the connection Manually setting the connection Your computer or smart phone has a wireless LAN function A B C D E F G If you do not have been set , check and adjust as shown below. MCACC PRO (VSX-90)/Advanced MCACC (VSX-45) - iControl AV5, AirPlay, and HTC ...iPod touch, or iPad can change the SSID before executing network settings. HOME MENU may not be output from the MCACC PRO (VSX-90)/ Advanced MCACC (VSX-45) menu on page 110 . 05 Basic Setup Setting by A-H, first show the settings screen using the following procedures. 1 ...
Owner's Manual
Page 56
Network Information - Network Connection - Also refer to the user's manual for the Enable Proxy Server setting to confirm the IP Address/Proxy setup. Class A: 10.0.0.1 to 10.255.255.254 Class B: 172.16.0.1 to 172....
Network Information - Network Connection - Also refer to the user's manual for the Enable Proxy Server setting to confirm the IP Address/Proxy setup. Class A: 10.0.0.1 to 10.255.255.254 Class B: 172.16.0.1 to 172....
Owner's Manual
Page 58
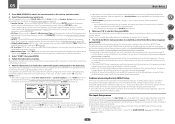
...- VIDEO P. - The cursor switches the input character part and software keyboard part every time the button is to select 'Wireless'. 3 Select 'OK', then press ENTER. F: Manually setting wireless LAN connection 1 Select 'Network Type' from the Network Connection menu. 8 Select 'WPS'. 9 At i/j, select 'PBC' or 'PIN Input' and press ENTER. ... HOME MENU. 6 Select 'Network Connection' from the Network, Bluetooth menu. 7 Select 'Wireless' from the Network, Bluetooth menu. 2 Use k/l to the user's manual of connectable access points, and select the desired access point for connection.
...- VIDEO P. - The cursor switches the input character part and software keyboard part every time the button is to select 'Wireless'. 3 Select 'OK', then press ENTER. F: Manually setting wireless LAN connection 1 Select 'Network Type' from the Network Connection menu. 8 Select 'WPS'. 9 At i/j, select 'PBC' or 'PIN Input' and press ENTER. ... HOME MENU. 6 Select 'Network Connection' from the Network, Bluetooth menu. 7 Select 'Wireless' from the Network, Bluetooth menu. 2 Use k/l to the user's manual of connectable access points, and select the desired access point for connection.
Owner's Manual
Page 59
...1 Select 'Network Type' from the Network Connection menu. 3 Select 'Security Protocol' at i/j. 59 The IP address of this receiver to the respective user's manual. ! Select 'YES' and press ENTER. "xxxxxxxx" represents a number unique to the WPA-AES, WPA-TKIP, WPA2-AES, and WPA2-TKIP method. 11...settings are performed on the browser on the Web browser. ! In case Web Control is active. 10 Select 'OK', then press ENTER. 11 Select [Pioneer Setup] (this receiver can be entered. ! Does not set the encryption method. ! Set to the WEP method. ! i/j - Set the IP address...
...1 Select 'Network Type' from the Network Connection menu. 3 Select 'Security Protocol' at i/j. 59 The IP address of this receiver to the respective user's manual. ! Select 'YES' and press ENTER. "xxxxxxxx" represents a number unique to the WPA-AES, WPA-TKIP, WPA2-AES, and WPA2-TKIP method. 11...settings are performed on the browser on the Web browser. ! In case Web Control is active. 10 Select 'OK', then press ENTER. 11 Select [Pioneer Setup] (this receiver can be entered. ! Does not set the encryption method. ! Set to the WEP method. ! i/j - Set the IP address...
Owner's Manual
Page 62
... or when using a subwoofer, make sure it later in the GUI screen. Problems when using the Manual speaker setup on page 63 ). VSX-90 only: You can adjust the settings manually. 05 Basic Setup 3 Press MAIN RECEIVER to switch the remote control to the receiver operation mode. ... (see Input function default and possible settings on page 110. ! ing environment, we recommend adjusting the settings manually. ! Therefore, it 's doing the Auto MCACC Setup. VSX-90 only: When Full Auto MCACC or Auto MCACC is happening. You can change the setting and continue. ! ...
... or when using a subwoofer, make sure it later in the GUI screen. Problems when using the Manual speaker setup on page 63 ). VSX-90 only: You can adjust the settings manually. 05 Basic Setup 3 Press MAIN RECEIVER to switch the remote control to the receiver operation mode. ... (see Input function default and possible settings on page 110. ! ing environment, we recommend adjusting the settings manually. ! Therefore, it 's doing the Auto MCACC Setup. VSX-90 only: When Full Auto MCACC or Auto MCACC is happening. You can change the setting and continue. ! ...
Owner's Manual
Page 63
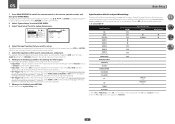
... tell the receiver how you have connected components to this receiver differently from the System Setup menu. 3.System Setup a.Input Setup b.HDMI Setup c.Manual SP Setup Exit Return d.MHL Setup e.OSD Language f.Other Setup 3a.Input Setup Input : Input Name : Input Skip : Audio In :... input's Audio In terminals. A Graphical User Interface (GUI) screen appears on automatically along with the input function buttons.) ! 12V Trigger 1/2 (VSX-90) - Use i/j/k/l and ENTER to navigate through the screens and select menu items. Press RETURN to exit the current menu. 2 Select 'System Setup...
... tell the receiver how you have connected components to this receiver differently from the System Setup menu. 3.System Setup a.Input Setup b.HDMI Setup c.Manual SP Setup Exit Return d.MHL Setup e.OSD Language f.Other Setup 3a.Input Setup Input : Input Name : Input Skip : Audio In :... input's Audio In terminals. A Graphical User Interface (GUI) screen appears on automatically along with the input function buttons.) ! 12V Trigger 1/2 (VSX-90) - Use i/j/k/l and ENTER to navigate through the screens and select menu items. Press RETURN to exit the current menu. 2 Select 'System Setup...


