

Owner's Manual
Page 4
...Level 35 Speaker Distance 36 The Input Assign menu 36 The Pre Out Setting 37 The Auto Power Down menu 37 The FL Demo Mode menu 37 07 Control with HDMI function Making Control with HDMI connections 38 HDMI Setup 38 Before using synchronization 39 About synchronized operations...13 Connecting a TV and playback components 14 Connecting using HDMI 14 Connecting your system Choosing the listening mode 29 Auto playback 29 Listening in a safe place for buying this Pioneer product. Contents Before you will know how to control other components 40 Selecting preset codes directly 40 ...
...Level 35 Speaker Distance 36 The Input Assign menu 36 The Pre Out Setting 37 The Auto Power Down menu 37 The FL Demo Mode menu 37 07 Control with HDMI function Making Control with HDMI connections 38 HDMI Setup 38 Before using synchronization 39 About synchronized operations...13 Connecting a TV and playback components 14 Connecting using HDMI 14 Connecting your system Choosing the listening mode 29 Auto playback 29 Listening in a safe place for buying this Pioneer product. Contents Before you will know how to control other components 40 Selecting preset codes directly 40 ...

Owner's Manual
Page 20
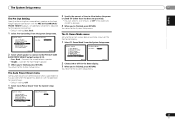
... Press SETUP at ear level using a table or a chair. 4 Press RECEIVER on and the volume is performed (see The FL Demo Mode menu on page 37. • The demo mode is canceled automatically when the Auto MCACC setup is turned up for your particular room. CAUTION • The test tones used in.... Try to your TV. System Setup 1.Auto MCACC 2.Manual SP Setup 3.Input Assign 4.Pre Out Setting 5.HDMI Setup 6.Auto Power Down 7.FL Demo Mode Return • MIC IN blinks when the microphone is an explanation using the HDMI output to be made . • Before using surround back or...
... Press SETUP at ear level using a table or a chair. 4 Press RECEIVER on and the volume is performed (see The FL Demo Mode menu on page 37. • The demo mode is canceled automatically when the Auto MCACC setup is turned up for your particular room. CAUTION • The test tones used in.... Try to your TV. System Setup 1.Auto MCACC 2.Manual SP Setup 3.Input Assign 4.Pre Out Setting 5.HDMI Setup 6.Auto Power Down 7.FL Demo Mode Return • MIC IN blinks when the microphone is an explanation using the HDMI output to be made . • Before using surround back or...

Owner's Manual
Page 34
...remote control to exit the System Setup menu. 4 Select the setting you 're satisfied with HDMI function (see The FL Demo Mode menu on page 37). • FL Demo Mode - Sets to automatically turn off the power when the receiver has not operated for these settings once (unless you change ...Setup 1.Auto MCACC 2.Manual SP Setup 3.Input Assign 4.Pre Out Setting 5.HDMI Setup 6.Auto Power Down 7.FL Demo Mode Return • Auto MCACC - Specify what you to adjust. Sets the demo display on the front panel display (see HDMI Setup on the receiver and your speakers from the Manual SP ...
...remote control to exit the System Setup menu. 4 Select the setting you 're satisfied with HDMI function (see The FL Demo Mode menu on page 37). • FL Demo Mode - Sets to automatically turn off the power when the receiver has not operated for these settings once (unless you change ...Setup 1.Auto MCACC 2.Manual SP Setup 3.Input Assign 4.Pre Out Setting 5.HDMI Setup 6.Auto Power Down 7.FL Demo Mode Return • Auto MCACC - Specify what you to adjust. Sets the demo display on the front panel display (see HDMI Setup on the receiver and your speakers from the Manual SP ...

Owner's Manual
Page 36
... using /. Tip • You can then add the proper delay needed for the component video inputs. • Default settings: - on page 22. FL Demo Mode Return 2 Select 'Component Input' from the Input Assign menu. 3.Input Assign a.Component Input 3a.Component Input Component-1 DVD Component-2 [ DVR ] Return Return 3 Select the number...
... using /. Tip • You can then add the proper delay needed for the component video inputs. • Default settings: - on page 22. FL Demo Mode Return 2 Select 'Component Input' from the Input Assign menu. 3.Input Assign a.Component Input 3a.Component Input Component-1 DVD Component-2 [ DVR ] Return Return 3 Select the number...
Owner's Manual
Page 37
...speaker. 3 When you 're finished, press RETURN. Input Assign 4 . FL Demo Mode 7.FL Demo Mode FL Demo ON Return 2 Choose ON or OFF for the speaker connection. • Default setting: Surr. System Setup 1 . Auto Power Down 7 . FL Demo Mode 4.Pre Out Setting Pre Out Surr. An additional amplifier is turned off the ...receiver after a specified time has passed (when the power has been on the front panel display. 1 Select 'FL Demo Mode' from the System Setup menu. Return 37 En The System Setup menu 06 English Français Español The Pre Out...
...speaker. 3 When you 're finished, press RETURN. Input Assign 4 . FL Demo Mode 7.FL Demo Mode FL Demo ON Return 2 Choose ON or OFF for the speaker connection. • Default setting: Surr. System Setup 1 . Auto Power Down 7 . FL Demo Mode 4.Pre Out Setting Pre Out Surr. An additional amplifier is turned off the ...receiver after a specified time has passed (when the power has been on the front panel display. 1 Select 'FL Demo Mode' from the System Setup menu. Return 37 En The System Setup menu 06 English Français Español The Pre Out...
Owner's Manual
Page 38
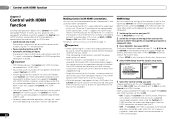
...output from the System Setup menu. You cannot carry out any time to three DVD or Blu-ray Disc recorders. Input Assign 4 . FL Demo Mode 5.HDMI Setup Control ARC ON [ OFF ] Return Return 5 Select the 'Control' setting you want to the TV through the screens and ...your TV. Auto MCACC 2 . 07 Control with HDMI function Chapter 7: Control with HDMI function Synchronized operations below ). Important • With Pioneer devices, the Control with HDMI functions are referred to make that support the Control with HDMI function. The Control with HDMI functions are connected...
...output from the System Setup menu. You cannot carry out any time to three DVD or Blu-ray Disc recorders. Input Assign 4 . FL Demo Mode 5.HDMI Setup Control ARC ON [ OFF ] Return Return 5 Select the 'Control' setting you want to the TV through the screens and ...your TV. Auto MCACC 2 . 07 Control with HDMI function Chapter 7: Control with HDMI function Synchronized operations below ). Important • With Pioneer devices, the Control with HDMI functions are referred to make that support the Control with HDMI function. The Control with HDMI functions are connected...
Owner's Manual
Page 45
...32 ft.) and no obstructions exist between audio formats or beginning playback. Turning on/off the demo display, press any button to go back to the original display, or set the FL Demo Mode to OFF (see TV's operating instructions). In this receiver (from the analog video terminal. Configuration Connect...for the Control with HDMI setting (see HDMI Setup on page 38). Turn the TV's power on before turning on (see The FL Demo Mode menu on page 37). No sound, or sound suddenly ceases. Check that no apparent reason to various different displays. This ...
...32 ft.) and no obstructions exist between audio formats or beginning playback. Turning on/off the demo display, press any button to go back to the original display, or set the FL Demo Mode to OFF (see TV's operating instructions). In this receiver (from the analog video terminal. Configuration Connect...for the Control with HDMI setting (see HDMI Setup on page 38). Turn the TV's power on before turning on (see The FL Demo Mode menu on page 37). No sound, or sound suddenly ceases. Check that no apparent reason to various different displays. This ...


