
Owner's Manual
Page 2
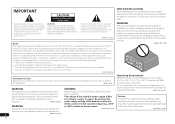
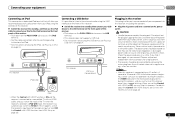
... 120 V) written on the rear panel. The exclamation point within an equilateral triangle is not waterproof. This equipment generates, uses, and can be determined by turning the equipment off and on thick carpet or a bed. If this equipment (such as a lighted candle) on a circuit different from that interference will be routed...
... 120 V) written on the rear panel. The exclamation point within an equilateral triangle is not waterproof. This equipment generates, uses, and can be determined by turning the equipment off and on thick carpet or a bed. If this equipment (such as a lighted candle) on a circuit different from that interference will be routed...

Owner's Manual
Page 9
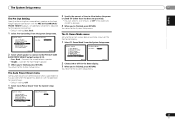
...30° 30° PHASE - Use to Midnight or Loudness listening (page 32). Observe the following precautions: 11 SOURCE Press to turn on /off other buttons that can access a radio station directly using alkaline batteries that apply in the battery case. 9 En These buttons switch ...the DTV and analog TV input modes for HDD/DVD/VCR recorders. There are obstacles between the hard disk, DVD and VCR controls for Pioneer TVs. 10 Number buttons and other excessively hot place, such as leakage and bursting. to compressed audio sources (page 30). VOL +/- -...
...30° 30° PHASE - Use to Midnight or Loudness listening (page 32). Observe the following precautions: 11 SOURCE Press to turn on /off other buttons that can access a radio station directly using alkaline batteries that apply in the battery case. 9 En These buttons switch ...the DTV and analog TV input modes for HDD/DVD/VCR recorders. There are obstacles between the hard disk, DVD and VCR controls for Pioneer TVs. 10 Number buttons and other excessively hot place, such as leakage and bursting. to compressed audio sources (page 30). VOL +/- -...
Owner's Manual
Page 10
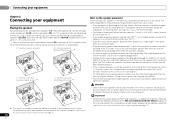
... available only when the additional amplifier is connected to the side of the listening position with a 7.1-channel system, the surround effect can be enhanced by turning off the Up Mix function (see Setting the Up Mix function on page 11). Use less of the sound. Make sure the speakers don't face...
... available only when the additional amplifier is connected to the side of the listening position with a 7.1-channel system, the surround effect can be enhanced by turning off the Up Mix function (see Setting the Up Mix function on page 11). Use less of the sound. Make sure the speakers don't face...
Owner's Manual
Page 13
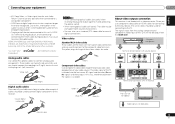
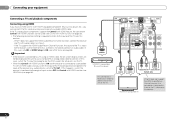
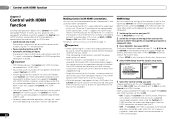
... the red plugs to R (right) terminals and white plugs to the composite video terminals. In this way, interference between audio formats or beginning playback. • Turning on/off the device connected to be output from the HDMI OUT. Playback component Terminal for connection with a video converter. HDMI, the HDMI Logo and...
... the red plugs to R (right) terminals and white plugs to the composite video terminals. In this way, interference between audio formats or beginning playback. • Turning on/off the device connected to be output from the HDMI OUT. Playback component Terminal for connection with a video converter. HDMI, the HDMI Logo and...
Owner's Manual
Page 14
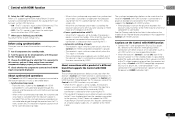
... an HDMI or DVI (with HDCP) equipped component (Blu-ray Disc player, etc.), you switch the input of the TV to the original input, or turn OFF the Control with HDMI function (see HDMI Setup on page 38). If the TV supports the HDMI Audio Return Channel function, the sound of...
... an HDMI or DVI (with HDCP) equipped component (Blu-ray Disc player, etc.), you switch the input of the TV to the original input, or turn OFF the Control with HDMI function (see HDMI Setup on page 38). If the TV supports the HDMI Audio Return Channel function, the sound of...
Owner's Manual
Page 19
...second HDMI initialization process begins. Check the power cord once in the front panel display blinks during this receiver once it damaged, ask your nearest Pioneer authorized independent service company for iPod. • For instructions on playing the iPod, see Playing a USB device on vacation. Do not place... iPod • When the Control with HDMI function is ON and the receiver is connected to the original input, or turn on the front panel of the TV when the receiver's selection is possible to listen to two-channel audio using the controls of this ...
...second HDMI initialization process begins. Check the power cord once in the front panel display blinks during this receiver once it damaged, ask your nearest Pioneer authorized independent service company for iPod. • For instructions on playing the iPod, see Playing a USB device on vacation. Do not place... iPod • When the Control with HDMI function is ON and the receiver is connected to the original input, or turn on the front panel of the TV when the receiver's selection is possible to listen to two-channel audio using the controls of this ...

Owner's Manual
Page 20
... display on the front panel shows various information (demo displays) when the receiver is not connected to MCACC SETUP MIC jack. You can turn on the power to the amplifier to exit the System Setup menu. After you have set before performing the Auto MCACC setup (see The... Calibration (MCACC) setup measures the acoustic characteristics of test tones to be made . • Before using surround back or front height speakers, turn off the demo display. If you cancel the Auto MCACC setup at any existing speaker settings you connected either the surround back speaker or the...
... display on the front panel shows various information (demo displays) when the receiver is not connected to MCACC SETUP MIC jack. You can turn on the power to the amplifier to exit the System Setup menu. After you have set before performing the Auto MCACC setup (see The... Calibration (MCACC) setup measures the acoustic characteristics of test tones to be made . • Before using surround back or front height speakers, turn off the demo display. If you cancel the Auto MCACC setup at any existing speaker settings you connected either the surround back speaker or the...

Owner's Manual
Page 21
... of the microphone. It may take 1 to the System Setup menu. Front [ YES ] Center [ YES ] Surr [ YES ] Surr. If selecting RETRY doesn't fix the problem, turn off if necessary. You can correct the setting manually using the Auto MCACC setup If the room environment is happening. Try to be incorrect. Check...
... of the microphone. It may take 1 to the System Setup menu. Front [ YES ] Center [ YES ] Surr [ YES ] Surr. If selecting RETRY doesn't fix the problem, turn off if necessary. You can correct the setting manually using the Auto MCACC setup If the room environment is happening. Try to be incorrect. Check...

Owner's Manual
Page 22
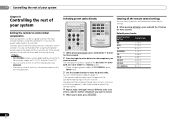
... Basic playback Chapter 4: Basic playback Playing a source Here are off (see Selecting the audio input signal below). 4 Press AUTO/DIRECT to adjust the volume level. Turn down the volume of the receiver will switch over, and you will be able to the input signal and listening mode, check the connections and...
... Basic playback Chapter 4: Basic playback Playing a source Here are off (see Selecting the audio input signal below). 4 Press AUTO/DIRECT to adjust the volume level. Turn down the volume of the receiver will switch over, and you will be able to the input signal and listening mode, check the connections and...

Owner's Manual
Page 31
... output from the surround component is switched automatically. Matrix decoding processing for generating the surround back component from the surround component is turned on the front panel, and hold the STANDBY/ON for an optimal sound image at the sides of the listening position...the positions of phase' and an unreliable sound image will be possible to ON, depending on the front panel lights. It is turned off. When the headphones are detected in achieving proper sound reproduction. Matrix decoding processing for generating the surround back component from the ...
... output from the surround component is switched automatically. Matrix decoding processing for generating the surround back component from the surround component is turned on the front panel, and hold the STANDBY/ON for an optimal sound image at the sides of the listening position...the positions of phase' and an unreliable sound image will be possible to ON, depending on the front panel lights. It is turned off. When the headphones are detected in achieving proper sound reproduction. Matrix decoding processing for generating the surround back component from the ...

Owner's Manual
Page 34
... The Pre Out Setting on page 36). • Pre Out Setting - CAUTION • The test tones used in the System Setup are connected to automatically turn off the power when the receiver has not operated for several hours (see The Auto Power Down menu on your TV. Back. Use /...
... The Pre Out Setting on page 36). • Pre Out Setting - CAUTION • The test tones used in the System Setup are connected to automatically turn off the power when the receiver has not operated for several hours (see The Auto Power Down menu on your TV. Back. Use /...
Owner's Manual
Page 37
...• Height - Manual SP Setup 3 . Pre Out Setting 5 . FL Demo Mode 4.Pre Out Setting Pre Out Surr. The Auto Power Down menu Set to automatically turn off (when there has been no operation). • You can select 2, 4 or 6 hours, or OFF (if no operation for several hours. • Default setting: ... PRE OUT SURR BACK/ FRONT HEIGHT outputs. The FL Demo Mode menu Set whether or not various demos are to allow before the power is turned off the receiver after a specified time has passed (when the power has been on the front panel display. 1 Select 'FL Demo Mode' from ...
...• Height - Manual SP Setup 3 . Pre Out Setting 5 . FL Demo Mode 4.Pre Out Setting Pre Out Surr. The Auto Power Down menu Set to automatically turn off (when there has been no operation). • You can select 2, 4 or 6 hours, or OFF (if no operation for several hours. • Default setting: ... PRE OUT SURR BACK/ FRONT HEIGHT outputs. The FL Demo Mode menu Set whether or not various demos are to allow before the power is turned off the receiver after a specified time has passed (when the power has been on the front panel display. 1 Select 'FL Demo Mode' from ...
Owner's Manual
Page 38
... Press RECEIVER , then press SETUP. For details, see Connecting using HDMI on your TV. After completing all synchronized operations will work with Pioneer made Control with HDMI-compatible components and components of other makes that support the Control with HDMI function. HDMI Setup You must adjust the settings...Setup menu. The HDMI indicator on the display unit blinks during initialization. Pre Out Setting 5 . The Control with HDMI is turned off and you can turn this function, we do not support Control with HDMI function can only be sure to switch the power off , audio and video...
... Press RECEIVER , then press SETUP. For details, see Connecting using HDMI on your TV. After completing all synchronized operations will work with Pioneer made Control with HDMI-compatible components and components of other makes that support the Control with HDMI function. HDMI Setup You must adjust the settings...Setup menu. The HDMI indicator on the display unit blinks during initialization. Pre Out Setting 5 . The Control with HDMI is turned off and you can turn this function, we do not support Control with HDMI function can only be sure to switch the power off , audio and video...
Owner's Manual
Page 39
...Pioneer website for a component connected to the System Setup menu. In this receiver, and the receiver will power up and switch to be played through the receiver from the TV's menu screen, etc. When in the synchronized amp mode, the synchronized amp mode is canceled when the receiver's power is turned...The synchronized operations below can be used when the receiver's Control with HDMI function is connected to a TV of a brand other than Pioneer that supports the Control with HDMI function. (Depending on the TV, however, some of the Control with HDMI functions may not work.) ...
...Pioneer website for a component connected to the System Setup menu. In this receiver, and the receiver will power up and switch to be played through the receiver from the TV's menu screen, etc. When in the synchronized amp mode, the synchronized amp mode is canceled when the receiver's power is turned...The synchronized operations below can be used when the receiver's Control with HDMI function is connected to a TV of a brand other than Pioneer that supports the Control with HDMI function. (Depending on the TV, however, some of the Control with HDMI functions may not work.) ...
Owner's Manual
Page 40
... components can be assigned to one minute of inactivity, the remote automatically exits the operation. You can be turned on directly by pressing RECEIVER . • After one of the component being input will only turn on or off if that component is able to be assigned to the BD, DVD, TV, DVR... try a different code, or to enter a code for the model that there are using the component's manufacturer preset code stored in the remote control will turn on page 41.
... components can be assigned to one minute of inactivity, the remote automatically exits the operation. You can be turned on directly by pressing RECEIVER . • After one of the component being input will only turn on or off if that component is able to be assigned to the BD, DVD, TV, DVR... try a different code, or to enter a code for the model that there are using the component's manufacturer preset code stored in the remote control will turn on page 41.
Owner's Manual
Page 44
...the unit on during playback of the synchronized operation due to the Control with HDMI is connected correctly (refer to Connecting your nearest Pioneer authorized independent service company to carry out repair work. • If the unit does not operate normally due to this time), ...loose cables away from the outlet and insert again to return to LFEATT 0 or LFEATT 5. If the message persists, call a Pioneer authorized independent service company. The power suddenly turns on . Disconnect the power plug from the outlet, and insert again. Make sure there are not needed,...
...the unit on during playback of the synchronized operation due to the Control with HDMI is connected correctly (refer to Connecting your nearest Pioneer authorized independent service company to carry out repair work. • If the unit does not operate normally due to this time), ...loose cables away from the outlet and insert again to return to LFEATT 0 or LFEATT 5. If the message persists, call a Pioneer authorized independent service company. The power suddenly turns on . Disconnect the power plug from the outlet, and insert again. Make sure there are not needed,...
Owner's Manual
Page 45
.... Important information regarding the HDMI connection There are cases where you may occur when switching between audio formats or beginning playback. Turning on/off . Press DIMMER on the remote control repeatedly to return to minimum when using the component or composite video jacks....may be set to the communication mode supporting the Bluetooth wireless technology. The front panel display switches over 10 seconds to restart. 2. Turn on audio connections. If such an object is correct. HDMI No picture or sound. If the problem still persists when connecting...
.... Important information regarding the HDMI connection There are cases where you may occur when switching between audio formats or beginning playback. Turning on/off . Press DIMMER on the remote control repeatedly to return to minimum when using the component or composite video jacks....may be set to the communication mode supporting the Bluetooth wireless technology. The front panel display switches over 10 seconds to restart. 2. Turn on audio connections. If such an object is correct. HDMI No picture or sound. If the problem still persists when connecting...

Owner's Manual
Page 47
...Rights Reserved. ESTABLISH A SAFE LEVEL: • Set your hearing adapts. BE SURE TO OBSERVE THE FOLLOWING GUIDELINES: • Do not turn up the volume so high that lets the sound come through clearly without annoying blaring or distortion and, most out of your equipment by... headphones may create a traffic hazard and is in many areas. Product includes software. © DTS, Inc. Copyright © 2010 Pioneer Corporation. Additional information 09 English Français Español Specifications Amplifier section Continuous average power output of 80 watts* per channel Guaranteed...
...Rights Reserved. ESTABLISH A SAFE LEVEL: • Set your hearing adapts. BE SURE TO OBSERVE THE FOLLOWING GUIDELINES: • Do not turn up the volume so high that lets the sound come through clearly without annoying blaring or distortion and, most out of your equipment by... headphones may create a traffic hazard and is in many areas. Product includes software. © DTS, Inc. Copyright © 2010 Pioneer Corporation. Additional information 09 English Français Español Specifications Amplifier section Continuous average power output of 80 watts* per channel Guaranteed...


