

Owner's Manual
Page 9
...is operated simultaneously with the unit are obstacles between the hard disk, DVD and VCR controls for Pioneer TVs. 10 Number buttons and other buttons that have one TV to hook up to this ...DIMMER - they may have selected. 16 SHIFT Press to access the 'boxed' commands (above 150 Hz, the subwoofer channel level will be accessed after RECEIVER is pressed. (For example MIDNIGHT, etc.) HDD*, DVD*, VCR* -... front speaker is set at SMALL in the Speaker Setting (or automatically via the Auto MCACC setup) and the Crossover Network is set the listening volume. 14 MUTE Mutes/unmutes the sound....
...is operated simultaneously with the unit are obstacles between the hard disk, DVD and VCR controls for Pioneer TVs. 10 Number buttons and other buttons that have one TV to hook up to this ...DIMMER - they may have selected. 16 SHIFT Press to access the 'boxed' commands (above 150 Hz, the subwoofer channel level will be accessed after RECEIVER is pressed. (For example MIDNIGHT, etc.) HDD*, DVD*, VCR* -... front speaker is set at SMALL in the Speaker Setting (or automatically via the Auto MCACC setup) and the Crossover Network is set the listening volume. 14 MUTE Mutes/unmutes the sound....
Owner's Manual
Page 11
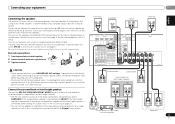
... connecting or disconnecting the speaker cables, disconnect the power cord before connecting this unit to stereo playback in .) Front right Subwoofer LINE LEVEL INPUT Center Front left (L) terminal. Surround right Surround left (L (Single)) terminal only. However, note that all...R IN L IN MONITOR OUT Y PB PR COMPONENT VIDEO TV/SAT BD R DVD SUBWOOFER PRE OUT SPEAKERS Class 2 Wiring CAUTION • These speaker terminals carry HAZARDOUS LIVE voltage. In this setup. You can use speakers with this case plug the amplifier into the speaker terminal. Connecting...
... connecting or disconnecting the speaker cables, disconnect the power cord before connecting this unit to stereo playback in .) Front right Subwoofer LINE LEVEL INPUT Center Front left (L) terminal. Surround right Surround left (L (Single)) terminal only. However, note that all...R IN L IN MONITOR OUT Y PB PR COMPONENT VIDEO TV/SAT BD R DVD SUBWOOFER PRE OUT SPEAKERS Class 2 Wiring CAUTION • These speaker terminals carry HAZARDOUS LIVE voltage. In this setup. You can use speakers with this case plug the amplifier into the speaker terminal. Connecting...
Owner's Manual
Page 14
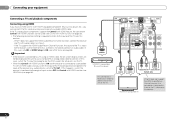
...A MAX) R ANTENNA FM CD UNBAL 75 L AM LOOP IN SIRIUS A R FRONT L R IN L IN CENTER MONITOR OUT Y PB PR COMPONENT VIDEO TV/SAT BD R SUBWOOFER DVD PRE OUT HDMI/DVI-compatible Blu-ray Disc player This connection is required to listen to the sound of the receiver may automatically switch...Connecting your equipment Connecting a TV and playback components Connecting using HDMI If you have an HDMI or DVI (with HDMI function (see HDMI Setup on page 38). If this receiver using a commercially available HDMI cable. If the TV and playback components support the Control with HDMI ...
...A MAX) R ANTENNA FM CD UNBAL 75 L AM LOOP IN SIRIUS A R FRONT L R IN L IN CENTER MONITOR OUT Y PB PR COMPONENT VIDEO TV/SAT BD R SUBWOOFER DVD PRE OUT HDMI/DVI-compatible Blu-ray Disc player This connection is required to listen to the sound of the receiver may automatically switch...Connecting your equipment Connecting a TV and playback components Connecting using HDMI If you have an HDMI or DVI (with HDMI function (see HDMI Setup on page 38). If this receiver using a commercially available HDMI cable. If the TV and playback components support the Control with HDMI ...

Owner's Manual
Page 20
...background noise and other possible interference. Automatically setting up the microphone provided with your system, the receiver uses the information from the System Setup menu, then press ENTER. If you connected either the surround back speaker or the front height speaker, make sure that the Pre...Follow the instructions on-screen. • Make sure the microphone is connected. • Make sure the subwoofer is turned up. • When using the HDMI output to exit the System Setup menu. Use and ENTER on the front panel shows various information (demo displays) when the receiver is ...
...background noise and other possible interference. Automatically setting up the microphone provided with your system, the receiver uses the information from the System Setup menu, then press ENTER. If you connected either the surround back speaker or the front height speaker, make sure that the Pre...Follow the instructions on-screen. • Make sure the microphone is connected. • Make sure the subwoofer is turned up. • When using the HDMI output to exit the System Setup menu. Use and ENTER on the front panel shows various information (demo displays) when the receiver is ...

Owner's Manual
Page 21
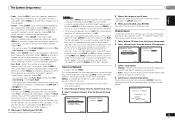
... you 're finished, go to the next step. Other problems when using the Auto MCACC setup If the room environment is displayed on page 34. • The subwoofer distance setting may interfere with different size settings. Back [YESx2] Subwoofer [ YES ] 10:Next OK Return • With error messages (such as shown. 1.Auto MCACC...
... you 're finished, go to the next step. Other problems when using the Auto MCACC setup If the room environment is displayed on page 34. • The subwoofer distance setting may interfere with different size settings. Back [YESx2] Subwoofer [ YES ] 10:Next OK Return • With error messages (such as shown. 1.Auto MCACC...

Owner's Manual
Page 22
... you select the input source using the remote control. If you have one), then the receiver (press RECEIVER). • Make sure the setup microphone is disconnected. 2 Switch the TV input to the input that all sound is possible to operate other inputs, H cannot be selected for BD,...is input, and DTS lights when a DTS signal is input. • When the H (HDMI) is selected for example a DVD player), your TV and subwoofer (if you 're playing a Dolby Digital or DTS surround sound DVD disc, with your system components and receiver. Turn down the volume of your DVD...
... you select the input source using the remote control. If you have one), then the receiver (press RECEIVER). • Make sure the setup microphone is disconnected. 2 Switch the TV input to the input that all sound is possible to operate other inputs, H cannot be selected for BD,...is input, and DTS lights when a DTS signal is input. • When the H (HDMI) is selected for example a DVD player), your TV and subwoofer (if you 're playing a Dolby Digital or DTS surround sound DVD disc, with your system components and receiver. Turn down the volume of your DVD...

Owner's Manual
Page 29
... most direct listening option is the AUTO SURROUND feature. Yesa No No - Twoa No just the front left and right speakers (and possibly your subwoofer depending on the current source, settings and status of surround modes Suitable sources Two channel sources STEREO ALC See above . - - 29 En DTS... - Listening to your system 05 Surround back speaker(s) Front height speakers English Français Español Chapter 5: Listening to your speaker setup and the type of source you're listening to. • If the source is Dolby Digital, DTS, or Dolby Surround encoded, the proper...
... most direct listening option is the AUTO SURROUND feature. Yesa No No - Twoa No just the front left and right speakers (and possibly your subwoofer depending on the current source, settings and status of surround modes Suitable sources Two channel sources STEREO ALC See above . - - 29 En DTS... - Listening to your system 05 Surround back speaker(s) Front height speakers English Français Español Chapter 5: Listening to your speaker setup and the type of source you're listening to. • If the source is Dolby Digital, DTS, or Dolby Surround encoded, the proper...

Owner's Manual
Page 30
...8226; The Sound Retriever is switched off, or the surround back speakers are heard according to the settings made in the Manual SP Setup (speaker setting, channel level, speaker distance), as well as with various soundtracks to compressed 2-channel audio by using just the front speakers and... the subwoofer. The MCACC indicator on page 32). You can choose the STEREO mode by restoring sound pressure and smoothing jagged artifacts left over after ...
...8226; The Sound Retriever is switched off, or the surround back speakers are heard according to the settings made in the Manual SP Setup (speaker setting, channel level, speaker distance), as well as with various soundtracks to compressed 2-channel audio by using just the front speakers and... the subwoofer. The MCACC indicator on page 32). You can choose the STEREO mode by restoring sound pressure and smoothing jagged artifacts left over after ...

Owner's Manual
Page 34
... them. • You can be sent to the component video inputs (see HDMI Setup on page 20 are output at any time to exit the System Setup menu. 4 Select the setting you 've connected to the subwoofer (page 35). - Back. Use component or composite connections for surround sound (MCACC)...Setting on your current speaker system or add new speakers). Back [ NO ] Subwoofer: YES Return Return 3 Choose the set then select a speaker size. Press RECEIVER to switch on page 20). • Manual SP Setup - Use and ENTER on page 37). Specify what you want to automatically ...
... them. • You can be sent to the component video inputs (see HDMI Setup on page 20 are output at any time to exit the System Setup menu. 4 Select the setting you 've connected to the subwoofer (page 35). - Back. Use component or composite connections for surround sound (MCACC)...Setting on your current speaker system or add new speakers). Back [ NO ] Subwoofer: YES Return Return 3 Choose the set then select a speaker size. Press RECEIVER to switch on page 20). • Manual SP Setup - Use and ENTER on page 37). Specify what you want to automatically ...
Owner's Manual
Page 35
...press ENTER. Select SMALL to send bass frequencies to the other speakers or subwoofer. LFE signals and bass frequencies of channels set to SMALL are output from the Manual SP Setup menu. 2.Manual SP Setup a.Speaker Setting b.Crossover Network c.Channel Level d.Speaker Distance 2b.Crossover Network ... point will be set to LARGE if the front speakers are also routed to the PRE OUT L (Single) terminal. • Subwoofer - Frequencies below ). The System Setup menu 06 • Front - Select SMALL to send bass frequencies to the other speakers). 4 When you have (one surround back...
...press ENTER. Select SMALL to send bass frequencies to the other speakers or subwoofer. LFE signals and bass frequencies of channels set to SMALL are output from the Manual SP Setup menu. 2.Manual SP Setup a.Speaker Setting b.Crossover Network c.Channel Level d.Speaker Distance 2b.Crossover Network ... point will be set to LARGE if the front speakers are also routed to the PRE OUT L (Single) terminal. • Subwoofer - Frequencies below ). The System Setup menu 06 • Front - Select SMALL to send bass frequencies to the other speakers). 4 When you have (one surround back...

Owner's Manual
Page 36
... L [ Surround L [ Subwoofer [ 0dB 0dB] 0dB] 0dB 0dB] 0dB] Return Adjust the level of each speaker as the test tone is not possible after testing with the one you connected to the default settings for effective surround sound. 1 Select 'Manual SP Setup' from the System Setup menu. 2 Select 'Speaker ...you must assign the numbered input to 75 dB SPL (C-weighting/slow reading). • The subwoofer test tone is output at any time by press RECEIVER , then press CH SELECT and LEV +/- System Setup 1 . The numbers correspond with the numbers beside the inputs on the rear of the ...
... L [ Surround L [ Subwoofer [ 0dB 0dB] 0dB] 0dB 0dB] 0dB] Return Adjust the level of each speaker as the test tone is not possible after testing with the one you connected to the default settings for effective surround sound. 1 Select 'Manual SP Setup' from the System Setup menu. 2 Select 'Speaker ...you must assign the numbered input to 75 dB SPL (C-weighting/slow reading). • The subwoofer test tone is output at any time by press RECEIVER , then press CH SELECT and LEV +/- System Setup 1 . The numbers correspond with the numbers beside the inputs on the rear of the ...
Owner's Manual
Page 44
...page 2). Lower the volume level. TEMP shows in the room and rerun the Auto MCACC setup. There seems to be a time lag between the speakers and the output of the subwoofer. See Automatically setting up for surround sound (MCACC) on page 20 to set up your ...insert again. Make sure there are no loose strands of speaker wire touching the rear panel. If the message persists, call a Pioneer authorized independent service company. If synchronized operations are correct and/or the DTS signal out is connected correctly (refer to Connecting your system again...
...page 2). Lower the volume level. TEMP shows in the room and rerun the Auto MCACC setup. There seems to be a time lag between the speakers and the output of the subwoofer. See Automatically setting up for surround sound (MCACC) on page 20 to set up your ...insert again. Make sure there are no loose strands of speaker wire touching the rear panel. If the message persists, call a Pioneer authorized independent service company. If synchronized operations are correct and/or the DTS signal out is connected correctly (refer to Connecting your system again...


