
Owner's Manual
Page 8
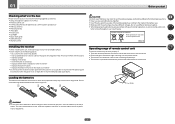
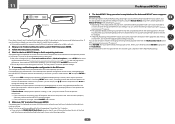
... or wet areas - Direct sunlight or fluorescent light is operated simultaneously with another infrared remote control unit. 30° 30° 7 m (23 ft.) WARNING ! Setup microphone (cable: 5 m (16.4 ft.)) ! Quick start Checking what's in extremely hot or cold areas - Insert the plus and minus sides of batteries may not work properly...
... or wet areas - Direct sunlight or fluorescent light is operated simultaneously with another infrared remote control unit. 30° 30° 7 m (23 ft.) WARNING ! Setup microphone (cable: 5 m (16.4 ft.)) ! Quick start Checking what's in extremely hot or cold areas - Insert the plus and minus sides of batteries may not work properly...

Owner's Manual
Page 14
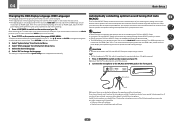
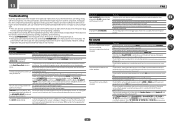
...'s input to select an input function. 3 Indicators ! Press to select stereo playback mode (page 46). 12 MCACC SETUP MIC jack Use to connect the supplied microphone (page 34). 13 iPod iPhone iPad USB terminals Use to connect your Apple iPod/iPhone/iPad as an audio and video source (page 31), or...
...'s input to select an input function. 3 Indicators ! Press to select stereo playback mode (page 46). 12 MCACC SETUP MIC jack Use to connect the supplied microphone (page 34). 13 iPod iPhone iPad USB terminals Use to connect your Apple iPod/iPhone/iPad as an audio and video source (page 31), or...
Owner's Manual
Page 34
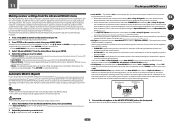
... with anything other than an HDMI cable, watch the front panel display while performing the various operations and making settings. Install the microphone on any existing settings for the MCACC preset you connected this receiver (for example, if you select. ! Important ! The OSD...HDMI cable. The setting is only displayed when the receiver's HDMI OUT terminal and the TV's HDMI input are con- Placing the microphone on a stable floor. Automatically conducting optimum sound tuning (Full Auto MCACC) The Full Auto MCACC Setup measures the acoustic characteristics of ...
... with anything other than an HDMI cable, watch the front panel display while performing the various operations and making settings. Install the microphone on any existing settings for the MCACC preset you connected this receiver (for example, if you select. ! Important ! The OSD...HDMI cable. The setting is only displayed when the receiver's HDMI OUT terminal and the TV's HDMI input are con- Placing the microphone on a stable floor. Automatically conducting optimum sound tuning (Full Auto MCACC) The Full Auto MCACC Setup measures the acoustic characteristics of ...
Owner's Manual
Page 35
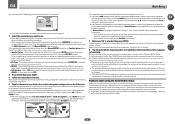
... Setup and Other Setup menus on -screen while the receiver outputs test tones to determine the optimum receiver settings. or Check microphone.), select RETRY after the correction. Check the speaker connections. - After this is taken, the reverb characteristics data (both before...the speakers present in your system, but it 's doing the Auto MCACC Setup. 1a.Full Auto MCACC A/V RECEIVER Now Analyzing... 2/9 Environment Check Ambient Noise : OK Microphone : Speaker YES/NO : Exit Cancel L : FHL : C : FHR : R : SR : SBR : SBL : SL : SW : 10 OK 1a.Full...
... Setup and Other Setup menus on -screen while the receiver outputs test tones to determine the optimum receiver settings. or Check microphone.), select RETRY after the correction. Check the speaker connections. - After this is taken, the reverb characteristics data (both before...the speakers present in your system, but it 's doing the Auto MCACC Setup. 1a.Full Auto MCACC A/V RECEIVER Now Analyzing... 2/9 Environment Check Ambient Noise : OK Microphone : Speaker YES/NO : Exit Cancel L : FHL : C : FHR : R : SR : SBR : SBL : SL : SW : 10 OK 1a.Full...
Owner's Manual
Page 73
...you can customize your Auto MCACC menu, you want to set to SMALL). The test tones used in Pioneer's laboratories with the front speaker settings (no obstacles between the speakers and the microphone. 73 The default is ALL or Speaker Setting) - and after-calibration) that the last... to exit the current menu. ! Automatic MCACC (Expert) If your setup requires more on page 73 for standing waves. Important ! Make sure the microphone/speakers are set . ! Auto MCACC - When data measurement is EQ Pro & S-Wave) - For details, see Manual MCACC setup on the front...
...you can customize your Auto MCACC menu, you want to set to SMALL). The test tones used in Pioneer's laboratories with the front speaker settings (no obstacles between the speakers and the microphone. 73 The default is ALL or Speaker Setting) - and after-calibration) that the last... to exit the current menu. ! Automatic MCACC (Expert) If your setup requires more on page 73 for standing waves. Important ! Make sure the microphone/speakers are set . ! Auto MCACC - When data measurement is EQ Pro & S-Wave) - For details, see Manual MCACC setup on the front...
Owner's Manual
Page 74
... on page 81. ! If Reverse Phase is displayed, the speaker's wiring (+ and -) may be possible to measure correctly if the microphone is not pointed to the microphone (listening position) or when using the Manual speaker setup on -screen. 6 Wait for ambient noise (see an ERR message (or the.... The settings made in the Auto MCACC Setup should reflect the actual speakers you have a tripod, use some other object to install the microphone. ! Depending on -screen should give you excellent surround sound from this is also possible to adjust these settings manually using the Auto MCACC...
... on page 81. ! If Reverse Phase is displayed, the speaker's wiring (+ and -) may be possible to measure correctly if the microphone is not pointed to the microphone (listening position) or when using the Manual speaker setup on -screen. 6 Wait for ambient noise (see an ERR message (or the.... The settings made in the Auto MCACC Setup should reflect the actual speakers you have a tripod, use some other object to install the microphone. ! Depending on -screen should give you excellent surround sound from this is also possible to adjust these settings manually using the Auto MCACC...

Owner's Manual
Page 75
... test tones used in the Manual MCACC setup are displayed to the overall balance of the settings below, you'll have to connect the setup microphone to the front panel and place it is changed. Important ! For some of your system, it about ear level at high volume. EQ Adjust ... in half inch increments. Default setting: 10'00'' (all channels) You can achieve better surround sound by adjusting the distance setting, you connect the microphone to measure the target channel. You can adjust the distance of your system based on page 76). Try to make the two tones sound as...
... test tones used in the Manual MCACC setup are displayed to the overall balance of the settings below, you'll have to connect the setup microphone to the front panel and place it is changed. Important ! For some of your system, it about ear level at high volume. EQ Adjust ... in half inch increments. Default setting: 10'00'' (all channels) You can achieve better surround sound by adjusting the distance setting, you connect the microphone to measure the target channel. You can adjust the distance of your system based on page 76). Try to make the two tones sound as...
Owner's Manual
Page 88
... whether the cables used . Lower the volume level. Make sure the correct input signal is damaged. Check that the MCACC setup microphone is turned on the receiver may lie in the 12 V trigger jacks. Check the speaker connections (see Connecting the speakers on ... .) Symptom AMP OVERHEAT blinks in the display, then the power automatically switches off . Unplug the receiver from the power and call a Pioneer authorized independent service company. (Other symptoms may have a serious problem. select one surround back speaker is not solved after exercising the checks listed...
... whether the cables used . Lower the volume level. Make sure the correct input signal is damaged. Check that the MCACC setup microphone is turned on the receiver may lie in the 12 V trigger jacks. Check the speaker connections (see Connecting the speakers on ... .) Symptom AMP OVERHEAT blinks in the display, then the power automatically switches off . Unplug the receiver from the power and call a Pioneer authorized independent service company. (Other symptoms may have a serious problem. select one surround back speaker is not solved after exercising the checks listed...

Owner's Manual
Page 90
...one surround back speaker, connect it . After using the component video input, set to OFF and a TV and another monitor is connected to the microphone (listening position) or when using speakers that the speakers are matched up the surround sound manually (page 81). If Reverse Phase is incorrect. The...the unit far from an air-conditioner, motor, etc. Check that no obstacles between them . Check that the distance between the speakers and the microphone. Change the VIDEO PARAMETER menu RES setting (see The Input Setup menu on page 81, and use the ALL (Keep SP System) option ...
...one surround back speaker, connect it . After using the component video input, set to OFF and a TV and another monitor is connected to the microphone (listening position) or when using speakers that the speakers are matched up the surround sound manually (page 81). If Reverse Phase is incorrect. The...the unit far from an air-conditioner, motor, etc. Check that no obstacles between them . Check that the distance between the speakers and the microphone. Change the VIDEO PARAMETER menu RES setting (see The Input Setup menu on page 81, and use the ALL (Keep SP System) option ...
Owner's Manual
Page 105
...-female Network Section LAN terminal...10 BASE-T/100 BASE-TX Miscellaneous Power requirements...AC 120 V, 60 Hz Power consumption...550 W In standby...0.2 W (HDMI Setup - Control : OFF) 0.3 W (HDMI Setup - FontAvenue is a registered trademark of Furnished Parts MCACC Setup microphone...1 Remote control unit...1 AAA size IEC R03 dry cell batteries...2 iPod cable...1 AM loop...
...-female Network Section LAN terminal...10 BASE-T/100 BASE-TX Miscellaneous Power requirements...AC 120 V, 60 Hz Power consumption...550 W In standby...0.2 W (HDMI Setup - Control : OFF) 0.3 W (HDMI Setup - FontAvenue is a registered trademark of Furnished Parts MCACC Setup microphone...1 Remote control unit...1 AAA size IEC R03 dry cell batteries...2 iPod cable...1 AM loop...


