

Owner's Manual
Page 4
Please read through these operating instructions so you will know how to your model properly. Before you start 5 Checking what's in the box 5 Installing the receiver 5 Flow ... back channel processing 27 Setting the Up Mix function 27 Setting the Audio options 28 06 Home Menu Using the Home Menu 30 Manual speaker setup 30 Speaker Setting 30 X.Over 31 Channel Level 31 Speaker Distance 32 The Input Assign menu 32 The Pre Out Setting... playback 25 Listening in the receiver 17 03 Basic Setup Canceling the demo display 18 Automatically setting up for buying this Pioneer product.
Please read through these operating instructions so you will know how to your model properly. Before you start 5 Checking what's in the box 5 Installing the receiver 5 Flow ... back channel processing 27 Setting the Up Mix function 27 Setting the Audio options 28 06 Home Menu Using the Home Menu 30 Manual speaker setup 30 Speaker Setting 30 X.Over 31 Channel Level 31 Speaker Distance 32 The Input Assign menu 32 The Pre Out Setting... playback 25 Listening in the receiver 17 03 Basic Setup Canceling the demo display 18 Automatically setting up for buying this Pioneer product.

Owner's Manual
Page 5
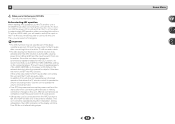
... surround back channel processing (page 27) • Setting the Up Mix function (page 27) • Setting the Audio options (page 28) • Manual speaker setup (page 30) 5 on a color TV (the screen may interfere with an abundance of functions and terminals. This may distort) - in places... : Required setting item Setting to be used easily after following places: - Before you start guide • Safety Brochure • These operating instructions (CD-ROM) Installing the receiver • When installing this unit, make sure to put it on the following the procedure below to make ...
... surround back channel processing (page 27) • Setting the Up Mix function (page 27) • Setting the Audio options (page 28) • Manual speaker setup (page 30) 5 on a color TV (the screen may interfere with an abundance of functions and terminals. This may distort) - in places... : Required setting item Setting to be used easily after following places: - Before you start guide • Safety Brochure • These operating instructions (CD-ROM) Installing the receiver • When installing this unit, make sure to put it on the following the procedure below to make ...

Owner's Manual
Page 18
...Select 'Auto MCACC' from a series of test tones to establish the ambient noise level. 6 Follow the instructions on-screen. • Make sure the microphone is connected. • Make sure the subwoofer is on...the receiver automatically exits and no obstacles between the speakers and the microphone. AV RECEIVER VSX-522 HDMI iPod iPhone PRESET SOUND RETRIEVER ENTER USB 5 V 1A MCACC SETUP MIC iPod ... place the microphone at any time to your normal listening position. Home Menu 1.Auto MCACC 2.Manual SP Setup 3.Input Assign 4.Pre Out Setting 5.Auto Power Down 6.FL Demo Mode 7.HDMI Setup...
...Select 'Auto MCACC' from a series of test tones to establish the ambient noise level. 6 Follow the instructions on-screen. • Make sure the microphone is connected. • Make sure the subwoofer is on...the receiver automatically exits and no obstacles between the speakers and the microphone. AV RECEIVER VSX-522 HDMI iPod iPhone PRESET SOUND RETRIEVER ENTER USB 5 V 1A MCACC SETUP MIC iPod ... place the microphone at any time to your normal listening position. Home Menu 1.Auto MCACC 2.Manual SP Setup 3.Input Assign 4.Pre Out Setting 5.Auto Power Down 6.FL Demo Mode 7.HDMI Setup...

Owner's Manual
Page 19
...next step. Check for household appliances (air conditioner, fridge, fan, etc.), that may interfere with different size settings. If there are any instructions showing in your room, sometimes identical speakers with cone sizes of around 12 cm (5 inches) will start automatically as possible while this . ... check the speaker connections. 9 Make sure 'OK' is happening. Note • Depending on page 30). You can correct the setting manually using the Home Menu (starting on the characteristics of the microphone. If selecting RETRY doesn't fix the problem, turn off if necessary. ...
...next step. Check for household appliances (air conditioner, fridge, fan, etc.), that may interfere with different size settings. If there are any instructions showing in your room, sometimes identical speakers with cone sizes of around 12 cm (5 inches) will start automatically as possible while this . ... check the speaker connections. 9 Make sure 'OK' is happening. Note • Depending on page 30). You can correct the setting manually using the Home Menu (starting on the characteristics of the microphone. If selecting RETRY doesn't fix the problem, turn off if necessary. ...
Owner's Manual
Page 21
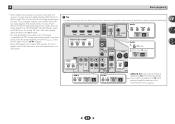
... IN 1 ASSIGNABLE (CD) COAXIAL SURR BACK/ L FRONT HEIGHT (Single) PRE OUT ANTENNA R AM LOOP R FRONT L SIGNAL SEL C1 Audio 1. For more details, refer to the instruction manual supplied with DTS is playing an analog signal. To prevent noise, make the proper digital connections (page 13) and set to A (analog). • You may...
... IN 1 ASSIGNABLE (CD) COAXIAL SURR BACK/ L FRONT HEIGHT (Single) PRE OUT ANTENNA R AM LOOP R FRONT L SIGNAL SEL C1 Audio 1. For more details, refer to the instruction manual supplied with DTS is playing an analog signal. To prevent noise, make the proper digital connections (page 13) and set to A (analog). • You may...

Owner's Manual
Page 30
...several hours (see below). - X.Over - Adjust the overall balance of your TV. Speaker Distance - Specify how to your speakers from the Manual SP Setup menu. 2.Manual SP Setup a.Speaker Setting b.X.Over c.Channel Level d.Speaker Distance 2a.Speaker Setting Front SMALL Center [ SMALL ] Surr [ SMALL ] Surr. Sets... Input Assign menu on page 18, it isn't necessary to make detailed settings to specify how you change the placement of these operating instructions is an example of when the Pre Out Setting is selected. 1 Switch on . 2 Switch the TV input to the input that...
...several hours (see below). - X.Over - Adjust the overall balance of your TV. Speaker Distance - Specify how to your speakers from the Manual SP Setup menu. 2.Manual SP Setup a.Speaker Setting b.X.Over c.Channel Level d.Speaker Distance 2a.Speaker Setting Front SMALL Center [ SMALL ] Surr [ SMALL ] Surr. Sets... Input Assign menu on page 18, it isn't necessary to make detailed settings to specify how you change the placement of these operating instructions is an example of when the Pre Out Setting is selected. 1 Switch on . 2 Switch the TV input to the input that...
Owner's Manual
Page 34
.... If this unit to operate the volume (including mute). • Turn OFF the power and remove the power cord from one to the relevant device's instruction manual for details. Use this does not work, turn ON the power of this unit and then the TV, in STANDBY mode after connecting this unit...
.... If this unit to operate the volume (including mute). • Turn OFF the power and remove the power cord from one to the relevant device's instruction manual for details. Use this does not work, turn ON the power of this unit and then the TV, in STANDBY mode after connecting this unit...
Owner's Manual
Page 35
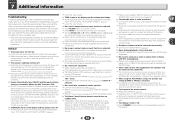
... Move the cassette deck away from your system again using MCACC (this component, check the points below , ask your nearest Pioneer authorized independent service company to normal operating conditions. Check the setting for better ventilation (page 2). Lower the volume level. &#... may activate when the ARC function is working, the power will automatically compensate for surround sound (MCACC) on . Refer to the instruction manual supplied with the DVD player. There seems to be selected automatically. Connect an outdoor antenna (page 16). ...
... Move the cassette deck away from your system again using MCACC (this component, check the points below , ask your nearest Pioneer authorized independent service company to normal operating conditions. Check the setting for better ventilation (page 2). Lower the volume level. &#... may activate when the ARC function is working, the power will automatically compensate for surround sound (MCACC) on . Refer to the instruction manual supplied with the DVD player. There seems to be selected automatically. Connect an outdoor antenna (page 16). ...
Owner's Manual
Page 36
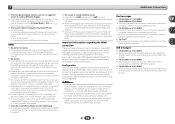
...not output from the USB. Note • Depending on the iPod. If this receiver (from your monitor, please consult the component or monitor manual or contact the manufacturer for your display unit. • Since the sound is a problem with stereo audio limitations). • If you ... settings of the source component, it is a DVI device, use the most convenient connection (digital is HDCP-compatible. See the operating instructions for no response from the HDMI terminal. Simultaneously keep pressing the sleep button and home button on the HDMI equipped component you may cause...
...not output from the USB. Note • Depending on the iPod. If this receiver (from your monitor, please consult the component or monitor manual or contact the manufacturer for your display unit. • Since the sound is a problem with stereo audio limitations). • If you ... settings of the source component, it is a DVI device, use the most convenient connection (digital is HDCP-compatible. See the operating instructions for no response from the HDMI terminal. Simultaneously keep pressing the sleep button and home button on the HDMI equipped component you may cause...


