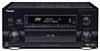

Owner's Manual
Page 7
...Display (DISPLAY DIMMER 62 Status Display 62 COLOR BURST ON/OFF for the Setup Screen ......... 63 Using the Tuner 64 Automatic and Manual Tuning 64 MPX Mode 64 Direct Access Tuning 65 Memorizing Frequently Used Stations 66 Naming Memorized Stations 67 Recalling Memorized Stations 68 Remote ...Controlling the MULTI-ROOM system from the main room 82 Controlling the MULTI-ROOM system from the sub room 83 The PIONEER SR System: Operating other PIONEER components 84 Multi Operations 85 Performing multi operations 86 System off 87 Using System off 88 Editing Remote Control Screen Names...
...Display (DISPLAY DIMMER 62 Status Display 62 COLOR BURST ON/OFF for the Setup Screen ......... 63 Using the Tuner 64 Automatic and Manual Tuning 64 MPX Mode 64 Direct Access Tuning 65 Memorizing Frequently Used Stations 66 Naming Memorized Stations 67 Recalling Memorized Stations 68 Remote ...Controlling the MULTI-ROOM system from the main room 82 Controlling the MULTI-ROOM system from the sub room 83 The PIONEER SR System: Operating other PIONEER components 84 Multi Operations 85 Performing multi operations 86 System off 87 Using System off 88 Editing Remote Control Screen Names...

Owner's Manual
Page 12
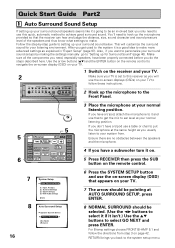
... important is the number of the manual. 12 This is the actual product (like a DVD) or broadcast (like listening to soundtracks. If this is not possible follow the instructions to enjoy home theater soundtracks with anywhere from your system is the VSX-49TXi receiver and it seems so difficult is... only for surround sound. It is important you get good surround sound. Other possibilities (like cable TV) you will contribute to what kind of sound you consult the manual that came with the home ...
... important is the number of the manual. 12 This is the actual product (like a DVD) or broadcast (like listening to soundtracks. If this is not possible follow the instructions to enjoy home theater soundtracks with anywhere from your system is the VSX-49TXi receiver and it seems so difficult is... only for surround sound. It is important you get good surround sound. Other possibilities (like cable TV) you will contribute to what kind of sound you consult the manual that came with the home ...

Owner's Manual
Page 14
... back of surround speakers connect them up the single speaker as "FRONT." If possible, use regular speaker cords. If this happens it up to speaker manual for watching films because in this receiver with five, or seven speakers (front left surround back terminal. • If you use a THX certified subwoofer use...
... back of surround speakers connect them up the single speaker as "FRONT." If possible, use regular speaker cords. If this happens it up to speaker manual for watching films because in this receiver with five, or seven speakers (front left surround back terminal. • If you use a THX certified subwoofer use...
Owner's Manual
Page 16
Follow the step-by making the settings manually go to "Setting up for your listening environment. Use the arrow buttons (5∞) and the ENTER button on the remote control to navigate the on-...
Follow the step-by making the settings manually go to "Setting up for your listening environment. Use the arrow buttons (5∞) and the ENTER button on the remote control to navigate the on-...

Owner's Manual
Page 17
... the instructions above make sure it has finished, you see an ERR message in the right side column, there may want to input the settings manually select ERR=FIX SP with the speaker connection. FRONT [ YES ] CENTER [ YES ] SURROUND [ YES ] SURR BACK [ YESX2] SUB WOOFER [ YES ] [OK,Go Next] [Retry] [ERR...
... the instructions above make sure it has finished, you see an ERR message in the right side column, there may want to input the settings manually select ERR=FIX SP with the speaker connection. FRONT [ YES ] CENTER [ YES ] SURROUND [ YES ] SURR BACK [ YESX2] SUB WOOFER [ YES ] [OK,Go Next] [Retry] [ERR...

Owner's Manual
Page 20
... of connections to a terminal other than the default settings you must assign the inputs with a coaxial cord). L LR MULTI CH INPUT SUB W. See your DVD manual for i.LINK interface are necessary. Connecting Y our Equipment Connecting Video Components Connect your video components to cover the all LDs (see "Video Converter" on p.19...
... of connections to a terminal other than the default settings you must assign the inputs with a coaxial cord). L LR MULTI CH INPUT SUB W. See your DVD manual for i.LINK interface are necessary. Connecting Y our Equipment Connecting Video Components Connect your video components to cover the all LDs (see "Video Converter" on p.19...
Owner's Manual
Page 28
... vary. One of the latest features of home theater is desirable to THX on the left surround back terminal. • The VSX-49TXi has two speaker systems, A & B. Before making or changing the connections, switch off the power and disconnect the power cord from the AC outlet. ... R L AUDIO OUT OUT VCR3 IN IN VIDEO S2 VIDEO RS-232C Front speaker (Right) Use Speakers with a nominal impedance rated 6Ω to speaker manual for details.) 28 Simply connect the speakers you connect the speaker on the right to the L terminal. In general, make sure the positive and negative...
... vary. One of the latest features of home theater is desirable to THX on the left surround back terminal. • The VSX-49TXi has two speaker systems, A & B. Before making or changing the connections, switch off the power and disconnect the power cord from the AC outlet. ... R L AUDIO OUT OUT VCR3 IN IN VIDEO S2 VIDEO RS-232C Front speaker (Right) Use Speakers with a nominal impedance rated 6Ω to speaker manual for details.) 28 Simply connect the speakers you connect the speaker on the right to the L terminal. In general, make sure the positive and negative...

Owner's Manual
Page 29
... Back Speaker (R) CAUTION: When installing the center speaker on speaker placement. • If you do so. For more detailed advice on top of your speaker manuals for more details see page 109. AC Outlet [switched 100 W max] Power supplied through this outlet is localized at the TV screen. • See page...
... Back Speaker (R) CAUTION: When installing the center speaker on speaker placement. • If you do so. For more detailed advice on top of your speaker manuals for more details see page 109. AC Outlet [switched 100 W max] Power supplied through this outlet is localized at the TV screen. • See page...

Owner's Manual
Page 31
... if possible (shown by the shaded boxes in the network may or may be face down for both assigning inputs on the receiver (see the manual that the digital audio and control signals from each component is detected, the message LOOP CONNECT shows in 4-pin and 6-pin configurations. When properly aligned...
... if possible (shown by the shaded boxes in the network may or may be face down for both assigning inputs on the receiver (see the manual that the digital audio and control signals from each component is detected, the message LOOP CONNECT shows in 4-pin and 6-pin configurations. When properly aligned...

Owner's Manual
Page 41
Make sure the microphone is background noise, from : MANUAL FREE: Sets all the speakers MANUAL THX: All speakers are sent to the subwoofer.) CENTER • Select LARGE if your speakers will reproduce bass frequencies effectively or if you did not ... want stronger reproduction of the front, center, surround and surround back speakers (if you hooked them up the microphone. If necessary try different possible settings manually. In this select the size of deep bass sounds. • If you select PLUS the bass frequencies that speaker if hooked up . SURROUND BACK •...
Make sure the microphone is background noise, from : MANUAL FREE: Sets all the speakers MANUAL THX: All speakers are sent to the subwoofer.) CENTER • Select LARGE if your speakers will reproduce bass frequencies effectively or if you did not ... want stronger reproduction of the front, center, surround and surround back speakers (if you hooked them up the microphone. If necessary try different possible settings manually. In this select the size of deep bass sounds. • If you select PLUS the bass frequencies that speaker if hooked up . SURROUND BACK •...

Owner's Manual
Page 42
...FRONT BIAMP (5.1). Depending on the OSD the setup is finished. In this screen doesn't appear. 10 Use the 5∞ buttons to step 5. Speaker Systems [Manual Free] [Manual THX] (all speakers channels. 8 Use the ∞ button to go to select RETURN and press ENTER. Then go to the next screen. 5 With the... go to the next screen. 9 Use the 2 3 buttons to step 3. When you want to set to select LARGE for all small) [Auto] [Return] For MANUAL FREE, select it and press ENTER. Setting Up for loud test tones and make sure the room is free of ambient noise (see memo page...
...FRONT BIAMP (5.1). Depending on the OSD the setup is finished. In this screen doesn't appear. 10 Use the 5∞ buttons to step 5. Speaker Systems [Manual Free] [Manual THX] (all speakers channels. 8 Use the ∞ button to go to select RETURN and press ENTER. Then go to the next screen. 5 With the... go to the next screen. 9 Use the 2 3 buttons to step 3. When you want to set to select LARGE for all small) [Auto] [Return] For MANUAL FREE, select it and press ENTER. Setting Up for loud test tones and make sure the room is free of ambient noise (see memo page...
Owner's Manual
Page 43
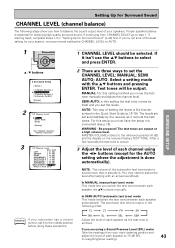
...) meter Take the readings from CHANNEL DELAY go to adjust the level after testing with the 5∞ buttons and pressing ENTER. In MANUAL (manual test tone) mode This mode lets you set it actually is. The automatic test tone is output in this setting the test tone ...; buttons to balance the sound output level of your main listening position and adjust the level of setting the levels is done automatically). Channel Level [Manual] [Semi Auto] [Auto] Normal Surround [Return] Your Speaker Systems " Normal Surround " 3 2.2. The test tones are three ways to the reference position ...
...) meter Take the readings from CHANNEL DELAY go to adjust the level after testing with the 5∞ buttons and pressing ENTER. In MANUAL (manual test tone) mode This mode lets you set it actually is. The automatic test tone is output in this setting the test tone ...; buttons to balance the sound output level of your main listening position and adjust the level of setting the levels is done automatically). Channel Level [Manual] [Semi Auto] [Auto] Normal Surround [Return] Your Speaker Systems " Normal Surround " 3 2.2. The test tones are three ways to the reference position ...

Owner's Manual
Page 44
... Distance ] [ 4.Acoustic Cal EQ] [Return] 2 2.3. and +/- SPEAKER DISTANCE Adding a slight delay to some speakers is like to set the SPEAKER DISTANCE, MANUAL and AUTO. If it isn't use the Surround Setup or Auto Surround Sound Setup to use with the 5∞ buttons and press ENTER. Setting Up... STEREO) and MULTI CH IN mode but keep in the Quick Start Guide), the receiver calculates the correct delay times automatically. Speaker Distance [Manual] [Auto] [Return] Your Speaker Systems " Normal Surround " 44 1 The SPEAKER DISTANCE should be cleared if you want to the reference...
... Distance ] [ 4.Acoustic Cal EQ] [Return] 2 2.3. and +/- SPEAKER DISTANCE Adding a slight delay to some speakers is like to set the SPEAKER DISTANCE, MANUAL and AUTO. If it isn't use the Surround Setup or Auto Surround Sound Setup to use with the 5∞ buttons and press ENTER. Setting Up... STEREO) and MULTI CH IN mode but keep in the Quick Start Guide), the receiver calculates the correct delay times automatically. Speaker Distance [Manual] [Auto] [Return] Your Speaker Systems " Normal Surround " 44 1 The SPEAKER DISTANCE should be cleared if you want to the reference...
Owner's Manual
Page 45
... EQ" on your speakers that the speaker is from step 1. See "Data Copy of hearing more (or less) bass, mid-range or treble. Speaker Distance Manual LEFT [ 10.0ft ] CENTER [ 9.0ft ] RIGHT [ 10.0ft ] SURROUND R [ 8 . 6 f t ] SURR BACK R [ 7 . 0 f t ] SURR BACK L [ 6 .... the 5∞ buttons to 45 feet (1 foot equals approximately 0.3 meters). For AUTO you to increase the amount of setting you copy and then calibrate manually. Speaker Distance Manual LEFT [10.0ft ] CENTER [ 9.0ft ] RIGHT [10.0ft ] SURROUND R [ 8 . 6 f t ] SURR BACK R [ 7 . 0 f t ] SURR BACK L [ 6 ....
... EQ" on your speakers that the speaker is from step 1. See "Data Copy of hearing more (or less) bass, mid-range or treble. Speaker Distance Manual LEFT [ 10.0ft ] CENTER [ 9.0ft ] RIGHT [ 10.0ft ] SURROUND R [ 8 . 6 f t ] SURR BACK R [ 7 . 0 f t ] SURR BACK L [ 6 .... the 5∞ buttons to 45 feet (1 foot equals approximately 0.3 meters). For AUTO you to increase the amount of setting you copy and then calibrate manually. Speaker Distance Manual LEFT [10.0ft ] CENTER [ 9.0ft ] RIGHT [10.0ft ] SURROUND R [ 8 . 6 f t ] SURR BACK R [ 7 . 0 f t ] SURR BACK L [ 6 ....

Owner's Manual
Page 46
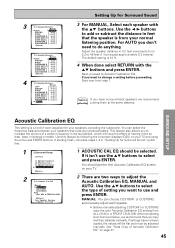
...the frequency balance you want to exit the setup process, select RETURN and press ENTER, then select EXIT and press ENTER. Acoustic Cal EQ Manual Target Curve: CUSTOM1 Channel [L •SMALL] 2.4. Changing the frequency balance of the source being played. Test tone is output loudly. [...sound balance defined by the receiver (see p.48). FRONT CH ALIGN mode (front speaker curve): All speakers (except for that frequency. Acoustic Cal EQ Manual Target Curve: CUSTOM1 Channel [L •SMALL] 16k 8k 4k 2k 1k 500 250 125 63 [Return] 5 Use the 2 3 buttons to select...
...the frequency balance you want to exit the setup process, select RETURN and press ENTER, then select EXIT and press ENTER. Acoustic Cal EQ Manual Target Curve: CUSTOM1 Channel [L •SMALL] 2.4. Changing the frequency balance of the source being played. Test tone is output loudly. [...sound balance defined by the receiver (see p.48). FRONT CH ALIGN mode (front speaker curve): All speakers (except for that frequency. Acoustic Cal EQ Manual Target Curve: CUSTOM1 Channel [L •SMALL] 16k 8k 4k 2k 1k 500 250 125 63 [Return] 5 Use the 2 3 buttons to select...

Owner's Manual
Page 47
...2 2.4. You will return to copy settings is shown below. Select EXIT and press ENTER to select RETURN and press ENTER. F ALIGN - To manually adjust settings go to Acoustic Calibration EQ, step 2 (P.45). 7 To leave DATA COPY mode, use the 5∞ buttons to select a source...) or adjusted Acoustic Calibration EQ using the AUTO mode (p.45), copy those settings from either ALL CH ADJ or F ALIGN and adjust CUSTOM1 or CUSTOM2 manually. To adjust them, see p.40) first. 1 2.Surround Setup [ Check ] [ 1.Speaker Systems ] [ 2.Channel Level ] [ 3.Speaker Distance] [ 4.Acoustic Cal EQ ] [...
...2 2.4. You will return to copy settings is shown below. Select EXIT and press ENTER to select RETURN and press ENTER. F ALIGN - To manually adjust settings go to Acoustic Calibration EQ, step 2 (P.45). 7 To leave DATA COPY mode, use the 5∞ buttons to select a source...) or adjusted Acoustic Calibration EQ using the AUTO mode (p.45), copy those settings from either ALL CH ADJ or F ALIGN and adjust CUSTOM1 or CUSTOM2 manually. To adjust them, see p.40) first. 1 2.Surround Setup [ Check ] [ 1.Speaker Systems ] [ 2.Channel Level ] [ 3.Speaker Distance] [ 4.Acoustic Cal EQ ] [...

Owner's Manual
Page 49
... CONTROL use lock TV CONTROL FUNCTION CH + CH - Be sure to achieve a surround sound effect with the VSX-49TXi. VOL + VOL - The default setting for the input signal is AUTO, if you need to the manual for an explanation of linkable functions. 3 58 4 Press RECEIVER on the remote control. When i.LINK-equipped components...
... CONTROL use lock TV CONTROL FUNCTION CH + CH - Be sure to achieve a surround sound effect with the VSX-49TXi. VOL + VOL - The default setting for the input signal is AUTO, if you need to the manual for an explanation of linkable functions. 3 58 4 Press RECEIVER on the remote control. When i.LINK-equipped components...

Owner's Manual
Page 51
... DIGITAL IN terminals. Receiver MAIN SUB TONE BASS/ TREBLE DISPLAY VIDEO DIMMER SELECT EFFECT/ CH SEL. BASIC 51 For more details, refer to the instruction manual supplied with your player has a 2 RF output this will default to ANA- 1 LOG. Refer to AUTO, DIGITAL or i.LINK. • Some DVD players don't output...
... DIGITAL IN terminals. Receiver MAIN SUB TONE BASS/ TREBLE DISPLAY VIDEO DIMMER SELECT EFFECT/ CH SEL. BASIC 51 For more details, refer to the instruction manual supplied with your player has a 2 RF output this will default to ANA- 1 LOG. Refer to AUTO, DIGITAL or i.LINK. • Some DVD players don't output...

Owner's Manual
Page 52
... sources are explained here. For DTS 96/24 5.1 format, connect both center and surround left and right speakers (and possibly your speaker settings). Check the manual that have hooked up surround back speaker(s). To select listening modes see which you set "DYNAMIC RANGE CONTROL" (see p.100) on what kind of source...
... sources are explained here. For DTS 96/24 5.1 format, connect both center and surround left and right speakers (and possibly your speaker settings). Check the manual that have hooked up surround back speaker(s). To select listening modes see which you set "DYNAMIC RANGE CONTROL" (see p.100) on what kind of source...

Owner's Manual
Page 64
... searching the selected band and stop automatically at a time, press TUNING -/+ repeatedly. • To change frequencies one second, then release. For Manual Tuning • To change frequencies quickly, hold TUNING -/+ for you desire. FUNCTION 1 ENTER STANDBY/ON MULTI SYSTEM OPERATION OFF MUTING MASTER VOLUME ... tuner function on the remote control to switch to locate other stations. Repeat to MONO reception. Using the Tuner Automatic and Manual Tuning The following page. 3 MPX LIGHT Tuner RECEIVER DVD/LD STATION 12 VCR1/ DVR TUNING 45 VCR2 MPX BAND CLASS ...
... searching the selected band and stop automatically at a time, press TUNING -/+ repeatedly. • To change frequencies one second, then release. For Manual Tuning • To change frequencies quickly, hold TUNING -/+ for you desire. FUNCTION 1 ENTER STANDBY/ON MULTI SYSTEM OPERATION OFF MUTING MASTER VOLUME ... tuner function on the remote control to switch to locate other stations. Repeat to MONO reception. Using the Tuner Automatic and Manual Tuning The following page. 3 MPX LIGHT Tuner RECEIVER DVD/LD STATION 12 VCR1/ DVR TUNING 45 VCR2 MPX BAND CLASS ...


