
Owner's Manual
Page 4
... system from the sub room 77 The PIONEER SR System: Operating other PIONEER components 78 Multi Operations 79 Performing multi operations 80 System off 81 Using System off 82 Editing Remote Control Display Names 83 Editing Buttons Names (KEY LABEL 84 Adjusting the Light on the Remote control 85 Clearing Remote Control Settings You Have Input . 86 Resetting...
... system from the sub room 77 The PIONEER SR System: Operating other PIONEER components 78 Multi Operations 79 Performing multi operations 80 System off 81 Using System off 82 Editing Remote Control Display Names 83 Editing Buttons Names (KEY LABEL 84 Adjusting the Light on the Remote control 85 Clearing Remote Control Settings You Have Input . 86 Resetting...
Owner's Manual
Page 5
... system from the sub room 77 The PIONEER SR System: Operating other PIONEER components 78 Multi Operations 79 Performing multi operations 80 System off 81 Using System off 82 Editing Remote Control Display Names 83 Editing Buttons Names (KEY LABEL 84 Adjusting the Light on the Remote control 85 Clearing Remote Control Settings You Have Input . 86 Resetting...
... system from the sub room 77 The PIONEER SR System: Operating other PIONEER components 78 Multi Operations 79 Performing multi operations 80 System off 81 Using System off 82 Editing Remote Control Display Names 83 Editing Buttons Names (KEY LABEL 84 Adjusting the Light on the Remote control 85 Clearing Remote Control Settings You Have Input . 86 Resetting...
Owner's Manual
Page 6
... channels of sources at the highest possible quality. On the video side, the component video output is fully compatible with Pioneer's industry-leading advanced multichannel stereophonic concept. Used under license from Dolby Laboratories. Advanced Cinema & Advanced Concert Modes The Advanced...reproduce music and movie soundtracks as close as possible for ultra realistic sound. The VSX-47TX is designed to play all types of audio. With the microphone equipped remote control plugged into the front panel with high-performance Advanced Direct Energy MOS-FET output ...
... channels of sources at the highest possible quality. On the video side, the component video output is fully compatible with Pioneer's industry-leading advanced multichannel stereophonic concept. Used under license from Dolby Laboratories. Advanced Cinema & Advanced Concert Modes The Advanced...reproduce music and movie soundtracks as close as possible for ultra realistic sound. The VSX-47TX is designed to play all types of audio. With the microphone equipped remote control plugged into the front panel with high-performance Advanced Direct Energy MOS-FET output ...

Owner's Manual
Page 7
... VOLUME PRREE-MPAROXOTDGE7R2CA9OM0NMTREODLAUNNDITLEARNING CHLSISETLEENCITNG LIGHT UTE VIDBEAOSSSD/EILTRREDECIBMTSLMAEIGCENCRAERLSCESMSDEODLITNISEPPSU1EMT0DETVTOAUVNACDTPTRPRTTEAE1CEP/2DRE-1RL/OMEDUFIFDVSUENCCCLETTSTR/SUCI2HNCSSEOPERELNLATKTVVERIRDORAEE/LCOBEIVERSAOPTERMATUIOLTNIOTFVSFCYOSNTTEM RETURNEXIT RECEIVER Remote Control Unit Remote Control Cable for Auto Surround Sound Setup Remote Control Stand for Auto Surround Sound Setup U-shaped connectors x 2 (attached to operate the remote control properly an indicator warning screen will be done within five minutes or all of the...
... VOLUME PRREE-MPAROXOTDGE7R2CA9OM0NMTREODLAUNNDITLEARNING CHLSISETLEENCITNG LIGHT UTE VIDBEAOSSSD/EILTRREDECIBMTSLMAEIGCENCRAERLSCESMSDEODLITNISEPPSU1EMT0DETVTOAUVNACDTPTRPRTTEAE1CEP/2DRE-1RL/OMEDUFIFDVSUENCCCLETTSTR/SUCI2HNCSSEOPERELNLATKTVVERIRDORAEE/LCOBEIVERSAOPTERMATUIOLTNIOTFVSFCYOSNTTEM RETURNEXIT RECEIVER Remote Control Unit Remote Control Cable for Auto Surround Sound Setup Remote Control Stand for Auto Surround Sound Setup U-shaped connectors x 2 (attached to operate the remote control properly an indicator warning screen will be done within five minutes or all of the...

Owner's Manual
Page 8
... Receiver Opening the Front Panel To open the front panel push gently on the front panel of this unit. Remote control may not function properly if: • There are obstacles between the remote control and the remote sensor. • Direct sunlight or fluorescent light is fairly large. S0URCE Î 4- 1 - ¶-7...remote control which you can use , point the remote control toward the remote sensor on the lower third of cloth. When installing in any place object directly on top of this unit in a rack, shelf, etc., be sure to operate the VSX-47TX is shining onto the remote...
... Receiver Opening the Front Panel To open the front panel push gently on the front panel of this unit. Remote control may not function properly if: • There are obstacles between the remote control and the remote sensor. • Direct sunlight or fluorescent light is fairly large. S0URCE Î 4- 1 - ¶-7...remote control which you can use , point the remote control toward the remote sensor on the lower third of cloth. When installing in any place object directly on top of this unit in a rack, shelf, etc., be sure to operate the VSX-47TX is shining onto the remote...

Owner's Manual
Page 12
...[ CD ] [ SAT ] [ VCR1 ] [ CD-R ] RF IN [ DVD/LD ] [Return] 1.1. Input Assign ] [2. SETUP 2 S0URCE TV SYSTEM RECEIVER OFF DVD/LD TV SAT MULTI CONTROL VCR1/ DVR VCR2 VIDEO TV CONT MULTI OPERATION CD CD-R/ TAPE1 TUNER RECEIVER DIMMER INPUT ATT LOUDNESS SPEAKER A/B 1 2 3 4 VIDEO SEL SIGNAL SEL TAPE 2 EFFECT/CH...to page 12 to make sure you did not hook up your DVD player to select INPUT ASSIGN. The SYSTEM SETUP menu appears on the remote control. 2 Press the SYSTEM SETUP button. Press the ENTER button. 4 DIGITAL IN-SELECT should be selected, if not use the 5∞ ...
...[ CD ] [ SAT ] [ VCR1 ] [ CD-R ] RF IN [ DVD/LD ] [Return] 1.1. Input Assign ] [2. SETUP 2 S0URCE TV SYSTEM RECEIVER OFF DVD/LD TV SAT MULTI CONTROL VCR1/ DVR VCR2 VIDEO TV CONT MULTI OPERATION CD CD-R/ TAPE1 TUNER RECEIVER DIMMER INPUT ATT LOUDNESS SPEAKER A/B 1 2 3 4 VIDEO SEL SIGNAL SEL TAPE 2 EFFECT/CH...to page 12 to make sure you did not hook up your DVD player to select INPUT ASSIGN. The SYSTEM SETUP menu appears on the remote control. 2 Press the SYSTEM SETUP button. Press the ENTER button. 4 DIGITAL IN-SELECT should be selected, if not use the 5∞ ...
Owner's Manual
Page 13
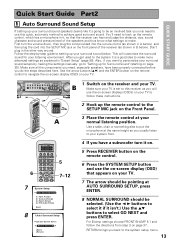
...surround sound setups by -step guide to setting up your TV. TOR ACOUSTIC CAL. Use the arrow buttons (5∞) and the ENTER button on the remote control to navigate the on-screen display (OSD) on the receiver and your TV is a good idea to make . Input Assign] [2. MIDNIGHT TONE ... MPX DTV ON/OFF ¶ 8 EXTRA MENU 5 7~12 7 System Setup [ Auto Surround Setup ] [1. First turn it on. 5 Press RECEIVER button on the remote control. 6 Press the SYSTEM SETUP button and use the on page 35). This will use this receiver as you do the steps described here. THX Audio...
...surround sound setups by -step guide to setting up your TV. TOR ACOUSTIC CAL. Use the arrow buttons (5∞) and the ENTER button on the remote control to navigate the on-screen display (OSD) on the receiver and your TV is a good idea to make . Input Assign] [2. MIDNIGHT TONE ... MPX DTV ON/OFF ¶ 8 EXTRA MENU 5 7~12 7 System Setup [ Auto Surround Setup ] [1. First turn it on. 5 Press RECEIVER button on the remote control. 6 Press the SYSTEM SETUP button and use the on page 35). This will use this receiver as you do the steps described here. THX Audio...

Owner's Manual
Page 14
.... After it is turned on the OSD If they do not match the speaker configuration you connected and you wan to follow them. Put the remote control into the its stand again. and go to step 13. Auto Surround Setup Front [ YES ] Center [ YES ] Surround [ YES ] SurrBack [ NO ] Subwoofer [ NO ] ...12. If not, simply go to be prepared for loud test tones. If selecting RETRY doesn't fix the problem, turn volume up the remote control microphone and moved obstacles to input the settings manually select ERR=FIX SP with 5∞ buttons and press ENTER. If you hooked up. 11...
.... After it is turned on the OSD If they do not match the speaker configuration you connected and you wan to follow them. Put the remote control into the its stand again. and go to step 13. Auto Surround Setup Front [ YES ] Center [ YES ] Surround [ YES ] SurrBack [ NO ] Subwoofer [ NO ] ...12. If not, simply go to be prepared for loud test tones. If selecting RETRY doesn't fix the problem, turn volume up the remote control microphone and moved obstacles to input the settings manually select ERR=FIX SP with 5∞ buttons and press ENTER. If you hooked up. 11...

Owner's Manual
Page 15
... optimal for the source material. QUICK START GUIDE memo • Make sure the room environment follows the guidelines displayed on the remote control. The MCACC indicator will automatically exit from the microphone on the screen for household appliances (air conditioner, fridge, fan, etc.)... that point will be incorrect. Put the remote control into the its stand. If the room environment is set automatically. Again, be affecting the environment and switch them off if necessary...
... optimal for the source material. QUICK START GUIDE memo • Make sure the room environment follows the guidelines displayed on the remote control. The MCACC indicator will automatically exit from the microphone on the screen for household appliances (air conditioner, fridge, fan, etc.)... that point will be incorrect. Put the remote control into the its stand. If the room environment is set automatically. Again, be affecting the environment and switch them off if necessary...

Owner's Manual
Page 23
... optical cables (not supplied) are used to connect digital components to one type of component, they can be in accordance with the names on the remote control buttons and the like.
... optical cables (not supplied) are used to connect digital components to one type of component, they can be in accordance with the names on the remote control buttons and the like.
Owner's Manual
Page 27
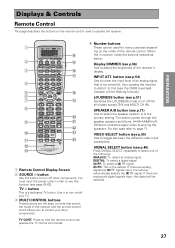
...the default. SPEAKER A/B button (see p.55) Use to select the speaker system. TV CONT: Press so that the remote control can operate the TV control commands. 4 Number buttons These can be selected. 27 INPUT ATT. For this case the OVER (overload) indicator will...LISTENING MODE ACOUSTIC CAL (DVD-A/SACD) MULTI CH INPUT LISTENING CH SELECT MUTE LIGHT Î AV PRE-PROGRAMMED AND LEARNING REMOTE CONTROL UNIT AXD7290 ! @ # $ % ^ & * ( ) _ 1 Remote Control Display Screen 2 SOURCE button Use this function (see p.45) Press SIGNAL SELECT repeatedly to select one of the following...
...the default. SPEAKER A/B button (see p.55) Use to select the speaker system. TV CONT: Press so that the remote control can operate the TV control commands. 4 Number buttons These can be selected. 27 INPUT ATT. For this case the OVER (overload) indicator will...LISTENING MODE ACOUSTIC CAL (DVD-A/SACD) MULTI CH INPUT LISTENING CH SELECT MUTE LIGHT Î AV PRE-PROGRAMMED AND LEARNING REMOTE CONTROL UNIT AXD7290 ! @ # $ % ^ & * ( ) _ 1 Remote Control Display Screen 2 SOURCE button Use this function (see p.45) Press SIGNAL SELECT repeatedly to select one of the following...

Owner's Manual
Page 29
... digital TV tuners this button will either exit you are using your DVD menu screen this button to customize the remote control functions and the remote control itself. (See "Setting Up Remote Control of Other Components" starting on p.62). ^ EXIT button When you from SYSTEM SETUP procedures. Use to start ... all the possible sources. * VOLUME (+/-) buttons Use to raise or lower the volume of the unit. & INPUT button Press to light the remote control display and buttons. The button will exit from the menu screen or act like a "Return" button above, depending on or off (for how...
... digital TV tuners this button will either exit you are using your DVD menu screen this button to customize the remote control functions and the remote control itself. (See "Setting Up Remote Control of Other Components" starting on p.62). ^ EXIT button When you from SYSTEM SETUP procedures. Use to start ... all the possible sources. * VOLUME (+/-) buttons Use to raise or lower the volume of the unit. & INPUT button Press to light the remote control display and buttons. The button will exit from the menu screen or act like a "Return" button above, depending on or off (for how...

Owner's Manual
Page 31
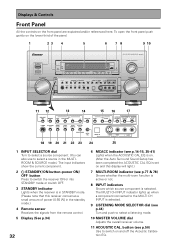
...16 SPEAKERS terminals (see p.89). 14 RS-232C Connection This is fed by the surround and surround rear speakers. If you can control them all pointing the remote control(s) at one remote sensor. 11 MONITOR OUT terminals (connect a TV or monitor here, see p.16) Use these terminals to output a video signal... the terminals as well to take advantage of this receiver A & B. Only do this with this high quality method. PREPARATION PREPARATION Displays & Controls 12 15 DVD /LD IN 1Y PB REMOTE IN MULTIROOM & SOURCE Y MONITOR OUT PB PR (TV) IN 2 Y PR (SAT) IN 3 Y PB PB PR PR COMPONENT VIDEO...
...16 SPEAKERS terminals (see p.89). 14 RS-232C Connection This is fed by the surround and surround rear speakers. If you can control them all pointing the remote control(s) at one remote sensor. 11 MONITOR OUT terminals (connect a TV or monitor here, see p.16) Use these terminals to output a video signal... the terminals as well to take advantage of this receiver A & B. Only do this with this high quality method. PREPARATION PREPARATION Displays & Controls 12 15 DVD /LD IN 1Y PB REMOTE IN MULTIROOM & SOURCE Y MONITOR OUT PB PR (TV) IN 2 Y PR (SAT) IN 3 Y PB PB PR PR COMPONENT VIDEO...
Owner's Manual
Page 32
... the Acoustic Calibration EQ. button (see p.50) Use to switch on the lower third of power [0.65 W] in the standby mode.) 4 Remote sensor Receives the signals from the remote control. 5 Display (See p.34) 32 6 MCACC indicator (see p.14-15, 35-41) Lights when the ACOUSTIC CAL EQ is on. (... this receiver consumes a small amount of the panel. 1 23 4 5 6 78 9 10 STANDBY/ON OFF ON INPUT SELECTOR AUDIO/VIDEO MULTI-CHANNEL AMPLIFIER VSX-47TX LISTENING MODE SELECTOR STANDBY VIDEO DVD/LD TV/DVD SAT VIDEO VCR VCR2 AUDIO CD-R/ MULTI CH CD TAPE1/MD TUNER PHONO INPUT MULTI ROOM...
... the Acoustic Calibration EQ. button (see p.50) Use to switch on the lower third of power [0.65 W] in the standby mode.) 4 Remote sensor Receives the signals from the remote control. 5 Display (See p.34) 32 6 MCACC indicator (see p.14-15, 35-41) Lights when the ACOUSTIC CAL EQ is on. (... this receiver consumes a small amount of the panel. 1 23 4 5 6 78 9 10 STANDBY/ON OFF ON INPUT SELECTOR AUDIO/VIDEO MULTI-CHANNEL AMPLIFIER VSX-47TX LISTENING MODE SELECTOR STANDBY VIDEO DVD/LD TV/DVD SAT VIDEO VCR VCR2 AUDIO CD-R/ MULTI CH CD TAPE1/MD TUNER PHONO INPUT MULTI ROOM...

Owner's Manual
Page 33
... TONE button This button switches between the various types of channels used in the set up mic (the remote control) here. To select an optical or coaxial digital signal. 2 RF - AUTO - If there are analog and digital signals input, the digital will be selected. ...MIDNIGHT button (see p.51) Use to switch the receiver into the receiver. CONTROL button (see p.74-78) Used together with the MASTER VOLUME to select the function or use the multi room feature (requires an optional PIONEER Multi-Room Remote Sensor Unit MR-100 or another IR receiver). The button cycles through the...
... TONE button This button switches between the various types of channels used in the set up mic (the remote control) here. To select an optical or coaxial digital signal. 2 RF - AUTO - If there are analog and digital signals input, the digital will be selected. ...MIDNIGHT button (see p.51) Use to switch the receiver into the receiver. CONTROL button (see p.74-78) Used together with the MASTER VOLUME to select the function or use the multi room feature (requires an optional PIONEER Multi-Room Remote Sensor Unit MR-100 or another IR receiver). The button cycles through the...
Owner's Manual
Page 35
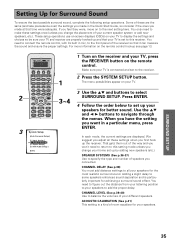
...'t need to figure out the distance from your listening position to your TV, press the RECEIVER button on the remote control hookup see page 13. You only need to connect the remote control, with its built in a particular menu, press ENTER. DTV ON/OFF 8 BAND 3 DTV MENU CLASS 7..., to balance the volumes of your speakers for achieving a surround sound effect. For more information on the remote control. SETUP 2 S0URCE TV SYSTEM RECEIVER OFF DVD/LD TV SAT MULTI CONTROL VCR1/ DVR VCR2 VIDEO TV CONT MULTI OPERATION CD CD-R/ TAPE1 TUNER RECEIVER DIMMER INPUT ATT LOUDNESS SPEAKER ...
...'t need to figure out the distance from your listening position to your TV, press the RECEIVER button on the remote control hookup see page 13. You only need to connect the remote control, with its built in a particular menu, press ENTER. DTV ON/OFF 8 BAND 3 DTV MENU CLASS 7..., to balance the volumes of your speakers for achieving a surround sound effect. For more information on the remote control. SETUP 2 S0URCE TV SYSTEM RECEIVER OFF DVD/LD TV SAT MULTI CONTROL VCR1/ DVR VCR2 VIDEO TV CONT MULTI OPERATION CD CD-R/ TAPE1 TUNER RECEIVER DIMMER INPUT ATT LOUDNESS SPEAKER ...

Owner's Manual
Page 36
... decide how to route the sound for all routed to the subwoofer. 1 36 TONE BASS/TREBLE 9 0 - +10 + DISC ENTER SYSTEM SETUP DIRECT ACCESS DISP MODE REMOTE SETUP MENU TUNER EDIT ENTER STATUS EXIT GUIDE RETURN MPX ¶ TUNING - 1 DTV ON/OFF 8 BAND 3 EXTRA MENU TUNING + ¡ 2.Surround Setup [ Check ].... Press the ENTER button. The setup possibilities appear on your TV. 2 Use the 5∞ buttons to the front panel and in the remote control may not properly assess the size of your speaker will automatically be able to choose NO or PLUS). • If you may not get the...
... decide how to route the sound for all routed to the subwoofer. 1 36 TONE BASS/TREBLE 9 0 - +10 + DISC ENTER SYSTEM SETUP DIRECT ACCESS DISP MODE REMOTE SETUP MENU TUNER EDIT ENTER STATUS EXIT GUIDE RETURN MPX ¶ TUNING - 1 DTV ON/OFF 8 BAND 3 EXTRA MENU TUNING + ¡ 2.Surround Setup [ Check ].... Press the ENTER button. The setup possibilities appear on your TV. 2 Use the 5∞ buttons to the front panel and in the remote control may not properly assess the size of your speaker will automatically be able to choose NO or PLUS). • If you may not get the...

Owner's Manual
Page 37
..., 80 Hz, 100 Hz, 150 Hz or 200 Hz. If you have a subwoofer, listen to the bass response with the front speakers set automatically. (The remote control must be between those bass sounds playing back from the speaker selected as LARGE.
..., 80 Hz, 100 Hz, 150 Hz or 200 Hz. If you have a subwoofer, listen to the bass response with the front speakers set automatically. (The remote control must be between those bass sounds playing back from the speaker selected as LARGE.

Owner's Manual
Page 38
...Quick Start Guide), the receiver calculates the correct delay times automatically. Setting Up for Surround Sound" (p.35) first. The setup possibilities appear on the remote control connected (see p.97, 101, 103). 38 For this way of setting the delay time is done automatically through the AUTO selection, or in "... and press ENTER. VIDEO SEL SIGNAL SEL 5 6 TAPE 2 EFFECT/CH SELL 7 8 TONE BASS/TREBLE 9 0 - +10 + DISC ENTER SYSTEM SETUP DIRECT ACCESS DISP MODE REMOTE SETUP MENU TUNER EDIT ENTER STATUS EXIT GUIDE RETURN MPX ¶ TUNING - 1 STATION - 4 CHANNEL-
...Quick Start Guide), the receiver calculates the correct delay times automatically. Setting Up for Surround Sound" (p.35) first. The setup possibilities appear on the remote control connected (see p.97, 101, 103). 38 For this way of setting the delay time is done automatically through the AUTO selection, or in "... and press ENTER. VIDEO SEL SIGNAL SEL 5 6 TAPE 2 EFFECT/CH SELL 7 8 TONE BASS/TREBLE 9 0 - +10 + DISC ENTER SYSTEM SETUP DIRECT ACCESS DISP MODE REMOTE SETUP MENU TUNER EDIT ENTER STATUS EXIT GUIDE RETURN MPX ¶ TUNING - 1 STATION - 4 CHANNEL-

Owner's Manual
Page 39
If continuing from CHANNEL DELAY go to the reference position (0 dB) and the display on the remote control connected (see page 13). Channel Level [Manual] [Semi Auto] [Auto] Normal Surround [Return] Your Speaker Systems " Normal Surround " 1 CHANNEL LEVEL should be output.... to select and press ENTER. 2 Use the 5∞ buttons to the middle position before doing these operations. memo • If your subwoofer has a volume control, set the CHANNEL LEVEL: MANUAL; If you're not sure of your speakers. There are output at a high volume level. WARNING : Be prepared! MANUAL ...
If continuing from CHANNEL DELAY go to the reference position (0 dB) and the display on the remote control connected (see page 13). Channel Level [Manual] [Semi Auto] [Auto] Normal Surround [Return] Your Speaker Systems " Normal Surround " 1 CHANNEL LEVEL should be output.... to select and press ENTER. 2 Use the 5∞ buttons to the middle position before doing these operations. memo • If your subwoofer has a volume control, set the CHANNEL LEVEL: MANUAL; If you're not sure of your speakers. There are output at a high volume level. WARNING : Be prepared! MANUAL ...


