
Owner's Manual
Page 4
...use regular RCA stereo cords. Coaxial Digital Connection If your DVD player has a coaxial terminal (not a PCM-only output) for recording the audio on the receiver. Follow the diagram below . Also hook up the video connection of your DVD player, the analog audio (for the audio out hook it 's easiest ...able to follow the default settings of this receiver and won't need to assign the digital inputs. In order to do this you don't need a special optical cord which are at your local stereo store. You can buy at the heart of the manual. For optical connections you will need to ...
...use regular RCA stereo cords. Coaxial Digital Connection If your DVD player has a coaxial terminal (not a PCM-only output) for recording the audio on the receiver. Follow the diagram below . Also hook up the video connection of your DVD player, the analog audio (for the audio out hook it 's easiest ...able to follow the default settings of this receiver and won't need to assign the digital inputs. In order to do this you don't need a special optical cord which are at your local stereo store. You can buy at the heart of the manual. For optical connections you will need to ...

Owner's Manual
Page 7
... properly. For more information see pages 39-42. 3 As mentioned above you should see "DVD/LD" in the display on the receiver. 3 Press the STANDARD button for the basic surround sound setting. 4 Play a DVD. 6 For Better Surround Sound 1 Go through... the "SpeakerSetting" instructions on pages 27- 38 of the receiver (see page 13) you won't have a center speaker. You should go through the entire "Initial Setup" procedures as outlined on...digital inputs, but many other conmponents with digital audio or do this instruction manual.
... properly. For more information see pages 39-42. 3 As mentioned above you should see "DVD/LD" in the display on the receiver. 3 Press the STANDARD button for the basic surround sound setting. 4 Play a DVD. 6 For Better Surround Sound 1 Go through... the "SpeakerSetting" instructions on pages 27- 38 of the receiver (see page 13) you won't have a center speaker. You should go through the entire "Initial Setup" procedures as outlined on...digital inputs, but many other conmponents with digital audio or do this instruction manual.

Owner's Manual
Page 9
...Before You Start 10 Checking the Supplied Accessories 10 How to Use This Manual 10 Preparing the Remote Control 10 Installing the Receiver 11 Opening the Front Panel 11 The PIONEER SR System: Operating other PIONEER components 11 Connecting Your Equipment 12 Audio Components 12 Digital Connections 13 ... 48 Direct Playback 49 Adjusting the Brightness of the Display 49 DUAL MONO Setting 50 Using the Tuner 51 Automatic and Manual Tuning 51 Direct Access Tuning 52 Memorizing Frequently Used Stations 53 Recalling Memorized Stations 54 Remote Control of Other Components .. ...
...Before You Start 10 Checking the Supplied Accessories 10 How to Use This Manual 10 Preparing the Remote Control 10 Installing the Receiver 11 Opening the Front Panel 11 The PIONEER SR System: Operating other PIONEER components 11 Connecting Your Equipment 12 Audio Components 12 Digital Connections 13 ... 48 Direct Playback 49 Adjusting the Brightness of the Display 49 DUAL MONO Setting 50 Using the Tuner 51 Automatic and Manual Tuning 51 Direct Access Tuning 52 Memorizing Frequently Used Stations 53 Recalling Memorized Stations 54 Remote Control of Other Components .. ...
Owner's Manual
Page 10
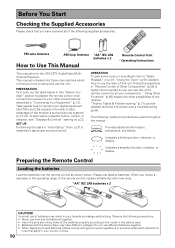
... display. OPERATION To play some music or soundtrack refer to use this unit's remote control for the VSX-33TX Audio/Video MultiChannel Receiver. "Using the Tuner" (p.51) explains how to "Basic Playback" on p.22. When you notice... that apply in your components. FM wire Antenna AM loop Antenna "AA" IEC LR6 batteries x 2 How to Use This Manual 4 ST TUNE &D.ACCESS GUIDE TUNE ENTER 2 AV THX / DTS MAIDDVNAIGNHCTERDERCSEDETTSIAVUPNERDRNADRIRDSES.MCMTETPORCXDEOEONTRFUOCNLLCDETTIAOVNROND/TOVFIFNFBOANDDTV PRREE-MPOROTEGCROAMNTMREODLAUNNDITLEARNING MUTE MENU CLASS MENU DVD ...
... display. OPERATION To play some music or soundtrack refer to use this unit's remote control for the VSX-33TX Audio/Video MultiChannel Receiver. "Using the Tuner" (p.51) explains how to "Basic Playback" on p.22. When you notice... that apply in your components. FM wire Antenna AM loop Antenna "AA" IEC LR6 batteries x 2 How to Use This Manual 4 ST TUNE &D.ACCESS GUIDE TUNE ENTER 2 AV THX / DTS MAIDDVNAIGNHCTERDERCSEDETTSIAVUPNERDRNADRIRDSES.MCMTETPORCXDEOEONTRFUOCNLLCDETTIAOVNROND/TOVFIFNFBOANDDTV PRREE-MPOROTEGCROAMNTMREODLAUNNDITLEARNING MUTE MENU CLASS MENU DVD ...
Owner's Manual
Page 19
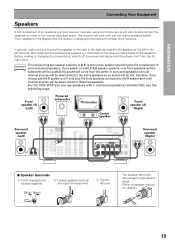
... speaker manual for details.) 19 If you switch on both A & B speaker systems, only front speakers and the subwoofer will be lost. For the VSX-33TX you have in . (10mm) The speaker terminals also accept single banana plugs. (Refer to these two speakers. In general, make sure the positive and negative (+/-) terminals on the receiver...
... speaker manual for details.) 19 If you switch on both A & B speaker systems, only front speakers and the subwoofer will be lost. For the VSX-33TX you have in . (10mm) The speaker terminals also accept single banana plugs. (Refer to these two speakers. In general, make sure the positive and negative (+/-) terminals on the receiver...
Owner's Manual
Page 20
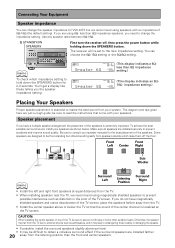
...; setting or the 6Ω-8Ω setting. The receiver will re-set to prevent accidents and improve sound quality. You'll get a display like these telling you need to change the speaker impedance for VSX-33TX but others benefit greatly from speakers stands which impedance ...SPEAKERS button. less than the front and center speakers. STANDBY/ON SPEAKERS First turn the receiver off the floor. To achieve the best possible surround sound, install your speaker manuals for 2-3 seconds. If you do not have a multiple speaker arrangement the placement of the...
...; setting or the 6Ω-8Ω setting. The receiver will re-set to prevent accidents and improve sound quality. You'll get a display like these telling you need to change the speaker impedance for VSX-33TX but others benefit greatly from speakers stands which impedance ...SPEAKERS button. less than the front and center speakers. STANDBY/ON SPEAKERS First turn the receiver off the floor. To achieve the best possible surround sound, install your speaker manuals for 2-3 seconds. If you do not have a multiple speaker arrangement the placement of the...
Owner's Manual
Page 34
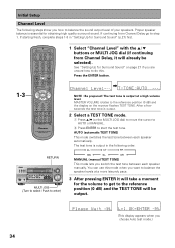
...LOUDNESS VIDEO SELECT MULTI CH INPUT 4 INPUT ATT 5 DIGITAL NR 6 FL DIMMER 7 8 9 REMOTE SETUP SYSTEM SETUP SIGNAL SELECT +10 DISC 0 ENTER EFFECT/CH SEL RECEIVER TV VOL TV MASTER VOLUME TV CONTROL TVFUNC 4 CHANNEL ¢ TUNE ST ST ENTER TUNE GUIDE D.ACCESS & BAND ‹ MENU CLASS * MPX DTV ON / ... tone is output. 2 Select a TEST TONE mode. 1 Press 5/∞ (or the MULTI JOG dial) to move the cursor to AUTO or MANUAL. 2 Press ENTER to balance the speaker levels at a high volume level. AUTO (automatic TEST TONE) This mode switches the test tone between each ...
...LOUDNESS VIDEO SELECT MULTI CH INPUT 4 INPUT ATT 5 DIGITAL NR 6 FL DIMMER 7 8 9 REMOTE SETUP SYSTEM SETUP SIGNAL SELECT +10 DISC 0 ENTER EFFECT/CH SEL RECEIVER TV VOL TV MASTER VOLUME TV CONTROL TVFUNC 4 CHANNEL ¢ TUNE ST ST ENTER TUNE GUIDE D.ACCESS & BAND ‹ MENU CLASS * MPX DTV ON / ... tone is output. 2 Select a TEST TONE mode. 1 Press 5/∞ (or the MULTI JOG dial) to move the cursor to AUTO or MANUAL. 2 Press ENTER to balance the speaker levels at a high volume level. AUTO (automatic TEST TONE) This mode switches the test tone between each ...
Owner's Manual
Page 35
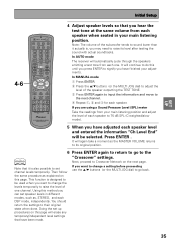
In MANUAL mode 1 Press ENTER 2 Press the 5/∞ buttons (or the MULTI JOG... 4 INPUT ATT 5 DIGITAL NR 6 FL DIMMER 7 8 9 REMOTE SETUP SYSTEM SETUP SIGNAL SELECT +10 DISC 0 ENTER EFFECT/CH SEL RECEIVER TV VOL TV MASTER VOLUME TV CONTROL TVFUNC 4 CHANNEL ¢ TUNE ST ST ENTER TUNE GUIDE D.ACCESS & BAND ‹ MENU CLASS ...* MPX DTV ON / OFF DTV MENU ¶ !⁄ RETURN S.MODE CLEAR DTV INFO RDM RECEIVER DIRECT CONTROL MIDNIGHT DSP STEREO FUNCTION THX ADVANCED STANDARD MUTE 2 / DTS Î AV PRE-PROGRAMMED AND LEARNING REMOTE CONTROL ...
In MANUAL mode 1 Press ENTER 2 Press the 5/∞ buttons (or the MULTI JOG... 4 INPUT ATT 5 DIGITAL NR 6 FL DIMMER 7 8 9 REMOTE SETUP SYSTEM SETUP SIGNAL SELECT +10 DISC 0 ENTER EFFECT/CH SEL RECEIVER TV VOL TV MASTER VOLUME TV CONTROL TVFUNC 4 CHANNEL ¢ TUNE ST ST ENTER TUNE GUIDE D.ACCESS & BAND ‹ MENU CLASS ...* MPX DTV ON / OFF DTV MENU ¶ !⁄ RETURN S.MODE CLEAR DTV INFO RDM RECEIVER DIRECT CONTROL MIDNIGHT DSP STEREO FUNCTION THX ADVANCED STANDARD MUTE 2 / DTS Î AV PRE-PROGRAMMED AND LEARNING REMOTE CONTROL ...
Owner's Manual
Page 44
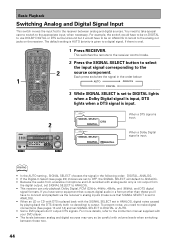
...following order: DIGITAL, ANALOG. • If the Digital-In Select (see page 29) choices are set SIGNAL SELECT to ANALOG. • This receiver can only playback Dolby Digital, PCM (32kHz, 44kHz, 48kHz, and 96kHz), and DTS digital signal formats. To prevent noise, you need to ...the source component. When a Dolby Digital signal is input. When a DTS signal is input. For more details, refer to the instruction manual supplied with analog audio only is one). 1 SOURCE RECEIVER DVD CD TV VCR 1 MULTI CONTROL CD-R TUN VCR 2 TVC 1 2 3 LOUDNESS VIDEO SELECT MULTI CH INPUT 4 INPUT ATT...
...following order: DIGITAL, ANALOG. • If the Digital-In Select (see page 29) choices are set SIGNAL SELECT to ANALOG. • This receiver can only playback Dolby Digital, PCM (32kHz, 44kHz, 48kHz, and 96kHz), and DTS digital signal formats. To prevent noise, you need to ...the source component. When a Dolby Digital signal is input. When a DTS signal is input. For more details, refer to the instruction manual supplied with analog audio only is one). 1 SOURCE RECEIVER DVD CD TV VCR 1 MULTI CONTROL CD-R TUN VCR 2 TVC 1 2 3 LOUDNESS VIDEO SELECT MULTI CH INPUT 4 INPUT ATT...

Owner's Manual
Page 48
... selected only the volume level can 't use MULTI CH playback follow the instructions below. 1 Press RECEIVER. To use the STANDARD, ADVANCED THEATER, THX, or DSP modes. 48 Check the manual of playing back advanced DVD discs which are recorded in 96 kHz and up to set . TV VOL TV MASTER VOLUME TV...
... selected only the volume level can 't use MULTI CH playback follow the instructions below. 1 Press RECEIVER. To use the STANDARD, ADVANCED THEATER, THX, or DSP modes. 48 Check the manual of playing back advanced DVD discs which are recorded in 96 kHz and up to set . TV VOL TV MASTER VOLUME TV...

Owner's Manual
Page 51
...Manual Tuning • To change frequencies quickly, hold down TUNING -/+ and release when you reach the frequency you desire. 1 4 Adjust the MASTER VOLUME buttons on the remote control or the MASTER VOLUME on the following steps show you how to tune in the station. MPX SOURCE RECEIVER...SELECT MULTI CH INPUT 4 INPUT ATT 5 DIGITAL NR 6 FL DIMMER 7 8 9 REMOTE SETUP SYSTEM SETUP SIGNAL SELECT +10 DISC 0 ENTER EFFECT/CH SEL RECEIVER TV VOL TV MASTER VOLUME TV CONTROL TVFUNC 4 CHANNEL ¢ TUNE ST ST ENTER TUNE GUIDE D.ACCESS & BAND ‹ MENU CLASS * MPX DTV ON...
...Manual Tuning • To change frequencies quickly, hold down TUNING -/+ and release when you reach the frequency you desire. 1 4 Adjust the MASTER VOLUME buttons on the remote control or the MASTER VOLUME on the following steps show you how to tune in the station. MPX SOURCE RECEIVER...SELECT MULTI CH INPUT 4 INPUT ATT 5 DIGITAL NR 6 FL DIMMER 7 8 9 REMOTE SETUP SYSTEM SETUP SIGNAL SELECT +10 DISC 0 ENTER EFFECT/CH SEL RECEIVER TV VOL TV MASTER VOLUME TV CONTROL TVFUNC 4 CHANNEL ¢ TUNE ST ST ENTER TUNE GUIDE D.ACCESS & BAND ‹ MENU CLASS * MPX DTV ON...

Owner's Manual
Page 53
...show you want to 30 radio stations in the desired station. If you how to memorize up to select a class number. See "Automatic and Manual Tuning" or "Direct Access Tuning" on p.51 and 52. 2 Press the MEMORY button to activate the memory function. 3 Press the CLASS ...to 30 stations. Repeat steps 1 through 4 to memorize up to escape from MEMORY mode Press the MEMORY button again. When memorizing FM frequencies, the receiver also memorizes the MPX mode (STEREO or MONO). 342 1 Tune in 3 classes (each holding 10 channels). The station is memorized automatically after 5 ...
...show you want to 30 radio stations in the desired station. If you how to memorize up to select a class number. See "Automatic and Manual Tuning" or "Direct Access Tuning" on p.51 and 52. 2 Press the MEMORY button to activate the memory function. 3 Press the CLASS ...to 30 stations. Repeat steps 1 through 4 to memorize up to escape from MEMORY mode Press the MEMORY button again. When memorizing FM frequencies, the receiver also memorizes the MPX mode (STEREO or MONO). 342 1 Tune in 3 classes (each holding 10 channels). The station is memorized automatically after 5 ...

Owner's Manual
Page 79
...or the setting of connections made (see p. 44). • Set the digital input settings correctly (see p.44). • Refer to the instruction manual supplied with DTS is dark. Cause Remedy • Speaker settings are incorrect. • The rear and/or center levels are turned down to prevent... repeatedly to return to the default setting (see p.49). • Press the INPUT ATT button (see p.24). • For 2/DTS sources put the receiver in STANDARD mode (see p.19). • SIGNAL SELECT is set to "ANALOG". • A DVD player not compatible with the reading of digital information....
...or the setting of connections made (see p. 44). • Set the digital input settings correctly (see p.44). • Refer to the instruction manual supplied with DTS is dark. Cause Remedy • Speaker settings are incorrect. • The rear and/or center levels are turned down to prevent... repeatedly to return to the default setting (see p.49). • Press the INPUT ATT button (see p.24). • For 2/DTS sources put the receiver in STANDARD mode (see p.19). • SIGNAL SELECT is set to "ANALOG". • A DVD player not compatible with the reading of digital information....


