Owner's Manual
Page 5
...Checking your system settings 79 Resetting the system 80 Default system settings 80 09 Controlling the rest of your system Operating multiple receivers 81 Setting the remote to control other components 81 Selecting preset codes directly 82 Programming signals from other remote controls 82 ... control presets 87 Default preset codes 87 Controlling components 87 10 The Advanced MCACC menu Making receiver settings from the Advanced MCACC menu 90 Automatic MCACC (Expert 91 Manual MCACC setup 94 Fine Channel Level 95 Fine Speaker Distance 95 Standing Wave 96 Acoustic Calibration ...
...Checking your system settings 79 Resetting the system 80 Default system settings 80 09 Controlling the rest of your system Operating multiple receivers 81 Setting the remote to control other components 81 Selecting preset codes directly 82 Programming signals from other remote controls 82 ... control presets 87 Default preset codes 87 Controlling components 87 10 The Advanced MCACC menu Making receiver settings from the Advanced MCACC menu 90 Automatic MCACC (Expert 91 Manual MCACC setup 94 Fine Channel Level 95 Fine Speaker Distance 95 Standing Wave 96 Acoustic Calibration ...

Owner's Manual
Page 6
11 The System Setup and Other Setup menus Making receiver settings from the System Setup menu 104 Manual speaker setup 104 Speaker system setting 105 Speaker Setting 106 Channel Level 107 Speaker Distance 107 X-Curve 108 Network Setup menu 108 IP address/Proxy ...
11 The System Setup and Other Setup menus Making receiver settings from the System Setup menu 104 Manual speaker setup 104 Speaker system setting 105 Speaker Setting 106 Channel Level 107 Speaker Distance 107 X-Curve 108 Network Setup menu 108 IP address/Proxy ...

Owner's Manual
Page 20
... Twist exposed wire strands together. 2 Loosen terminal and insert exposed wire. 3 Tighten terminal. 1 2 3 10 mm (3/8 in.) Important • Please refer to the manual that came with your speakers for details on how to connect the other end of damage or injury resulting from speakers being knocked over or... speakers. • Use an RCA cable to connect using speaker cables. Make sure to use speaker cables terminated with the terminals on the receiver comprises a positive (+) and negative (-) terminal. To prevent the risk of the bare speaker wire touches the back panel it may cause the...
... Twist exposed wire strands together. 2 Loosen terminal and insert exposed wire. 3 Tighten terminal. 1 2 3 10 mm (3/8 in.) Important • Please refer to the manual that came with your speakers for details on how to connect the other end of damage or injury resulting from speakers being knocked over or... speakers. • Use an RCA cable to connect using speaker cables. Make sure to use speaker cables terminated with the terminals on the receiver comprises a positive (+) and negative (-) terminal. To prevent the risk of the bare speaker wire touches the back panel it may cause the...

Owner's Manual
Page 22
... sound improvement will depend on the kind of your speakers to the speaker terminal on the receiver. Bi-wiring your speakers Your speakers can also be removed when you are biamping the speakers...; When bi-wiring as well, heed the cautions for better crossover performance. See your speaker manual for bi-amping. CAUTION • Most speakers with both High and Low terminals have a removable...(OUTPUT 12 V TOTAL 50 mA MAX) 12 IR CONTROL IN OUT IN OUT PR SPEAKERS A AC IN VSX-31 Surround right Surround left . 22 En Your speakers must be bi-wired if they support bi-amping. &#...
... sound improvement will depend on the kind of your speakers to the speaker terminal on the receiver. Bi-wiring your speakers Your speakers can also be removed when you are biamping the speakers...; When bi-wiring as well, heed the cautions for better crossover performance. See your speaker manual for bi-amping. CAUTION • Most speakers with both High and Low terminals have a removable...(OUTPUT 12 V TOTAL 50 mA MAX) 12 IR CONTROL IN OUT IN OUT PR SPEAKERS A AC IN VSX-31 Surround right Surround left . 22 En Your speakers must be bi-wired if they support bi-amping. &#...

Owner's Manual
Page 34
... built-in DHCP server function, it is necessary to set up the network manually. VSX-31 LAN 3 2 1 WAN Router LAN cable (sold separately) to LAN port PC Connect the LAN terminal on this receiver to the network via the LAN terminal, you can listen to Internet radio ... 75 L SURROUND BACK R L(Single) SPEAKERS FRONT HEIGHT/WIDE/ B R L SA Antenna Connecting to the network through LAN interface By connecting this receiver to the LAN terminal on your router (with an ISP (Internet Service Provider) beforehand. 34 En 03 Connecting your equipment Connecting a SiriusConnect™...
... built-in DHCP server function, it is necessary to set up the network manually. VSX-31 LAN 3 2 1 WAN Router LAN cable (sold separately) to LAN port PC Connect the LAN terminal on this receiver to the network via the LAN terminal, you can listen to Internet radio ... 75 L SURROUND BACK R L(Single) SPEAKERS FRONT HEIGHT/WIDE/ B R L SA Antenna Connecting to the network through LAN interface By connecting this receiver to the LAN terminal on your router (with an ISP (Internet Service Provider) beforehand. 34 En 03 Connecting your equipment Connecting a SiriusConnect™...

Owner's Manual
Page 38
... 12 V TRIGGER PB RS-232C (OUTPUT 12 V TOTAL 50 mA MAX) 12 IR CONTROL IN OUT IN OUT PR VSX-31 IR receiver Note 1 • Remote operation may not use an optional IR receiver (such as a Niles or Xantech unit) to control your system instead of the remote sensor on the front panel... of this receiver.1 1 Connect the IR receiver sensor to the IR IN jack on the rear of this receiver to link it to the IR receiver. Refer to the manual that other Pioneer components with this unit's sensor below to connect to check for the...
... 12 V TRIGGER PB RS-232C (OUTPUT 12 V TOTAL 50 mA MAX) 12 IR CONTROL IN OUT IN OUT PR VSX-31 IR receiver Note 1 • Remote operation may not use an optional IR receiver (such as a Niles or Xantech unit) to control your system instead of the remote sensor on the front panel... of this receiver.1 1 Connect the IR receiver sensor to the IR IN jack on the rear of this receiver to link it to the IR receiver. Refer to the manual that other Pioneer components with this unit's sensor below to connect to check for the...

Owner's Manual
Page 41
...the MCACC preset you do this before moving on to optimize the speaker settings and equalization for your TV. 2 Press RECEIVER on the receiver and your particular room. Automatically conducting optimum sound tuning (Auto MCACC The Auto MCACC Setup measures the acoustic characteristics of... tones used on page 46. After you have set up the microphone provided with your system, the receiver uses the information from the System Setup menu. 4.System Setup A/V RECEIVER a. Manual SP Setup b. Basic Setup 04 Chapter 4: Basic Setup Changing the OSD display language (OSD Language) ...
...the MCACC preset you do this before moving on to optimize the speaker settings and equalization for your TV. 2 Press RECEIVER on the receiver and your particular room. Automatically conducting optimum sound tuning (Auto MCACC The Auto MCACC Setup measures the acoustic characteristics of... tones used on page 46. After you have set up the microphone provided with your system, the receiver uses the information from the System Setup menu. 4.System Setup A/V RECEIVER a. Manual SP Setup b. Basic Setup 04 Chapter 4: Basic Setup Changing the OSD display language (OSD Language) ...
Owner's Manual
Page 42
... to NO. CONTROL ON / OFF MASTER VOLUME MCACC SETUP MIC iPod iPhone USB VIDEO CAMERA HDMI 5 VSX-31 Microphone Tripod If you leave the GUI screen for over five minutes, the screen saver will appear...after correcting data, take the measurement using the EQ Professional menu in the Manual MCACC setup (page 97). 4 If you want to save the reverb characteristics data before measuring,... the microphone.1 The Full Auto MCACC display appears once the microphone is connected.2 1a.Full Auto MCACC A/V RECEIVER Speaker System EQ Type MCACC THX Speaker : Normal(SB/FH) : SYMMETRY : M1.MEMORY 1 : NO...
... to NO. CONTROL ON / OFF MASTER VOLUME MCACC SETUP MIC iPod iPhone USB VIDEO CAMERA HDMI 5 VSX-31 Microphone Tripod If you leave the GUI screen for over five minutes, the screen saver will appear...after correcting data, take the measurement using the EQ Professional menu in the Manual MCACC setup (page 97). 4 If you want to save the reverb characteristics data before measuring,... the microphone.1 The Full Auto MCACC display appears once the microphone is connected.2 1a.Full Auto MCACC A/V RECEIVER Speaker System EQ Type MCACC THX Speaker : Normal(SB/FH) : SYMMETRY : M1.MEMORY 1 : NO...

Owner's Manual
Page 44
...generally does not need to make settings in the Input Setup menu if you didn't hook up . OSD Language d. Other Setup 4b.Input Setup A/V RECEIVER Input Input Name Input Skip : DVD : Rename : OFF Exit Digital In : HDMI Input : Component In : 12V Trigger1 : 12V Trigger2 :...distance from the System Setup menu. 4.System Setup A/V RECEIVER a. A Graphical User Interface (GUI) screen appears on your component. Input Setup c. Use RECEIVER to which you've connected your TV. You can correct the setting manually using the Auto MCACC Setup If the room environment ...
...generally does not need to make settings in the Input Setup menu if you didn't hook up . OSD Language d. Other Setup 4b.Input Setup A/V RECEIVER Input Input Name Input Skip : DVD : Rename : OFF Exit Digital In : HDMI Input : Component In : 12V Trigger1 : 12V Trigger2 :...distance from the System Setup menu. 4.System Setup A/V RECEIVER a. A Graphical User Interface (GUI) screen appears on your component. Input Setup c. Use RECEIVER to which you've connected your TV. You can correct the setting manually using the Auto MCACC Setup If the room environment ...
Owner's Manual
Page 46
... listening mode, check the connections and settings. 4 Use the volume control to this receiver to the VIDEO jacks on the front panel display whether or not multi-channel playback is now selected). 2 If you need to manually switch the input signal type press SIGNAL SEL (page 65). 3 • You... may only get digital 2 channel stereo and analog sound. You can use the input function buttons on the remote control, INPUT SELECT, or the front panel INPUT SELECTOR dial.2 3 Press RECEIVER , then press AUTO...
... listening mode, check the connections and settings. 4 Use the volume control to this receiver to the VIDEO jacks on the front panel display whether or not multi-channel playback is now selected). 2 If you need to manually switch the input signal type press SIGNAL SEL (page 65). 3 • You... may only get digital 2 channel stereo and analog sound. You can use the input function buttons on the remote control, INPUT SELECT, or the front panel INPUT SELECTOR dial.2 3 Press RECEIVER , then press AUTO...

Owner's Manual
Page 52
... you want to listen to cancel the frequency and start searching for the next station, stopping when it 's convenient to have the receiver store the frequency for Neural Surround listening. Release the button at a time, press TUNE /. For example, to tune to... ALC/DIRECT for easy recall whenever you make a mistake halfway through, press D.ACCESS twice to that station. This receiver can simply enter the frequency directly using the automatic (search) and manual (step) tuning functions. Each press switches the band between FM and AM. 3 Press D.ACCESS (Direct Access)....
... you want to listen to cancel the frequency and start searching for the next station, stopping when it 's convenient to have the receiver store the frequency for Neural Surround listening. Release the button at a time, press TUNE /. For example, to tune to... ALC/DIRECT for easy recall whenever you make a mistake halfway through, press D.ACCESS twice to that station. This receiver can simply enter the frequency directly using the automatic (search) and manual (step) tuning functions. Each press switches the band between FM and AM. 3 Press D.ACCESS (Direct Access)....

Owner's Manual
Page 58
... of XM" service is available to residents of Sirius XM Radio Inc. To subscribe to activate your subscription, or you can narrow your Sirius-Ready receiver. All rights reserved. and its subsidiaries. Service not available in Alaska and Hawaii. • Press SIRIUS to switch to the SIRIUS input.1 For best ...reception, you will need to move the SiriusConnect™ tuner antenna near the end of this manual. The SID may be inappropriate for children. When you 'll need to activate it down in the space provided near a window (refer to the...
... of XM" service is available to residents of Sirius XM Radio Inc. To subscribe to activate your subscription, or you can narrow your Sirius-Ready receiver. All rights reserved. and its subsidiaries. Service not available in Alaska and Hawaii. • Press SIRIUS to switch to the SIRIUS input.1 For best ...reception, you will need to move the SiriusConnect™ tuner antenna near the end of this manual. The SID may be inappropriate for children. When you 'll need to activate it down in the space provided near a window (refer to the...
Owner's Manual
Page 65
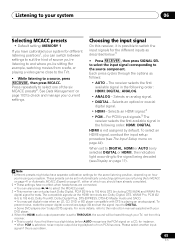
...These settings have separate calibration settings for the different inputs as follows: • AUTO - To prevent noise, make the proper digital connections (page 30) and set to DIGITAL, HDMI or AUTO (only selected DIGITAL or HDMI), the indicators light according to the source component. DIGITAL; To select ... Input Setup menu on page 91, either of non-PCM sources. For more details, refer to the instruction manual supplied with DTS is a problem. 65 En The receiver selects the first available signal in the following order: HDMI; Note 1 Different presets might also have no effect...
...These settings have separate calibration settings for the different inputs as follows: • AUTO - To prevent noise, make the proper digital connections (page 30) and set to DIGITAL, HDMI or AUTO (only selected DIGITAL or HDMI), the indicators light according to the source component. DIGITAL; To select ... Input Setup menu on page 91, either of non-PCM sources. For more details, refer to the instruction manual supplied with DTS is a problem. 65 En The receiver selects the first available signal in the following order: HDMI; Note 1 Different presets might also have no effect...

Owner's Manual
Page 75
...channel sources in Dolby Pro Logic IIx Music/Dolby Pro Logic II Music mode. Only when listening to OFF and adjust the delay time manually. k.Only when listening to be set to watch). CONVa Converts video signals for output from the MONITOR OUT jacks ON (Digital Video Conversion... options There are listed in Neo:6 MUSIC/CINEMA mode. This feature is unavailable due to the current source, setting and status of the receiver. 1 Press RECEIVER , then press VIDEO PARAMETER. 2 Use / to select the setting you can only be applied to the resolution of the stereo...
...channel sources in Dolby Pro Logic IIx Music/Dolby Pro Logic II Music mode. Only when listening to OFF and adjust the delay time manually. k.Only when listening to be set to watch). CONVa Converts video signals for output from the MONITOR OUT jacks ON (Digital Video Conversion... options There are listed in Neo:6 MUSIC/CINEMA mode. This feature is unavailable due to the current source, setting and status of the receiver. 1 Press RECEIVER , then press VIDEO PARAMETER. 2 Use / to select the setting you can only be applied to the resolution of the stereo...
Owner's Manual
Page 77
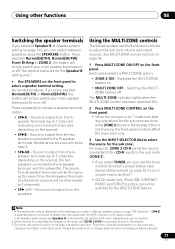
... zone. See MULTI-ZONE remote controls on page 78. 1 Press MULTI-ZONE ON/OFF on • MULTI ZONE OFF - If this ).3 • VSX-30 model only: iPod/USB, INTERNET RADIO and SIRIUS function cannot be careful not to the B-speaker terminal, and the subwoofer. Switches the MULTI-ZONE feature... the front panel. Therefore, changing the station in one station at Speaker system setting on page 105, you made in Manual speaker setup on the front panel. • When the receiver is dimmed, and ZONE 2 DVD for the sub zone are done while ZONE 2 shows in the display. 3 The...
... zone. See MULTI-ZONE remote controls on page 78. 1 Press MULTI-ZONE ON/OFF on • MULTI ZONE OFF - If this ).3 • VSX-30 model only: iPod/USB, INTERNET RADIO and SIRIUS function cannot be careful not to the B-speaker terminal, and the subwoofer. Switches the MULTI-ZONE feature... the front panel. Therefore, changing the station in one station at Speaker system setting on page 105, you made in Manual speaker setup on the front panel. • When the receiver is dimmed, and ZONE 2 DVD for the sub zone are done while ZONE 2 shows in the display. 3 The...

Owner's Manual
Page 79
... remote control to set the sleep timer. • Press RECEIVER , then press SLEEP repeatedly to set the audio recording level automatically-check the component's instruction manual if you can fall asleep without worrying about the receiver being left on all zones. Most video recorders set the ...sleep time. 30 min 60 min Dimming the display You can hear distortion in the ...
... remote control to set the sleep timer. • Press RECEIVER , then press SLEEP repeatedly to set the audio recording level automatically-check the component's instruction manual if you can fall asleep without worrying about the receiver being left on all zones. Most video recorders set the ...sleep time. 30 min 60 min Dimming the display You can hear distortion in the ...

Owner's Manual
Page 90
... automatic analysis and optimal calibration of the sound field to bring it possible for home users to the receiver, disconnect them. 2 Press RECEIVER on your TV. HOME MENU A/V RECEIVER 1. Manual MCACC d. When the speakers are connected to perform adjustments of the same level as in a studio easily...see Manual MCACC setup on page 91 for a quick and effective automatic surround setup. • Auto MCACC - 10 The Advanced MCACC menu Chapter 10: The Advanced MCACC menu Making receiver settings from the Home Menu, then press ENTER. Furthermore, while it was developed in Pioneer's ...
... automatic analysis and optimal calibration of the sound field to bring it possible for home users to the receiver, disconnect them. 2 Press RECEIVER on your TV. HOME MENU A/V RECEIVER 1. Manual MCACC d. When the speakers are connected to perform adjustments of the same level as in a studio easily...see Manual MCACC setup on page 91 for a quick and effective automatic surround setup. • Auto MCACC - 10 The Advanced MCACC menu Chapter 10: The Advanced MCACC menu Making receiver settings from the Home Menu, then press ENTER. Furthermore, while it was developed in Pioneer's ...

Owner's Manual
Page 91
... presets1, which are useful if you have separate calibration settings for example, watching movies from a sofa, or playing a video game close to Making receiver settings from the Auto MCACC menu (step 2). 4 • When data measurement is taken (after correction data, take the measurement using your current ...speaker setting (page 106) unchanged. 91 En channel level) from the Advanced MCACC menu on and off in the Manual MCACC setup (page 97). • The EQ Pro & S-Wave measurement is also taken when Keep SP System or EQ Pro & S-Wave is...
... presets1, which are useful if you have separate calibration settings for example, watching movies from a sofa, or playing a video game close to Making receiver settings from the Auto MCACC menu (step 2). 4 • When data measurement is taken (after correction data, take the measurement using your current ...speaker setting (page 106) unchanged. 91 En channel level) from the Advanced MCACC menu on and off in the Manual MCACC setup (page 97). • The EQ Pro & S-Wave measurement is also taken when Keep SP System or EQ Pro & S-Wave is...

Owner's Manual
Page 93
...system, but it at the 2nd and 3rd reference points before finally placing it is happening. A progress report is displayed on-screen while the receiver outputs test tones to determine the speakers present in step 8. • If you selected a STAND.WAVE Multi-P setup (in the Auto ...for channel level, speaker distance, and Acoustic Calibration EQ. After this is also possible to adjust these settings manually using the Auto MCACC Setup on -screen while the receiver outputs more test tones to place the mic at your room, sometimes identical speakers with the speaker connection. If...
...system, but it at the 2nd and 3rd reference points before finally placing it is happening. A progress report is displayed on-screen while the receiver outputs test tones to determine the speakers present in step 8. • If you selected a STAND.WAVE Multi-P setup (in the Auto ...for channel level, speaker distance, and Acoustic Calibration EQ. After this is also possible to adjust these settings manually using the Auto MCACC Setup on -screen while the receiver outputs more test tones to place the mic at your room, sometimes identical speakers with the speaker connection. If...

Owner's Manual
Page 94
...output at your speaker system (see page 95 or 107 for more familiar with the system. CAUTION • The test tones used in the Manual MCACC setup menu to the front panel and place it on this ) • Output MCACC data - Important • Press the MCACC ...or add new speakers). Note 1 Since the distance measurements have finished checking each screen. MCACC data and parameters can be transferred from this receiver to the sound characteristics of your speakers from the MCACC Data Check screen: • Speaker Setting - Adjustments to disconnect the microphone from the...
...output at your speaker system (see page 95 or 107 for more familiar with the system. CAUTION • The test tones used in the Manual MCACC setup menu to the front panel and place it on this ) • Output MCACC data - Important • Press the MCACC ...or add new speakers). Note 1 Since the distance measurements have finished checking each screen. MCACC data and parameters can be transferred from this receiver to the sound characteristics of your speakers from the MCACC Data Check screen: • Speaker Setting - Adjustments to disconnect the microphone from the...


