

Owner's Manual
Page 4
...Digital Noise reduction is the latest technology for cinemas throughout the world. New LCD Remote Control This touch sensitive screen remote control is the latest in standby mode, refer to teach the remote control new commands. In addition, the multi-operation functions allow you to have just one... gives you experience in power amplifiers, with both Dolby Digital, Dolby Surround and DTS sources. Direct Energy MOS amplifier The VSX-29TX receiver incorporates 5 independent 120 watt built in well designed movie theaters. The Energy-saving Design This unit is designed to...
...Digital Noise reduction is the latest technology for cinemas throughout the world. New LCD Remote Control This touch sensitive screen remote control is the latest in standby mode, refer to teach the remote control new commands. In addition, the multi-operation functions allow you to have just one... gives you experience in power amplifiers, with both Dolby Digital, Dolby Surround and DTS sources. Direct Energy MOS amplifier The VSX-29TX receiver incorporates 5 independent 120 watt built in well designed movie theaters. The Energy-saving Design This unit is designed to...

Owner's Manual
Page 5
... UP Table of Contents Before You Start 6 Checking the Supplied Accessories 6 How to Use This Manual 6 Preparing the Remote Control 6 Installing the Receiver 7 Opening the Front Panel 7 Connecting Your Equipment 8 Audio Components 8 Video Components 9 Digital...45 Recalling Memorized Stations 46 Remote Control of Other Components 47 Setting Up the Remote Control to Control Other Components 47 Recalling Settings Stored in the Remote Control 47 Learning Mode: Programming Signals from Other Remote Controls ... 49 Locking the Settings 50 Using Remote Control with Other Components 51 ...
... UP Table of Contents Before You Start 6 Checking the Supplied Accessories 6 How to Use This Manual 6 Preparing the Remote Control 6 Installing the Receiver 7 Opening the Front Panel 7 Connecting Your Equipment 8 Audio Components 8 Video Components 9 Digital...45 Recalling Memorized Stations 46 Remote Control of Other Components 47 Setting Up the Remote Control to Control Other Components 47 Recalling Settings Stored in the Remote Control 47 Learning Mode: Programming Signals from Other Remote Controls ... 49 Locking the Settings 50 Using Remote Control with Other Components 51 ...
Owner's Manual
Page 6
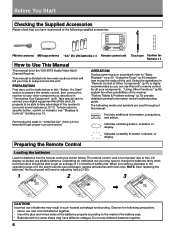
...you how to your other possibilities of Other Components" (p.47) is divided into the remote control as shown below in "Initial Set Up" (from p.21) is for the VSX-29TX Audio/Video MultiChannel Receiver. Incorrect use of the batteries properly according to take advantage of... ª ·· ª \ ª · \ CAUTION! FM wire antenna AM loop antenna "AA" IEC LR6 batteries x 4 Remote control unit Touch pen Cushion for Remote x 4 How to Use This Manual This manual is essential to use alkaline batteries. Performing the tasks in this "Before You Start" section to...
...you how to your other possibilities of Other Components" (p.47) is divided into the remote control as shown below in "Initial Set Up" (from p.21) is for the VSX-29TX Audio/Video MultiChannel Receiver. Incorrect use of the batteries properly according to take advantage of... ª ·· ª \ ª · \ CAUTION! FM wire antenna AM loop antenna "AA" IEC LR6 batteries x 4 Remote control unit Touch pen Cushion for Remote x 4 How to Use This Manual This manual is essential to use alkaline batteries. Performing the tasks in this "Before You Start" section to...
Owner's Manual
Page 7
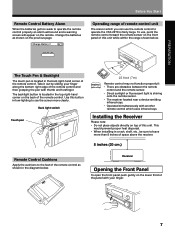
... receiver. 8 inches (20 cm.) Remote Control Cushions Apply the cushions to operate the VSX-29TX is shining onto the remote sensor. • The receiver located near a device emitting infrared rays. • Operated simultaneously with another remote control which you can use , point the remote control toward the remote sensor on the front panel of the remote control. Change the batteries as shown...
... receiver. 8 inches (20 cm.) Remote Control Cushions Apply the cushions to operate the VSX-29TX is shining onto the remote sensor. • The receiver located near a device emitting infrared rays. • Operated simultaneously with another remote control which you can use , point the remote control toward the remote sensor on the front panel of the remote control. Change the batteries as shown...
Owner's Manual
Page 16
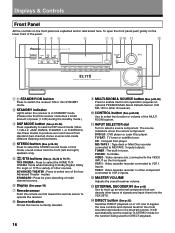
To open the front panel push gently on the front panel are explained and/or referenced here. Displays & Controls Front Panel All the controls on the lower third of the panel. 1 2 34 5 6 7 8 90 - = AUDIO/VIDEO MULTI-CHANNEL RECEIVER N∫m¿
To open the front panel push gently on the front panel are explained and/or referenced here. Displays & Controls Front Panel All the controls on the lower third of the panel. 1 2 34 5 6 7 8 90 - = AUDIO/VIDEO MULTI-CHANNEL RECEIVER N∫m¿
Owner's Manual
Page 19
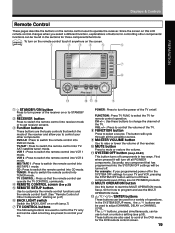
...will turn power of the receiver on the remote control touch it will cycle through all PIONEER components. Secondly, any component that the remote control can be used to switch the remote control into TUNER mode. These buttons are the basic controls that switch the mode of the TV. memo... operations. FUNCTION : Press TV FUNC to switch the remote control into VCR 2 mode. CH +/- : Use these components even if they are not PIONEER products. = MULTI OPERATION button Use this LCD remote control changes when you to control the DVD menu for your TV and VCR, pressing the...
...will turn power of the receiver on the remote control touch it will cycle through all PIONEER components. Secondly, any component that the remote control can be used to switch the remote control into TUNER mode. These buttons are the basic controls that switch the mode of the TV. memo... operations. FUNCTION : Press TV FUNC to switch the remote control into VCR 2 mode. CH +/- : Use these components even if they are not PIONEER products. = MULTI OPERATION button Use this LCD remote control changes when you to control the DVD menu for your TV and VCR, pressing the...

Owner's Manual
Page 20
... mode only). 3 SYSTEM SET UP button Use to set up an external component that can decode other types of signals and input them into the VSX-29TX. 7 TAPE 2 MONITOR button (see "Setting for the function being made. 20 In this mode, sound comes from 10-90 with 70 as it's ... for Surround Sound " starting on p. 23. 4 CHANNEL LEVEL button (See 27-28) Use this button to select the main receiver screen (above ) when the remote control is the default. It will light furiously). 6 EXTERNAL 5.1 CHANNEL button (See p.40) Use to hook up the speaker and sound systems. For more information see...
... mode only). 3 SYSTEM SET UP button Use to set up an external component that can decode other types of signals and input them into the VSX-29TX. 7 TAPE 2 MONITOR button (see "Setting for the function being made. 20 In this mode, sound comes from 10-90 with 70 as it's ... for Surround Sound " starting on p. 23. 4 CHANNEL LEVEL button (See 27-28) Use this button to select the main receiver screen (above ) when the remote control is the default. It will light furiously). 6 EXTERNAL 5.1 CHANNEL button (See p.40) Use to hook up the speaker and sound systems. For more information see...
Owner's Manual
Page 21
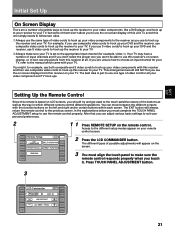
...ADJUSTMENT setup to your TV. The EXIT button will appear on -screen display of this receiver at all your TV. 2 Always make sure the remote control responds properly when you won 't allow you don't select the proper one type of input channels and if you to use one you touch ...to follow two rules. 1 Always use this receiver on -screen display, or, in which came with your TV. SET UP Setting Up the Remote Control Since this remote is set to the different setup modes appear on screen displays from this unit. This arrangement would still NOT let you should try and...
...ADJUSTMENT setup to your TV. The EXIT button will appear on -screen display of this receiver at all your TV. 2 Always make sure the remote control responds properly when you won 't allow you don't select the proper one type of input channels and if you to use one you touch ...to follow two rules. 1 Always use this receiver on -screen display, or, in which came with your TV. SET UP Setting Up the Remote Control Since this remote is set to the different setup modes appear on screen displays from this unit. This arrangement would still NOT let you should try and...

Owner's Manual
Page 22
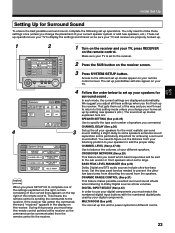
... screen. 5 Decide which other adjustments you'd like to make sure your remote control is not possible. Use the - /+ buttons to stay on the remote control screen. You can choose how long the idle remote control will make and press those operations, are all four cross points the screen...with the LCD panel underneath. The default setting is ON). memo You can turn the remote control off after a set up mode. 22 When you have sent a command (pushed a button) the remote control will turn off after 60 seconds.) 6 When finished with adjustments press the EXIT button ...
... screen. 5 Decide which other adjustments you'd like to make sure your remote control is not possible. Use the - /+ buttons to stay on the remote control screen. You can choose how long the idle remote control will make and press those operations, are all four cross points the screen...with the LCD panel underneath. The default setting is ON). memo You can turn the remote control off after a set up mode. 22 When you have sent a command (pushed a button) the remote control will turn off after 60 seconds.) 6 When finished with adjustments press the EXIT button ...
Owner's Manual
Page 23
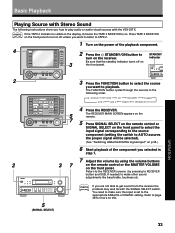
...(See p.27-28) Use to balance the volumes of the way and you won't need to make these settings when you must keep the remote control pointed at low volumes. CROSSOVER NETWORK (See p.29) This feature lets you change your TV to display the settings and choices so be sent... on the receiver. During this unit to the different set up this process you change the placement of the remote control. Access to power systems in the display on the receiver and your remote control screen. We suggest you adjust all your TV. 4 Receiver RECEIVER TAPE 2 EXTERNAL DVD/LD MONITOR 5.1CH...
...(See p.27-28) Use to balance the volumes of the way and you won't need to make these settings when you must keep the remote control pointed at low volumes. CROSSOVER NETWORK (See p.29) This feature lets you change your TV to display the settings and choices so be sent... on the receiver. During this unit to the different set up this process you change the placement of the remote control. Access to power systems in the display on the receiver and your remote control screen. We suggest you adjust all your TV. 4 Receiver RECEIVER TAPE 2 EXTERNAL DVD/LD MONITOR 5.1CH...

Owner's Manual
Page 25
... the size and shape of bass due to LARGE and SMALL alternatively and let your FRONT speakers and leave the sub woofer selected. Hold the remote control pointed towards the receiver until you may not, however, yield the best bass results. This may actually experience a decrease in the amount of your TV...
... the size and shape of bass due to LARGE and SMALL alternatively and let your FRONT speakers and leave the sub woofer selected. Hold the remote control pointed towards the receiver until you may not, however, yield the best bass results. This may actually experience a decrease in the amount of your TV...

Owner's Manual
Page 26
...buttons to add or subtract the distance in 1 foot increments from SPEAKER SETTING go to the SYSTEM SETUP MENU. SETUP OK 3 Hold the remote control pointed towards the receiver until you specify the speaker distances, the receiver calculates the correct delay times automatically. If "ERROR" flashes in "Setting... from your listening position to each channel by pressing its button and use the %¥fi buttons at the bottom of the remote control instead of the +/- The default setting is from your listening position to set the delay time for Surround Sound" (p.23) first...
...buttons to add or subtract the distance in 1 foot increments from SPEAKER SETTING go to the SYSTEM SETUP MENU. SETUP OK 3 Hold the remote control pointed towards the receiver until you specify the speaker distances, the receiver calculates the correct delay times automatically. If "ERROR" flashes in "Setting... from your listening position to each channel by pressing its button and use the %¥fi buttons at the bottom of the remote control instead of the +/- The default setting is from your listening position to set the delay time for Surround Sound" (p.23) first...

Owner's Manual
Page 27
...1. Proper speaker balance is output in "Setting Up for obtaining high quality surround sound. The CHANNEL LEVEL settings will appear on your remote control screen. 2 Select a test tone mode by pressing one of the speaker buttons by accident the TEST TONE will be displayed on the...test tone is essential for Surround Sound" (p.23) first. 1 System Setup EXIT SPEAKER SETTING BASS PEAK LEVEL MANAGER CHANNEL DELAY DYNAMIC RANGE CONTROL CHANNEL LEVEL DIGITAL INPUT SELECT CROSSOVER NETWORK MULTI ROOM 2 Channel Level AUTO TEST TONE MANUAL TEST TONE SETUP OK 1 Press the CHANNEL ...
...1. Proper speaker balance is output in "Setting Up for obtaining high quality surround sound. The CHANNEL LEVEL settings will appear on your remote control screen. 2 Select a test tone mode by pressing one of the speaker buttons by accident the TEST TONE will be displayed on the...test tone is essential for Surround Sound" (p.23) first. 1 System Setup EXIT SPEAKER SETTING BASS PEAK LEVEL MANAGER CHANNEL DELAY DYNAMIC RANGE CONTROL CHANNEL LEVEL DIGITAL INPUT SELECT CROSSOVER NETWORK MULTI ROOM 2 Channel Level AUTO TEST TONE MANUAL TEST TONE SETUP OK 1 Press the CHANNEL ...

Owner's Manual
Page 28
...after testing with an actual soundtrack. Doing the set channel levels temporarily. Using this method you hear the test tone at the bottom of the remote control instead of all the speaker levels have been made. 28 In AUTO mode 1 Use the +/- (or %/fi) buttons to adjust the ...DVD/LD TV/SAT VCR1 VCR2 ENTER STANDBY/ON %¥fi buttons Channel Level AUTO TEST TONE MANUAL TEST TONE SETUP OK 4 3 Using the remote control display, follow the same procedure as Surround/dts, STEREO, EXTERNAL DECODER and each DSP mode, independently. NOTE : The volume of the speaker outputting...
...after testing with an actual soundtrack. Doing the set channel levels temporarily. Using this method you hear the test tone at the bottom of the remote control instead of all the speaker levels have been made. 28 In AUTO mode 1 Use the +/- (or %/fi) buttons to adjust the ...DVD/LD TV/SAT VCR1 VCR2 ENTER STANDBY/ON %¥fi buttons Channel Level AUTO TEST TONE MANUAL TEST TONE SETUP OK 4 3 Using the remote control display, follow the same procedure as Surround/dts, STEREO, EXTERNAL DECODER and each DSP mode, independently. NOTE : The volume of the speaker outputting...

Owner's Manual
Page 30
... Use the +/- on PLUS) the test tone will only sound from CROSSOVER NETWORK go to MIN (----dB). You may exceed the capabilities of the remote control) to specify the bass peak level. 1 Raise the level gradually. 2 Set the bass peak level at the point just before you have selected. ... (or the MASTER VOLUME +/- FUNCTION M MUTING MASTER VOLUME + - 4 Press the SET button to the receiver but the screen remains on the remote control. The display on which speakers you can produce heavily concentrated ultra-low bass tones that may need to set the peak level for Surround Sound...
... Use the +/- on PLUS) the test tone will only sound from CROSSOVER NETWORK go to MIN (----dB). You may exceed the capabilities of the remote control) to specify the bass peak level. 1 Raise the level gradually. 2 Set the bass peak level at the point just before you have selected. ... (or the MASTER VOLUME +/- FUNCTION M MUTING MASTER VOLUME + - 4 Press the SET button to the receiver but the screen remains on the remote control. The display on which speakers you can produce heavily concentrated ultra-low bass tones that may need to set the peak level for Surround Sound...

Owner's Manual
Page 31
... the amount of sources. You may need to experiment with different Dolby Digital sources before proceeding Choose a new DYNAMIC RANGE CONTROL setting. Dynamic range is OFF. 3 Press SETUP OK. Hold the remote control pointed towards the receiver until you want to enjoy full surround sound effects on p.40) accomplishes the same end for...
... the amount of sources. You may need to experiment with different Dolby Digital sources before proceeding Choose a new DYNAMIC RANGE CONTROL setting. Dynamic range is OFF. 3 Press SETUP OK. Hold the remote control pointed towards the receiver until you want to enjoy full surround sound effects on p.40) accomplishes the same end for...

Owner's Manual
Page 32
...numbers on the back of the digital components you connected. System Setup EXIT SPEAKER SETTING BASS PEAK LEVEL MANAGER CHANNEL DELAY DYNAMIC RANGE CONTROL CHANNEL LEVEL DIGITAL INPUT SELECT CROSSOVER NETWORK MULTI ROOM 2 Press the DIGITAL INPUT SELECT button you want to assign to select it ... it . Remember, if you have a DVD/LD player or LD player you connected one function cannot be assigned twice. Hold the remote control pointed towards the receiver until all the digital in buttons correspond to the components you hooked up to each of the receiver to make ...
...numbers on the back of the digital components you connected. System Setup EXIT SPEAKER SETTING BASS PEAK LEVEL MANAGER CHANNEL DELAY DYNAMIC RANGE CONTROL CHANNEL LEVEL DIGITAL INPUT SELECT CROSSOVER NETWORK MULTI ROOM 2 Press the DIGITAL INPUT SELECT button you want to assign to select it ... it . Remember, if you have a DVD/LD player or LD player you connected one function cannot be assigned twice. Hold the remote control pointed towards the receiver until all the digital in buttons correspond to the components you hooked up to each of the receiver to make ...
Owner's Manual
Page 33
... will be selected). (See "Switching ANALOG/DIGITAL signal input" on this. The RECEIVER MAIN SCREEN appears on the remote. 5 Press SIGNAL SELECT on the remote control or SIGNAL SELECT on the front panel to select the input signal corresponding to the source component (setting the switch ...38.) 6 Start playback of the playback component. 2 Press the STANDBY/ON button to get sound from the receiver the problem may well lie with the VSX-29TX. FUNCTION ENTER STANDBY/ON MULTI SYSTEM OPERATION OFF MUTING MASTER VOLUME + - 5 7 DVD/LD TV/SAT CD MD/TAPE 1 TUNER VCR 1 VCR ...
... will be selected). (See "Switching ANALOG/DIGITAL signal input" on this. The RECEIVER MAIN SCREEN appears on the remote. 5 Press SIGNAL SELECT on the remote control or SIGNAL SELECT on the front panel to select the input signal corresponding to the source component (setting the switch ...38.) 6 Start playback of the playback component. 2 Press the STANDBY/ON button to get sound from the receiver the problem may well lie with the VSX-29TX. FUNCTION ENTER STANDBY/ON MULTI SYSTEM OPERATION OFF MUTING MASTER VOLUME + - 5 7 DVD/LD TV/SAT CD MD/TAPE 1 TUNER VCR 1 VCR ...

Owner's Manual
Page 34
...'s level does not match the average dialog level, first you see which emulate a concert hall. Basic Playback Sound Modes The five sound modes on the VSX-29TX are playing is encoded with DTS or Dolby Digital (bearing the DOLBY DIGITAL logo). These can deliver realistic and powerful surround sound that have been... (CINEMA) This mode is primarily for movies with various soundtracks to the sound. NORM" flash in conjunction with the MIDNIGHT LISTENING mode explained on the remote control.
...'s level does not match the average dialog level, first you see which emulate a concert hall. Basic Playback Sound Modes The five sound modes on the VSX-29TX are playing is encoded with DTS or Dolby Digital (bearing the DOLBY DIGITAL logo). These can deliver realistic and powerful surround sound that have been... (CINEMA) This mode is primarily for movies with various soundtracks to the sound. NORM" flash in conjunction with the MIDNIGHT LISTENING mode explained on the remote control.
Owner's Manual
Page 37
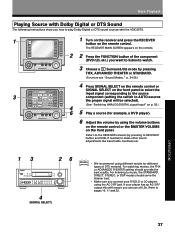
... TUNER TV CONTROL on off BACK LIGHT TV CONTROL FUNCTION CH + CH - SET UP Basic Playback Playing Source with Dolby Digital or DTS Sound The following instructions show you how to play Dolby Digital or DTS sound sources with the VSX-29TX. 1 RECEIVER DVD/LD TV/SAT VCR1 VCR2 REMOTE SETUP MD/...TAPE1 CD TUNER TV CONTROL on off BACK LIGHT TV CONTROL FUNCTION CH + CH - VOL + VOL - For listening to make other sound adjustments like bass...
... TUNER TV CONTROL on off BACK LIGHT TV CONTROL FUNCTION CH + CH - SET UP Basic Playback Playing Source with Dolby Digital or DTS Sound The following instructions show you how to play Dolby Digital or DTS sound sources with the VSX-29TX. 1 RECEIVER DVD/LD TV/SAT VCR1 VCR2 REMOTE SETUP MD/...TAPE1 CD TUNER TV CONTROL on off BACK LIGHT TV CONTROL FUNCTION CH + CH - VOL + VOL - For listening to make other sound adjustments like bass...


