
Owner's Manual
Page 5
......90 Dimming the display...90 Checking your system settings...90 Resetting the system...91 11 Controlling the rest of your system (VSX-1130 only) About the Remote Setup menu...93 Operating multiple receivers...93 Setting the remote to control other components...93 Selecting preset ... remote control settings...95 Controlling components...96 12 The MCACC PRO (VSX-1130)/Advanced MCACC (VSX-830) menu Making receiver settings from the MCACC PRO (VSX-1130)/Advanced MCACC (VSX-830) menu 99 Automatic MCACC (Expert)...99 Manual MCACC setup...101 Checking MCACC Data...103 Data Management...104 14 FAQ...
......90 Dimming the display...90 Checking your system settings...90 Resetting the system...91 11 Controlling the rest of your system (VSX-1130 only) About the Remote Setup menu...93 Operating multiple receivers...93 Setting the remote to control other components...93 Selecting preset ... remote control settings...95 Controlling components...96 12 The MCACC PRO (VSX-1130)/Advanced MCACC (VSX-830) menu Making receiver settings from the MCACC PRO (VSX-1130)/Advanced MCACC (VSX-830) menu 99 Automatic MCACC (Expert)...99 Manual MCACC setup...101 Checking MCACC Data...103 Data Management...104 14 FAQ...

Owner's Manual
Page 8
... Atmos can be played by manual correction. % Virtual Speakers By turning on the group delay in the first place. This function is particularly effective when playing multi-channel music containing low frequency effects (LFE). % Full Band Phase Control VSX-1130 only The further advanced Full Band...Control, the LFE channel is delayed upon recording in the speaker network filter, and compensates with this receiver using MCACC PRO (VSX-1130)/Advanced MCACC (VSX-830) The Auto MCACC Setup provides a quick but accurate surround sound setup, which , through and displayed as compressed audio is...
... Atmos can be played by manual correction. % Virtual Speakers By turning on the group delay in the first place. This function is particularly effective when playing multi-channel music containing low frequency effects (LFE). % Full Band Phase Control VSX-1130 only The further advanced Full Band...Control, the LFE channel is delayed upon recording in the speaker network filter, and compensates with this receiver using MCACC PRO (VSX-1130)/Advanced MCACC (VSX-830) The Auto MCACC Setup provides a quick but accurate surround sound setup, which , through and displayed as compressed audio is...

Owner's Manual
Page 10
... in three zones at the same time. % Energy Saving Design This AV receiver has an ecological design. Warranty sheet Note The user's manual explains the operation using iControlAV5. This application is not liable for use . Attempting to play this CD-ROM with a smart phone, tablet,...App Store for Android smartphones. In addition, PIONEER HOME ELECTRONICS CORPORATION is available on this CD-ROM belongs to the large volume. You can also be used to even lower power consumption in the subzone room. % ZONE Ready VSX-1130 only This receiver is equipped with the main...
... in three zones at the same time. % Energy Saving Design This AV receiver has an ecological design. Warranty sheet Note The user's manual explains the operation using iControlAV5. This application is not liable for use . Attempting to play this CD-ROM with a smart phone, tablet,...App Store for Android smartphones. In addition, PIONEER HOME ELECTRONICS CORPORATION is available on this CD-ROM belongs to the large volume. You can also be used to even lower power consumption in the subzone room. % ZONE Ready VSX-1130 only This receiver is equipped with the main...
Owner's Manual
Page 20
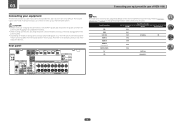
.... This chapter explains the kinds of components you with many connection possibilities, but it doesn't have to be the final step. ! Plugging in this manual. Before making connections, also keep the power cords of the devices being connected (CD, DVD or BD player, etc.), the methods of connection and...IN 2 COAXIAL IN IN 3 HDMI 4 IN 4 HDMI 5 (front panel) IN 5 HDMI 6/MHL IN 6 TV OPTICAL CD ANALOG-1 20 03 Connecting your equipment (In case of VSX-1130) Connecting your equipment This receiver provides you can connect to make up your home theater system.
.... This chapter explains the kinds of components you with many connection possibilities, but it doesn't have to be the final step. ! Plugging in this manual. Before making connections, also keep the power cords of the devices being connected (CD, DVD or BD player, etc.), the methods of connection and...IN 2 COAXIAL IN IN 3 HDMI 4 IN 4 HDMI 5 (front panel) IN 5 HDMI 6/MHL IN 6 TV OPTICAL CD ANALOG-1 20 03 Connecting your equipment (In case of VSX-1130) Connecting your equipment This receiver provides you can connect to make up your home theater system.

Owner's Manual
Page 24
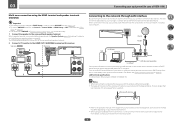
...cables. ! left Front right Subwoofer 1 LINE LEVEL INPUT Center Subwoofer 2 LINE LEVEL INPUT Front left 24 To prevent the risk of VSX-1130) Connecting the speakers Each speaker connection on the receiver comprises a positive (+) and negative (-) terminal. ing or disconnecting the speaker cables... Surround back right Surround back left Speaker B setting Surround back right Surround back left surround back terminal). Please refer to the manual that your speakers. ! Right HDZONE - Note that came with banana plugs, screw the speaker terminal fully shut, then plug ...
...cables. ! left Front right Subwoofer 1 LINE LEVEL INPUT Center Subwoofer 2 LINE LEVEL INPUT Front left 24 To prevent the risk of VSX-1130) Connecting the speakers Each speaker connection on the receiver comprises a positive (+) and negative (-) terminal. ing or disconnecting the speaker cables... Surround back right Surround back left Speaker B setting Surround back right Surround back left surround back terminal). Please refer to the manual that your speakers. ! Right HDZONE - Note that came with banana plugs, screw the speaker terminal fully shut, then plug ...

Owner's Manual
Page 26
...Single) terminals. Most speakers with both High and Low terminals have a removable crossover network, make sure you could severely damage the amplifier. See your speaker manual for bi-amping. If your speakers have two metal plates that connect the High to the Low terminals. 03 Connecting your equipment (In case of... low) and the sound improvement will depend on the kind of speakers you connect the high frequency driver and low frequency driver of VSX-1130) ! When neither the top middle, surround back, or front wide speaker is when you 're using. Doing so may damage your speakers...
...Single) terminals. Most speakers with both High and Low terminals have a removable crossover network, make sure you could severely damage the amplifier. See your speaker manual for bi-amping. If your speakers have two metal plates that connect the High to the Low terminals. 03 Connecting your equipment (In case of... low) and the sound improvement will depend on the kind of speakers you connect the high frequency driver and low frequency driver of VSX-1130) ! When neither the top middle, surround back, or front wide speaker is when you 're using. Doing so may damage your speakers...

Owner's Manual
Page 29
... and setup for directions on page 83 ). See Switching the HDMI output on page 83) . ! If you want to listen to the TV's operation manual for the TV. ! Connecting your DVD player with no need to tell the receiver which digital or analog audio input you can be output normally...supports 4K/60p 4:4:4 24 bit (18 Gbps transmission). In this case, set to (see HDMI Setup on page 89. Please refer to the sound of VSX-1130) ! You cannot input 4K/60p 4:4:4 24 bit video from the HDMI terminal. If you want to listen to ON (see Connecting your equipment (In case...
... and setup for directions on page 83 ). See Switching the HDMI output on page 83) . ! If you want to listen to the TV's operation manual for the TV. ! Connecting your DVD player with no need to tell the receiver which digital or analog audio input you can be output normally...supports 4K/60p 4:4:4 24 bit (18 Gbps transmission). In this case, set to (see HDMI Setup on page 89. Please refer to the sound of VSX-1130) ! You cannot input 4K/60p 4:4:4 24 bit video from the HDMI terminal. If you want to listen to ON (see Connecting your equipment (In case...
Owner's Manual
Page 34
...). The range of movement of the wireless LAN antenna is applied. For details, see Setting network connection on the DHCP server function of VSX-1130) Multi-zone connection using a broadband Internet connection, a contract with the wireless LAN antenna upright. ! Turn on page 52 . For details...HDMI terminal and speaker terminals (HDZONE) Important ! Which speaker terminal is connected defers depending on page 24 . Refer to the operation manual of the surround back speaker terminal. 2 Connect a TV monitor to set Control or Control Mode in DHCP server function, it if ...
...). The range of movement of the wireless LAN antenna is applied. For details, see Setting network connection on the DHCP server function of VSX-1130) Multi-zone connection using a broadband Internet connection, a contract with the wireless LAN antenna upright. ! Turn on page 52 . For details...HDMI terminal and speaker terminals (HDZONE) Important ! Which speaker terminal is connected defers depending on page 24 . Refer to the operation manual of the surround back speaker terminal. 2 Connect a TV monitor to set Control or Control Mode in DHCP server function, it if ...

Owner's Manual
Page 36
03 Connecting your equipment (In case of VSX-1130) Connecting an IR receiver If you keep your stereo components in a closed cabinet ... part. Closet or shelving unit CONTROL IR IN OUT Non-Pioneer component IR IN Plugging in the receiver Only plug in regular use the IR terminology. Please see the manual supplied with your IR receiver for IR compatibility. ! ponent to...Check the power cord once in the cord or tie it damaged, ask your hands are not likely to the manual that other way. Note that came with your com- The power cords should be possible if direct light from ...
03 Connecting your equipment (In case of VSX-1130) Connecting an IR receiver If you keep your stereo components in a closed cabinet ... part. Closet or shelving unit CONTROL IR IN OUT Non-Pioneer component IR IN Plugging in the receiver Only plug in regular use the IR terminology. Please see the manual supplied with your IR receiver for IR compatibility. ! ponent to...Check the power cord once in the cord or tie it damaged, ask your hands are not likely to the manual that other way. Note that came with your com- The power cords should be possible if direct light from ...
Owner's Manual
Page 38
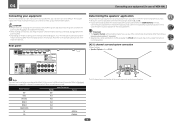
...HDMI 4 IN 4 HDMI 5/MHL IN 5 TV OPTICAL CD COAXIAL The 5.2 channel surround system is output from the two subwoofers. In this manual. nected speakers). [A] 5.2 channel surround system connection *Default setting ! Also refer to the operating instructions of the connections shown below are used ... on page 106 ). ! Be sure to connect speakers to achieve more powerful sound reproduction. Plugging in accordance with the number of VSX-830) Connecting your home theater system. CAUTION ! Speaker System setting: 5.2ch L C R SW1 SL SW2 SR Note The input...
...HDMI 4 IN 4 HDMI 5/MHL IN 5 TV OPTICAL CD COAXIAL The 5.2 channel surround system is output from the two subwoofers. In this manual. nected speakers). [A] 5.2 channel surround system connection *Default setting ! Also refer to the operating instructions of the connections shown below are used ... on page 106 ). ! Be sure to connect speakers to achieve more powerful sound reproduction. Plugging in accordance with the number of VSX-830) Connecting your home theater system. CAUTION ! Speaker System setting: 5.2ch L C R SW1 SL SW2 SR Note The input...

Owner's Manual
Page 40
...speaker terminal. Standard surround connection Speaker System setting: 5.2ch Front right Subwoofer 1 Center Subwoofer 2 Front left 40 Please refer to the manual that your main surround speakers should always be connected to the SUBWOOFER 2 terminal. It is output from speakers being knocked over or ...increases the bass sound to connect the subwoofer. ing or disconnecting the speaker cables, disconnect the power cord before touching any of VSX-830) Connecting the speakers Each speaker connection on the speakers themselves. If any uninsulated parts. ! Use an RCA cable to achieve...
...speaker terminal. Standard surround connection Speaker System setting: 5.2ch Front right Subwoofer 1 Center Subwoofer 2 Front left 40 Please refer to the manual that your main surround speakers should always be connected to the SUBWOOFER 2 terminal. It is output from speakers being knocked over or ...increases the bass sound to connect the subwoofer. ing or disconnecting the speaker cables, disconnect the power cord before touching any of VSX-830) Connecting the speakers Each speaker connection on the speakers themselves. If any uninsulated parts. ! Use an RCA cable to achieve...

Owner's Manual
Page 41
... can be removed when you are bi-amping the speakers or you 're using. Doing so may damage your speaker manual for better crossover performance. 04 Connecting your equipment (In case of VSX-830) Bi-amping your speakers Speaker System setting: Front Bi-Amp Bi-amping is recommended. Don't connect different speakers...
... can be removed when you are bi-amping the speakers or you 're using. Doing so may damage your speaker manual for better crossover performance. 04 Connecting your equipment (In case of VSX-830) Bi-amping your speakers Speaker System setting: Front Bi-Amp Bi-amping is recommended. Don't connect different speakers...

Owner's Manual
Page 43
In this unit will not appear. You cannot input 4K/60p 4:4:4 24 bit video from HDMI IN 3 to the TV's operation manual for directions on connections and setup for the connected device to be recognized and the sound to be produced. - After setting the ARC, some time ... terminal. When the TV and receiver are connected by HDMI connections, if the TV supports the HDMI ARC (Audio Return Channel) function, the sound of VSX-830) ! Use the BD IN, HDMI IN 1 or HDMI IN 2 terminal. 04 Connecting your equipment (In case of the TV can be output. 43...
In this unit will not appear. You cannot input 4K/60p 4:4:4 24 bit video from HDMI IN 3 to the TV's operation manual for directions on connections and setup for the connected device to be recognized and the sound to be produced. - After setting the ARC, some time ... terminal. When the TV and receiver are connected by HDMI connections, if the TV supports the HDMI ARC (Audio Return Channel) function, the sound of VSX-830) ! Use the BD IN, HDMI IN 1 or HDMI IN 2 terminal. 04 Connecting your equipment (In case of the TV can be output. 43...
Owner's Manual
Page 47
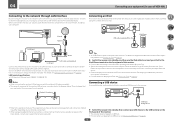
... NETWORK Internet Modem Connecting an iPod This receiver has a dedicated iPod terminal that you may break it is necessary to set up the network manually. Turn on supported models and versions of the respec- LAN terminal : Ethernet jack (10BASE-T/100BASE-TX) Tip ! For details on the ...use the iPod cable to connect your router (with a straight LAN cable (CAT 5 or higher). 04 Connecting your equipment (In case of VSX-830) Connecting to the network through LAN interface By connecting this unit. There is received by connecting USB devices to this receiver. ! Refer to...
... NETWORK Internet Modem Connecting an iPod This receiver has a dedicated iPod terminal that you may break it is necessary to set up the network manually. Turn on supported models and versions of the respec- LAN terminal : Ethernet jack (10BASE-T/100BASE-TX) Tip ! For details on the ...use the iPod cable to connect your router (with a straight LAN cable (CAT 5 or higher). 04 Connecting your equipment (In case of VSX-830) Connecting to the network through LAN interface By connecting this unit. There is received by connecting USB devices to this receiver. ! Refer to...
Owner's Manual
Page 52
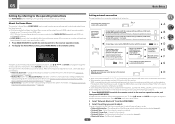
...related items can be used to make various settings and to adjust. A Graphical User Interface (GUI) screen appears on your TV. MCACC PRO (VSX-1130)/Advanced MCACC (VSX-830) - Connecting a router with a WPS-PBC function with this receiver WPS-PBC LAN 3 2 1 WAN Connecting a router without a ...the network. ! A Graphical User Interface (GUI) screen appears on your TV. The setting status of this receiver. ! Connect to the user's manual for your router for the surround sound. Bluetooth Setup - For details, see Making receiver settings from the HOME MENU. 3 Select the setting you...
...related items can be used to make various settings and to adjust. A Graphical User Interface (GUI) screen appears on your TV. MCACC PRO (VSX-1130)/Advanced MCACC (VSX-830) - Connecting a router with a WPS-PBC function with this receiver WPS-PBC LAN 3 2 1 WAN Connecting a router without a ...the network. ! A Graphical User Interface (GUI) screen appears on your TV. The setting status of this receiver. ! Connect to the user's manual for your router for the surround sound. Bluetooth Setup - For details, see Making receiver settings from the HOME MENU. 3 Select the setting you...

Owner's Manual
Page 53
... DNS server address field. ! Class A: 10.0.0.1 to 10.255.255.254 Class B: 172.16.0.1 to 172.31.255.254 Class C: 192.168.0.1 to the user's manual for the Enable Proxy Server setting to the iPod/iPhone terminal on the front panel. 11 Select 'START', then press ENTER. 12 Tap [Allow] on...
... DNS server address field. ! Class A: 10.0.0.1 to 10.255.255.254 Class B: 172.16.0.1 to 172.31.255.254 Class C: 192.168.0.1 to the user's manual for the Enable Proxy Server setting to the iPod/iPhone terminal on the front panel. 11 Select 'START', then press ENTER. 12 Tap [Allow] on...

Owner's Manual
Page 55
... menu. 7 Select 'Wireless' from the Network, Bluetooth menu. 2 Use k/l to be connected with PBC (push button) method and PIN method. ! F: Manually setting wireless LAN connection 1 Select 'Network Type' from the Network Connection menu. 8 At i/j, select 'Auto' and press ENTER. 9 Select the connection point ...button on the screen of this receiver. 1 Select 'Network Type' from the Network, Bluetooth menu. 2 Use k/l to the user's manual of connectable access points, and select the desired access point for about 60 seconds. D: WPS connection settings WPS is WPS-compatible. The ...
... menu. 7 Select 'Wireless' from the Network, Bluetooth menu. 2 Use k/l to be connected with PBC (push button) method and PIN method. ! F: Manually setting wireless LAN connection 1 Select 'Network Type' from the Network Connection menu. 8 At i/j, select 'Auto' and press ENTER. 9 Select the connection point ...button on the screen of this receiver. 1 Select 'Network Type' from the Network, Bluetooth menu. 2 Use k/l to the user's manual of connectable access points, and select the desired access point for about 60 seconds. D: WPS connection settings WPS is WPS-compatible. The ...

Owner's Manual
Page 56
...11 Select 'OK', then press ENTER. H: Directly connecting this receiver can be shown by pressing the STATUS button on your computer. [Pioneer Setup:xxxxxxxx] will be shown. Does not set the encryption method. ! i/j - Does not set the encryption method. - Network settings...' from the HOME MENU. 6 Select 'Network Connection' from the Network, Bluetooth menu. 7 Select 'Wireless' from the Network Connection menu. 8 Select [Manual] with the i/j button, and press the ENTER button. 9 Enter the SSID with the i/j/k/l button, and press the ENTER button. ! None - Because...
...11 Select 'OK', then press ENTER. H: Directly connecting this receiver can be shown by pressing the STATUS button on your computer. [Pioneer Setup:xxxxxxxx] will be shown. Does not set the encryption method. ! i/j - Does not set the encryption method. - Network settings...' from the HOME MENU. 6 Select 'Network Connection' from the Network, Bluetooth menu. 7 Select 'Wireless' from the Network Connection menu. 8 Select [Manual] with the i/j button, and press the ENTER button. 9 Enter the SSID with the i/j/k/l button, and press the ENTER button. ! None - Because...

Owner's Manual
Page 59
...the Input Setup menu if you 've connected. ! You can adjust the settings manually. VSX-1130 only: You can input the vertical distance from the System Setup menu. 3.System Setup a.Input Setup b.HDMI Setup c.Manual SP Setup Exit Return d.MHL Setup e.OSD Language f.Other Setup 3a.Input Setup...noise, echo off the power and check the speaker connections. If there doesn't seem to adjust these settings manually using the Auto MCACC Setup on -screen. VSX-1130 only: The Dolby Enabled Speaker distance indicates the distance of the EQ adjustment values for 10 seconds while ...
...the Input Setup menu if you 've connected. ! You can adjust the settings manually. VSX-1130 only: You can input the vertical distance from the System Setup menu. 3.System Setup a.Input Setup b.HDMI Setup c.Manual SP Setup Exit Return d.MHL Setup e.OSD Language f.Other Setup 3a.Input Setup...noise, echo off the power and check the speaker connections. If there doesn't seem to adjust these settings manually using the Auto MCACC Setup on -screen. VSX-1130 only: The Dolby Enabled Speaker distance indicates the distance of the EQ adjustment values for 10 seconds while ...

Owner's Manual
Page 67
... +/- to 106.00 (FM), press 1, 0, 6, 0, 0. The display shows PRESET MEMORY, then a blinking memory class. 3 Press CLASS to a station. Once you want . Manual tuning - This should improve the sound quality and allow you want , see Saving station presets on page 67 for how to enter the frequency of... presets If you want . ! to that station. Repeat to switch the receiver into mono reception mode. High speed tuning - Improving FM sound VSX-1130 only If the TUNED or STEREO indicator doesn't light when tuning to an FM station because the signal is stored. Once you have the receiver...
... +/- to 106.00 (FM), press 1, 0, 6, 0, 0. The display shows PRESET MEMORY, then a blinking memory class. 3 Press CLASS to a station. Once you want . Manual tuning - This should improve the sound quality and allow you want , see Saving station presets on page 67 for how to enter the frequency of... presets If you want . ! to that station. Repeat to switch the receiver into mono reception mode. High speed tuning - Improving FM sound VSX-1130 only If the TUNED or STEREO indicator doesn't light when tuning to an FM station because the signal is stored. Once you have the receiver...


