
Owner's Manual
Page 10
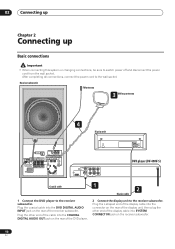
...of the display unit, then plug the other end of the cable into the COAXIAL DIGITAL AUDIO OUT jack on the rear of the DVD player. 2 Connect the display unit to the receiver subwoofer. After completing all connections, connect the power cord to switch power off and disconnect the... cord from the wall socket. R SEE INSTRUCTION MANUAL. Plug the coaxial cable into SYSTEM CONNECTOR jack on the rear of the display cable into the DVD DIGITAL AUDIO INPUT jack on the receiver subwoofer. 10 En Plug the other end of the receiver subwoofer. 02 Connecting up Chapter 2 Connecting up ...
...of the display unit, then plug the other end of the cable into the COAXIAL DIGITAL AUDIO OUT jack on the rear of the DVD player. 2 Connect the display unit to the receiver subwoofer. After completing all connections, connect the power cord to switch power off and disconnect the... cord from the wall socket. R SEE INSTRUCTION MANUAL. Plug the coaxial cable into SYSTEM CONNECTOR jack on the rear of the display cable into the DVD DIGITAL AUDIO INPUT jack on the receiver subwoofer. 10 En Plug the other end of the receiver subwoofer. 02 Connecting up Chapter 2 Connecting up ...

Owner's Manual
Page 12
... MANUAL. Connect the power cords of the supplied audio/ video cable for the video connection. • Connect the AUDIO OUTPUT jacks to the corresponding audio inputs on the receiver subwoofer. Use the red and white jacks of the receiver subwoofer and DVD player to a video input on your TV. Receiver ...MCACC CONTROL IN SETUP MIC 6 CONTROL SPEAKERS SYSTEM CONNECTOR OUT SUB WOOFER R SURROUND L ANTENNA FM UNBAL 75Ω AM LOOP ANTENNA 5 AUDIO INPUT DIGITAL DVD DTV PC/GAME (COAXIAL) (OPTICAL) (OPTICAL) ANALOG AUX L USE ONLY WITH DISPLAY UNIT. Connection to any power cord...
... MANUAL. Connect the power cords of the supplied audio/ video cable for the video connection. • Connect the AUDIO OUTPUT jacks to the corresponding audio inputs on the receiver subwoofer. Use the red and white jacks of the receiver subwoofer and DVD player to a video input on your TV. Receiver ...MCACC CONTROL IN SETUP MIC 6 CONTROL SPEAKERS SYSTEM CONNECTOR OUT SUB WOOFER R SURROUND L ANTENNA FM UNBAL 75Ω AM LOOP ANTENNA 5 AUDIO INPUT DIGITAL DVD DTV PC/GAME (COAXIAL) (OPTICAL) (OPTICAL) ANALOG AUX L USE ONLY WITH DISPLAY UNIT. Connection to any power cord...

Owner's Manual
Page 13
... material and that will support the weight of the display. • Pioneer bears no responsibility for accidents resulting from faulty assembly or installation, insuf...mount on the wall. SEE INSTRUCTION MANUAL. CENTER R FRONT L AUDIO INPUT DIGITAL DVD DTV PC/GAME (COAXIAL) (OPTICAL) (OPTICAL) ANALOG AUX L R AC IN 1 AUDIO OUTPUT TV 1 Connect the AUDIO OUTPUT jacks on is strong enough...match the left and right outputs with their corresponding inputs for TV audio If your TV to the AUX AUDIO INPUT jacks on the receiver subwoofer. Before mounting: • Remember that the wall you want...
... material and that will support the weight of the display. • Pioneer bears no responsibility for accidents resulting from faulty assembly or installation, insuf...mount on the wall. SEE INSTRUCTION MANUAL. CENTER R FRONT L AUDIO INPUT DIGITAL DVD DTV PC/GAME (COAXIAL) (OPTICAL) (OPTICAL) ANALOG AUX L R AC IN 1 AUDIO OUTPUT TV 1 Connect the AUDIO OUTPUT jacks on is strong enough...match the left and right outputs with their corresponding inputs for TV audio If your TV to the AUX AUDIO INPUT jacks on the receiver subwoofer. Before mounting: • Remember that the wall you want...

Owner's Manual
Page 19
...SURROUND ENTER TOP MENU ADVANCED CLEAR TUNE MENU SOUND SETUP ST ENTER ST TEST TONE / TUNE RETURN MCACC / 1 Switch on the display unit (receiver subwoofer). 2 Switch on the DVD player. 3 Switch on your TV and make sure that when using the surround effects (page 22). 19 En...on the display unit (receiver subwoofer). 2 Switch on the DVD player. 3 Press DVD. 4 Load a CD and start playback. 5 Adjust the volume. 6 Adjust the sound using the surround effects See Listening to find them explained in this manual. Before you start 04 English Basic operation This manual is set to the ...
...SURROUND ENTER TOP MENU ADVANCED CLEAR TUNE MENU SOUND SETUP ST ENTER ST TEST TONE / TUNE RETURN MCACC / 1 Switch on the display unit (receiver subwoofer). 2 Switch on the DVD player. 3 Switch on your TV and make sure that when using the surround effects (page 22). 19 En...on the display unit (receiver subwoofer). 2 Switch on the DVD player. 3 Press DVD. 4 Load a CD and start playback. 5 Adjust the volume. 6 Adjust the sound using the surround effects See Listening to find them explained in this manual. Before you start 04 English Basic operation This manual is set to the ...
Owner's Manual
Page 20
... sound The Multichannel Acoustic Calibration (MCACC) system measures the acoustic characteristics of your speakers or your room layout). 20 En R SEE INSTRUCTION MANUAL. CENTER R FRONT L AC IN 2 Place the microphone at your normal listening position. however, do not turn the volume down ) ... MENU ADVANCED CLEAR TUNE MENU DVD MUTE VOLUME RECEIVER DVD DTV PC/GAME AUX TUNER SOUND SETUP ST ENTER ST TEST TONE / TUNE RETURN MCACC / SOUND AUDIO SUBTITLE ANGLE RETRIEVER PLAY MODE ZOOM DISPLAY SLEEP TV INPUT CHANNEL VOLUME SR SHIFT TV CONTROL SURROUND 1 Connect ...
... sound The Multichannel Acoustic Calibration (MCACC) system measures the acoustic characteristics of your speakers or your room layout). 20 En R SEE INSTRUCTION MANUAL. CENTER R FRONT L AC IN 2 Place the microphone at your normal listening position. however, do not turn the volume down ) ... MENU ADVANCED CLEAR TUNE MENU DVD MUTE VOLUME RECEIVER DVD DTV PC/GAME AUX TUNER SOUND SETUP ST ENTER ST TEST TONE / TUNE RETURN MCACC / SOUND AUDIO SUBTITLE ANGLE RETRIEVER PLAY MODE ZOOM DISPLAY SLEEP TV INPUT CHANNEL VOLUME SR SHIFT TV CONTROL SURROUND 1 Connect ...
Owner's Manual
Page 25
...trying the above to switch back to auto-stereo mode (the stereo indicator ( ) lights when receiving a stereo broadcast). For the FM band, select mono or auto-stereo reception as necessary. until...SETUP ST ENTER ST TEST TONE / TUNE RETURN MCACC / SOUND AUDIO SUBTITLE ANGLE RETRIEVER PLAY MODE ZOOM DISPLAY SLEEP TV INPUT CHANNEL VOLUME SHIFT TV CONTROL 1 Press TUNER to switch to the ...; Many of the buttons used extensively in this chapter are three tuning modes-manual, auto, and highspeed: • Manual tuning: Press SHIFT+TUNE +/- until you reach the frequency you don't have...
...trying the above to switch back to auto-stereo mode (the stereo indicator ( ) lights when receiving a stereo broadcast). For the FM band, select mono or auto-stereo reception as necessary. until...SETUP ST ENTER ST TEST TONE / TUNE RETURN MCACC / SOUND AUDIO SUBTITLE ANGLE RETRIEVER PLAY MODE ZOOM DISPLAY SLEEP TV INPUT CHANNEL VOLUME SHIFT TV CONTROL 1 Press TUNER to switch to the ...; Many of the buttons used extensively in this chapter are three tuning modes-manual, auto, and highspeed: • Manual tuning: Press SHIFT+TUNE +/- until you reach the frequency you don't have...
Owner's Manual
Page 29
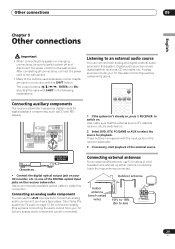
R SEE INSTRUCTION MANUAL. Also make this explains connecting the audio output from the wall socket. DIGITAL OUT (OPTICAL) CD recorder, etc. • Connect the digital optical output jack on your TV. See Using this system for TV audio on . 2 Select DVD, DTV, PC/GAME or ... Many of the buttons used extensively in this chapter are used with the input jacks on , press RECEIVER to switch power off and disconnect the power cord from your TV, but any analog audio component can use 5-6 meters of the external source. After completing all be connected). The cursor buttons ...
R SEE INSTRUCTION MANUAL. Also make this explains connecting the audio output from the wall socket. DIGITAL OUT (OPTICAL) CD recorder, etc. • Connect the digital optical output jack on your TV. See Using this system for TV audio on . 2 Select DVD, DTV, PC/GAME or ... Many of the buttons used extensively in this chapter are used with the input jacks on , press RECEIVER to switch power off and disconnect the power cord from your TV, but any analog audio component can use 5-6 meters of the external source. After completing all be connected). The cursor buttons ...
Owner's Manual
Page 30
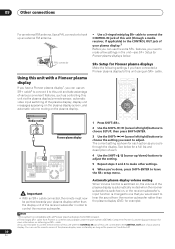
...setup menu. MCACC CONTROL IN SETUP MIC CONTROL SPEAKERS SYSTEM CONNECTOR OUT SUB WOOFER R SURROUND L ANTENNA FM UNBAL 75Ω AM LOOP ANTENNA AUDIO INPUT DIGITAL ANALOG DVD DTV PC/GAME AUX (COAXIAL) (OPTICAL) (OPTICAL) L USE ONLY WITH DISPLAY UNIT. Note 1 This system is ...The 3-ringed SR+ cable from Pioneer is compatible with a Pioneer plasma display If you want to hear the sound from the receiver subwoofer rather than the display unit of each option as the power isn't switched off. 30 En See below . R SEE INSTRUCTION MANUAL. 09 Other connections For an...
...setup menu. MCACC CONTROL IN SETUP MIC CONTROL SPEAKERS SYSTEM CONNECTOR OUT SUB WOOFER R SURROUND L ANTENNA FM UNBAL 75Ω AM LOOP ANTENNA AUDIO INPUT DIGITAL ANALOG DVD DTV PC/GAME AUX (COAXIAL) (OPTICAL) (OPTICAL) L USE ONLY WITH DISPLAY UNIT. Note 1 This system is ...The 3-ringed SR+ cable from Pioneer is compatible with a Pioneer plasma display If you want to hear the sound from the receiver subwoofer rather than the display unit of each option as the power isn't switched off. 30 En See below . R SEE INSTRUCTION MANUAL. 09 Other connections For an...

Owner's Manual
Page 72
... Boundary Road, Braeside, Victoria 3195, Australia, TEL: (03) 9586-6300 PIONEER ELECTRONICS DE MEXICO S.A. Customer Support Division P.O. Pioneer Electronics (USA) Inc. and you wish to locate the nearest Pioneer Authorized Independent Service Company, or if you wish to purchase replacement parts, operating instructions, service manuals, or accessories, please call the number shown below. 8 0 0 - 4 2 1 - 1 4 0 4 Please...
... Boundary Road, Braeside, Victoria 3195, Australia, TEL: (03) 9586-6300 PIONEER ELECTRONICS DE MEXICO S.A. Customer Support Division P.O. Pioneer Electronics (USA) Inc. and you wish to locate the nearest Pioneer Authorized Independent Service Company, or if you wish to purchase replacement parts, operating instructions, service manuals, or accessories, please call the number shown below. 8 0 0 - 4 2 1 - 1 4 0 4 Please...