
Owner's Manual
Page 5
... low setting. • Slowly increase the sound until it comfortably and clearly, and without affecting your hearing adapts. S001_En What's in the future. Receiver subwoofer (SX-SW560) box: • Remote control (page 15) • AA/R6 dry cell batteries (to consider how you can actually be deceiving. Once you... level" adapts to higher volumes of your new sound equipment will help to get the most importantly, without distortion. English Selecting fine audio equipment such as the unit you've just purchased is only the start of sound. One that the following items are all , we...
... low setting. • Slowly increase the sound until it comfortably and clearly, and without affecting your hearing adapts. S001_En What's in the future. Receiver subwoofer (SX-SW560) box: • Remote control (page 15) • AA/R6 dry cell batteries (to consider how you can actually be deceiving. Once you... level" adapts to higher volumes of your new sound equipment will help to get the most importantly, without distortion. English Selecting fine audio equipment such as the unit you've just purchased is only the start of sound. One that the following items are all , we...
Owner's Manual
Page 10
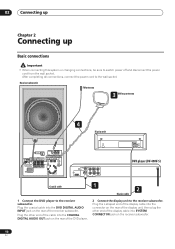
...) ANALOG AUX L USE ONLY WITH DISPLAY UNIT. Plug the coaxial cable into the DVD DIGITAL AUDIO INPUT jack on the receiver subwoofer. 10 En CENTER R FRONT L AC IN DIGITAL COAXIAL AUDIO OUT VIDEO OUT AUDIO OUT PB L HDMI OUT R PR Y S-VIDEO OUT COMPONENT VIDEO OUT DVD player (DV-490V...After completing all connections, connect the power cord to the receiver subwoofer. R SEE INSTRUCTION MANUAL. Plug the other end of the display cable into the COAXIAL DIGITAL AUDIO OUT jack on the rear of the receiver subwoofer. 02 Connecting up Chapter 2 Connecting up Basic connections ...
...) ANALOG AUX L USE ONLY WITH DISPLAY UNIT. Plug the coaxial cable into the DVD DIGITAL AUDIO INPUT jack on the receiver subwoofer. 10 En CENTER R FRONT L AC IN DIGITAL COAXIAL AUDIO OUT VIDEO OUT AUDIO OUT PB L HDMI OUT R PR Y S-VIDEO OUT COMPONENT VIDEO OUT DVD player (DV-490V...After completing all connections, connect the power cord to the receiver subwoofer. R SEE INSTRUCTION MANUAL. Plug the other end of the display cable into the COAXIAL DIGITAL AUDIO OUT jack on the rear of the receiver subwoofer. 02 Connecting up Chapter 2 Connecting up Basic connections ...

Owner's Manual
Page 12
...) (OPTICAL) (OPTICAL) ANALOG AUX L USE ONLY WITH DISPLAY UNIT. To prevent the risk of the receiver subwoofer and DVD player to AC inlets on the receiver subwoofer. R SEE INSTRUCTION MANUAL. Use the yellow jack of the supplied audio/ video cable for any purpose other than the one supplied with this system. 12 En...
...) (OPTICAL) (OPTICAL) ANALOG AUX L USE ONLY WITH DISPLAY UNIT. To prevent the risk of the receiver subwoofer and DVD player to AC inlets on the receiver subwoofer. R SEE INSTRUCTION MANUAL. Use the yellow jack of the supplied audio/ video cable for any purpose other than the one supplied with this system. 12 En...

Owner's Manual
Page 13
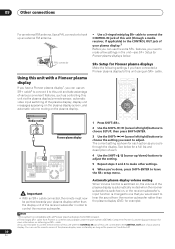
Use screws that are suitable for the wall material and that will support the weight of the display. • Pioneer bears no responsibility for accidents resulting from faulty assembly or installation, insufficient mounting strength of the wall, consult a professional for advice. 5... correct stereo sound. • You can use the AUX input jacks for TV audio If your TV to the AUX AUDIO INPUT jacks on the receiver subwoofer. Connecting up 02 English A/V IN TV White 7 DIGITAL COAXIAL AUDIO OUT VIDEO OUT AUDIO OUT PB RL HDMI L OUT R PR Y S-VIDEO OUT COMPONENT VIDEO OUT ...
Use screws that are suitable for the wall material and that will support the weight of the display. • Pioneer bears no responsibility for accidents resulting from faulty assembly or installation, insufficient mounting strength of the wall, consult a professional for advice. 5... correct stereo sound. • You can use the AUX input jacks for TV audio If your TV to the AUX AUDIO INPUT jacks on the receiver subwoofer. Connecting up 02 English A/V IN TV White 7 DIGITAL COAXIAL AUDIO OUT VIDEO OUT AUDIO OUT PB RL HDMI L OUT R PR Y S-VIDEO OUT COMPONENT VIDEO OUT ...

Owner's Manual
Page 14
... when FM mono reception is selected. 7 Lights when sleep timer is active (page 22). 4 Tuner indicators - Lights when a broadcast is being received. - VOLUME + AUDIO INPUT SURROUND 1 2 1 STANDBY/ON Press to switch the system on/into standby. 2 Front panel display See below for details. 3 VOLUME buttons... Use to adjust the volume. 3 45 6 4 AUDIO INPUT (page 29) Press repeatedly to select a Surround mode (page 22). 6 IR remote sensor (page 16) Display 123 SOUND DTS F.SURR. 2D kHz...
... when FM mono reception is selected. 7 Lights when sleep timer is active (page 22). 4 Tuner indicators - Lights when a broadcast is being received. - VOLUME + AUDIO INPUT SURROUND 1 2 1 STANDBY/ON Press to switch the system on/into standby. 2 Front panel display See below for details. 3 VOLUME buttons... Use to adjust the volume. 3 45 6 4 AUDIO INPUT (page 29) Press repeatedly to select a Surround mode (page 22). 6 IR remote sensor (page 16) Display 123 SOUND DTS F.SURR. 2D kHz...

Owner's Manual
Page 15
... TONE / TUNE RETURN MCACC / 2 4 7 8 9 11 14 SOUND AUDIO SUBTITLE ANGLE RETRIEVER PLAY MODE ZOOM DISPLAY SLEEP TV INPUT CHANNEL VOLUME SHIFT TV CONTROL 17 18 1 DVD Press to switch the DVD player on or into standby. 2 RECEIVER Press to switch the receiver subwoofer on or into standby. 3 MUTE Press to mute all... the SR+ features and to select the SR+ mode (page 31). 8 SURROUND Use to select a Surround mode (page 22). 9 ADVANCED Use to select a Pioneer original surround mode (page 23). 10 TOP MENU Press to display the top menu if a DVD-Video disc is loaded. + SHIFT: SETUP Use to access...
... TONE / TUNE RETURN MCACC / 2 4 7 8 9 11 14 SOUND AUDIO SUBTITLE ANGLE RETRIEVER PLAY MODE ZOOM DISPLAY SLEEP TV INPUT CHANNEL VOLUME SHIFT TV CONTROL 17 18 1 DVD Press to switch the DVD player on or into standby. 2 RECEIVER Press to switch the receiver subwoofer on or into standby. 3 MUTE Press to mute all... the SR+ features and to select the SR+ mode (page 31). 8 SURROUND Use to select a Surround mode (page 22). 9 ADVANCED Use to select a Pioneer original surround mode (page 23). 10 TOP MENU Press to display the top menu if a DVD-Video disc is loaded. + SHIFT: SETUP Use to access...

Owner's Manual
Page 18
...AUDIO INPUT SURROUND AUDIO SUBTITLE SOUND ANGLE RETRIEVER PLAY MODE ZOOM DISPLAY SLEEP TV INPUT The table below shows what needs to be switched on for various system functions: Function DVD playback CD playback Radio Display unit On On On DVD player On On Off DVD Player Setting up for the receiver... subwoofer is located on the display unit. Receiver subwoofer • Switch off the display demo mode (page 20). • Complete the Auto MCACC Setup to set the...
...AUDIO INPUT SURROUND AUDIO SUBTITLE SOUND ANGLE RETRIEVER PLAY MODE ZOOM DISPLAY SLEEP TV INPUT The table below shows what needs to be switched on for various system functions: Function DVD playback CD playback Radio Display unit On On On DVD player On On Off DVD Player Setting up for the receiver... subwoofer is located on the display unit. Receiver subwoofer • Switch off the display demo mode (page 20). • Complete the Auto MCACC Setup to set the...
Owner's Manual
Page 20
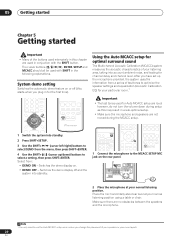
...TOP MENU SR SURROUND ADVANCED CLEAR TUNE MENU SOUND SETUP ST ENTER ST TEST TONE / TUNE RETURN MCACC / SOUND AUDIO SUBTITLE ANGLE RETRIEVER PLAY MODE ZOOM DISPLAY SLEEP TV INPUT CHANNEL VOLUME SHIFT TV CONTROL 1 Switch the system into standby. 2 Press SHIFT+SETUP. 3 Use the SHIFT+ / ... MENU ADVANCED CLEAR TUNE MENU DVD MUTE VOLUME RECEIVER DVD DTV PC/GAME AUX TUNER SOUND SETUP ST ENTER ST TEST TONE / TUNE RETURN MCACC / SOUND AUDIO SUBTITLE ANGLE RETRIEVER PLAY MODE ZOOM DISPLAY SLEEP TV INPUT CHANNEL VOLUME SR SHIFT TV CONTROL SURROUND 1 Connect the...
...TOP MENU SR SURROUND ADVANCED CLEAR TUNE MENU SOUND SETUP ST ENTER ST TEST TONE / TUNE RETURN MCACC / SOUND AUDIO SUBTITLE ANGLE RETRIEVER PLAY MODE ZOOM DISPLAY SLEEP TV INPUT CHANNEL VOLUME SHIFT TV CONTROL 1 Switch the system into standby. 2 Press SHIFT+SETUP. 3 Use the SHIFT+ / ... MENU ADVANCED CLEAR TUNE MENU DVD MUTE VOLUME RECEIVER DVD DTV PC/GAME AUX TUNER SOUND SETUP ST ENTER ST TEST TONE / TUNE RETURN MCACC / SOUND AUDIO SUBTITLE ANGLE RETRIEVER PLAY MODE ZOOM DISPLAY SLEEP TV INPUT CHANNEL VOLUME SR SHIFT TV CONTROL SURROUND 1 Connect the...
Owner's Manual
Page 25
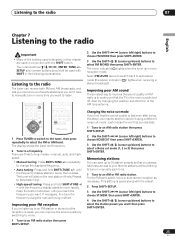
...8226; Many of the AM loop antenna. Memorizing stations You can save up /down) buttons to auto-stereo mode (the stereo indicator ( ) lights when receiving a stereo broadcast). then press SHIFT+ENTER. 4 Use the SHIFT+ / (cursor up /down ) buttons to select the station preset you always have to...ENTER TOP MENU ADVANCED CLEAR TUNE MENU SOUND SETUP ST ENTER ST TEST TONE / TUNE RETURN MCACC / SOUND AUDIO SUBTITLE ANGLE RETRIEVER PLAY MODE ZOOM DISPLAY SLEEP TV INPUT CHANNEL VOLUME SHIFT TV CONTROL 1 Press TUNER to switch to the tuner, then press repeatedly to move , then release...
...8226; Many of the AM loop antenna. Memorizing stations You can save up /down) buttons to auto-stereo mode (the stereo indicator ( ) lights when receiving a stereo broadcast). then press SHIFT+ENTER. 4 Use the SHIFT+ / (cursor up /down ) buttons to select the station preset you always have to...ENTER TOP MENU ADVANCED CLEAR TUNE MENU SOUND SETUP ST ENTER ST TEST TONE / TUNE RETURN MCACC / SOUND AUDIO SUBTITLE ANGLE RETRIEVER PLAY MODE ZOOM DISPLAY SLEEP TV INPUT CHANNEL VOLUME SHIFT TV CONTROL 1 Press TUNER to switch to the tuner, then press repeatedly to move , then release...
Owner's Manual
Page 29
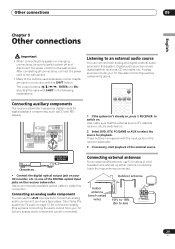
...SR SURROUND ENTER ADVANCED CLEAR 1 If the system isn't already on, press RECEIVER to select the source for TV audio on . 2 Select DVD, DTV, PC/GAME or AUX to switch on the receiver subwoofer. Also make this connection. Leave the loop antenna connected. CENTER R ...FRONT L AC IN Listening to an external audio source You can be connected). Digital audio sources include digital satellite receivers, CD recorders, etc. See Using this explains connecting the audio output from the wall socket. Connecting external antennas For an external AM ...
...SR SURROUND ENTER ADVANCED CLEAR 1 If the system isn't already on, press RECEIVER to select the source for TV audio on . 2 Select DVD, DTV, PC/GAME or AUX to switch on the receiver subwoofer. Also make this connection. Leave the loop antenna connected. CENTER R ...FRONT L AC IN Listening to an external audio source You can be connected). Digital audio sources include digital satellite receivers, CD recorders, etc. See Using this explains connecting the audio output from the wall socket. Connecting external antennas For an external AM ...
Owner's Manual
Page 30
... AUDIO INPUT DIGITAL ANALOG DVD DTV PC/GAME AUX (COAXIAL) (OPTICAL) (OPTICAL) L USE ONLY WITH DISPLAY UNIT. Note 1 This system is commercially available under the part number ADE7095. R SEE INSTRUCTION MANUAL. You can use the extra SR+ features, you would want to control the receiver .../GAME AUX TUNER SR SURROUND ENTER TOP MENU ADVANCED CLEAR TUNE MENU SOUND SETUP ST ENTER ST TEST TONE / TUNE RETURN MCACC / Media receiver CONTROL OUT Pioneer plasma display 1 Press SHIFT+SR+. 2 Use the SHIFT+ / (cursor left/right) buttons to choose SETUP, then press SHIFT+ENTER. ...
... AUDIO INPUT DIGITAL ANALOG DVD DTV PC/GAME AUX (COAXIAL) (OPTICAL) (OPTICAL) L USE ONLY WITH DISPLAY UNIT. Note 1 This system is commercially available under the part number ADE7095. R SEE INSTRUCTION MANUAL. You can use the extra SR+ features, you would want to control the receiver .../GAME AUX TUNER SR SURROUND ENTER TOP MENU ADVANCED CLEAR TUNE MENU SOUND SETUP ST ENTER ST TEST TONE / TUNE RETURN MCACC / Media receiver CONTROL OUT Pioneer plasma display 1 Press SHIFT+SR+. 2 Use the SHIFT+ / (cursor left/right) buttons to choose SETUP, then press SHIFT+ENTER. ...

Owner's Manual
Page 31
... even in standby, but you use just the remote sensor of one of analog or coaxial digital audio jacks connected to another component for the connection. About the control out jack Many Pioneer components have at least one set of the numbered inputs (1 to input 2. switches the plasma display... mini-plug on . For each end for grounding purposes. • Connect the CONTROL IN jack on another Pioneer component to the CONTROL OUT jack on your DVD player to the DVD input on the receiver subwoofer, and to input 2 on , the SR+ ON setting remains. • To switch to SR+...
... even in standby, but you use just the remote sensor of one of analog or coaxial digital audio jacks connected to another component for the connection. About the control out jack Many Pioneer components have at least one set of the numbered inputs (1 to input 2. switches the plasma display... mini-plug on . For each end for grounding purposes. • Connect the CONTROL IN jack on another Pioneer component to the CONTROL OUT jack on your DVD player to the DVD input on the receiver subwoofer, and to input 2 on , the SR+ ON setting remains. • To switch to SR+...

Owner's Manual
Page 32
...SHIFT+ENTER. SLP - - - - - Note 1 The display dims when the sleep timer is set . The DVD player does not automatically switch off the receiver subwoofer after about it too bright.2 1 Press SHIFT+SETUP. 2 Use the SHIFT+ / (cursor left/right) buttons to select DIMMER then press SHIFT+ENTER. ... SURROUND ADVANCED CLEAR TUNE MENU SOUND SETUP ST ENTER ST TEST TONE / TUNE RETURN MCACC / SOUND AUDIO SUBTITLE ANGLE RETRIEVER PLAY MODE ZOOM DISPLAY SLEEP TV INPUT CHANNEL VOLUME SHIFT TV CONTROL Resetting the system Use this procedure to reset all system settings to select an ...
...SHIFT+ENTER. SLP - - - - - Note 1 The display dims when the sleep timer is set . The DVD player does not automatically switch off the receiver subwoofer after about it too bright.2 1 Press SHIFT+SETUP. 2 Use the SHIFT+ / (cursor left/right) buttons to select DIMMER then press SHIFT+ENTER. ... SURROUND ADVANCED CLEAR TUNE MENU SOUND SETUP ST ENTER ST TEST TONE / TUNE RETURN MCACC / SOUND AUDIO SUBTITLE ANGLE RETRIEVER PLAY MODE ZOOM DISPLAY SLEEP TV INPUT CHANNEL VOLUME SHIFT TV CONTROL Resetting the system Use this procedure to reset all system settings to select an ...
Owner's Manual
Page 35
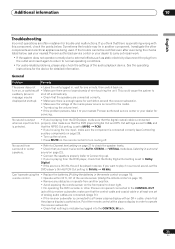
...• Make sure there is correct for one set of the audio playback device. If you 're playing from surround or center speakers. • Refer to Channel level setting on page 27 to your nearest Pioneer authorized service center or your dealer to carry out repair work. ...again to return to normal operating conditions. • For audio-related problems, please also check the settings of analog audio cables are connected. (page 31) • If the receiver subwoofer is connected to a Pioneer plasma display with this receiver subwoofer, make sure that the speakers are set to ...
...• Make sure there is correct for one set of the audio playback device. If you 're playing from surround or center speakers. • Refer to Channel level setting on page 27 to your nearest Pioneer authorized service center or your dealer to carry out repair work. ...again to return to normal operating conditions. • For audio-related problems, please also check the settings of analog audio cables are connected. (page 31) • If the receiver subwoofer is connected to a Pioneer plasma display with this receiver subwoofer, make sure that the speakers are set to ...
Owner's Manual
Page 37
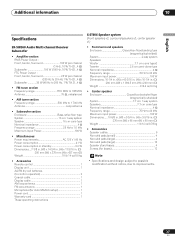
Additional information 10 English Specifications SX-SW560 Audio Multi-channal Receiver Subwoofer • Amplifier section RMS Power Output : Front, Center, Surround 100 W per channel (1 kHz, 10 % T.H.D., 4 Ω) Subwoofer 100 W (100 Hz, 10 % T.H.D., 4 Ω) FTC Power Output : Front, Center, Surround 25 W per channel (200 Hz to 20 kHz 1 % T.H.D., 4 Ω) Subwoofer 30 W (45 Hz to 200 Hz, 1 % T.H.D., 4 Ω) • FM...
Additional information 10 English Specifications SX-SW560 Audio Multi-channal Receiver Subwoofer • Amplifier section RMS Power Output : Front, Center, Surround 100 W per channel (1 kHz, 10 % T.H.D., 4 Ω) Subwoofer 100 W (100 Hz, 10 % T.H.D., 4 Ω) FTC Power Output : Front, Center, Surround 25 W per channel (200 Hz to 20 kHz 1 % T.H.D., 4 Ω) Subwoofer 30 W (45 Hz to 200 Hz, 1 % T.H.D., 4 Ω) • FM...


