

Owner's Manual
Page 4
...En Using the multiscreen functions 36 Splitting the screen 36 Freezing images 37 07 TV Guide On Screen™ System Setup 38 About the TV Guide On Screen™ system 38 Setting up the TV Guide On Screen™ system 38 08 The HOME MENU 41 HOME MENU ... Precautions 11 03 Supplied Accessories 12 04 Part Names 14 Plasma display 14 Remote control unit 16 05 Preparation 17 Installing the plasma display 17 Moving the plasma display 17 Attaching the Pioneer stand 17 Installing the Pioneer speaker 19 Preventing the plasma display from that shown in a safe place for future ...
...En Using the multiscreen functions 36 Splitting the screen 36 Freezing images 37 07 TV Guide On Screen™ System Setup 38 About the TV Guide On Screen™ system 38 Setting up the TV Guide On Screen™ system 38 08 The HOME MENU 41 HOME MENU ... Precautions 11 03 Supplied Accessories 12 04 Part Names 14 Plasma display 14 Remote control unit 16 05 Preparation 17 Installing the plasma display 17 Moving the plasma display 17 Attaching the Pioneer stand 17 Installing the Pioneer speaker 19 Preventing the plasma display from that shown in a safe place for future ...

Owner's Manual
Page 6
... 85 Other useful functions 88 Glossary 93 13 Using the HDMI Control 94 Using the HDMI Control functions ...........94 Making the HDMI Control connections ...95 Setting the HDMI Control 96 Using the HDMI Control menus 97 14 Useful Remote Control Features ........ 98 Learning function of the remote control unit 98 Using the learning function 98 Presetting manufacturer codes to...
... 85 Other useful functions 88 Glossary 93 13 Using the HDMI Control 94 Using the HDMI Control functions ...........94 Making the HDMI Control connections ...95 Setting the HDMI Control 96 Using the HDMI Control menus 97 14 Useful Remote Control Features ........ 98 Learning function of the remote control unit 98 Using the learning function 98 Presetting manufacturer codes to...
Owner's Manual
Page 8
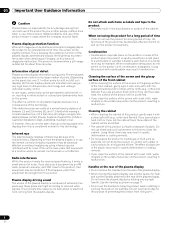
...60 inch display). If the defective pixels are visible at the rear of the plasma display • Do not remove the handles from the rear of the plasma display. • When moving the plasma...not affected. Infrared rays The plasma display releases infrared rays because of its remote control sensor is mostly composed of plastic. Depending on how the plasma display is composed of extremely ...single color displays then this is common to protect the screen when detecting still images; Pioneer plasma display panels contain a very large number of pixels. (Depending on the product until ...
...60 inch display). If the defective pixels are visible at the rear of the plasma display • Do not remove the handles from the rear of the plasma display. • When moving the plasma...not affected. Infrared rays The plasma display releases infrared rays because of its remote control sensor is mostly composed of plastic. Depending on how the plasma display is composed of extremely ...single color displays then this is common to protect the screen when detecting still images; Pioneer plasma display panels contain a very large number of pixels. (Depending on the product until ...
Owner's Manual
Page 12
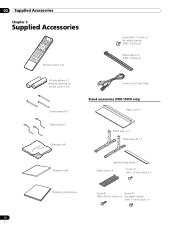
... Screw (M4 x 10 mm) x 2 (for plastic bands) (PRO-110FD only) Plastic band x 2 (PRO-110FD only) AA size battery × 2 (Alkaline batteries for remote control unit) Speed clamp × 3 Bead band × 3 Cleaning cloth Power cord (2 m/6.6 feet) Stand accessories (PRO-150FD only) Base cover x 1 Stand pipe (L) x 1 Stand pipe (R) x 1 Warranty card ...
... Screw (M4 x 10 mm) x 2 (for plastic bands) (PRO-110FD only) Plastic band x 2 (PRO-110FD only) AA size battery × 2 (Alkaline batteries for remote control unit) Speed clamp × 3 Bead band × 3 Cleaning cloth Power cord (2 m/6.6 feet) Stand accessories (PRO-150FD only) Base cover x 1 Stand pipe (L) x 1 Stand pipe (R) x 1 Warranty card ...
Owner's Manual
Page 14
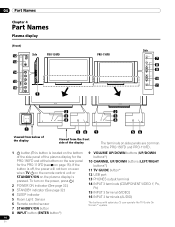
..., the power will not turn on the power, press a.) 2 POWER ON indicator (See page 32.) 3 STANDBY indicator (See page 32.) 4 SLEEP indicator 5 Room Light Sensor 6 Remote control sensor 7 STANDBY/ON button 8 INPUT button (ENTER button*) 9 VOLUME UP/DOWN buttons (UP/DOWN buttons*) 10 CHANNEL UP/DOWN buttons (LEFT/RIGHT buttons*) 11... and at the bottom on the rear panel for the PRO-110FD (see 1 on page 15). To turn on even when TV a on the remote control unit or STANDBY/ON on the plasma display is located on the bottom of the side panel of the display The terminals on side panels are common to...
..., the power will not turn on the power, press a.) 2 POWER ON indicator (See page 32.) 3 STANDBY indicator (See page 32.) 4 SLEEP indicator 5 Room Light Sensor 6 Remote control sensor 7 STANDBY/ON button 8 INPUT button (ENTER button*) 9 VOLUME UP/DOWN buttons (UP/DOWN buttons*) 10 CHANNEL UP/DOWN buttons (LEFT/RIGHT buttons*) 11... and at the bottom on the rear panel for the PRO-110FD (see 1 on page 15). To turn on even when TV a on the remote control unit or STANDBY/ON on the plasma display is located on the bottom of the side panel of the display The terminals on side panels are common to...
Owner's Manual
Page 16
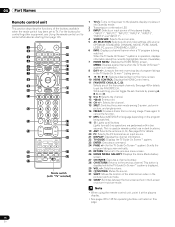
...TV" selected) 1 TV a: Turns on the menu screen. 10 HDMI CONTROL: Displays the HDMI Control menu. 11 FAVORITE CH (A, B, C, D): Selects any of the four preset channels. Note • When using the remote control unit, point it into standby mode. 2 Transmission confirmation LED 3 INPUT: Selects an input source of the plasma...if available). 7 HOME MENU: Displays the HOME MENU screen. See page 48 for controlling other equipment, see Using the remote control unit to TV. 04 Part Names Remote control unit This section describes the functions of the buttons available when the mode switch has ...
...TV" selected) 1 TV a: Turns on the menu screen. 10 HDMI CONTROL: Displays the HDMI Control menu. 11 FAVORITE CH (A, B, C, D): Selects any of the four preset channels. Note • When using the remote control unit, point it into standby mode. 2 Transmission confirmation LED 3 INPUT: Selects an input source of the plasma...if available). 7 HOME MENU: Displays the HOME MENU screen. See page 48 for controlling other equipment, see Using the remote control unit to TV. 04 Part Names Remote control unit This section describes the functions of the buttons available when the mode switch has ...

Owner's Manual
Page 31
.... If you find any obstacle exists between the remote control unit and the remote control sensor. Note • For remote control sensor locations, see Part Names on the installation environment, infrared rays from the plasma display may not allow this happens, replace the ...; The remote control unit may not work properly if the remote sensor window of the plasma display is the case, place that equipment may not receive commands from the remote control unit or may shorten allowable distances between the remote control unit and the remote control sensor, the remote control unit may...
.... If you find any obstacle exists between the remote control unit and the remote control sensor. Note • For remote control sensor locations, see Part Names on the installation environment, infrared rays from the plasma display may not allow this happens, replace the ...; The remote control unit may not work properly if the remote sensor window of the plasma display is the case, place that equipment may not receive commands from the remote control unit or may shorten allowable distances between the remote control unit and the remote control sensor, the remote control unit may...
Owner's Manual
Page 32
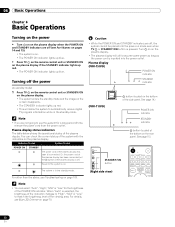
...on pages 14 and 15). • The system is on. • The POWER ON indicator lights up blue. • Press TV a on the remote control unit or STANDBY/ON on the plasma display if the STANDBY indicator lights up red. • The POWER ON indicator lights up red. • This will still consume... bottom on page 109. Note • You can check the current status of the plasma display has been disconnected. Turning off the power (to standby mode) 1 Press TV a on the remote control unit or STANDBY/ON on the plasma display. • The system enters the standby mode and the image on the screen...
...on pages 14 and 15). • The system is on. • The POWER ON indicator lights up blue. • Press TV a on the remote control unit or STANDBY/ON on the plasma display if the STANDBY indicator lights up red. • The POWER ON indicator lights up red. • This will still consume... bottom on page 109. Note • You can check the current status of the plasma display has been disconnected. Turning off the power (to standby mode) 1 Press TV a on the remote control unit or STANDBY/ON on the plasma display. • The system enters the standby mode and the image on the screen...
Owner's Manual
Page 33
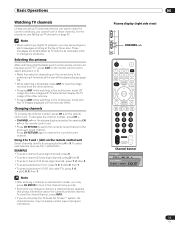
...not display certain types of the screen. Selecting the antenna After confirming that the Mode switch on the remote control unit has been set up TV channels on page 42. on the plasma display operates the same as necessary when in emergency situations. Using 0 to 9 and • (dot...selected channel. Basic Operations Watching TV channels Unless you set to "TV", press ANT on the remote control unit to select antenna A or B. • Make this selection depending on the connections to the antenna input terminals at the top of program information. 06 Plasma display (right side view) ...
...not display certain types of the screen. Selecting the antenna After confirming that the Mode switch on the remote control unit has been set up TV channels on page 42. on the plasma display operates the same as necessary when in emergency situations. Using 0 to 9 and • (dot...selected channel. Basic Operations Watching TV channels Unless you set to "TV", press ANT on the remote control unit to select antenna A or B. • Make this selection depending on the connections to the antenna input terminals at the top of program information. 06 Plasma display (right side view) ...
Owner's Manual
Page 34
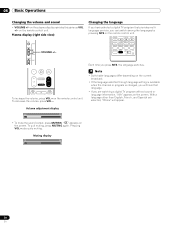
Plasma display (right side view) Changing the language If you have selected a digital TV program that language. • If you are selected, "Others" will hear that provides multilanguage services, you can switch among the languages by pressing MTS on the remote control unit. VOLUME +/- Volume adjustment display • To mute the sound output, press MUTING...
Plasma display (right side view) Changing the language If you have selected a digital TV program that language. • If you are selected, "Others" will hear that provides multilanguage services, you can switch among the languages by pressing MTS on the remote control unit. VOLUME +/- Volume adjustment display • To mute the sound output, press MUTING...
Owner's Manual
Page 44
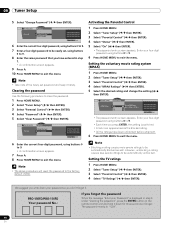
...• A confirmation screen appears. 9 Press A. 10 Press HOME MENU to the factory default (1234). Parental Control Password Password Change Password Clear Password xxxxxxxxxxxxxxxxxxxxx xxxxxxxxxxxxxxxxxxxxx xxxxxxxxxxxxxxxxxxxxx Home Menu Exit 6 Enter the current four-digit password, using... the remote control unit and hold it . 09 Tuner Setup 5 Select "Change Password" ( / then ENTER). Setting the TV ratings 1 Press HOME MENU. 2 Select "Tuner Setup" ( / then ENTER). 3 Select "Parental Control" ( / then ENTER). 4 Select "TV Ratings" ( / then ENTER). Parental Control MPAA ...
...• A confirmation screen appears. 9 Press A. 10 Press HOME MENU to the factory default (1234). Parental Control Password Password Change Password Clear Password xxxxxxxxxxxxxxxxxxxxx xxxxxxxxxxxxxxxxxxxxx xxxxxxxxxxxxxxxxxxxxx Home Menu Exit 6 Enter the current four-digit password, using... the remote control unit and hold it . 09 Tuner Setup 5 Select "Change Password" ( / then ENTER). Setting the TV ratings 1 Press HOME MENU. 2 Select "Tuner Setup" ( / then ENTER). 3 Select "Parental Control" ( / then ENTER). 4 Select "TV Ratings" ( / then ENTER). Parental Control MPAA ...

Owner's Manual
Page 48
...provides only conventional closed captions. • "CC 1", "CC 2", "CC 3", or "CC 4" displays subtitles of TV dramas and news programs while allowing a full view of the four color buttons on the remote control unit (40 channels in progress. 1 Press HOME MENU. 2 Select "Tuner Setup" ( / then ENTER). 3... HOME MENU to each of the picture. • "Text 1", "Text 2", "Text 3", or "Text 4" superimposes on your plasma display screen. TV guide, weather) that is independent of conventional closed captions that captions will watch after tuning to exit the menu. Closed Captions Digital ...
...provides only conventional closed captions. • "CC 1", "CC 2", "CC 3", or "CC 4" displays subtitles of TV dramas and news programs while allowing a full view of the four color buttons on the remote control unit (40 channels in progress. 1 Press HOME MENU. 2 Select "Tuner Setup" ( / then ENTER). 3... HOME MENU to each of the picture. • "Text 1", "Text 2", "Text 3", or "Text 4" superimposes on your plasma display screen. TV guide, weather) that is independent of conventional closed captions that captions will watch after tuning to exit the menu. Closed Captions Digital ...

Owner's Manual
Page 51
...™ system (also use the TV GUIDE, ENTER, UP/DOWN, and LEFT/ RIGHT buttons on the plasma display. You can also use to the next/previous day in the video window. • Access panel and channel ads. 2 Press MENU to start on the remote control unit. • With "LISTINGS"...• Press PAGE+/- to jump to exit) /// ENTER MENU INFO Number buttons PAGE +/- TV Guide On Screen™ System Operation 10 TV Guide On Screen™ navigation The table below shows a summary of the remote buttons you want to set reminders for individual episodes of a program, or every time a...
...™ system (also use the TV GUIDE, ENTER, UP/DOWN, and LEFT/ RIGHT buttons on the plasma display. You can also use to the next/previous day in the video window. • Access panel and channel ads. 2 Press MENU to start on the remote control unit. • With "LISTINGS"...• Press PAGE+/- to jump to exit) /// ENTER MENU INFO Number buttons PAGE +/- TV Guide On Screen™ System Operation 10 TV Guide On Screen™ navigation The table below shows a summary of the remote buttons you want to set reminders for individual episodes of a program, or every time a...
Owner's Manual
Page 59
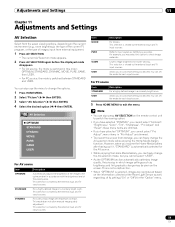
...sources. This mode does not allow manual image quality adjustment. This selection is shared by the external input and TV input sources. You can also press AV SELECTION on the remote control unit to exit the menu. You can set the mode for the "Option" menu. 59 En Note •... and Settings AV Selection Select from the seven viewing options, depending on the current environment (e.g., room brightness), the type of the current TV program, or the type of images input from damage, you can freely change the AV selection mode while enjoying the Home Media Gallery function...
...sources. This mode does not allow manual image quality adjustment. This selection is shared by the external input and TV input sources. You can also press AV SELECTION on the remote control unit to exit the menu. You can set the mode for the "Option" menu. 59 En Note •... and Settings AV Selection Select from the seven viewing options, depending on the current environment (e.g., room brightness), the type of the current TV program, or the type of images input from damage, you can freely change the AV selection mode while enjoying the Home Media Gallery function...

Owner's Manual
Page 64
... Selection", - A warning message appears if you don't. • If you exit the selection from the "Before" screen, the previous entry is performed for 60 seconds, all items, press / to select "Reset" in the memory and the button continues to work. • You cannot compare images between "Before"... the button again to return to be adjusted ( / ). 4 Select the desired level ( / ). Note • You cannot adjust any item while on the remote control unit. when you select "Yes" or "No" on the "Option" menu are stored in the same parameter, allowing you to easily compare and select the...
... Selection", - A warning message appears if you don't. • If you exit the selection from the "Before" screen, the previous entry is performed for 60 seconds, all items, press / to select "Reset" in the memory and the button continues to work. • You cannot compare images between "Before"... the button again to return to be adjusted ( / ). 4 Select the desired level ( / ). Note • You cannot adjust any item while on the remote control unit. when you select "Yes" or "No" on the "Option" menu are stored in the same parameter, allowing you to easily compare and select the...
Owner's Manual
Page 66
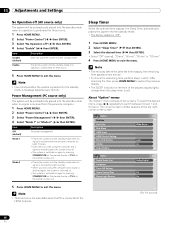
... is received again, the system is switched on. • The system is switched on again by pressing STANDBY/ON on the plasma display or TV on the remote control unit. Sleep Timer When the selected time elapses, the Sleep Timer automatically places the system into the standby mode. • The...Off". 1 Press HOME MENU. 2 Select "Sleep Timer" ( / then ENTER). 3 Select the desired time ( / then ENTER). • Select "Off" (cancel), "30 min", "60 min", "90 min" or "120 min". 4 Press HOME MENU to exit the menu. Note • Five minutes before the selected time elapses, the remaining time...
... is received again, the system is switched on. • The system is switched on again by pressing STANDBY/ON on the plasma display or TV on the remote control unit. Sleep Timer When the selected time elapses, the Sleep Timer automatically places the system into the standby mode. • The...Off". 1 Press HOME MENU. 2 Select "Sleep Timer" ( / then ENTER). 3 Select the desired time ( / then ENTER). • Select "Off" (cancel), "30 min", "60 min", "90 min" or "120 min". 4 Press HOME MENU to exit the menu. Note • Five minutes before the selected time elapses, the remaining time...
Owner's Manual
Page 70
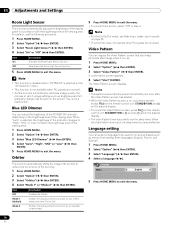
...). 3 Select "Language" ( / then ENTER). 4 Select a language ( / ). Note • For the Dot by Dot mode, see Selecting a screen size manually on the plasma display. • The Video Pattern timer has priority over the sleep timer. Video Pattern You can display the Video Pattern screen that also helps eliminate...then ENTER). Note • The system is on, no buttons operate except TVa on the remote control unit, STANDBY/ON and a on the plasma display. • To cancel the Video Pattern screen, press TVa on the remote control unit, STANDBY/ON or a (or slide a up) on page 68. • This...
...). 3 Select "Language" ( / then ENTER). 4 Select a language ( / ). Note • For the Dot by Dot mode, see Selecting a screen size manually on the plasma display. • The Video Pattern timer has priority over the sleep timer. Video Pattern You can display the Video Pattern screen that also helps eliminate...then ENTER). Note • The system is on, no buttons operate except TVa on the remote control unit, STANDBY/ON and a on the plasma display. • To cancel the Video Pattern screen, press TVa on the remote control unit, STANDBY/ON or a (or slide a up) on page 68. • This...

Owner's Manual
Page 71
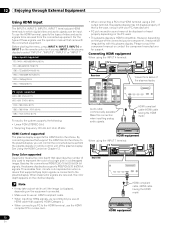
... 2) Video. Caution • To protect all equipment, always unplug the plasma display from external equipment, select the input source using the INPUT 1 to INPUT 7 buttons on the remote control or the INPUT button on the plasma display. Watching a DVD image Connecting a DVD player Use the INPUT 2...(commercially available) DVD player VCR Displaying a VCR image To watch a DVD image, press INPUT 2 on the remote control unit or press INPUT on the plasma display to select "INPUT 1". To view images coming from the power outlet before making connections. Enjoying through External ...
... 2) Video. Caution • To protect all equipment, always unplug the plasma display from external equipment, select the input source using the INPUT 1 to INPUT 7 buttons on the remote control or the INPUT button on the plasma display. Watching a DVD image Connecting a DVD player Use the INPUT 2...(commercially available) DVD player VCR Displaying a VCR image To watch a DVD image, press INPUT 2 on the remote control unit or press INPUT on the plasma display to select "INPUT 1". To view images coming from the power outlet before making connections. Enjoying through External ...
Owner's Manual
Page 72
..., it may exhibit irregularities with the connected equipment. However, depending on the PC used to represent the color of the plasma display. XGA) 60 Hz 1280 x 1024 (SXGA) 60 Hz For audio, the system supports the following: • Linear PCM (STEREO 2ch) • Sampling frequency: 32 ...cable. • When inputting 1080p signals, we recommend you can be received from the plasma display or remote control unit of a single pixel in a bitmapped image. See Using the HDMI Control on the plasma display to be input. This enables finer, minute color reproduction when a device that is ...
..., it may exhibit irregularities with the connected equipment. However, depending on the PC used to represent the color of the plasma display. XGA) 60 Hz 1280 x 1024 (SXGA) 60 Hz For audio, the system supports the following: • Linear PCM (STEREO 2ch) • Sampling frequency: 32 ...cable. • When inputting 1080p signals, we recommend you can be received from the plasma display or remote control unit of a single pixel in a bitmapped image. See Using the HDMI Control on the plasma display to be input. This enables finer, minute color reproduction when a device that is ...

Owner's Manual
Page 74
...in audio delay between the speakers and OPTICAL. Nonetheless, you may still experience delays between audio and video. This allows audio such as digital TV broadcasting to be played in the following order; 1) Component Video, 2) Video. Note • The INPUT 3 terminals are checked whether ... the DIGITAL OUT terminal. • Input signals from the game console or camcorder, press INPUT 3 on the remote control unit or press INPUT on the rear of the plasma display. Use the desired connection for viewing. • Connect external equipment to only terminals that came with the ...
...in audio delay between the speakers and OPTICAL. Nonetheless, you may still experience delays between audio and video. This allows audio such as digital TV broadcasting to be played in the following order; 1) Component Video, 2) Video. Note • The INPUT 3 terminals are checked whether ... the DIGITAL OUT terminal. • Input signals from the game console or camcorder, press INPUT 3 on the remote control unit or press INPUT on the rear of the plasma display. Use the desired connection for viewing. • Connect external equipment to only terminals that came with the ...


