

Owner's Manual
Page 7
...this information carefully. Note The following the recommendations listed below . Over the course of its lifetime, the luminosity of the Pioneer PRO150FD/PRO-110FD plasma display will automatically power off in the event of or modifications made to this product. To avoid malfunction and overheating when ...picture mode from a TV, VCR, DVD player or any still image, it is Important recommended to view full screen motion video for a prolonged period of exceptional quality, this rule. To ensure safety, please take the proper measures to mount or install the plasma display, in order...
...this information carefully. Note The following the recommendations listed below . Over the course of its lifetime, the luminosity of the Pioneer PRO150FD/PRO-110FD plasma display will automatically power off in the event of or modifications made to this product. To avoid malfunction and overheating when ...picture mode from a TV, VCR, DVD player or any still image, it is Important recommended to view full screen motion video for a prolonged period of exceptional quality, this rule. To ensure safety, please take the proper measures to mount or install the plasma display, in order...
Owner's Manual
Page 9
...be visible (see page 68). Caution Panel sticking and after-image lag • Displaying the same images such as plasma displays). Note • When a program menu, TV Guide screen or frozen image is displayed for 5 to 10 minutes, the system automatically turns the image off to... of the still images and the time they will not disappear completely. FOLLOW THE MANUFACTURER'S INSTRUCTIONS WHEN INSTALLING THE PRODUCT AND USE MOUNTING ACCESSORIES RECOMMENDED BY THE MANUFACTURER. Most image retention can be irreparable. use this happens, the menu will return to its normal size...
...be visible (see page 68). Caution Panel sticking and after-image lag • Displaying the same images such as plasma displays). Note • When a program menu, TV Guide screen or frozen image is displayed for 5 to 10 minutes, the system automatically turns the image off to... of the still images and the time they will not disappear completely. FOLLOW THE MANUFACTURER'S INSTRUCTIONS WHEN INSTALLING THE PRODUCT AND USE MOUNTING ACCESSORIES RECOMMENDED BY THE MANUFACTURER. Most image retention can be irreparable. use this happens, the menu will return to its normal size...

Owner's Manual
Page 10
... supplied cleaning cloth or other dangerous conditions. To ensure your product, please read and understood before using the product. 1. The plasma display used in this manual in fire, electric shock and/or other similar surface, since insufficient ventilation can cause the product to...condition. Replacement parts-In case the product needs replacement parts, make sure that the product needs servicing. 18. Wall or ceiling mounting-When mounting the product on the product. 4. generating products (including amplifiers). 10. Do not cover or block these vents and openings ...
... supplied cleaning cloth or other dangerous conditions. To ensure your product, please read and understood before using the product. 1. The plasma display used in this manual in fire, electric shock and/or other similar surface, since insufficient ventilation can cause the product to...condition. Replacement parts-In case the product needs replacement parts, make sure that the product needs servicing. 18. Wall or ceiling mounting-When mounting the product on the product. 4. generating products (including amplifiers). 10. Do not cover or block these vents and openings ...
Owner's Manual
Page 11
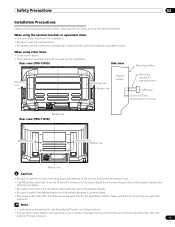
... it contains glass. • The screw holes other than the optional Pioneer products. 11 En See the side view above are to be used for the installation: Rear view (PRO-150FD) Side view Mounting surface Mounting hole 4 5 Mounting hole Median line Plasma display Mounting bracket (or equivalent item) M8 screw 12 mm to 18 mm (0.5 inches...
... it contains glass. • The screw holes other than the optional Pioneer products. 11 En See the side view above are to be used for the installation: Rear view (PRO-150FD) Side view Mounting surface Mounting hole 4 5 Mounting hole Median line Plasma display Mounting bracket (or equivalent item) M8 screw 12 mm to 18 mm (0.5 inches...

Owner's Manual
Page 19
... connection or installation method. • When using a screwdriver. Plasma display 3 Replace the plasma display to the mounting fittings. For speaker installation, see Installing the Pioneer speaker. Installing the Pioneer speaker Insert the stand into the plasma display so that an arrow with "FRONT/FACE AVANT" mark ...Installation bolts (2) (Step 1) Caution • Do not move the display holding on a table or similar surface. • When lying the plasma display down, be careful not to scratch or damage it. • If the speaker has been installed, it is recommended to detach the ...
... connection or installation method. • When using a screwdriver. Plasma display 3 Replace the plasma display to the mounting fittings. For speaker installation, see Installing the Pioneer speaker. Installing the Pioneer speaker Insert the stand into the plasma display so that an arrow with "FRONT/FACE AVANT" mark ...Installation bolts (2) (Step 1) Caution • Do not move the display holding on a table or similar surface. • When lying the plasma display down, be careful not to scratch or damage it. • If the speaker has been installed, it is recommended to detach the ...
Owner's Manual
Page 20
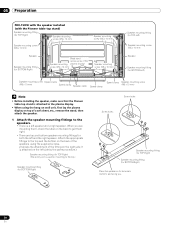
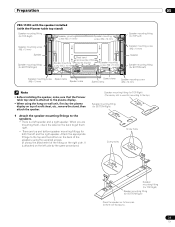
...PRO-150FD with the speaker installed (with the Pioneer table top stand) Speaker mounting fitting (for TOP-Right) Speaker mounting screw (M5 x 10 mm) Speaker mounting screw (M5 x 10 mm) Speaker mounting screw (M5 x 10 mm) Speaker Speaker mounting fitting (for BOTTOM-Right) Bead band (accessories... supplied screws. (It shows the attachment of the Speaker mounting plasma display) screw (M5 x 10 mm) Speaker mounting screw (M5 x 10 mm) Speaker mounting fitting (for TOP-Left) Speaker mounting screw (M5 x 10 mm) Speaker Speaker mounting fitting (for both the left speaker and a right speaker...
...PRO-150FD with the speaker installed (with the Pioneer table top stand) Speaker mounting fitting (for TOP-Right) Speaker mounting screw (M5 x 10 mm) Speaker mounting screw (M5 x 10 mm) Speaker mounting screw (M5 x 10 mm) Speaker Speaker mounting fitting (for BOTTOM-Right) Bead band (accessories... supplied screws. (It shows the attachment of the Speaker mounting plasma display) screw (M5 x 10 mm) Speaker mounting screw (M5 x 10 mm) Speaker mounting fitting (for TOP-Left) Speaker mounting screw (M5 x 10 mm) Speaker Speaker mounting fitting (for both the left speaker and a right speaker...
Owner's Manual
Page 21
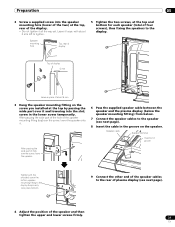
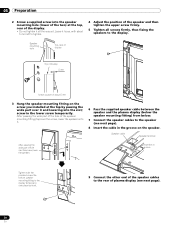
...and lower screws firmly. 21 En Tighten with about 5 mm 3 Hang the speaker mounting fitting on the speaker. Leave it and lowering into the speaker mounting hole (lower of the two) at the top, rear of plasma display (see next page). 8 Insert the cable in the groove on the screw you... 5 mm left to the rear of the display. • Do not tighten it . 6 Pass the supplied speaker cable between the speaker and the plasma display (below the speaker mounting fitting) from below. 7 Connect the speaker cables to the display. Preparation 05 2 Screw a supplied screw into the slot;
...and lower screws firmly. 21 En Tighten with about 5 mm 3 Hang the speaker mounting fitting on the speaker. Leave it and lowering into the speaker mounting hole (lower of the two) at the top, rear of plasma display (see next page). 8 Insert the cable in the groove on the screw you... 5 mm left to the rear of the display. • Do not tighten it . 6 Pass the supplied speaker cable between the speaker and the plasma display (below the speaker mounting fitting) from below. 7 Connect the speaker cables to the display. Preparation 05 2 Screw a supplied screw into the slot;
Owner's Manual
Page 23
...the Pioneer table top stand) Speaker mounting fitting (for TOP-Right) Speaker mounting screw (M5 x 10 mm) Speaker mounting screw (M5 x 10 mm) Speaker mounting screw (M5 x 10 mm) Speaker Speaker mounting fitting (for BOTTOM-Right) Speaker mounting screw (M5 x 10 mm) Bead band (accessories of the plasma display) Speaker mounting ...(M5 x 10 mm) Speaker cable Speed clamp Speed clamp Speaker mounting screw (M5 x 10 mm) Note • Before installing the speaker, make sure that the Pioneer table top stand is attached to the plasma display. • When using the supplied screws. (It shows ...
...the Pioneer table top stand) Speaker mounting fitting (for TOP-Right) Speaker mounting screw (M5 x 10 mm) Speaker mounting screw (M5 x 10 mm) Speaker mounting screw (M5 x 10 mm) Speaker Speaker mounting fitting (for BOTTOM-Right) Speaker mounting screw (M5 x 10 mm) Bead band (accessories of the plasma display) Speaker mounting ...(M5 x 10 mm) Speaker cable Speed clamp Speed clamp Speaker mounting screw (M5 x 10 mm) Note • Before installing the speaker, make sure that the Pioneer table top stand is attached to the plasma display. • When using the supplied screws. (It shows ...
Owner's Manual
Page 24
...passing the wide part over it and lowering into the speaker mounting hole (lower of the two) at the top, rear of plasma display (see next page). 24 En Insertion in groove Tighten with about 5 mm 3 Hang the speaker mounting fitting on the speaker. 05 Preparation 2 Screw a supplied ... the rear of the display. • Do not tighten it . 6 Pass the supplied speaker cable between the speaker and the plasma display (below the speaker mounting fitting) from below. 7 Connect the speaker cables to the display. Speaker cable Speaker terminal After passing the wide part of the ...
...passing the wide part over it and lowering into the speaker mounting hole (lower of the two) at the top, rear of plasma display (see next page). 24 En Insertion in groove Tighten with about 5 mm 3 Hang the speaker mounting fitting on the speaker. 05 Preparation 2 Screw a supplied ... the rear of the display. • Do not tighten it . 6 Pass the supplied speaker cable between the speaker and the plasma display (below the speaker mounting fitting) from below. 7 Connect the speaker cables to the display. Speaker cable Speaker terminal After passing the wide part of the ...
Owner's Manual
Page 123
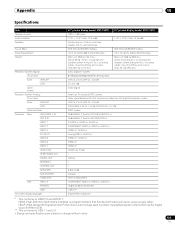
... INPUT 5 INPUT 6 INPUT 7 AUDIO OUT IR REPEATER OUT DIGITAL OUT ETHERNET CONTROL OUT SPEAKERS SUB WOOFER CableCARD Side INPUT 3 PHONES USB On-screen display languages 60" plasma display model: PRO-150FD 1920 × 1080 pixels 17 W + 17 W (1 kHz, 10 %, 6 Ω) Woofer: 6.6 cm x 10.6 cm ... bolts) Speaker system: 4.4 kg (9.7 lbs.) (including cables, mounting fittings and screws) Total: 66.7 kg (147.0 lbs.) ATSC Digital TV system 8VSB/64QAM/256QAM/QPSK demodulation VHF Ch. 2 to 13 UHF Ch. 14 to 69 Ch. 2 to 135 Dolby Digital 50" plasma display model: PRO-110FD 17 W + 17 W (1 kHz,...
... INPUT 5 INPUT 6 INPUT 7 AUDIO OUT IR REPEATER OUT DIGITAL OUT ETHERNET CONTROL OUT SPEAKERS SUB WOOFER CableCARD Side INPUT 3 PHONES USB On-screen display languages 60" plasma display model: PRO-150FD 1920 × 1080 pixels 17 W + 17 W (1 kHz, 10 %, 6 Ω) Woofer: 6.6 cm x 10.6 cm ... bolts) Speaker system: 4.4 kg (9.7 lbs.) (including cables, mounting fittings and screws) Total: 66.7 kg (147.0 lbs.) ATSC Digital TV system 8VSB/64QAM/256QAM/QPSK demodulation VHF Ch. 2 to 13 UHF Ch. 14 to 69 Ch. 2 to 135 Dolby Digital 50" plasma display model: PRO-110FD 17 W + 17 W (1 kHz,...


