
Owner's Manual
Page 3
...the FCC Rules. Product Name: Plasma Display System Model Number: PRO-150FD/PRO-110FD Product Category: Class B Personal Computers & Peripherals Responsible Party Name: PIONEER ELECTRONICS SERVICE, INC. Increase ...the separation between the equipment and receiver. - DOMINGUEZ ST., LONG BEACH, CA 90801-1760, U.S.A. Consult the dealer or an experienced radio/TV...turning the equipment off and on, the user is off all power.
...the FCC Rules. Product Name: Plasma Display System Model Number: PRO-150FD/PRO-110FD Product Category: Class B Personal Computers & Peripherals Responsible Party Name: PIONEER ELECTRONICS SERVICE, INC. Increase ...the separation between the equipment and receiver. - DOMINGUEZ ST., LONG BEACH, CA 90801-1760, U.S.A. Consult the dealer or an experienced radio/TV...turning the equipment off and on, the user is off all power.

Owner's Manual
Page 4
... of the power plug and power outlet may sometimes differ from falling over 26 Detaching the Pioneer stand 27 Cable connections for the PRO-110FD unless otherwise specified. Contents 01 Important User Guidance Information 7 02 Safety Precautions 10 Installation...plasma display 17 Moving the plasma display 17 Attaching the Pioneer stand 17 Installing the Pioneer speaker 19 Preventing the plasma display from that shown in this Pioneer product. However the method of the remote control unit 31 06 Basic Operations 32 Turning on the power 32 Turning off the power 32 Watching TV...
... of the power plug and power outlet may sometimes differ from falling over 26 Detaching the Pioneer stand 27 Cable connections for the PRO-110FD unless otherwise specified. Contents 01 Important User Guidance Information 7 02 Safety Precautions 10 Installation...plasma display 17 Moving the plasma display 17 Attaching the Pioneer stand 17 Installing the Pioneer speaker 19 Preventing the plasma display from that shown in this Pioneer product. However the method of the remote control unit 31 06 Basic Operations 32 Turning on the power 32 Turning off the power 32 Watching TV...
Owner's Manual
Page 14
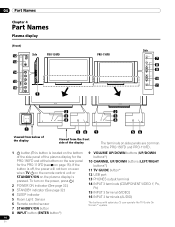
...Plasma display (Front) 12 13 Side PRO-150FD 14 15 16 1 PRO-110FD Side 7 8 9 10 11 2 2 3 3 4 4 1 56 1 56 Viewed from below of the display Viewed from the front side of the display The terminals on side panels are common to the PRO-150FD and PRO-110FD. 1 a button (This button is off, the power will not turn... En To turn on even when TV a on the remote control unit or STANDBY/ON on page 15). If the button is located on the bottom of the side panel of the plasma display for the PRO-150FD and at the bottom on the rear panel for the PRO-110FD (see 1 on the plasma display is...
...Plasma display (Front) 12 13 Side PRO-150FD 14 15 16 1 PRO-110FD Side 7 8 9 10 11 2 2 3 3 4 4 1 56 1 56 Viewed from below of the display Viewed from the front side of the display The terminals on side panels are common to the PRO-150FD and PRO-110FD. 1 a button (This button is off, the power will not turn... En To turn on even when TV a on the remote control unit or STANDBY/ON on page 15). If the button is located on the bottom of the side panel of the plasma display for the PRO-150FD and at the bottom on the rear panel for the PRO-110FD (see 1 on the plasma display is...
Owner's Manual
Page 17
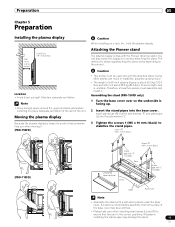
...positions. Using other stands can also install the display on the product. Attaching the Pioneer stand The plasma display comes with a soft sheet placed under the base cover. Assembling the stand (PRO-150FD only) 1 Turn the base cover over so the underside is facing up. 2 Insert the stand ...pipes into the side marked "L". 3 Tighten the screws 1 (M5 x 10 mm: black) to ensure that they are in instability, possibly causing injury. • The weight of a 60 inch plasma display is...
...positions. Using other stands can also install the display on the product. Attaching the Pioneer stand The plasma display comes with a soft sheet placed under the base cover. Assembling the stand (PRO-150FD only) 1 Turn the base cover over so the underside is facing up. 2 Insert the stand ...pipes into the side marked "L". 3 Tighten the screws 1 (M5 x 10 mm: black) to ensure that they are in instability, possibly causing injury. • The weight of a 60 inch plasma display is...

Owner's Manual
Page 19
.... Doing so may result in damage or fire. • Be sure to turn the connected devices off from the main unit and fall over. • When installing the speaker, tighten the screws firmly. (PRO-150FD) 19 En Installation • When installing the speaker, do not use excessive ... panel or its ports or result in injury or damage to the unit. For speaker installation, see Installing the Pioneer speaker. Plasma display 3 Replace the plasma display to protect the display from the speaker. Preparation 05 Attaching the stand • Steps for attaching the stand are subjected...
.... Doing so may result in damage or fire. • Be sure to turn the connected devices off from the main unit and fall over. • When installing the speaker, tighten the screws firmly. (PRO-150FD) 19 En Installation • When installing the speaker, do not use excessive ... panel or its ports or result in injury or damage to the unit. For speaker installation, see Installing the Pioneer speaker. Plasma display 3 Replace the plasma display to protect the display from the speaker. Preparation 05 Attaching the stand • Steps for attaching the stand are subjected...
Owner's Manual
Page 30
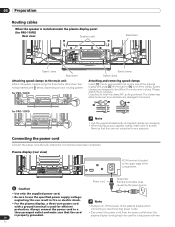
... completed. Plasma display (rear view) AC IN terminal is located on the rear of the plasma display and...routing system. Note • Always turn off the power of the plasma display when connecting or disconnecting power cords. •... plasma display is not going to be difficult to undo once in fire or electric shock. • For the plasma... twist the clamp 90º, pulling outward. for PRO-150FD for PRO-110FD Speed clamp Speed clamp Attaching and removing speed ... When the speaker is installed under the plasma display panel (for PRO-110FD) Rear view Speaker cable Bead band...
... completed. Plasma display (rear view) AC IN terminal is located on the rear of the plasma display and...routing system. Note • Always turn off the power of the plasma display when connecting or disconnecting power cords. •... plasma display is not going to be difficult to undo once in fire or electric shock. • For the plasma... twist the clamp 90º, pulling outward. for PRO-150FD for PRO-110FD Speed clamp Speed clamp Attaching and removing speed ... When the speaker is installed under the plasma display panel (for PRO-110FD) Rear view Speaker cable Bead band...
Owner's Manual
Page 32
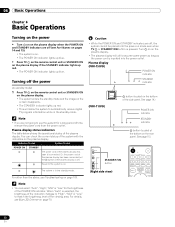
... the power (to automatically receive digital TV program information while in the standby mode. Turn a on on the plasma display. • The plasma display will allow the system to standby mode) 1 Press TV a on the remote control unit or STANDBY/ON on the plasma display. • The system enters ...area. For details, see Troubleshooting on page 109. Plasma display (PRO-150FD) POWER ON indicator STANDBY indicator (PRO-110FD) a button (located on the rear panel. When "Auto" is on. • The POWER ON indicator lights up blue. • Press TV a on the remote control unit or STANDBY/ON...
... the power (to automatically receive digital TV program information while in the standby mode. Turn a on on the plasma display. • The plasma display will allow the system to standby mode) 1 Press TV a on the remote control unit or STANDBY/ON on the plasma display. • The system enters ...area. For details, see Troubleshooting on page 109. Plasma display (PRO-150FD) POWER ON indicator STANDBY indicator (PRO-110FD) a button (located on the rear panel. When "Auto" is on. • The POWER ON indicator lights up blue. • Press TV a on the remote control unit or STANDBY/ON...

Owner's Manual
Page 60
...; To perform advanced picture adjustments, select "Pro Adjust" in step 3, and then press ENTER. Picture AV Selection Contrast Brightness Color Tint Sharpness Pro Adjust Reset OPTIMUM 40 0 0 0 ...3 Select an item to be adjusted, by pressing / . 5 Press HOME MENU to exit the menu. 60 En 11 Adjustments and Settings Basic picture adjustments Adjust the picture to your preference for all items, press / to... displayed, you can also change as OPTIMUM, Room Light Sensor and Intelligent Mode, are temporarily turned off when the "Picture" menu is displayed. Press / to select "Yes", and then ...
...; To perform advanced picture adjustments, select "Pro Adjust" in step 3, and then press ENTER. Picture AV Selection Contrast Brightness Color Tint Sharpness Pro Adjust Reset OPTIMUM 40 0 0 0 ...3 Select an item to be adjusted, by pressing / . 5 Press HOME MENU to exit the menu. 60 En 11 Adjustments and Settings Basic picture adjustments Adjust the picture to your preference for all items, press / to... displayed, you can also change as OPTIMUM, Room Light Sensor and Intelligent Mode, are temporarily turned off when the "Picture" menu is displayed. Press / to select "Yes", and then ...


