

Owner's Manual
Page 4
... so you will know how to operate your favorite channels 48 Illustrations shown in this Pioneer product. Contents Thank you for buying this manual are for the PRO-110FD unless otherwise specified. However the method of the remote control unit 31 06 Basic...unit 16 05 Preparation 17 Installing the plasma display 17 Moving the plasma display 17 Attaching the Pioneer stand 17 Installing the Pioneer speaker 19 Preventing the plasma display from that shown in a safe place for skipping unwanted channels 42 Setting up TV channels manually ........ 42 Checking signal strength...
... so you will know how to operate your favorite channels 48 Illustrations shown in this Pioneer product. Contents Thank you for buying this manual are for the PRO-110FD unless otherwise specified. However the method of the remote control unit 31 06 Basic...unit 16 05 Preparation 17 Installing the plasma display 17 Moving the plasma display 17 Attaching the Pioneer stand 17 Installing the Pioneer speaker 19 Preventing the plasma display from that shown in a safe place for skipping unwanted channels 42 Setting up TV channels manually ........ 42 Checking signal strength...

Owner's Manual
Page 7
...TV, VCR, DVD player or any still image, it is strongly recommended. Important User Guidance Information 01 Chapter 1 Important User Guidance Information In order to obtain maximum enjoyment from your Pioneer plasma display for many factors: inappropriate installation site, improper assembly/installation/mounting, improper operation of or modifications made to set... to its lowest suction setting. • Do not place the product on the sides and rear of the unit to remove dust build-up its lifetime, the luminosity of the Pioneer PRO150FD/PRO-110FD plasma display will diminish very...
...TV, VCR, DVD player or any still image, it is strongly recommended. Important User Guidance Information 01 Chapter 1 Important User Guidance Information In order to obtain maximum enjoyment from your Pioneer plasma display for many factors: inappropriate installation site, improper assembly/installation/mounting, improper operation of or modifications made to set... to its lowest suction setting. • Do not place the product on the sides and rear of the unit to remove dust build-up its lifetime, the luminosity of the Pioneer PRO150FD/PRO-110FD plasma display will diminish very...
Owner's Manual
Page 41
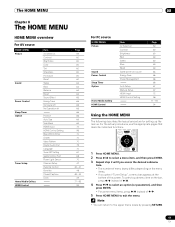
... HOME MENU Picture Sound Power Control Sleep Timer Option Tuner Setup Home Media Gallery HDMI Control Item AV Selection Contrast Brightness Color Tint Sharpness Pro Adjust Reset Treble Bass Balance Reset Sound Effect Energy Save No Signal off No Operation off Position Auto Size Side Mask HDMI Input HDMI ... Selection Contrast Brightness Red Green Blue Reset Same as the AV source Energy Save Power Management Auto Setup Manual Setup HDMI Input HDMI Control Setting Page 59 60 60 60 60 60 60 64 65 66 66 67 67 72 96 77 - 93 94 Using the HOME MENU The following describes the typical procedure for...
... HOME MENU Picture Sound Power Control Sleep Timer Option Tuner Setup Home Media Gallery HDMI Control Item AV Selection Contrast Brightness Color Tint Sharpness Pro Adjust Reset Treble Bass Balance Reset Sound Effect Energy Save No Signal off No Operation off Position Auto Size Side Mask HDMI Input HDMI ... Selection Contrast Brightness Red Green Blue Reset Same as the AV source Energy Save Power Management Auto Setup Manual Setup HDMI Input HDMI Control Setting Page 59 60 60 60 60 60 60 64 65 66 66 67 67 72 96 77 - 93 94 Using the HOME MENU The following describes the typical procedure for...
Owner's Manual
Page 44
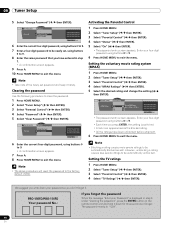
... "Status" ( / then ENTER). 5 Select "On" ( / then ENTER). • The password entry screen appears. PRO-150FD/PRO-110FD Your password No.: If you press ENTER, the setting is displayed in step 7. • A confirmation screen appears. 9 Press A. 10 Press HOME MENU to be automatically unblocked....press the ENTER button on the remote control unit and hold it handy. Setting the TV ratings 1 Press HOME MENU. 2 Select "Tuner Setup" ( / then ENTER). 3 Select "Parental Control" ( / then ENTER). 4 Select "TV Ratings" ( / then ENTER). Likewise, unblocking a rating causes less severe...
... "Status" ( / then ENTER). 5 Select "On" ( / then ENTER). • The password entry screen appears. PRO-150FD/PRO-110FD Your password No.: If you press ENTER, the setting is displayed in step 7. • A confirmation screen appears. 9 Press A. 10 Press HOME MENU to be automatically unblocked....press the ENTER button on the remote control unit and hold it handy. Setting the TV ratings 1 Press HOME MENU. 2 Select "Tuner Setup" ( / then ENTER). 3 Select "Parental Control" ( / then ENTER). 4 Select "TV Ratings" ( / then ENTER). Likewise, unblocking a rating causes less severe...
Owner's Manual
Page 59
...this order; This is not a malfunction. • When "OPTIMUM" is shared by the external input and TV input sources. This selection is shared by the external input and TV input sources. Item MOVIE PURE GAME USER Description For movies. This selection is shared by the external input ...the viewing option. • If you have selected "OPTIMUM", you to the optimum level in a normally bright room. Allows you cannot select "Pro Adjust"; You can set the mode for easier viewing. OPTIMUM, STANDARD, DYNAMIC, MOVIE, PURE, GAME, then USER. • For PC source, the mode is switched...
...this order; This is not a malfunction. • When "OPTIMUM" is shared by the external input and TV input sources. This selection is shared by the external input and TV input sources. Item MOVIE PURE GAME USER Description For movies. This selection is shared by the external input ...the viewing option. • If you have selected "OPTIMUM", you to the optimum level in a normally bright room. Allows you cannot select "Pro Adjust"; You can set the mode for easier viewing. OPTIMUM, STANDARD, DYNAMIC, MOVIE, PURE, GAME, then USER. • For PC source, the mode is switched...

Owner's Manual
Page 60
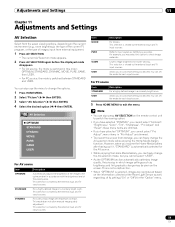
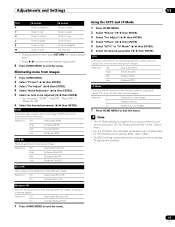
...). 3 Select an item to be adjusted, by pressing / . 5 Press HOME MENU to exit the menu. 60 En Press / to select "Yes", and then press ENTER. • Some functions, such as you can also... change the item to be adjusted ( / then ENTER). 11 Adjustments and Settings Basic picture adjustments Adjust the picture to your preference for all items, press / to select ..."Reset" in step 3, and then press ENTER. Picture AV Selection Contrast Brightness Color Tint Sharpness Pro Adjust Reset OPTIMUM 40 0 0 0 0 For PC source, the following screen appears: Picture AV Selection...
...). 3 Select an item to be adjusted, by pressing / . 5 Press HOME MENU to exit the menu. 60 En Press / to select "Yes", and then press ENTER. • Some functions, such as you can also... change the item to be adjusted ( / then ENTER). 11 Adjustments and Settings Basic picture adjustments Adjust the picture to your preference for all items, press / to select ..."Reset" in step 3, and then press ENTER. Picture AV Selection Contrast Brightness Color Tint Sharpness Pro Adjust Reset OPTIMUM 40 0 0 0 0 For PC source, the following screen appears: Picture AV Selection...

Owner's Manual
Page 61
... input signals: 480p, 720p@60 Hz, 1080p@60 Hz. • "Smooth" is not selectable for the following input signals: 1080p@60 Hz. • "Advance" is not selectable for the following input signals: 1080p@60 Hz. • When you...plasma display provides various advanced functions for images Selections Off Deactivates ACL On Activates ACL 61 En Intelligent Mode Performs such compensation that results in which image settings such as shown on these functions, see the table. This is disabled. Using the Picture Detail 1 Press HOME MENU. 2 Select "Picture" ( / then ENTER). 3 Select "Pro...
... input signals: 480p, 720p@60 Hz, 1080p@60 Hz. • "Smooth" is not selectable for the following input signals: 1080p@60 Hz. • "Advance" is not selectable for the following input signals: 1080p@60 Hz. • When you...plasma display provides various advanced functions for images Selections Off Deactivates ACL On Activates ACL 61 En Intelligent Mode Performs such compensation that results in which image settings such as shown on these functions, see the table. This is disabled. Using the Picture Detail 1 Press HOME MENU. 2 Select "Picture" ( / then ENTER). 3 Select "Pro...
Owner's Manual
Page 62
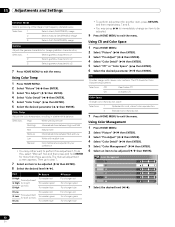
...8226; You may press / to immediately change an item to be adjusted. 9 Press HOME MENU to exit the menu. 11 Adjustments and Settings Enhancer Mode Selects processing of the image's high frequency (detailed) areas Selections 1 Selects Hard (SHARPNESS) image 2 Selects Natural (SHARPNESS) image... tone between Mid and Low Low White with clearer color contours. Using Color Management 1 Press HOME MENU. 2 Select "Picture" ( / then ENTER). 3 Select "Pro Adjust" ( / then ENTER). 4 Select "Color Detail" ( / then ENTER). 5 Select "Color Management" ( / then ENTER). 6 Select an item to exit...
...8226; You may press / to immediately change an item to be adjusted. 9 Press HOME MENU to exit the menu. 11 Adjustments and Settings Enhancer Mode Selects processing of the image's high frequency (detailed) areas Selections 1 Selects Hard (SHARPNESS) image 2 Selects Natural (SHARPNESS) image... tone between Mid and Low Low White with clearer color contours. Using Color Management 1 Press HOME MENU. 2 Select "Picture" ( / then ENTER). 3 Select "Pro Adjust" ( / then ENTER). 4 Select "Color Detail" ( / then ENTER). 5 Select "Color Management" ( / then ENTER). 6 Select an item to exit...
Owner's Manual
Page 63
...images. 3DNR stands for separating brightness signals and color signals. Note • The I-P Mode setting is selectable when composite video or analog TV signals are received. 63 En Using the 3DYC and I-P Mode 1 Press HOME MENU. ...2 Select "Picture" ( / then ENTER). 3 Select "Pro Adjust" ( / then ENTER). 4 Select "Others" ( / then ENTER). 5 Select "3DYC" or "I -P Mode, the individual parameters are not selectable for both video and still images. Selections 1 Optimum for video images 2 Standard setting...
...images. 3DNR stands for separating brightness signals and color signals. Note • The I-P Mode setting is selectable when composite video or analog TV signals are received. 63 En Using the 3DYC and I-P Mode 1 Press HOME MENU. ...2 Select "Picture" ( / then ENTER). 3 Select "Pro Adjust" ( / then ENTER). 4 Select "Others" ( / then ENTER). 5 Select "3DYC" or "I -P Mode, the individual parameters are not selectable for both video and still images. Selections 1 Optimum for video images 2 Standard setting...

Owner's Manual
Page 64
..." menu are stored in memory. • If you want to exit the menu without performing the adjustments (or leaving the settings disabled) on the confirmation screen for 60 seconds, all items, press / to select "Reset" in the same parameter, allowing you to easily compare and select the ...ENTER. 11 Adjustments and Settings Comparing picture adjustments on the screen During picture adjustments, you can adjust the sound quality to your preference for other parameters. 7 Press HOME MENU to exit the menu. "Before" displays and the image adjusted last time appears for "Pro Adjust" on the "...
..." menu are stored in memory. • If you want to exit the menu without performing the adjustments (or leaving the settings disabled) on the confirmation screen for 60 seconds, all items, press / to select "Reset" in the same parameter, allowing you to easily compare and select the ...ENTER. 11 Adjustments and Settings Comparing picture adjustments on the screen During picture adjustments, you can adjust the sound quality to your preference for other parameters. 7 Press HOME MENU to exit the menu. "Before" displays and the image adjusted last time appears for "Pro Adjust" on the "...


