
Owner's Manual
Page 17
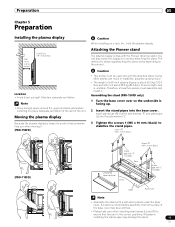
Note • Allow enough space around the upper and back parts when installing to ensure adequate ventilation of the rear of a 60 inch plasma display is about 55.5 kg (122.4 lbs.) and a 50 inch about 38.8 kg (85.5 lbs.), it has no depth, and is facing up. 2 ... "L". 3 Tighten the screws 1 (M5 x 10 mm: black) to stabilize the stand pipes. Assembling the stand (PRO-150FD only) 1 Turn the base cover over so the underside is unstable. Attaching the Pioneer stand The plasma display comes with a soft sheet placed under the base cover. Mistakenly installing the stand pipes may be...
Note • Allow enough space around the upper and back parts when installing to ensure adequate ventilation of the rear of a 60 inch plasma display is about 55.5 kg (122.4 lbs.) and a 50 inch about 38.8 kg (85.5 lbs.), it has no depth, and is facing up. 2 ... "L". 3 Tighten the screws 1 (M5 x 10 mm: black) to stabilize the stand pipes. Assembling the stand (PRO-150FD only) 1 Turn the base cover over so the underside is unstable. Attaching the Pioneer stand The plasma display comes with a soft sheet placed under the base cover. Mistakenly installing the stand pipes may be...
Owner's Manual
Page 30
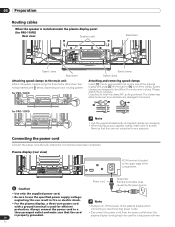
... going to be difficult to undo once in fire or electric shock. • For the plasma display, a three-core power cord with a ground terminal is installed under the plasma display panel (for PRO-110FD) Rear view Speaker cable Bead band Speed clamp Bead band Attaching speed clamps to the... main unit Attach the speed clamps using the three holes (60 inches: four holes) marked with below, depending on ...
... going to be difficult to undo once in fire or electric shock. • For the plasma display, a three-core power cord with a ground terminal is installed under the plasma display panel (for PRO-110FD) Rear view Speaker cable Bead band Speed clamp Bead band Attaching speed clamps to the... main unit Attach the speed clamps using the three holes (60 inches: four holes) marked with below, depending on ...
Owner's Manual
Page 41
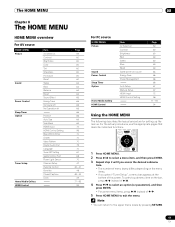
... source HOME MENU Picture Sound Power Control Sleep Timer Option Tuner Setup Home Media Gallery HDMI Control Item AV Selection Contrast Brightness Color Tint Sharpness Pro Adjust Reset Treble Bass Balance Reset Sound Effect Energy Save No Signal off No Operation off Position Auto Size Side Mask HDMI Input HDMI Control... Video Pattern Digital Audio Out Language Tuner NR Setting Game Control Pref Room Light Sensor Channel Setup Parental Control Favorites Closed Captions Clock Page 59 60 60 60 60 60 60 60 64 64 64 64 65 65 65 66 66 66 69 69 72 96 70 70 70 75 70 67 68 70 42 43 - 47...
... source HOME MENU Picture Sound Power Control Sleep Timer Option Tuner Setup Home Media Gallery HDMI Control Item AV Selection Contrast Brightness Color Tint Sharpness Pro Adjust Reset Treble Bass Balance Reset Sound Effect Energy Save No Signal off No Operation off Position Auto Size Side Mask HDMI Input HDMI Control... Video Pattern Digital Audio Out Language Tuner NR Setting Game Control Pref Room Light Sensor Channel Setup Parental Control Favorites Closed Captions Clock Page 59 60 60 60 60 60 60 60 64 64 64 64 65 65 65 66 66 66 69 69 72 96 70 70 70 75 70 67 68 70 42 43 - 47...

Owner's Manual
Page 60
..."Picture" menu is displayed, you can also change the item to be adjusted ( / then ENTER). Press / to exit the menu. 60 En A confirmation screen appears. 11 Adjustments and Settings Basic picture adjustments Adjust the picture to your preference for all items, press / to ...select "Reset" in step 3, and then press ENTER. Picture AV Selection Contrast Brightness Color Tint Sharpness Pro Adjust Reset OPTIMUM 40 0 0 0 0 For PC source, the following screen appears: Picture AV Selection Contrast Brightness Red Green Blue Reset STANDARD 40 ...
..."Picture" menu is displayed, you can also change the item to be adjusted ( / then ENTER). Press / to exit the menu. 60 En A confirmation screen appears. 11 Adjustments and Settings Basic picture adjustments Adjust the picture to your preference for all items, press / to ...select "Reset" in step 3, and then press ENTER. Picture AV Selection Contrast Brightness Color Tint Sharpness Pro Adjust Reset OPTIMUM 40 0 0 0 0 For PC source, the following screen appears: Picture AV Selection Contrast Brightness Red Green Blue Reset STANDARD 40 ...

Owner's Manual
Page 61
...1 Press HOME MENU. 2 Select "Picture" ( / then ENTER). 3 Select "Pro Adjust" ( / then ENTER). 4 Select "Intelligent Mode" ( / then ENTER). ...60 Hz, 1080p@60 Hz. • "Smooth" is not selectable for the following input signals: 1080p@60 Hz. • "Advance" is not selectable for the following input signals: 1080p@60... PureCinema 1 Press HOME MENU. 2 Select "Picture" ( / then ENTER). 3 Select "Pro Adjust" ( / then ENTER). 4 Select "PureCinema" ( / then ENTER). 5 Select ...Select "Picture" ( / then ENTER). 3 Select "Pro Adjust" ( / then ENTER). 4 Select "Picture Detail" ( / ...
...1 Press HOME MENU. 2 Select "Picture" ( / then ENTER). 3 Select "Pro Adjust" ( / then ENTER). 4 Select "Intelligent Mode" ( / then ENTER). ...60 Hz, 1080p@60 Hz. • "Smooth" is not selectable for the following input signals: 1080p@60 Hz. • "Advance" is not selectable for the following input signals: 1080p@60... PureCinema 1 Press HOME MENU. 2 Select "Picture" ( / then ENTER). 3 Select "Pro Adjust" ( / then ENTER). 4 Select "PureCinema" ( / then ENTER). 5 Select ...Select "Picture" ( / then ENTER). 3 Select "Pro Adjust" ( / then ENTER). 4 Select "Picture Detail" ( / ...

Owner's Manual
Page 64
...preference with headphones connected, the new settings will become effective as soon as you disconnect the headphones. • To restore the factory defaults for 60 seconds, all items, press / to select "Reset" in step 3, and then press ENTER. 11 Adjustments and Settings Comparing picture adjustments on ...the screen During picture adjustments, you can adjust the sound quality to your preference for "Pro Adjust" on the "Picture" menu and "Room Light Sensor" on the "Option" menu are stored in memory. • If you want...
...preference with headphones connected, the new settings will become effective as soon as you disconnect the headphones. • To restore the factory defaults for 60 seconds, all items, press / to select "Reset" in step 3, and then press ENTER. 11 Adjustments and Settings Comparing picture adjustments on ...the screen During picture adjustments, you can adjust the sound quality to your preference for "Pro Adjust" on the "Picture" menu and "Room Light Sensor" on the "Option" menu are stored in memory. • If you want...
Owner's Manual
Page 123
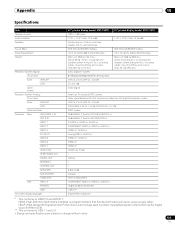
... 5 INPUT 6 INPUT 7 AUDIO OUT IR REPEATER OUT DIGITAL OUT ETHERNET CONTROL OUT SPEAKERS SUB WOOFER CableCARD Side INPUT 3 PHONES USB On-screen display languages 60" plasma display model: PRO-150FD 1920 × 1080 pixels 17 W + 17 W (1 kHz, 10 %, 6 Ω) Woofer: 6.6 cm x 10.6 cm cone type Tweeter: ...(including cables, mounting fittings and screws) Total: 66.7 kg (147.0 lbs.) ATSC Digital TV system 8VSB/64QAM/256QAM/QPSK demodulation VHF Ch. 2 to 13 UHF Ch. 14 to 69 Ch. 2 to 135 Dolby Digital 50" plasma display model: PRO-110FD 17 W + 17 W (1 kHz, 10 %, 6 Ω) SRS FOCUS/SRS...
... 5 INPUT 6 INPUT 7 AUDIO OUT IR REPEATER OUT DIGITAL OUT ETHERNET CONTROL OUT SPEAKERS SUB WOOFER CableCARD Side INPUT 3 PHONES USB On-screen display languages 60" plasma display model: PRO-150FD 1920 × 1080 pixels 17 W + 17 W (1 kHz, 10 %, 6 Ω) Woofer: 6.6 cm x 10.6 cm cone type Tweeter: ...(including cables, mounting fittings and screws) Total: 66.7 kg (147.0 lbs.) ATSC Digital TV system 8VSB/64QAM/256QAM/QPSK demodulation VHF Ch. 2 to 13 UHF Ch. 14 to 69 Ch. 2 to 135 Dolby Digital 50" plasma display model: PRO-110FD 17 W + 17 W (1 kHz, 10 %, 6 Ω) SRS FOCUS/SRS...


