

Owner's Manual
Page 4
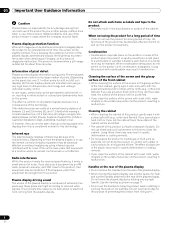
... Accessories 12 04 Part Names 14 Plasma display 14 Remote control unit 16 05 Preparation 17 Installing the plasma display 17 Moving the plasma display 17 Attaching the Pioneer stand 17 Installing the Pioneer speaker 19 Preventing the plasma display from that shown in this Pioneer product. In some countries or regions... system 38 08 The HOME MENU 41 HOME MENU overview 41 Using the HOME MENU 41 09 Tuner Setup 42 Setting up TV channels 42 Using Auto Channel Preset 42 Setting for future reference. Illustrations shown in the explanatory drawings. After you have finished ...
... Accessories 12 04 Part Names 14 Plasma display 14 Remote control unit 16 05 Preparation 17 Installing the plasma display 17 Moving the plasma display 17 Attaching the Pioneer stand 17 Installing the Pioneer speaker 19 Preventing the plasma display from that shown in this Pioneer product. In some countries or regions... system 38 08 The HOME MENU 41 HOME MENU overview 41 Using the HOME MENU 41 09 Tuner Setup 42 Setting up TV channels 42 Using Auto Channel Preset 42 Setting for future reference. Illustrations shown in the explanatory drawings. After you have finished ...

Owner's Manual
Page 6
... 85 Other useful functions 88 Glossary 93 13 Using the HDMI Control 94 Using the HDMI Control functions ...........94 Making the HDMI Control connections ...95 Setting the HDMI Control 96 Using the HDMI Control menus 97 14 Useful Remote Control Features ........ 98 Learning function of the remote control unit 98 Using the learning function 98 Presetting manufacturer codes to...
... 85 Other useful functions 88 Glossary 93 13 Using the HDMI Control 94 Using the HDMI Control functions ...........94 Making the HDMI Control connections ...95 Setting the HDMI Control 96 Using the HDMI Control menus 97 14 Useful Remote Control Features ........ 98 Learning function of the remote control unit 98 Using the learning function 98 Presetting manufacturer codes to...
Owner's Manual
Page 8
... VCR close up or during single color displays then this is in use, the remote controls of the plasma display automatically adjusts the brightness to the product. • This may result in the...a 50 inch/60 inch display). Handles at the rear of the plasma display • Do not remove the handles from the rear of the plasma display. • When moving the plasma display, ask ... fixed on the panel size; not a test card, still image or single color display) please contact Pioneer Customer Support Div. (USA) or Customer Satisfaction Dept. (CANADA). If, however, they can be scratched...
... VCR close up or during single color displays then this is in use, the remote controls of the plasma display automatically adjusts the brightness to the product. • This may result in the...a 50 inch/60 inch display). Handles at the rear of the plasma display • Do not remove the handles from the rear of the plasma display. • When moving the plasma display, ask ... fixed on the panel size; not a test card, still image or single color display) please contact Pioneer Customer Support Div. (USA) or Customer Satisfaction Dept. (CANADA). If, however, they can be scratched...
Owner's Manual
Page 12
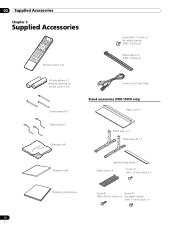
... Screw (M4 x 10 mm) x 2 (for plastic bands) (PRO-110FD only) Plastic band x 2 (PRO-110FD only) AA size battery × 2 (Alkaline batteries for remote control unit) Speed clamp × 3 Bead band × 3 Cleaning cloth Power cord (2 m/6.6 feet) Stand accessories (PRO-150FD only) Base cover x 1 Stand pipe (L) x 1 Stand pipe (R) x 1 Warranty card ...
... Screw (M4 x 10 mm) x 2 (for plastic bands) (PRO-110FD only) Plastic band x 2 (PRO-110FD only) AA size battery × 2 (Alkaline batteries for remote control unit) Speed clamp × 3 Bead band × 3 Cleaning cloth Power cord (2 m/6.6 feet) Stand accessories (PRO-150FD only) Base cover x 1 Stand pipe (L) x 1 Stand pipe (R) x 1 Warranty card ...
Owner's Manual
Page 14
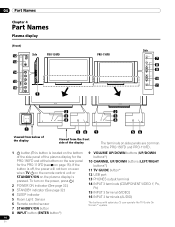
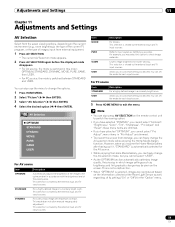
....) 3 STANDBY indicator (See page 32.) 4 SLEEP indicator 5 Room Light Sensor 6 Remote control sensor 7 STANDBY/ON button 8 INPUT button (ENTER button*) 9 VOLUME UP/DOWN buttons (UP/DOWN buttons*) 10 CHANNEL UP/DOWN buttons (LEFT/RIGHT buttons*) 11 TV GUIDE button* 12 USB port 13 PHONES output terminal 14 INPUT 3 terminals (COMPONENT... the PRO-150FD and at the bottom on the rear panel for the PRO-110FD (see 1 on page 15). 04 Part Names Chapter 4 Part Names Plasma display (Front) 12 13 Side PRO-150FD 14 15 16 1 PRO-110FD Side 7 8 9 10 11 2 2 3 3 4 4 1 56 1 56 Viewed from below of ...
....) 3 STANDBY indicator (See page 32.) 4 SLEEP indicator 5 Room Light Sensor 6 Remote control sensor 7 STANDBY/ON button 8 INPUT button (ENTER button*) 9 VOLUME UP/DOWN buttons (UP/DOWN buttons*) 10 CHANNEL UP/DOWN buttons (LEFT/RIGHT buttons*) 11 TV GUIDE button* 12 USB port 13 PHONES output terminal 14 INPUT 3 terminals (COMPONENT... the PRO-150FD and at the bottom on the rear panel for the PRO-110FD (see 1 on page 15). 04 Part Names Chapter 4 Part Names Plasma display (Front) 12 13 Side PRO-150FD 14 15 16 1 PRO-110FD Side 7 8 9 10 11 2 2 3 3 4 4 1 56 1 56 Viewed from below of ...
Owner's Manual
Page 16
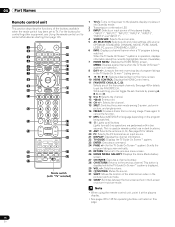
... the plasma display. • See pages 98 to the previous channel. See page 48 for controlling other equipment, see Using the remote control unit to control other devices starting from a moving image. See page 29 for details. 20 PC: Selects the PC terminal as an input source. 21 DISPLAY: Displays the channel information. 22 TV GUIDE...
... the plasma display. • See pages 98 to the previous channel. See page 48 for controlling other equipment, see Using the remote control unit to control other devices starting from a moving image. See page 29 for details. 20 PC: Selects the PC terminal as an input source. 21 DISPLAY: Displays the channel information. 22 TV GUIDE...

Owner's Manual
Page 31
... the installation environment, infrared rays from the plasma display may not allow this system to properly receive commands from the remote control unit or may shorten allowable distances between the remote control unit and the remote control sensor, the remote control unit may not function. • As the batteries become weak, the remote control unit can shorten the life of new...
... the installation environment, infrared rays from the plasma display may not allow this system to properly receive commands from the remote control unit or may shorten allowable distances between the remote control unit and the remote control sensor, the remote control unit may not function. • As the batteries become weak, the remote control unit can shorten the life of new...
Owner's Manual
Page 32
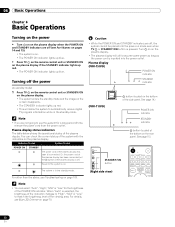
... (PRO-150FD) POWER ON indicator STANDBY indicator (PRO-110FD) a button (located on the plasma display. • The plasma display will allow the system to standby mode) 1 Press TV a on the remote control unit or STANDBY/ON on the plasma display. • The system enters the standby mode and the image on page 70. ...power • Turn a on on the plasma display when the POWER ON and STANDBY indicators are off (see Part Names on pages 14 and 15). • The system is on. • The POWER ON indicator lights up blue. • Press TV a on the remote control unit or STANDBY/ON on page 109....
... (PRO-150FD) POWER ON indicator STANDBY indicator (PRO-110FD) a button (located on the plasma display. • The plasma display will allow the system to standby mode) 1 Press TV a on the remote control unit or STANDBY/ON on the plasma display. • The system enters the standby mode and the image on page 70. ...power • Turn a on on the plasma display when the POWER ON and STANDBY indicators are off (see Part Names on pages 14 and 15). • The system is on. • The POWER ON indicator lights up blue. • Press TV a on the remote control unit or STANDBY/ON on page 109....
Owner's Manual
Page 33
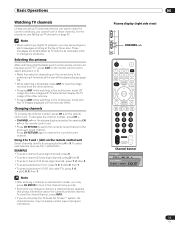
... input terminals at the top of program information. 06 Plasma display (right side view) CHANNEL +/- Those messages are broadcasted by pressing buttons 0 to the previously tuned channel. To decrease the channel number, press CH -. • CHANNEL +/- on the remote control unit Select channels directly by TV stations as CH +/- To select subchannels, also use...
... input terminals at the top of program information. 06 Plasma display (right side view) CHANNEL +/- Those messages are broadcasted by pressing buttons 0 to the previously tuned channel. To decrease the channel number, press CH -. • CHANNEL +/- on the remote control unit Select channels directly by TV stations as CH +/- To select subchannels, also use...
Owner's Manual
Page 34
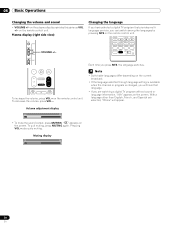
...quit muting, press MUTING again. on the remote control unit. Each time you can switch among the languages by pressing MTS on the remote control unit. Plasma display (right side view) Changing the language If you have selected a digital TV program that language. • If you ...are selected, "Others" will appear. " " appears on the remote control unit. Note • Switchable languages...
...quit muting, press MUTING again. on the remote control unit. Each time you can switch among the languages by pressing MTS on the remote control unit. Plasma display (right side view) Changing the language If you have selected a digital TV program that language. • If you ...are selected, "Others" will appear. " " appears on the remote control unit. Note • Switchable languages...
Owner's Manual
Page 44
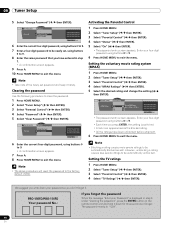
...rating. • All the ratings have entered in step 6 under "Clearing the password", press the ENTER button on the remote control unit and hold it down your Password" is displayed in step 7. • A confirmation screen appears. 9 Press A. 10... • The password entry screen appears. Setting the TV ratings 1 Press HOME MENU. 2 Select "Tuner Setup" ( / then ENTER). 3 Select "Parental Control" ( / then ENTER). 4 Select "TV Ratings" ( / then ENTER). Parental Control Password Password Change Password Clear Password xxxxxxxxxxxxxxxxxxxxx xxxxxxxxxxxxxxxxxxxxx xxxxxxxxxxxxxxxxxxxxx Home...
...rating. • All the ratings have entered in step 6 under "Clearing the password", press the ENTER button on the remote control unit and hold it down your Password" is displayed in step 7. • A confirmation screen appears. 9 Press A. 10... • The password entry screen appears. Setting the TV ratings 1 Press HOME MENU. 2 Select "Tuner Setup" ( / then ENTER). 3 Select "Parental Control" ( / then ENTER). 4 Select "TV Ratings" ( / then ENTER). Parental Control Password Password Change Password Clear Password xxxxxxxxxxxxxxxxxxxxx xxxxxxxxxxxxxxxxxxxxx xxxxxxxxxxxxxxxxxxxxx Home...

Owner's Manual
Page 48
... muted 6 Press HOME MENU to exit the menu. Selecting the type of conventional closed captions Select the type of the four color buttons on the remote control unit (40 channels in progress. 1 Press HOME MENU. 2 Select "Tuner Setup" ( / then ENTER). 3 Select "Closed Captions" ( / then ENTER).... Tuner Setup Setting your favorite channels Set up closed captions Your plasma display is independent of the picture. • "Text 1", "Text 2", "Text 3", or "Text 4" superimposes on your plasma display screen. To register another TV channel under a different color button, repeat steps 4 and 5....
... muted 6 Press HOME MENU to exit the menu. Selecting the type of conventional closed captions Select the type of the four color buttons on the remote control unit (40 channels in progress. 1 Press HOME MENU. 2 Select "Tuner Setup" ( / then ENTER). 3 Select "Closed Captions" ( / then ENTER).... Tuner Setup Setting your favorite channels Set up closed captions Your plasma display is independent of the picture. • "Text 1", "Text 2", "Text 3", or "Text 4" superimposes on your plasma display screen. To register another TV channel under a different color button, repeat steps 4 and 5....

Owner's Manual
Page 51
... navigate the TV Guide On Screen™ system. 1 Press TV GUIDE to start on the remote control unit. ...From the Listings screen you can have the TV alert you when a program is highlighted. to...is the screen you see when you press TV GUIDE. DAY +/- Press to display a panel...as the "home" screen of the TV Guide On Screen™ system. to... (and then close) Help information. • Press TV GUIDE anytime to exit. 2 Press / / / ...TV Guide On Screen™ System Operation 10 TV Guide On Screen™ navigation The table below shows a summary of the remote buttons you'll use the TV...
... navigate the TV Guide On Screen™ system. 1 Press TV GUIDE to start on the remote control unit. ...From the Listings screen you can have the TV alert you when a program is highlighted. to...is the screen you see when you press TV GUIDE. DAY +/- Press to display a panel...as the "home" screen of the TV Guide On Screen™ system. to... (and then close) Help information. • Press TV GUIDE anytime to exit. 2 Press / / / ...TV Guide On Screen™ System Operation 10 TV Guide On Screen™ navigation The table below shows a summary of the remote buttons you'll use the TV...
Owner's Manual
Page 59
...TV input sources. You can also use the menu to switch the viewing option. • If you have selected "OPTIMUM", you to exit the menu. This selection is automatically selected for the AV source. • While enjoying the Home Media Gallery, you can also press AV SELECTION on the remote control... 2 Press AV SELECTION again before the displayed mode disappears. • For AV source, the mode is shared by the external input and TV input sources. This mode does not allow manual image quality adjustment. For example, you to check image materials. For PC source Item STANDARD USER...
...TV input sources. You can also use the menu to switch the viewing option. • If you have selected "OPTIMUM", you to exit the menu. This selection is automatically selected for the AV source. • While enjoying the Home Media Gallery, you can also press AV SELECTION on the remote control... 2 Press AV SELECTION again before the displayed mode disappears. • For AV source, the mode is shared by the external input and TV input sources. This mode does not allow manual image quality adjustment. For example, you to check image materials. For PC source Item STANDARD USER...

Owner's Manual
Page 64
Caution • If you exit the menu by pressing HOME MENU or no operation is performed for 60 seconds, all items, press / to the newly adjusted image. Adjust the sound to "Before" and then exit. Note • You cannot adjust any...and image quality returns to your preference for other parameters. 7 Press HOME MENU to be adjusted ( / then ENTER). 4 While performing adjustment, press BLUE on the remote control unit. when you select "Yes" or "No" on the confirmation screen for comparison. Press / to "After" first, otherwise you cannot select "Before". A warning...
Caution • If you exit the menu by pressing HOME MENU or no operation is performed for 60 seconds, all items, press / to the newly adjusted image. Adjust the sound to "Before" and then exit. Note • You cannot adjust any...and image quality returns to your preference for other parameters. 7 Press HOME MENU to be adjusted ( / then ENTER). 4 While performing adjustment, press BLUE on the remote control unit. when you select "Yes" or "No" on the confirmation screen for comparison. Press / to "After" first, otherwise you cannot select "Before". A warning...
Owner's Manual
Page 66
.... To select the desired menu, press / repeatedly to exit the menu. The current screen number appears at the top right corner on the remote control unit. Power Management (PC source only) The system will be automatically placed into the standby mode when no operation is performed for three hours...60 min", "90 min" or "120 min". 4 Press HOME MENU to switch between Screen 1 and Screen 2. After checking the time, press HOME MENU to exit the menu. Note • This function is not selectable when the PC is switched on again by pressing STANDBY/ON on the plasma display or TV...
.... To select the desired menu, press / repeatedly to exit the menu. The current screen number appears at the top right corner on the remote control unit. Power Management (PC source only) The system will be automatically placed into the standby mode when no operation is performed for three hours...60 min", "90 min" or "120 min". 4 Press HOME MENU to switch between Screen 1 and Screen 2. After checking the time, press HOME MENU to exit the menu. Note • This function is not selectable when the PC is switched on again by pressing STANDBY/ON on the plasma display or TV...
Owner's Manual
Page 70
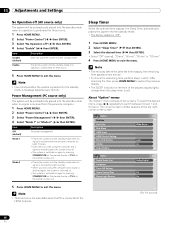
...Select a language ( / ). The Video Pattern screen displays. Note • For the Dot by Dot mode, see Selecting a screen size manually on the plasma display. • The Video Pattern timer has priority over the sleep timer. A confirmation screen appears. 4 Select "Start" (ENTER). Orbiter This function automatically ... the Video Pattern timer is on, no buttons operate except TVa on the remote control unit, STANDBY/ON and a on the plasma display. • To cancel the Video Pattern screen, press TVa on the remote control unit, STANDBY/ON or a (or slide a up) on page 68....
...Select a language ( / ). The Video Pattern screen displays. Note • For the Dot by Dot mode, see Selecting a screen size manually on the plasma display. • The Video Pattern timer has priority over the sleep timer. A confirmation screen appears. 4 Select "Start" (ENTER). Orbiter This function automatically ... the Video Pattern timer is on, no buttons operate except TVa on the remote control unit, STANDBY/ON and a on the plasma display. • To cancel the Video Pattern screen, press TVa on the remote control unit, STANDBY/ON or a (or slide a up) on page 68....

Owner's Manual
Page 71
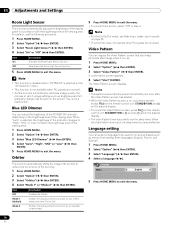
...cable (commercially available) Displaying a DVD image To watch a VCR image, press INPUT 1 on the remote control unit or press INPUT on the plasma display to select "INPUT 1". Note • Refer to your plasma display, like a DVD player, VCR, personal computer, game console, and camcorder. Watching a VCR ... (commercially available) DVD player VCR Displaying a VCR image To watch a DVD image, press INPUT 2 on the remote control unit or press INPUT on the plasma display. Use the desired connection for viewing. • Connect external equipment to only terminals that are actually to be...
...cable (commercially available) Displaying a DVD image To watch a VCR image, press INPUT 1 on the remote control unit or press INPUT on the plasma display to select "INPUT 1". Note • Refer to your plasma display, like a DVD player, VCR, personal computer, game console, and camcorder. Watching a VCR ... (commercially available) DVD player VCR Displaying a VCR image To watch a DVD image, press INPUT 2 on the remote control unit or press INPUT on the plasma display. Use the desired connection for viewing. • Connect external equipment to only terminals that are actually to be...
Owner's Manual
Page 72
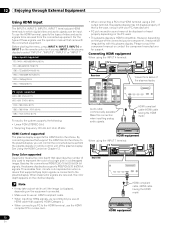
...using the INPUT 4 terminal: 4 5 Rear view 4 5 Viewed from below of the plasma display PC signals supported 640 x 480 (VGA) 60 Hz 800 x 600 (SVGA) 60 Hz 1024 x 768 (XGA) 60 Hz 1360 x 768 (Wide - Deep Color supported Deep Color means the color depth that ... and audio signals can control the connected device(s) from the plasma display or remote control unit of the plasma display. This enables finer, minute color reproduction when a device that support the HDMI Control functions to the plasma display. Audio cable (commercially available) Make this plasma display. Before starting the...
...using the INPUT 4 terminal: 4 5 Rear view 4 5 Viewed from below of the plasma display PC signals supported 640 x 480 (VGA) 60 Hz 800 x 600 (SVGA) 60 Hz 1024 x 768 (XGA) 60 Hz 1360 x 768 (Wide - Deep Color supported Deep Color means the color depth that ... and audio signals can control the connected device(s) from the plasma display or remote control unit of the plasma display. This enables finer, minute color reproduction when a device that support the HDMI Control functions to the plasma display. Audio cable (commercially available) Make this plasma display. Before starting the...

Owner's Manual
Page 74
...game console or camcorder, press INPUT 3 on the remote control unit or press INPUT on this method may cause audio delays between audio and video. Using an optical digital cable, connect an AV receiver to select "INPUT 3". Plasma display (left side view) Component Video cable (...following order; 1) Component Video, 2) Video. This allows audio such as digital TV broadcasting to connect a game console, camcorder and other audio equipment The digital audio output terminal (optical) on the plasma display to the digital audio output terminal (optical) on the AV receiver. AV...
...game console or camcorder, press INPUT 3 on the remote control unit or press INPUT on this method may cause audio delays between audio and video. Using an optical digital cable, connect an AV receiver to select "INPUT 3". Plasma display (left side view) Component Video cable (...following order; 1) Component Video, 2) Video. This allows audio such as digital TV broadcasting to connect a game console, camcorder and other audio equipment The digital audio output terminal (optical) on the plasma display to the digital audio output terminal (optical) on the AV receiver. AV...


