

Owner's Manual
Page 4
... of the power plug and power outlet may sometimes differ from falling over 26 Detaching the Pioneer stand 27 Cable connections for watching digital and/or conventional TV channels 29 Inserting the CableCARD 29 Routing cables 30 Connecting the power cord 30 Preparing the remote... Precautions 11 03 Supplied Accessories 12 04 Part Names 14 Plasma display 14 Remote control unit 16 05 Preparation 17 Installing the plasma display 17 Moving the plasma display 17 Attaching the Pioneer stand 17 Installing the Pioneer speaker 19 Preventing the plasma display from that shown in this...
... of the power plug and power outlet may sometimes differ from falling over 26 Detaching the Pioneer stand 27 Cable connections for watching digital and/or conventional TV channels 29 Inserting the CableCARD 29 Routing cables 30 Connecting the power cord 30 Preparing the remote... Precautions 11 03 Supplied Accessories 12 04 Part Names 14 Plasma display 14 Remote control unit 16 05 Preparation 17 Installing the plasma display 17 Moving the plasma display 17 Attaching the Pioneer stand 17 Installing the Pioneer speaker 19 Preventing the plasma display from that shown in this...

Owner's Manual
Page 7
...a traditional tube-type television). By following are typical effects and characteristics of the Pioneer PRO150FD/PRO-110FD plasma display will automatically power off in the "WIDE" or "FULL" screen setting for... its use of accessories other than the Pioneer stand or installation bracket may NOT control Audio/Video input from your Pioneer plasma display for accident or damage caused by ...TV, VCR, DVD player or any still image, it is poor. • Do not cover with long-life and high reliability. To ensure safety, please take the proper measures to mount or install the plasma...
...a traditional tube-type television). By following are typical effects and characteristics of the Pioneer PRO150FD/PRO-110FD plasma display will automatically power off in the "WIDE" or "FULL" screen setting for... its use of accessories other than the Pioneer stand or installation bracket may NOT control Audio/Video input from your Pioneer plasma display for accident or damage caused by ...TV, VCR, DVD player or any still image, it is poor. • Do not cover with long-life and high reliability. To ensure safety, please take the proper measures to mount or install the plasma...

Owner's Manual
Page 10
... used to perform many useful functions, but it can cause fire or electric shock. 15. The plasma display weighs about 66.7 kg (147.0 lbs.) for the PRO-150FD (including the stand and speaker) and about 45.1 kg (99.4 lbs.) for a long period of your safety and prolong the ... depth and is unstable, unpack, carry, and install the product with impact. Request a qualified service person to direct sunlight for the PRO-110FD (including the stand and speaker). Do not place the product on the product. 4. 02 Safety Precautions Chapter 2 Safety Precautions Electricity is used in serious...
... used to perform many useful functions, but it can cause fire or electric shock. 15. The plasma display weighs about 66.7 kg (147.0 lbs.) for the PRO-150FD (including the stand and speaker) and about 45.1 kg (99.4 lbs.) for a long period of your safety and prolong the ... depth and is unstable, unpack, carry, and install the product with impact. Request a qualified service person to direct sunlight for the PRO-110FD (including the stand and speaker). Do not place the product on the product. 4. 02 Safety Precautions Chapter 2 Safety Precautions Electricity is used in serious...
Owner's Manual
Page 12
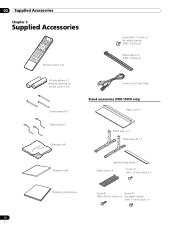
... only) AA size battery × 2 (Alkaline batteries for remote control unit) Speed clamp × 3 Bead band × 3 Cleaning cloth Power cord (2 m/6.6 feet) Stand accessories (PRO-150FD only) Base cover x 1 Stand pipe (L) x 1 Stand pipe (R) x 1 Warranty card Light-blocking shield x 1 Plastic band x 4 Screw ➀ (M5 x 10 mm: black) x 6 Operating instructions Screw ➁ Screw ➂ (M6 x 20...
... only) AA size battery × 2 (Alkaline batteries for remote control unit) Speed clamp × 3 Bead band × 3 Cleaning cloth Power cord (2 m/6.6 feet) Stand accessories (PRO-150FD only) Base cover x 1 Stand pipe (L) x 1 Stand pipe (R) x 1 Warranty card Light-blocking shield x 1 Plastic band x 4 Screw ➀ (M5 x 10 mm: black) x 6 Operating instructions Screw ➁ Screw ➂ (M6 x 20...
Owner's Manual
Page 17
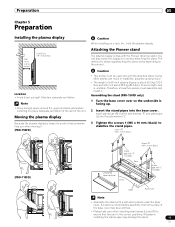
... Assemble the stand with the Pioneer table top stand. If a sheet is unstable. Mistakenly installing the stand pipes may be scratched. • Please take care when installing stand pipes (L) and (R) to stabilize the stand pipes. Moving the plasma display Because the plasma display is facing up. 2 Insert the stand pipes into ... are in instability, possibly causing injury. • The weight of a 60 inch plasma display is about 55.5 kg (122.4 lbs.) and a 50 inch about 38.8 kg (85.5 lbs.), it . Assembling the stand (PRO-150FD only) 1 Turn the base cover over so the underside is heavy...
... Assemble the stand with the Pioneer table top stand. If a sheet is unstable. Mistakenly installing the stand pipes may be scratched. • Please take care when installing stand pipes (L) and (R) to stabilize the stand pipes. Moving the plasma display Because the plasma display is facing up. 2 Insert the stand pipes into ... are in instability, possibly causing injury. • The weight of a 60 inch plasma display is about 55.5 kg (122.4 lbs.) and a 50 inch about 38.8 kg (85.5 lbs.), it . Assembling the stand (PRO-150FD only) 1 Turn the base cover over so the underside is heavy...

Owner's Manual
Page 19
...to greatly emphasize treble sounds, do not use any part of the stand. For speaker installation, see Installing the Pioneer speaker. Preparation 05 Attaching the stand • Steps for attaching the stand are the same for PRO-150FD Installation bolts (1) (Step 2) Installation bolts (2) (Step 1)... Caution • Do not move the display holding on a table or similar surface. • When lying the plasma...
...to greatly emphasize treble sounds, do not use any part of the stand. For speaker installation, see Installing the Pioneer speaker. Preparation 05 Attaching the stand • Steps for attaching the stand are the same for PRO-150FD Installation bolts (1) (Step 2) Installation bolts (2) (Step 1)... Caution • Do not move the display holding on a table or similar surface. • When lying the plasma...
Owner's Manual
Page 20
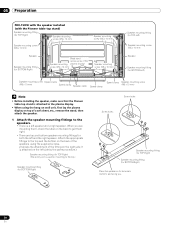
...Attach the appropriate fittings to the top and the bottom on the back of the speakers using the hang on wall unit, first lay the plasma display on the right side. It is attached on the left side by the same procedure.) Speaker mounting fitting (for TOP-Right) (The... screw (M5 x 10 mm) Note • Before installing the speaker, make sure that the Pioneer table top stand is a left and the right speaker. 05 Preparation PRO-150FD with the speaker installed (with the Pioneer table top stand) Speaker mounting fitting (for TOP-Right) Speaker mounting screw (M5 x 10 mm) Speaker mounting ...
...Attach the appropriate fittings to the top and the bottom on the back of the speakers using the hang on wall unit, first lay the plasma display on the right side. It is attached on the left side by the same procedure.) Speaker mounting fitting (for TOP-Right) (The... screw (M5 x 10 mm) Note • Before installing the speaker, make sure that the Pioneer table top stand is a left and the right speaker. 05 Preparation PRO-150FD with the speaker installed (with the Pioneer table top stand) Speaker mounting fitting (for TOP-Right) Speaker mounting screw (M5 x 10 mm) Speaker mounting ...
Owner's Manual
Page 23
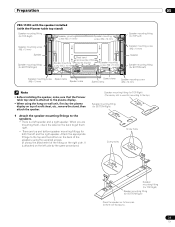
... to the plasma display. • When using the supplied screws. (It shows the attachment of a soft sheet, etc., remove the stand, then attach the speaker. 1 Attach the speaker mounting fittings to get them , check the label on the right side. Preparation 05 PRO-110FD with the speaker installed (with the Pioneer table top stand) Speaker...
... to the plasma display. • When using the supplied screws. (It shows the attachment of a soft sheet, etc., remove the stand, then attach the speaker. 1 Attach the speaker mounting fittings to get them , check the label on the right side. Preparation 05 PRO-110FD with the speaker installed (with the Pioneer table top stand) Speaker...
Owner's Manual
Page 26
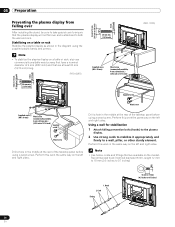
...mm min. (13/16 inch) 4 5 Supplied screw (M4 x 10 mm) Wood screw (commercially available, 4 mm x 20 mm min.) (5/32 inch x 13/16 inch) (PRO-110FD) 20 mm min. (13/16 inch) 4 5 Supplied screw Wood screw Supplied screw (M4 x 10 mm) Wood screw (commercially available, 4 mm x 20 mm min.) ... 5/8 inch) 4 mm (5/32 inch) 8 mm to 15 mm (3/8 inch to 5/8 inch) 4 mm (5/32 inch) M8 05 Preparation Preventing the plasma display from falling over After installing the stand, be sure to take special care to ensure that the plasma display will not fall over and is stabilized to 0.7 inches) 4 5 26 En
...mm min. (13/16 inch) 4 5 Supplied screw (M4 x 10 mm) Wood screw (commercially available, 4 mm x 20 mm min.) (5/32 inch x 13/16 inch) (PRO-110FD) 20 mm min. (13/16 inch) 4 5 Supplied screw Wood screw Supplied screw (M4 x 10 mm) Wood screw (commercially available, 4 mm x 20 mm min.) ... 5/8 inch) 4 mm (5/32 inch) 8 mm to 15 mm (3/8 inch to 5/8 inch) 4 mm (5/32 inch) M8 05 Preparation Preventing the plasma display from falling over After installing the stand, be sure to take special care to ensure that the plasma display will not fall over and is stabilized to 0.7 inches) 4 5 26 En
Owner's Manual
Page 27
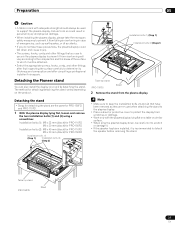
...Pioneer stand You can also install the display on a table or similar surface. • When lying the plasma display down and cause injury. • The screws, hooks, cords and other fittings that have been removed as earthquakes, or of accidents. • If you use to secure the plasma... if necessary. Detaching the stand • Steps for PRO-150FD and PRO-110FD. 1 With the plasma display lying flat, loosen and remove the two installation bolts (1) and (2) using a screwdriver. Table top stand (PRO-150FD) Sheet 27 En The method for PRO-150FD Installation bolts (1) (...
...Pioneer stand You can also install the display on a table or similar surface. • When lying the plasma display down and cause injury. • The screws, hooks, cords and other fittings that have been removed as earthquakes, or of accidents. • If you use to secure the plasma... if necessary. Detaching the stand • Steps for PRO-150FD and PRO-110FD. 1 With the plasma display lying flat, loosen and remove the two installation bolts (1) and (2) using a screwdriver. Table top stand (PRO-150FD) Sheet 27 En The method for PRO-150FD Installation bolts (1) (...

Owner's Manual
Page 28
... x 40 mm (black) for PRO-110FD M6 x 20 mm (black) for PRO-150FD Installation bolts (1) (Step 2) Installation bolts (2) (Step 1) Insert the stand into the plasma display so that an arrow with "FRONT/FACE AVANT" mark inscribed at the bottom of the stand indicates downward. For speaker installation, see Installing the Pioneer speaker on a table or similar...
... x 40 mm (black) for PRO-110FD M6 x 20 mm (black) for PRO-150FD Installation bolts (1) (Step 2) Installation bolts (2) (Step 1) Insert the stand into the plasma display so that an arrow with "FRONT/FACE AVANT" mark inscribed at the bottom of the stand indicates downward. For speaker installation, see Installing the Pioneer speaker on a table or similar...
Owner's Manual
Page 62
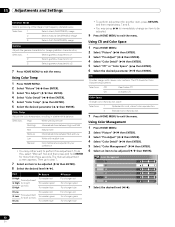
... G 0 C 0 B 0 M 0 7 Select the desired level ( / ). 62 En Using CTI and Color Space 1 Press HOME MENU. 2 Select "Picture" ( / then ENTER). 3 Select "Pro Adjust" ( / then ENTER). 4 Select "Color Detail" ( / then ENTER). 5 Select "CTI" or "Color Space" ( / then ENTER). 6 Select the desired parameter ( / then ENTER). Color Temp... Natural tone Mid-Low Intermediate tone between Mid and Low Low White with clearer color contours. The CTI stands for more than three seconds. The manual adjustment screen appears. Using Color Temp 1 Press HOME MENU. 2 Select "Picture" ...
... G 0 C 0 B 0 M 0 7 Select the desired level ( / ). 62 En Using CTI and Color Space 1 Press HOME MENU. 2 Select "Picture" ( / then ENTER). 3 Select "Pro Adjust" ( / then ENTER). 4 Select "Color Detail" ( / then ENTER). 5 Select "CTI" or "Color Space" ( / then ENTER). 6 Select the desired parameter ( / then ENTER). Color Temp... Natural tone Mid-Low Intermediate tone between Mid and Low Low White with clearer color contours. The CTI stands for more than three seconds. The manual adjustment screen appears. Using Color Temp 1 Press HOME MENU. 2 Select "Picture" ...
Owner's Manual
Page 63
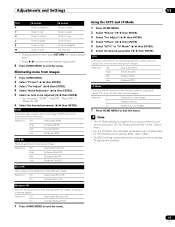
... NR". 6 Select the desired parameter ( / then ENTER). 3DNR Eliminates video noise for clean crisp images. 3DNR stands for both video and still images. Using the 3DYC and I-P Mode 1 Press HOME MENU. 2 Select "Picture" ( / then ENTER). 3 Select "Pro Adjust" ( / then ENTER). 4 Select "Others" ( / then ENTER). 5 Select "3DYC" or "I-P Mode" ( / then ENTER). 6 Select...are not selectable for adjustment. 8 Press HOME MENU to exit the menu. Note • The I-P Mode setting is selectable when composite video or analog TV signals are received. 63 En This works for 3dimensional Noise Reduction.
... NR". 6 Select the desired parameter ( / then ENTER). 3DNR Eliminates video noise for clean crisp images. 3DNR stands for both video and still images. Using the 3DYC and I-P Mode 1 Press HOME MENU. 2 Select "Picture" ( / then ENTER). 3 Select "Pro Adjust" ( / then ENTER). 4 Select "Others" ( / then ENTER). 5 Select "3DYC" or "I-P Mode" ( / then ENTER). 6 Select...are not selectable for adjustment. 8 Press HOME MENU to exit the menu. Note • The I-P Mode setting is selectable when composite video or analog TV signals are received. 63 En This works for 3dimensional Noise Reduction.
Owner's Manual
Page 123
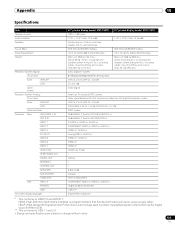
... Digital 50" plasma display model: PRO-110FD 17 W + 17 W (1 kHz, 10 %, 6 Ω) SRS FOCUS/SRS/SRS TruBass 120 V AC, 60 Hz, 446 W (26 W Standby) Main unit: 38.8 kg (85.5 lbs.) Stand: 2.5 kg (5.5 lbs.) (including bolts) Speaker system: 3.8 kg (8.4 lbs.) (including cables, mounting fittings and screws) Total: 45.1 kg (99.4 lbs.) American TV standard NTSC system...
... Digital 50" plasma display model: PRO-110FD 17 W + 17 W (1 kHz, 10 %, 6 Ω) SRS FOCUS/SRS/SRS TruBass 120 V AC, 60 Hz, 446 W (26 W Standby) Main unit: 38.8 kg (85.5 lbs.) Stand: 2.5 kg (5.5 lbs.) (including bolts) Speaker system: 3.8 kg (8.4 lbs.) (including cables, mounting fittings and screws) Total: 45.1 kg (99.4 lbs.) American TV standard NTSC system...


