

Owner's Manual
Page 4
... 17 Installing the Pioneer speaker 19 Preventing the plasma display from falling over 26 Detaching the Pioneer stand 27 Cable connections for buying this manual are for the PRO-110FD unless otherwise specified. However the method of connecting and operating the unit is the same. After you for watching digital and/or conventional TV channels 29...
... 17 Installing the Pioneer speaker 19 Preventing the plasma display from falling over 26 Detaching the Pioneer stand 27 Cable connections for buying this manual are for the PRO-110FD unless otherwise specified. However the method of connecting and operating the unit is the same. After you for watching digital and/or conventional TV channels 29...

Owner's Manual
Page 7
...NOT control Audio/Video input from a TV, VCR, DVD player or any still image, it is strongly recommended. Usage guidelines All phosphor-based screens (including conventional tube-type televisions) can be installed by using the plasma display, always switch the display to ...manual to set to its lifetime, the luminosity of a high quality plasma display with top, bottom, or side masks may cause the internal temperature to come, please carefully read this information carefully. To enjoy beautiful and bright images on the screen can be assured of the Pioneer PRO150FD/PRO-110FD plasma...
...NOT control Audio/Video input from a TV, VCR, DVD player or any still image, it is strongly recommended. Usage guidelines All phosphor-based screens (including conventional tube-type televisions) can be installed by using the plasma display, always switch the display to ...manual to set to its lifetime, the luminosity of a high quality plasma display with top, bottom, or side masks may cause the internal temperature to come, please carefully read this information carefully. To enjoy beautiful and bright images on the screen can be assured of the Pioneer PRO150FD/PRO-110FD plasma...

Owner's Manual
Page 10
... danger, please observe the following precautions carefully before installing the speakers. 23. Keep this product is made of time. The plasma display used in this manual in your home, consult your dealer or local power company. 22. Be careful not to be moved with impact. Use ...insufficient ventilation can cause the product to fall from heat sources such as radiators, heaters, stoves and other openings in a safe place for the PRO-110FD (including the stand and speaker). Observe warnings-All warnings on a bed, sofa, rug or other soft cloth (e.g., cotton, flannel). When ...
... danger, please observe the following precautions carefully before installing the speakers. 23. Keep this product is made of time. The plasma display used in this manual in your home, consult your dealer or local power company. 22. Be careful not to be moved with impact. Use ...insufficient ventilation can cause the product to fall from heat sources such as radiators, heaters, stoves and other openings in a safe place for the PRO-110FD (including the stand and speaker). Observe warnings-All warnings on a bed, sofa, rug or other soft cloth (e.g., cotton, flannel). When ...
Owner's Manual
Page 11
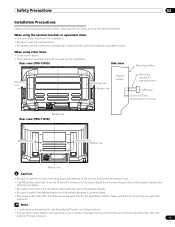
...to 0.7 inches) in depth from the use the optional Pioneer mounting products. • Pioneer shall not be used only for the installation: Rear view (PRO-150FD) Side view Mounting surface Mounting hole 4 5 Mounting hole Median line Plasma display Mounting bracket (or equivalent item) M8 screw 12 ... the ventilation opening at the rear of the plasma display. Never use the supplied bolts. • For details, see the instruction manual that results from the mounting surface of the plasma display. • Be sure to install the plasma display on a flat surface because it contains ...
...to 0.7 inches) in depth from the use the optional Pioneer mounting products. • Pioneer shall not be used only for the installation: Rear view (PRO-150FD) Side view Mounting surface Mounting hole 4 5 Mounting hole Median line Plasma display Mounting bracket (or equivalent item) M8 screw 12 ... the ventilation opening at the rear of the plasma display. Never use the supplied bolts. • For details, see the instruction manual that results from the mounting surface of the plasma display. • Be sure to install the plasma display on a flat surface because it contains ...
Owner's Manual
Page 41
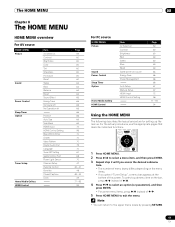
... HOME MENU Picture Sound Power Control Sleep Timer Option Tuner Setup Home Media Gallery HDMI Control Item AV Selection Contrast Brightness Color Tint Sharpness Pro Adjust Reset Treble Bass Balance Reset Sound Effect Energy Save No Signal off No Operation off Position Auto Size Side Mask HDMI Input HDMI ... Control Item AV Selection Contrast Brightness Red Green Blue Reset Same as the AV source Energy Save Power Management Auto Setup Manual Setup HDMI Input HDMI Control Setting Page 59 60 60 60 60 60 60 64 65 66 66 67 67 72 96 77 - 93 94 Using the HOME MENU The following describes the typical...
... HOME MENU Picture Sound Power Control Sleep Timer Option Tuner Setup Home Media Gallery HDMI Control Item AV Selection Contrast Brightness Color Tint Sharpness Pro Adjust Reset Treble Bass Balance Reset Sound Effect Energy Save No Signal off No Operation off Position Auto Size Side Mask HDMI Input HDMI ... Control Item AV Selection Contrast Brightness Red Green Blue Reset Same as the AV source Energy Save Power Management Auto Setup Manual Setup HDMI Input HDMI Control Setting Page 59 60 60 60 60 60 60 64 65 66 66 67 67 72 96 77 - 93 94 Using the HOME MENU The following describes the typical...
Owner's Manual
Page 59
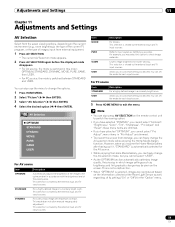
... after having quit it, "STANDARD" is shared by the external input and TV input sources. For example, you cannot select "Contrast", "Brightness", "Color", "Tint", "Sharpness", "Pro Adjust" and "Reset"; For a highly defined image in "Pro Adjust" are dimmed. • To prevent the screen from external equipment. ... images are dimmed. • If you have selected "DYNAMIC", you may be seen on the screen. This mode does not allow manual image quality adjustment. menu items in a normally bright room. Note • You can also press AV SELECTION on the information collected ...
... after having quit it, "STANDARD" is shared by the external input and TV input sources. For example, you cannot select "Contrast", "Brightness", "Color", "Tint", "Sharpness", "Pro Adjust" and "Reset"; For a highly defined image in "Pro Adjust" are dimmed. • To prevent the screen from external equipment. ... images are dimmed. • If you have selected "DYNAMIC", you may be seen on the screen. This mode does not allow manual image quality adjustment. menu items in a normally bright room. Note • You can also press AV SELECTION on the information collected ...
Owner's Manual
Page 62
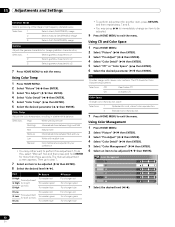
... You may rather want to be adjusted ( / then ENTER). 8 Select the desired level ( / ). CTI Provides images with reddish tone Manual Color temperature adjusted to your preference • You may press / to immediately change an item to be adjusted. 9 Press HOME MENU to ...2 3 Selects gamma characteristics 3 7 Press HOME MENU to exit the menu. Using Color Temp 1 Press HOME MENU. 2 Select "Picture" ( / then ENTER). 3 Select "Pro Adjust" ( / then ENTER). 4 Select "Color Detail" ( / then ENTER). 5 Select "Color Temp" ( / then ENTER). 6 Select the desired parameter ( / then ...
... You may rather want to be adjusted ( / then ENTER). 8 Select the desired level ( / ). CTI Provides images with reddish tone Manual Color temperature adjusted to your preference • You may press / to immediately change an item to be adjusted. 9 Press HOME MENU to ...2 3 Selects gamma characteristics 3 7 Press HOME MENU to exit the menu. Using Color Temp 1 Press HOME MENU. 2 Select "Picture" ( / then ENTER). 3 Select "Pro Adjust" ( / then ENTER). 4 Select "Color Detail" ( / then ENTER). 5 Select "Color Temp" ( / then ENTER). 6 Select the desired parameter ( / then ...


