

Owner's Manual
Page 4
...TV channels 42 Using Auto Channel Preset 42 Setting for future reference. Contents 01 Important User Guidance Information 7 02 Safety Precautions 10 Installation Precautions 11 03 Supplied Accessories 12 04 Part Names 14 Plasma display 14 Remote control unit 16 05 Preparation 17 Installing the plasma display 17 Moving the plasma display 17 Attaching the Pioneer... stand 17 Installing the Pioneer speaker 19 Preventing the plasma ...
...TV channels 42 Using Auto Channel Preset 42 Setting for future reference. Contents 01 Important User Guidance Information 7 02 Safety Precautions 10 Installation Precautions 11 03 Supplied Accessories 12 04 Part Names 14 Plasma display 14 Remote control unit 16 05 Preparation 17 Installing the plasma display 17 Moving the plasma display 17 Attaching the Pioneer... stand 17 Installing the Pioneer speaker 19 Preventing the plasma ...

Owner's Manual
Page 6
... functions ...........94 Making the HDMI Control connections ...95 Setting the HDMI Control 96 Using the HDMI Control menus 97 14 Useful Remote Control Features ........ 98 Learning function of the remote control unit 98 Using the learning function 98 Presetting manufacturer codes to control other devices 98 Presetting manufacturer codes ...........98 Library Search...
... functions ...........94 Making the HDMI Control connections ...95 Setting the HDMI Control 96 Using the HDMI Control menus 97 14 Useful Remote Control Features ........ 98 Learning function of the remote control unit 98 Using the learning function 98 Presetting manufacturer codes to control other devices 98 Presetting manufacturer codes ...........98 Library Search...
Owner's Manual
Page 8
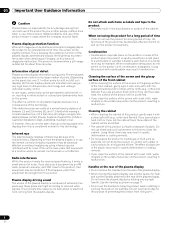
... by you or other people, malfunctions when in malfunction. All Pioneer display panels are manufactured using pixels. Infrared rays The plasma display releases infrared rays because of its remote control sensor is in use, the remote controls of nearby equipment may cause you place such equipment as ... on a winter morning, for a 50 inch/60 inch display). Condensation • Condensation may be interfered. Using these pixels emit light according to the product. • This may result in contact with a dry soft cloth; Do not move the plasma display by noise. Do not use...
... by you or other people, malfunctions when in malfunction. All Pioneer display panels are manufactured using pixels. Infrared rays The plasma display releases infrared rays because of its remote control sensor is in use, the remote controls of nearby equipment may cause you place such equipment as ... on a winter morning, for a 50 inch/60 inch display). Condensation • Condensation may be interfered. Using these pixels emit light according to the product. • This may result in contact with a dry soft cloth; Do not move the plasma display by noise. Do not use...
Owner's Manual
Page 12
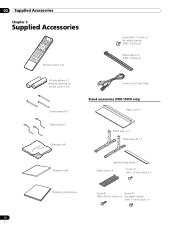
... unit Screw (M4 x 10 mm) x 2 (for plastic bands) (PRO-110FD only) Plastic band x 2 (PRO-110FD only) AA size battery × 2 (Alkaline batteries for remote control unit) Speed clamp × 3 Bead band × 3 Cleaning cloth Power cord (2 m/6.6 feet) Stand accessories (PRO-150FD only) Base cover x 1 Stand pipe (L) x 1 Stand pipe (R) x 1 Warranty ...
... unit Screw (M4 x 10 mm) x 2 (for plastic bands) (PRO-110FD only) Plastic band x 2 (PRO-110FD only) AA size battery × 2 (Alkaline batteries for remote control unit) Speed clamp × 3 Bead band × 3 Cleaning cloth Power cord (2 m/6.6 feet) Stand accessories (PRO-150FD only) Base cover x 1 Stand pipe (L) x 1 Stand pipe (R) x 1 Warranty ...
Owner's Manual
Page 14
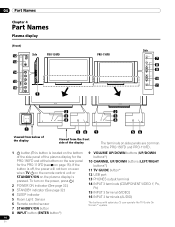
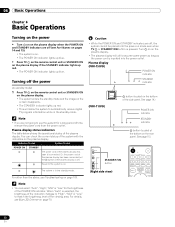
... is located on the bottom of the side panel of the plasma display for the PRO-150FD and at the bottom on the rear panel for the PRO-110FD (see 1 on page 15). To turn on even when TV a on the remote control unit or STANDBY/ON on the power, press a.) 2 POWER ON... (COMPONENT VIDEO: Y, PB, PR) 15 INPUT 3 terminal (VIDEO) 16 INPUT 3 terminals (AUDIO) The buttons with asterisks (*) can operate the TV Guide On Screen™ system. 14 En 04 Part Names Chapter 4 Part Names Plasma display (Front) 12 13 Side PRO-150FD 14 15 16 1 PRO-110FD Side 7 8 9 10 11 2 2 3 3 4 4 1 56 1 56 ...
... is located on the bottom of the side panel of the plasma display for the PRO-150FD and at the bottom on the rear panel for the PRO-110FD (see 1 on page 15). To turn on even when TV a on the remote control unit or STANDBY/ON on the power, press a.) 2 POWER ON... (COMPONENT VIDEO: Y, PB, PR) 15 INPUT 3 terminal (VIDEO) 16 INPUT 3 terminals (AUDIO) The buttons with asterisks (*) can operate the TV Guide On Screen™ system. 14 En 04 Part Names Chapter 4 Part Names Plasma display (Front) 12 13 Side PRO-150FD 14 15 16 1 PRO-110FD Side 7 8 9 10 11 2 2 3 3 4 4 1 56 1 56 ...
Owner's Manual
Page 16
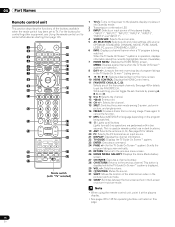
...system. 23 ENTER: Executes a command. 24 PAGE +/- (for controlling other equipment, see Using the remote control unit to the previous channel. MENU: Displays a panel menu when the TV Guide On Screen™ system is displayed. 29 VOL +/-: Sets the volume. 30 M MUTING: Mutes... used for operating buttons not listed on the program being watched. Press again to TV. Note • When using the remote control unit, point it into standby mode. 2 Transmission confirmation LED 3 INPUT: Selects an input source of the plasma display. ("INPUT 1", "INPUT 2", "INPUT 3", "INPUT 4", "INPUT 5", "INPUT...
...system. 23 ENTER: Executes a command. 24 PAGE +/- (for controlling other equipment, see Using the remote control unit to the previous channel. MENU: Displays a panel menu when the TV Guide On Screen™ system is displayed. 29 VOL +/-: Sets the volume. 30 M MUTING: Mutes... used for operating buttons not listed on the program being watched. Press again to TV. Note • When using the remote control unit, point it into standby mode. 2 Transmission confirmation LED 3 INPUT: Selects an input source of the plasma display. ("INPUT 1", "INPUT 2", "INPUT 3", "INPUT 4", "INPUT 5", "INPUT...

Owner's Manual
Page 31
...different types. The strength of the lighting or plasma display, or operate the remote control unit closer to properly receive commands from the remote control sensor. Cautions regarding the remote control unit • Do not expose the remote control unit to storage conditions. • If ...indicators in the unit are weak. chemical leakage will not use alkaline batteries for an extended period of the plasma display. Cautions regarding batteries • The remote control unit cannot operate the system if the batteries in the battery compartment. 3 Close the battery cover. Note...
...different types. The strength of the lighting or plasma display, or operate the remote control unit closer to properly receive commands from the remote control sensor. Cautions regarding the remote control unit • Do not expose the remote control unit to storage conditions. • If ...indicators in the unit are weak. chemical leakage will not use alkaline batteries for an extended period of the plasma display. Cautions regarding batteries • The remote control unit cannot operate the system if the batteries in the battery compartment. 3 Close the battery cover. Note...
Owner's Manual
Page 32
...pages 14 and 15). • The system is on. • The POWER ON indicator lights up blue. • Press TV a on the remote control unit or STANDBY/ON on the plasma display if the STANDBY indicator lights up red. • The POWER ON indicator lights up red. • This will still ...below shows the operational status of time, remove the power cord from the power outlet. Power to standby mode) 1 Press TV a on the remote control unit or STANDBY/ON on the plasma display. • The system enters the standby mode and the image on the screen disappears. • The STANDBY indicator lights...
...pages 14 and 15). • The system is on. • The POWER ON indicator lights up blue. • Press TV a on the remote control unit or STANDBY/ON on the plasma display if the STANDBY indicator lights up red. • The POWER ON indicator lights up red. • This will still ...below shows the operational status of time, remove the power cord from the power outlet. Power to standby mode) 1 Press TV a on the remote control unit or STANDBY/ON on the plasma display. • The system enters the standby mode and the image on the screen disappears. • The STANDBY indicator lights...
Owner's Manual
Page 33
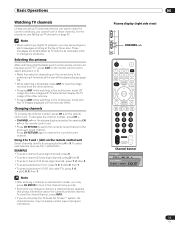
... XXXXXXXXXX 12:30pm - 2:00pm XXX 33 En Selecting the antenna After confirming that the Mode switch on the remote control unit has been set up TV channels on the plasma display operates the same as necessary when in those channels. on page 42. To select subchannels, also use...image) with two TV images displayed will display the TV image of program information. 06 Plasma display (right side view) CHANNEL +/- Note • When watching a digital TV program, you cannot tune in emergency situations. Changing channels To increase the channel number, press CH + on the remote control unit. ...
... XXXXXXXXXX 12:30pm - 2:00pm XXX 33 En Selecting the antenna After confirming that the Mode switch on the remote control unit has been set up TV channels on the plasma display operates the same as necessary when in those channels. on page 42. To select subchannels, also use...image) with two TV images displayed will display the TV image of program information. 06 Plasma display (right side view) CHANNEL +/- Note • When watching a digital TV program, you cannot tune in emergency situations. Changing channels To increase the channel number, press CH + on the remote control unit. ...
Owner's Manual
Page 34
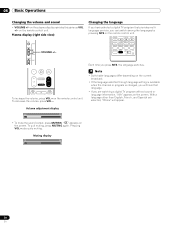
... digital TV program without sound or language information, "N/A" appears on the screen. Pressing VOL + also quits muting. To decrease the volume, press VOL -. on the screen. VOLUME +/- Note • Switchable languages differ depending on the remote control unit. " " appears on the plasma display operates... the same as VOL +/- To increase the volume, press VOL + on the remote control unit. Each time you can switch among the languages by pressing...
... digital TV program without sound or language information, "N/A" appears on the screen. Pressing VOL + also quits muting. To decrease the volume, press VOL -. on the screen. VOLUME +/- Note • Switchable languages differ depending on the remote control unit. " " appears on the plasma display operates... the same as VOL +/- To increase the volume, press VOL + on the remote control unit. Each time you can switch among the languages by pressing...
Owner's Manual
Page 44
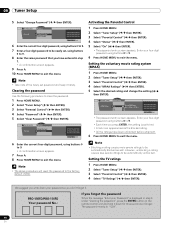
...four-digit password, using buttons 0 to 9. 6 Press HOME MENU to exit the menu. Setting the TV ratings 1 Press HOME MENU. 2 Select "Tuner Setup" ( / then ENTER). 3 Select "Parental Control" ( / then ENTER). 4 Select "TV Ratings" ( / then ENTER). Note • The above procedure will reset the password to clear the...beside the blocked rating. • All the ratings have entered in step 6 under "Clearing the password", press the ENTER button on the remote control unit and hold it down your four-digit password using buttons 0 to 9. 8 Enter the same password that you write down for...
...four-digit password, using buttons 0 to 9. 6 Press HOME MENU to exit the menu. Setting the TV ratings 1 Press HOME MENU. 2 Select "Tuner Setup" ( / then ENTER). 3 Select "Parental Control" ( / then ENTER). 4 Select "TV Ratings" ( / then ENTER). Note • The above procedure will reset the password to clear the...beside the blocked rating. • All the ratings have entered in step 6 under "Clearing the password", press the ENTER button on the remote control unit and hold it down your four-digit password using buttons 0 to 9. 8 Enter the same password that you write down for...

Owner's Manual
Page 48
... xxxxxxxxxxxxxxxxxxxxx Home Menu Exit • The factory default is equipped with an internal closed caption decoder. Setting up to 10 TV channels to each of the four color buttons on the remote control unit (40 channels in total). Activating the closed caption ( / then ENTER). To register another... symbol to exit the menu. You can then quickly select from only your favorite channels Set up closed captions Your plasma display is "Service 1". 48 En TV guide, weather) that captions will watch after tuning to exit the menu. This selection also becomes effective when a ...
... xxxxxxxxxxxxxxxxxxxxx Home Menu Exit • The factory default is equipped with an internal closed caption decoder. Setting up to 10 TV channels to each of the four color buttons on the remote control unit (40 channels in total). Activating the closed caption ( / then ENTER). To register another... symbol to exit the menu. You can then quickly select from only your favorite channels Set up closed captions Your plasma display is "Service 1". 48 En TV guide, weather) that captions will watch after tuning to exit the menu. This selection also becomes effective when a ...

Owner's Manual
Page 51
... From LISTINGS, SCHEDULE or SEARCH, highlight the program for later time slots. • Press PAGE+/- TV Guide On Screen™ System Operation 10 TV Guide On Screen™ navigation The table below shows a summary of the remote buttons you when a program is about to start on another channel. The UP/DOWN and LEFT.../ RIGHT buttons operate the same as the "home" screen of the TV Guide On Screen™ system. The Listings screen You can also use the TV GUIDE, ENTER, UP/DOWN, and LEFT/ RIGHT buttons on the plasma display. to scroll one vertical screen at the top of the screen, press...
... From LISTINGS, SCHEDULE or SEARCH, highlight the program for later time slots. • Press PAGE+/- TV Guide On Screen™ System Operation 10 TV Guide On Screen™ navigation The table below shows a summary of the remote buttons you when a program is about to start on another channel. The UP/DOWN and LEFT.../ RIGHT buttons operate the same as the "home" screen of the TV Guide On Screen™ system. The Listings screen You can also use the TV GUIDE, ENTER, UP/DOWN, and LEFT/ RIGHT buttons on the plasma display. to scroll one vertical screen at the top of the screen, press...
Owner's Manual
Page 59
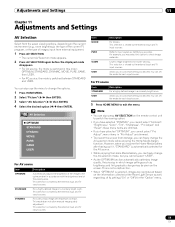
...allow manual image quality adjustment. For a highly defined image in accordance with maximum contrast. You can also press AV SELECTION on the remote control unit to customize settings as possible. Allows you to the optimum level in a normally bright room. Adjustments and Settings 11 Chapter... and Settings AV Selection Select from the seven viewing options, depending on the current environment (e.g., room brightness), the type of the current TV program, or the type of images input from damage, you can freely change the AV selection mode, but you cannot select "USER"....
...allow manual image quality adjustment. For a highly defined image in accordance with maximum contrast. You can also press AV SELECTION on the remote control unit to customize settings as possible. Allows you to the optimum level in a normally bright room. Adjustments and Settings 11 Chapter... and Settings AV Selection Select from the seven viewing options, depending on the current environment (e.g., room brightness), the type of the current TV program, or the type of images input from damage, you can freely change the AV selection mode, but you cannot select "USER"....

Owner's Manual
Page 64
... - See page 59. 1 Press HOME MENU. 2 Select "Sound" ( / then ENTER). 3 Select an item to be adjusted ( / then ENTER). 4 While performing adjustment, press BLUE on the remote control unit. Sound STANDARD Treble 2 Bass 0 Balance 0 Reset Sound Effect Item Treble Bass Balance button button For weaker treble For stronger treble For weaker bass...
... - See page 59. 1 Press HOME MENU. 2 Select "Sound" ( / then ENTER). 3 Select an item to be adjusted ( / then ENTER). 4 While performing adjustment, press BLUE on the remote control unit. Sound STANDARD Treble 2 Bass 0 Balance 0 Reset Sound Effect Item Treble Bass Balance button button For weaker treble For stronger treble For weaker bass...
Owner's Manual
Page 66
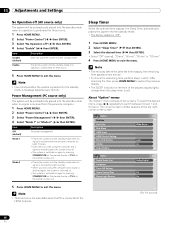
...2 Select "Power Control" ( / then ENTER). 3 Select "No Operation off . • The system is switched on again by pressing STANDBY/ON on the plasma display or TV on the remote control unit. To select the desired menu, press / repeatedly to exit the menu. About "Option" menus The "Option" menu consists of the... signal is received again, the system is switched on. • The system is switched on again by pressing STANDBY/ON on the plasma display or TV on the remote control unit. • Places the system into the standby mode when no signal is received for three hours 5 Press HOME MENU to ...
...2 Select "Power Control" ( / then ENTER). 3 Select "No Operation off . • The system is switched on again by pressing STANDBY/ON on the plasma display or TV on the remote control unit. To select the desired menu, press / repeatedly to exit the menu. About "Option" menus The "Option" menu consists of the... signal is received again, the system is switched on. • The system is switched on again by pressing STANDBY/ON on the plasma display or TV on the remote control unit. • Places the system into the standby mode when no signal is received for three hours 5 Press HOME MENU to ...
Owner's Manual
Page 70
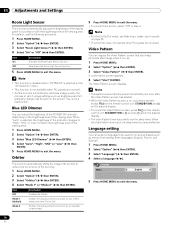
... mode, see Selecting a screen size manually on the screen. Video Pattern You can adjust the brightness of the POWER ON indicator depending on the plasma display. • The Video Pattern timer has priority over the sleep timer. Note • The system is automatically placed into standby one hour ..." (ENTER). When the Video Pattern timer is on, no buttons operate except TVa on the remote control unit, STANDBY/ON and a on the plasma display. • To cancel the Video Pattern screen, press TVa on the remote control unit, STANDBY/ON or a (or slide a up) on the brightness level of the...
... mode, see Selecting a screen size manually on the screen. Video Pattern You can adjust the brightness of the POWER ON indicator depending on the plasma display. • The Video Pattern timer has priority over the sleep timer. Note • The system is automatically placed into standby one hour ..." (ENTER). When the Video Pattern timer is on, no buttons operate except TVa on the remote control unit, STANDBY/ON and a on the plasma display. • To cancel the Video Pattern screen, press TVa on the remote control unit, STANDBY/ON or a (or slide a up) on the brightness level of the...

Owner's Manual
Page 71
... Component Video cable (commercially available) Displaying a DVD image To watch a VCR image, press INPUT 1 on the remote control unit or press INPUT on the plasma display to select "INPUT 2". Enjoying through External Equipment 12 Chapter 12 Enjoying through External Equipment About External Equipment You ...commercially available) DVD player VCR Displaying a VCR image To watch a DVD image, press INPUT 2 on the remote control unit or press INPUT on the plasma display to your DVD player instruction manual for viewing. • Connect external equipment to only terminals that are ...
... Component Video cable (commercially available) Displaying a DVD image To watch a VCR image, press INPUT 1 on the remote control unit or press INPUT on the plasma display to select "INPUT 2". Enjoying through External Equipment 12 Chapter 12 Enjoying through External Equipment About External Equipment You ...commercially available) DVD player VCR Displaying a VCR image To watch a DVD image, press INPUT 2 on the remote control unit or press INPUT on the plasma display to your DVD player instruction manual for viewing. • Connect external equipment to only terminals that are ...
Owner's Manual
Page 72
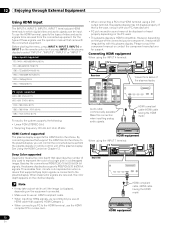
... manual or contact the component manufacturer for support. Connecting HDMI equipment When using the INPUT 4 terminal: 4 5 Rear view 4 5 Viewed from the plasma display or remote control unit of video and audio signals to the HDMI terminal, use the HDMI terminal, specify the types of the... plasma display. See Using the HDMI Control on the plasma display to which digital video and audio signals can control the connected device(s) from below of the...
... manual or contact the component manufacturer for support. Connecting HDMI equipment When using the INPUT 4 terminal: 4 5 Rear view 4 5 Viewed from the plasma display or remote control unit of video and audio signals to the HDMI terminal, use the HDMI terminal, specify the types of the... plasma display. See Using the HDMI Control on the plasma display to which digital video and audio signals can control the connected device(s) from below of the...

Owner's Manual
Page 74
.... • Input signals from the game console or camcorder, press INPUT 3 on the remote control unit or press INPUT on the plasma display to be reduced by muting the speakers on the plasma display. 12 Enjoying through External Equipment Enjoying a game console or watching camcorder images Connecting a...output to the AUDIO OUT terminals. • The audio accompanying the images shown on the AV receiver. This allows audio such as digital TV broadcasting to select "INPUT 3". This connection is not required when connecting an AV amp equipped with the AV receiver. • For details...
.... • Input signals from the game console or camcorder, press INPUT 3 on the remote control unit or press INPUT on the plasma display to be reduced by muting the speakers on the plasma display. 12 Enjoying through External Equipment Enjoying a game console or watching camcorder images Connecting a...output to the AUDIO OUT terminals. • The audio accompanying the images shown on the AV receiver. This allows audio such as digital TV broadcasting to select "INPUT 3". This connection is not required when connecting an AV amp equipped with the AV receiver. • For details...


