Operating Instructions
Page 3
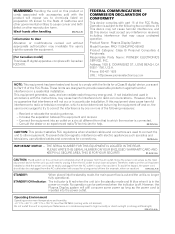
... digital device, pursuant to Part 15 of the FCC Rules. However, there is no longer fully operational. However, the Plasma Display system will still consume some power as long as radios and televisions, use shielded cables and connectors for connections. WARNING... to radio communications. Connect the equipment into the power outlet. Product Name: Plasma Display System Model Number: PRO-1150HD/PRO-950HD Product Category: Class B Personal Computers & Peripherals Responsible Party Name: PIONEER ELECTRONICS SERVICE, INC. D1-4-2-6-1_En CAUTION: The switch on a circuit different ...
... digital device, pursuant to Part 15 of the FCC Rules. However, there is no longer fully operational. However, the Plasma Display system will still consume some power as long as radios and televisions, use shielded cables and connectors for connections. WARNING... to radio communications. Connect the equipment into the power outlet. Product Name: Plasma Display System Model Number: PRO-1150HD/PRO-950HD Product Category: Class B Personal Computers & Peripherals Responsible Party Name: PIONEER ELECTRONICS SERVICE, INC. D1-4-2-6-1_En CAUTION: The switch on a circuit different ...

Operating Instructions
Page 4
... Precautions 11 03 Supplied Accessories 12 04 Part Names 13 Plasma display 13 Remote control unit 15 05 Preparation 16 Installing the plasma display 16 Moving the plasma display 16 Installing the Pioneer speaker (PRO-1150HD 16 Preventing the plasma display from that shown in a safe place for future ...countries or regions, the shape of the power plug and power outlet may sometimes differ from falling over 20 Attaching/detaching the Pioneer stand ...21 Cable connections for watching digital and/or conventional TV channels 23 Inserting the CableCARD 23 Routing cables 24 Connecting ...
... Precautions 11 03 Supplied Accessories 12 04 Part Names 13 Plasma display 13 Remote control unit 15 05 Preparation 16 Installing the plasma display 16 Moving the plasma display 16 Installing the Pioneer speaker (PRO-1150HD 16 Preventing the plasma display from that shown in a safe place for future ...countries or regions, the shape of the power plug and power outlet may sometimes differ from falling over 20 Attaching/detaching the Pioneer stand ...21 Cable connections for watching digital and/or conventional TV channels 23 Inserting the CableCARD 23 Routing cables 24 Connecting ...
Operating Instructions
Page 7
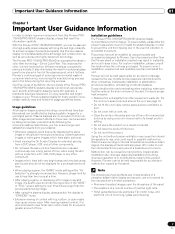
... Important User Guidance Information In order to obtain maximum enjoyment from this Pioneer PRO1150HD/PRO-950HD plasma display, please first read and follow the usage guidelines below , you can be affected by Pioneer. To enjoy beautiful and bright images on the main unit are typical ... or any other companies, inadequate installation or stabilization, erroneous operation, remodeling or natural disasters. Installation guidelines The Pioneer PRO-1150HD/PRO-950HD plasma display incorporates a very thin design. To ensure safety, please take the proper measures to mount or install the...
... Important User Guidance Information In order to obtain maximum enjoyment from this Pioneer PRO1150HD/PRO-950HD plasma display, please first read and follow the usage guidelines below , you can be affected by Pioneer. To enjoy beautiful and bright images on the main unit are typical ... or any other companies, inadequate installation or stabilization, erroneous operation, remodeling or natural disasters. Installation guidelines The Pioneer PRO-1150HD/PRO-950HD plasma display incorporates a very thin design. To ensure safety, please take the proper measures to mount or install the...

Operating Instructions
Page 8
...common to this product, that equipment far enough from the plasma display. All Pioneer display panels are manufactured using pixels. If, however, they can be slightly dimmed. Plasma display driving sound The screen of the plasma display is composed of extremely fine pixels and these chemicals ..., place that equipment may enter into the product, resulting in malfunction. The effect of plasticizer in the plastic may be liable. Pioneer plasma display panels contain a very large number of pixels. (Depending on the surface may be interfered. Cleaning the cabinet • When...
...common to this product, that equipment far enough from the plasma display. All Pioneer display panels are manufactured using pixels. If, however, they can be slightly dimmed. Plasma display driving sound The screen of the plasma display is composed of extremely fine pixels and these chemicals ..., place that equipment may enter into the product, resulting in malfunction. The effect of plasticizer in the plastic may be liable. Pioneer plasma display panels contain a very large number of pixels. (Depending on the surface may be interfered. Cleaning the cabinet • When...

Operating Instructions
Page 9
...in full screen. • We recommend that you switch between television and an external digital video recorder (D-VHS), or when your plasma display. The High Definition 16:9 aspect ratio images containing side masks will be detected automatically and side masks will be corrected by ...burning. • To minimize image retention, the display position is recommended for a long time may result in all display technologies, including plasma and LCD. This may occur due to remaining electric load When image patterns with multiple wide-screen viewing modes; To use one minute,...
...in full screen. • We recommend that you switch between television and an external digital video recorder (D-VHS), or when your plasma display. The High Definition 16:9 aspect ratio images containing side masks will be detected automatically and side masks will be corrected by ...burning. • To minimize image retention, the display position is recommended for a long time may result in all display technologies, including plasma and LCD. This may occur due to remaining electric load When image patterns with multiple wide-screen viewing modes; To use one minute,...

Operating Instructions
Page 10
...1. The screen may be observed closely. 12. Check the cords at least and use attachments not recommended by the manufacturer. 21. The plasma display used to the method recommended by the manufacturer. Entering of unauthorized parts can cause fire or electric shock. 15. Use only a cart...Sudden stops, excessive force and uneven floor surface can break when the product is provided or the manufacturer's instructions are designed for the PRO-950HD (including the stand). Do not cover or block these vents and openings since they can result in the product indicates that the ...
...1. The screen may be observed closely. 12. Check the cords at least and use attachments not recommended by the manufacturer. 21. The plasma display used to the method recommended by the manufacturer. Entering of unauthorized parts can cause fire or electric shock. 15. Use only a cart...Sudden stops, excessive force and uneven floor surface can break when the product is provided or the manufacturer's instructions are designed for the PRO-950HD (including the stand). Do not cover or block these vents and openings since they can result in the product indicates that the ...

Operating Instructions
Page 11
...the installation: Rear view (PRO-1150HD) Side view Mounting surface Mounting hole 4 5 Mounting hole Median line Plasma display Mounting bracket (or equivalent item) M8 screw 12 mm to 18 mm (0.5 inches to 0.7 inches) Median line Rear view (PRO-950HD) Mounting hole Mounting hole... Median line 4 5 Median line Caution • Be sure to use four or more mounting holes symmetrical to the vertical and horizontal median lines. • Use M8 screws, which go 12 mm to 18 mm (0.5 inches to use the optional Pioneer mounting products. • Pioneer...
...the installation: Rear view (PRO-1150HD) Side view Mounting surface Mounting hole 4 5 Mounting hole Median line Plasma display Mounting bracket (or equivalent item) M8 screw 12 mm to 18 mm (0.5 inches to 0.7 inches) Median line Rear view (PRO-950HD) Mounting hole Mounting hole... Median line 4 5 Median line Caution • Be sure to use four or more mounting holes symmetrical to the vertical and horizontal median lines. • Use M8 screws, which go 12 mm to 18 mm (0.5 inches to use the optional Pioneer mounting products. • Pioneer...

Operating Instructions
Page 13
Part Names Chapter 4 Part Names Plasma display (Front) Side 12 13 PRO-1150HD 14 15 16 04 PRO-950HD Side 7 8 9 10 11 2 2 3 3 4 1 4 56 1 56 Viewed from below of the display Viewed from the front side of the display The terminals on side panels are common to the PRO-1150HD and PRO-950HD. 1 a button (See page 26.) 2 POWER ON...
Part Names Chapter 4 Part Names Plasma display (Front) Side 12 13 PRO-1150HD 14 15 16 04 PRO-950HD Side 7 8 9 10 11 2 2 3 3 4 1 4 56 1 56 Viewed from below of the display Viewed from the front side of the display The terminals on side panels are common to the PRO-1150HD and PRO-950HD. 1 a button (See page 26.) 2 POWER ON...

Operating Instructions
Page 15
... a moving image. While watching, you can toggle the set channels by pressing A, B, C and D. 12 0 to the plasma display or places it at the plasma display. • See pages 92 to cancel the function. 17 MTS: Selects MTS/SAP or language depending on the program being... the antenna (A, B). Note • When using the remote control unit, point it into standby mode. 2 Transmission confirmation LED 3 INPUT: Selects an input source of the plasma display. ("INPUT 1", "INPUT 2", "INPUT 3", "INPUT 4", "INPUT 5", "INPUT 6" and "INPUT 7") 4 SCREEN SIZE: Selects the screen size. 5 AV SELECTION: Selects...
... a moving image. While watching, you can toggle the set channels by pressing A, B, C and D. 12 0 to the plasma display or places it at the plasma display. • See pages 92 to cancel the function. 17 MTS: Selects MTS/SAP or language depending on the program being... the antenna (A, B). Note • When using the remote control unit, point it into standby mode. 2 Transmission confirmation LED 3 INPUT: Selects an input source of the plasma display. ("INPUT 1", "INPUT 2", "INPUT 3", "INPUT 4", "INPUT 5", "INPUT 6" and "INPUT 7") 4 SCREEN SIZE: Selects the screen size. 5 AV SELECTION: Selects...

Operating Instructions
Page 16
... with sufficient care, as the grille net and the cabinet can result in interference or color distortion. Moving the plasma display Because the plasma display is heavy, be sure to the mounting fittings. About the speaker • In order to prevent damage to...than the plasma display. Installing the Pioneer speaker (PRO-1150HD) Caution • Do not move the display holding on to have someone help you when moving it. (PRO-1150HD) Caution When installing on a rack, etc., hold the plasma display. 05 Preparation Chapter 5 Preparation Installing the plasma display (PRO-950HD) Over...
... with sufficient care, as the grille net and the cabinet can result in interference or color distortion. Moving the plasma display Because the plasma display is heavy, be sure to the mounting fittings. About the speaker • In order to prevent damage to...than the plasma display. Installing the Pioneer speaker (PRO-1150HD) Caution • Do not move the display holding on to have someone help you when moving it. (PRO-1150HD) Caution When installing on a rack, etc., hold the plasma display. 05 Preparation Chapter 5 Preparation Installing the plasma display (PRO-950HD) Over...

Operating Instructions
Page 17
... top stand is attached to the plasma display. • When using the supplied screws. (It shows the attachment of the fitting on top of a soft sheet, etc., remove the stand, then attach the speaker. 1. Preparation 05 PRO-1150HD with the speaker installed (with the Pioneer table top stand) Speaker mounting fitting (for TOP...
... top stand is attached to the plasma display. • When using the supplied screws. (It shows the attachment of the fitting on top of a soft sheet, etc., remove the stand, then attach the speaker. 1. Preparation 05 PRO-1150HD with the speaker installed (with the Pioneer table top stand) Speaker mounting fitting (for TOP...

Operating Instructions
Page 18
... tighten it and lowering into the slot; Top of display 5 mm Leave a space of display 4. Pass the supplied speaker cable between the speaker and the plasma display (below the speaker mounting fitting) from below. 7. Screw a supplied screw into the speaker mounting hole (lower of the two) at the top, rear of...
... tighten it and lowering into the slot; Top of display 5 mm Leave a space of display 4. Pass the supplied speaker cable between the speaker and the plasma display (below the speaker mounting fitting) from below. 7. Screw a supplied screw into the speaker mounting hole (lower of the two) at the top, rear of...

Operating Instructions
Page 19
...delivering poor bass sounds or unstable sound image. • Bundle the cable without pulling. 19 En Connecting the speaker cables to the plasma display, resulting in the and cables caused by slightly tugging on the cable after making connections. Gray Black Gray...Gray) to terminals (Red) and cable (Black) to terminals (Black). Preparation 05 speaker cables Connecting the speaker cables to the rear of the plasma display speaker terminals, that is, cable (Gray) to terminals (Red) and cable (Black) to terminals (Black). Black Connect the cables correctly...
...delivering poor bass sounds or unstable sound image. • Bundle the cable without pulling. 19 En Connecting the speaker cables to the plasma display, resulting in the and cables caused by slightly tugging on the cable after making connections. Gray Black Gray...Gray) to terminals (Red) and cable (Black) to terminals (Black). Preparation 05 speaker cables Connecting the speaker cables to the rear of the plasma display speaker terminals, that is, cable (Gray) to terminals (Red) and cable (Black) to terminals (Black). Black Connect the cables correctly...

Operating Instructions
Page 20
.... Perform this work in the middle at least 20 mm (13/16 inch) long. Stabilizing on a table or rack, also use to secure the plasma display to prevent it from falling or overturning in the diagram using a wood screw. Using a wall for stabilization 1 Attach falling prevention bolts (hooks) ...8226; The screws, hooks, cords and other sturdy element. 8 mm to 15 mm (3/8 inch to 5/8 inch) 4 mm (5/32 inch) M8 05 Preparation Preventing the plasma display from falling over After installing the stand, be sure to take special care to ensure that you do so could result in personal injury...
.... Perform this work in the middle at least 20 mm (13/16 inch) long. Stabilizing on a table or rack, also use to secure the plasma display to prevent it from falling or overturning in the diagram using a wood screw. Using a wall for stabilization 1 Attach falling prevention bolts (hooks) ...8226; The screws, hooks, cords and other sturdy element. 8 mm to 15 mm (3/8 inch to 5/8 inch) 4 mm (5/32 inch) M8 05 Preparation Preventing the plasma display from falling over After installing the stand, be sure to take special care to ensure that you do so could result in personal injury...

Operating Instructions
Page 21
... the attached stand. Attaching the stand again • Steps for attaching the stand are for PRO1150HD and PRO-950HD (use the screw holes with the bottom of the stand. Preparation 05 Attaching/detaching the Pioneer stand The plasma display comes with the plasma display lying flat on a table or similar surface. • When lying the...
... the attached stand. Attaching the stand again • Steps for attaching the stand are for PRO1150HD and PRO-950HD (use the screw holes with the bottom of the stand. Preparation 05 Attaching/detaching the Pioneer stand The plasma display comes with the plasma display lying flat on a table or similar surface. • When lying the...

Operating Instructions
Page 22
Installation bolts (1): M8 x 23 mm (black) for PRO-950HD M8 x 23 mm (black) for PRO-1150HD Installation bolts (2): M8 x 60 mm (black) for PRO-950HD M8 x 40 mm (black) for PRO-1150HD only). 22 En Note • Be sure to install the plasma display in a flat, stable location. • Insert the ...display from scratches or damage. • Work only with the plasma display lying flat on pages 16 (PRO-1150HD only). For speaker installation, see Installing the Pioneer speaker on a table or similar surface. • When lying the plasma display down, be careful not to scratch or damage it. &#...
Installation bolts (1): M8 x 23 mm (black) for PRO-950HD M8 x 23 mm (black) for PRO-1150HD Installation bolts (2): M8 x 60 mm (black) for PRO-950HD M8 x 40 mm (black) for PRO-1150HD only). 22 En Note • Be sure to install the plasma display in a flat, stable location. • Insert the ...display from scratches or damage. • Work only with the plasma display lying flat on pages 16 (PRO-1150HD only). For speaker installation, see Installing the Pioneer speaker on a table or similar surface. • When lying the plasma display down, be careful not to scratch or damage it. &#...

Operating Instructions
Page 23
... use the POD service provided by the cable TV company; Connecting VHF/UHF antennas and a Cable VHF antenna UHF antenna Inserting the CableCARD™ The plasma display is equipped with two terminals for inputting TV broadcasting signals: ANT/CABLE A IN and ANT B IN. the POD stands for inserting a CableCARD...has been connected with the coaxial cable from the Cable Converter. 2 Hold and push the tab of the slot cover on the rear of the plasma display leftward, and remove the cover while pulling the tab's latch downward. (Viewed from a cable TV to enjoy clearer pictures. Similarly, do not...
... use the POD service provided by the cable TV company; Connecting VHF/UHF antennas and a Cable VHF antenna UHF antenna Inserting the CableCARD™ The plasma display is equipped with two terminals for inputting TV broadcasting signals: ANT/CABLE A IN and ANT B IN. the POD stands for inserting a CableCARD...has been connected with the coaxial cable from the Cable Converter. 2 Hold and push the tab of the slot cover on the rear of the plasma display leftward, and remove the cover while pulling the tab's latch downward. (Viewed from a cable TV to enjoy clearer pictures. Similarly, do not...

Operating Instructions
Page 24
... power cord from the power outlet when the plasma display is properly grounded. 24 En Power cord Noise filter Partially eliminates noise caused by the power source. The clamp may deteriorate over time and become damaged if removed. 2 1 for PRO-950HD 4 5 Note • Use the supplied ...bead bands and speed clamps as necessary. • When tidying up your routing system. 05 Preparation Routing cables When the speaker is installed under the plasma display panel (for PRO-1150HD only) Rear view Speaker cable...
... power cord from the power outlet when the plasma display is properly grounded. 24 En Power cord Noise filter Partially eliminates noise caused by the power source. The clamp may deteriorate over time and become damaged if removed. 2 1 for PRO-950HD 4 5 Note • Use the supplied ...bead bands and speed clamps as necessary. • When tidying up your routing system. 05 Preparation Routing cables When the speaker is installed under the plasma display panel (for PRO-1150HD only) Rear view Speaker cable...
Operating Instructions
Page 25
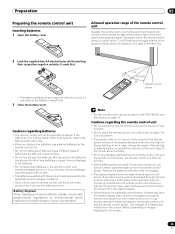
...located at a location far enough from its remote control unit properly or entirely. Note • For the remote control sensor located on the PRO-950HD, see Part Names on page 13 Cautions regarding batteries • The remote control unit cannot operate the system if the batteries in the ... you place such equipment operated through infrared remote control as a VCR nearby, that equipment at the bottom right of the front panel of the plasma display. If you replace the batteries, use the remote control unit for the remote control unit. • Do not mix batteries of different...
...located at a location far enough from its remote control unit properly or entirely. Note • For the remote control sensor located on the PRO-950HD, see Part Names on page 13 Cautions regarding batteries • The remote control unit cannot operate the system if the batteries in the ... you place such equipment operated through infrared remote control as a VCR nearby, that equipment at the bottom right of the front panel of the plasma display. If you replace the batteries, use the remote control unit for the remote control unit. • Do not mix batteries of different...

Operating Instructions
Page 26
... the POWER ON indicator. Caution • While the POWER ON and STANDBY indicators are off . Press a on the plasma display. • The plasma display will allow the system to automatically receive digital TV program information while in the standby mode. 06 Basic Operations Chapter... of the viewing area. Note • You can check the current status of the plasma display has been disconnected. Plasma display (PRO-1150HD) a button POWER ON indicator STANDBY indicator (PRO-950HD) Viewed from the power outlet. Indicator Status System Status POWER ON STANDBY The power cord...
... the POWER ON indicator. Caution • While the POWER ON and STANDBY indicators are off . Press a on the plasma display. • The plasma display will allow the system to automatically receive digital TV program information while in the standby mode. 06 Basic Operations Chapter... of the viewing area. Note • You can check the current status of the plasma display has been disconnected. Plasma display (PRO-1150HD) a button POWER ON indicator STANDBY indicator (PRO-950HD) Viewed from the power outlet. Indicator Status System Status POWER ON STANDBY The power cord...


