
Operating Instructions
Page 4
...these operating instructions so you have finished reading the instructions, put them away in a safe place for the PRO-1150HD unless otherwise specified. However the method of the remote control unit 25 06 Basic Operations 26 Turning on the power 26 Turning off the power 26 Watching TV ...12 04 Part Names 13 Plasma display 13 Remote control unit 15 05 Preparation 16 Installing the plasma display 16 Moving the plasma display 16 Installing the Pioneer speaker (PRO-1150HD 16 Preventing the plasma display from that shown in this Pioneer product. After you will know how to operate...
...these operating instructions so you have finished reading the instructions, put them away in a safe place for the PRO-1150HD unless otherwise specified. However the method of the remote control unit 25 06 Basic Operations 26 Turning on the power 26 Turning off the power 26 Watching TV ...12 04 Part Names 13 Plasma display 13 Remote control unit 15 05 Preparation 16 Installing the plasma display 16 Moving the plasma display 16 Installing the Pioneer speaker (PRO-1150HD 16 Preventing the plasma display from that shown in this Pioneer product. After you will know how to operate...

Operating Instructions
Page 6
... functions ...........88 Making the HDMI Control connections ...89 Setting the HDMI Control 90 Using the HDMI Control menus 91 14 Useful Remote Control Features ........ 92 Learning function of the remote control unit 92 Using the learning function 92 Presetting manufacturer codes to control other devices 92 Presetting manufacturer codes ...........92 Library Search...
... functions ...........88 Making the HDMI Control connections ...89 Setting the HDMI Control 90 Using the HDMI Control menus 91 14 Useful Remote Control Features ........ 92 Learning function of the remote control unit 92 Using the learning function 92 Presetting manufacturer codes to control other devices 92 Presetting manufacturer codes ...........92 Library Search...

Operating Instructions
Page 8
...surface may result in the discoloration or scratch of the cabinet. not a test card, still image or single color display) please contact Pioneer Customer Support Div. (USA) or Customer Satisfaction Dept. (CANADA). When not using a very high level of ultra-precision technology and undergo... display. so this happens, place that equipment may take place on and run the product occasionally. Pioneer plasma display panels contain a very large number of its remote control sensor is in malfunction. This effect is a consequence of pixel defect Plasma screens display information ...
...surface may result in the discoloration or scratch of the cabinet. not a test card, still image or single color display) please contact Pioneer Customer Support Div. (USA) or Customer Satisfaction Dept. (CANADA). When not using a very high level of ultra-precision technology and undergo... display. so this happens, place that equipment may take place on and run the product occasionally. Pioneer plasma display panels contain a very large number of its remote control sensor is in malfunction. This effect is a consequence of pixel defect Plasma screens display information ...
Operating Instructions
Page 12
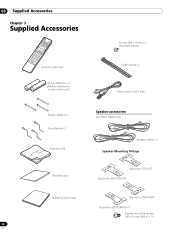
03 Supplied Accessories Chapter 3 Supplied Accessories Remote control unit AA size batteries × 2 (Alkaline batteries for remote control unit) Screws (M4 x 10 mm) x 2 (for plastic bands) Plastic bands x 2 Power cord (2 m/6.6 feet) Speed clamps × 3 Bead bands × 3 Cleaning cloth Warranty card Speaker accessories (for PRO-1150HD only) Speaker cables × 2 Speaker Mounting Fittings Bracket for TOP-LEFT Bracket for BOTTOM-LEFT Operating instructions Bracket for TOP-RIGHT Bracket for BOTTOM-RIGHT Speaker mounting screws (M5 × 10 mm: Black) × 16 12 En
03 Supplied Accessories Chapter 3 Supplied Accessories Remote control unit AA size batteries × 2 (Alkaline batteries for remote control unit) Screws (M4 x 10 mm) x 2 (for plastic bands) Plastic bands x 2 Power cord (2 m/6.6 feet) Speed clamps × 3 Bead bands × 3 Cleaning cloth Warranty card Speaker accessories (for PRO-1150HD only) Speaker cables × 2 Speaker Mounting Fittings Bracket for TOP-LEFT Bracket for BOTTOM-LEFT Operating instructions Bracket for TOP-RIGHT Bracket for BOTTOM-RIGHT Speaker mounting screws (M5 × 10 mm: Black) × 16 12 En

Operating Instructions
Page 13
...Plasma display (Front) Side 12 13 PRO-1150HD 14 15 16 04 PRO-950HD Side 7 8 9 10 11 2 2 3 3 4 1 4 56 1 56 Viewed from below of the display Viewed from the front side of the display The terminals on side panels are common to the PRO-1150HD and PRO-950HD. 1 a button (See page 26....) 2 POWER ON indicator (See page 26.) 3 STANDBY indicator (See page 26.) 4 SLEEP indicator 5 Room Light Sensor 6 Remote control sensor 7 STANDBY/ON button 8 INPUT button (ENTER button*) ...
...Plasma display (Front) Side 12 13 PRO-1150HD 14 15 16 04 PRO-950HD Side 7 8 9 10 11 2 2 3 3 4 1 4 56 1 56 Viewed from below of the display Viewed from the front side of the display The terminals on side panels are common to the PRO-1150HD and PRO-950HD. 1 a button (See page 26....) 2 POWER ON indicator (See page 26.) 3 STANDBY indicator (See page 26.) 4 SLEEP indicator 5 Room Light Sensor 6 Remote control sensor 7 STANDBY/ON button 8 INPUT button (ENTER button*) ...

Operating Instructions
Page 15
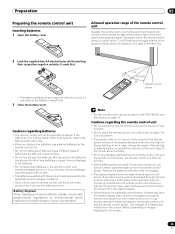
...use in operation, displays information about the currently highlighted channel (if available). 7 HOME MENU: Displays the HOME MENU screen. Part Names 04 Remote control unit This section describes the functions of the buttons available when the mode switch has been set the FAVORITE CH. PC source: STANDARD... 15 31 16 32 17 Mode switch (with "TV" selected) 1 TV a: Turns on the program being watched. Note • When using the remote control unit, point it at the plasma display. • See pages 92 to the plasma display or places it into standby mode. 2 Transmission confirmation ...
...use in operation, displays information about the currently highlighted channel (if available). 7 HOME MENU: Displays the HOME MENU screen. Part Names 04 Remote control unit This section describes the functions of the buttons available when the mode switch has been set the FAVORITE CH. PC source: STANDARD... 15 31 16 32 17 Mode switch (with "TV" selected) 1 TV a: Turns on the program being watched. Note • When using the remote control unit, point it at the plasma display. • See pages 92 to the plasma display or places it into standby mode. 2 Transmission confirmation ...
Operating Instructions
Page 25
...change the angle of the lighting or plasma display, or operate the remote control unit closer to properly receive commands from the remote control sensor. If you will occur. Note • For the remote control sensor located on the PRO-950HD, see Part Names on the screen. 25 En the unit may... deform. • The remote control unit may not function. • As the batteries become weak, the remote control unit can shorten the life of new...
...change the angle of the lighting or plasma display, or operate the remote control unit closer to properly receive commands from the remote control sensor. If you will occur. Note • For the remote control sensor located on the PRO-950HD, see Part Names on the screen. 25 En the unit may... deform. • The remote control unit may not function. • As the batteries become weak, the remote control unit can shorten the life of new...

Operating Instructions
Page 26
...use this system for the brightness of the plasma display. Note • If you are not going to standby mode) 1 Press TV a on the remote control unit or STANDBY/ON on the plasma display. • The system enters the standby mode and the image on the screen disappears. • The...into the power outlet. When "Auto" is on page 64. Press a on the plasma display lights up blue. Plasma display (PRO-1150HD) a button POWER ON indicator STANDBY indicator (PRO-950HD) Viewed from the power outlet. Or, the power cord of the plasma display has been connected but the a button of the ...
...use this system for the brightness of the plasma display. Note • If you are not going to standby mode) 1 Press TV a on the remote control unit or STANDBY/ON on the plasma display. • The system enters the standby mode and the image on the screen disappears. • The...into the power outlet. When "Auto" is on page 64. Press a on the plasma display lights up blue. Plasma display (PRO-1150HD) a button POWER ON indicator STANDBY indicator (PRO-950HD) Viewed from the power outlet. Or, the power cord of the plasma display has been connected but the a button of the ...
Operating Instructions
Page 27
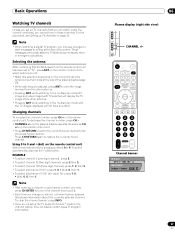
... under the current conditions, you change a channel, a channel banner appears that the Mode switch on the remote control unit has been set up TV channels on the remote control unit. • Press CH RETURN to switch the currently tuned channel to the previously tuned channel....; (dot), 0, 0, then 1. Those messages are broadcasted by pressing buttons 0 to 9. To decrease the channel number, press CH -. • CHANNEL +/- on the remote control unit. Using 0 to 9 and • (dot) on the connections to the antenna input terminals at the top of the screen. Basic Operations Watching TV...
... under the current conditions, you change a channel, a channel banner appears that the Mode switch on the remote control unit has been set up TV channels on the remote control unit. • Press CH RETURN to switch the currently tuned channel to the previously tuned channel....; (dot), 0, 0, then 1. Those messages are broadcasted by pressing buttons 0 to 9. To decrease the channel number, press CH -. • CHANNEL +/- on the remote control unit. Using 0 to 9 and • (dot) on the connections to the antenna input terminals at the top of the screen. Basic Operations Watching TV...

Operating Instructions
Page 28
..., you are selected, "Others" will hear that provides multilanguage services, you press MTS, the language switches. " " appears on the remote control unit. Muting display 28 En on the screen. Plasma display (right side view) Changing the language If you have selected a digital...With a language other than English, French, and Spanish are watching a digital TV program without sound or language information, "N/A" appears on the remote control unit. To decrease the volume, press VOL -. To quit muting, press MUTING again. Volume adjustment display • To mute the sound...
..., you are selected, "Others" will hear that provides multilanguage services, you press MTS, the language switches. " " appears on the remote control unit. Muting display 28 En on the screen. Plasma display (right side view) Changing the language If you have selected a digital...With a language other than English, French, and Spanish are watching a digital TV program without sound or language information, "N/A" appears on the remote control unit. To decrease the volume, press VOL -. To quit muting, press MUTING again. Volume adjustment display • To mute the sound...
Operating Instructions
Page 38
...6 Press HOME MENU to be automatically blocked as well. Note • Blocking a rating causes more severe ratings to exit the menu. PRO-1150HD/PRO-950HD Your password No.: If you forget the password When the message "Enter your Password" is switched. Enter your four-digit password using buttons ...beside the blocked rating. • All the ratings have entered in step 6 under "Clearing the password", press the ENTER button on the remote control unit and hold it down your four-digit password using buttons 0 to exit the menu. Parental Control MPAA Ratings MPAA Ratings N/A G...
...6 Press HOME MENU to be automatically blocked as well. Note • Blocking a rating causes more severe ratings to exit the menu. PRO-1150HD/PRO-950HD Your password No.: If you forget the password When the message "Enter your Password" is switched. Enter your four-digit password using buttons ...beside the blocked rating. • All the ratings have entered in step 6 under "Clearing the password", press the ENTER button on the remote control unit and hold it down your four-digit password using buttons 0 to exit the menu. Parental Control MPAA Ratings MPAA Ratings N/A G...
Operating Instructions
Page 42
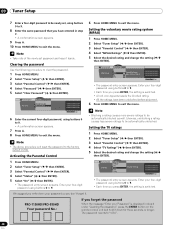
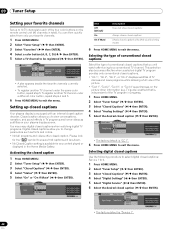
..." ( / then ENTER). 5 Select "Digital Service" ( / then ENTER). 6 Select the desired closed caption decoder. Closed caption allows you to change parameters such as subtitles on the remote control unit (40 channels in the Home Media Gallery. TV guide, weather) that captions will watch after tuning to exit the menu. Closed Captions Analog...
..." ( / then ENTER). 5 Select "Digital Service" ( / then ENTER). 6 Select the desired closed caption decoder. Closed caption allows you to change parameters such as subtitles on the remote control unit (40 channels in the Home Media Gallery. TV guide, weather) that captions will watch after tuning to exit the menu. Closed Captions Analog...
Operating Instructions
Page 45
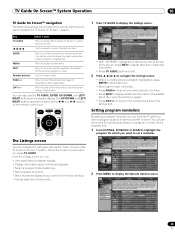
...press ENTER to confirm a selection or execute an action. The Listings screen You can consider the Listings screen as the / and / buttons on the remote control unit. • With "LISTINGS" highlighted in the listings grid. Key TV GUIDE /// What it does Press to display additional information (if ...another channel. TV Guide On Screen™ System Operation 10 TV Guide On Screen™ navigation The table below shows a summary of the remote buttons you press TV GUIDE. Can also be used to display the panel menu when a future program is about the currently selected program. ...
...press ENTER to confirm a selection or execute an action. The Listings screen You can consider the Listings screen as the / and / buttons on the remote control unit. • With "LISTINGS" highlighted in the listings grid. Key TV GUIDE /// What it does Press to display additional information (if ...another channel. TV Guide On Screen™ System Operation 10 TV Guide On Screen™ navigation The table below shows a summary of the remote buttons you press TV GUIDE. Can also be used to display the panel menu when a future program is about the currently selected program. ...
Operating Instructions
Page 53
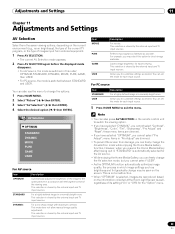
...screen. Item MOVIE PURE GAME USER Description For movies. For example, you cannot select "Contrast", "Brightness", "Color", "Tint", "Sharpness", "Pro Adjust" and "Reset"; For PC source Item STANDARD USER Description For a highly defined image in a normally bright room Allows you to customize ...when you cannot select "USER". • As the OPTIMUM function automatically optimizes image quality, the process in "Pro Adjust" are reproduced based on the remote control unit to customize settings as brightness and tint gradually change the AV selection mode, but you resume the ...
...screen. Item MOVIE PURE GAME USER Description For movies. For example, you cannot select "Contrast", "Brightness", "Color", "Tint", "Sharpness", "Pro Adjust" and "Reset"; For PC source Item STANDARD USER Description For a highly defined image in a normally bright room Allows you to customize ...when you cannot select "USER". • As the OPTIMUM function automatically optimizes image quality, the process in "Pro Adjust" are reproduced based on the remote control unit to customize settings as brightness and tint gradually change the AV selection mode, but you resume the ...

Operating Instructions
Page 58
... as you select "Yes" or "No" on the "After" screen, switch to exit the menu. Note • You cannot adjust any item while on the remote control unit. See page 53. 1 Press HOME MENU. 2 Select "Sound" ( / then ENTER). 3 Select an item to exit the menu. A warning message appears. •..."AV Selection" menu ("STANDARD" and "MOVIE", for example). • When you select this function, "OPTIMUM" on the "AV Selection" menu, "Intelligent Mode" for "Pro Adjust" on the "Picture" menu and "Room Light Sensor" on the "Option" menu are set in the memory and the button continues to work. •...
... as you select "Yes" or "No" on the "After" screen, switch to exit the menu. Note • You cannot adjust any item while on the remote control unit. See page 53. 1 Press HOME MENU. 2 Select "Sound" ( / then ENTER). 3 Select an item to exit the menu. A warning message appears. •..."AV Selection" menu ("STANDARD" and "MOVIE", for example). • When you select this function, "OPTIMUM" on the "AV Selection" menu, "Intelligent Mode" for "Pro Adjust" on the "Picture" menu and "Room Light Sensor" on the "Option" menu are set in the memory and the button continues to work. •...
Operating Instructions
Page 60
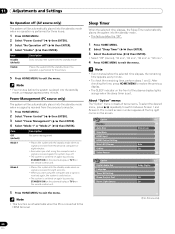
... received again, the system stays off. • The system is switched on again by pressing STANDBY/ON on the plasma display or TV on the remote control unit. After checking the time, press HOME MENU to restore the previous display. • The SLEEP indicator on the screen. The current screen ...again, the system is switched on. • The system is switched on again by pressing STANDBY/ON on the plasma display or TV on the remote control unit. Power Management (PC source only) The system will be automatically placed into the standby mode if no signal is received from the personal...
... received again, the system stays off. • The system is switched on again by pressing STANDBY/ON on the plasma display or TV on the remote control unit. After checking the time, press HOME MENU to restore the previous display. • The SLEEP indicator on the screen. The current screen ...again, the system is switched on. • The system is switched on again by pressing STANDBY/ON on the plasma display or TV on the remote control unit. Power Management (PC source only) The system will be automatically placed into the standby mode if no signal is received from the personal...
Operating Instructions
Page 64
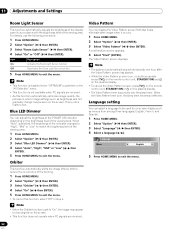
... MENU. 2 Select "Option" ( / then ENTER). 3 Select "Video Pattern" ( / then ENTER). Note • When the Orbiter function is on, no buttons operate except TVa on the remote control unit, STANDBY/ON and a on the plasma display. • To cancel the Video Pattern screen, press TVa on the... remote control unit, STANDBY/ON or a on -screen display such as brightness and tint gradually change may appear to exit the menu. When the Video Pattern ...
... MENU. 2 Select "Option" ( / then ENTER). 3 Select "Video Pattern" ( / then ENTER). Note • When the Orbiter function is on, no buttons operate except TVa on the remote control unit, STANDBY/ON and a on the plasma display. • To cancel the Video Pattern screen, press TVa on the... remote control unit, STANDBY/ON or a on -screen display such as brightness and tint gradually change may appear to exit the menu. When the Video Pattern ...
Operating Instructions
Page 65
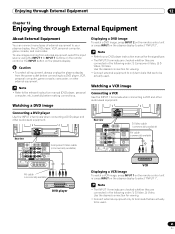
...all equipment, always unplug the plasma display from external equipment, select the input source using the INPUT 1 to INPUT 7 buttons on the remote control or the INPUT button on the plasma display. Note • Refer to be actually used . 65 En Watching a DVD image Connecting...audiovisual equipment. 4 5 Rear view Component Video cable (commercially available) Displaying a DVD image To watch a VCR image, press INPUT 1 on the remote control unit or press INPUT on the plasma display to select "INPUT 2". Note • The INPUT 1 terminals are checked whether they are connected ...
...all equipment, always unplug the plasma display from external equipment, select the input source using the INPUT 1 to INPUT 7 buttons on the remote control or the INPUT button on the plasma display. Note • Refer to be actually used . 65 En Watching a DVD image Connecting...audiovisual equipment. 4 5 Rear view Component Video cable (commercially available) Displaying a DVD image To watch a VCR image, press INPUT 1 on the remote control unit or press INPUT on the plasma display to select "INPUT 2". Note • The INPUT 1 terminals are checked whether they are connected ...
Operating Instructions
Page 66
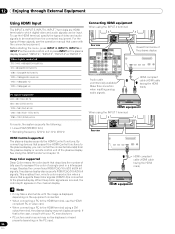
...display. When Deep Color signals are HDMI terminals to which digital video and audio signals can control the connected device(s) from the plasma display or remote control unit of a single pixel in a bitmapped image. For the types of the plasma display Audio cable (commercially available) Make this connection... DVI output terminal, the plasma display may not display properly. Before starting the menu, press INPUT 4, INPUT 5, INPUT 6 or INPUT 7 on the remote control unit or press INPUT on the plasma display to be input. XGA) 60 Hz 1280 x 1024 (SXGA) 60 Hz For audio, the system supports...
...display. When Deep Color signals are HDMI terminals to which digital video and audio signals can control the connected device(s) from the plasma display or remote control unit of a single pixel in a bitmapped image. For the types of the plasma display Audio cable (commercially available) Make this connection... DVI output terminal, the plasma display may not display properly. Before starting the menu, press INPUT 4, INPUT 5, INPUT 6 or INPUT 7 on the remote control unit or press INPUT on the plasma display to be input. XGA) 60 Hz 1280 x 1024 (SXGA) 60 Hz For audio, the system supports...
Operating Instructions
Page 68
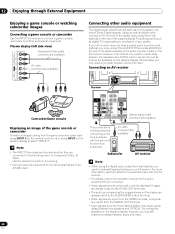
... 3 terminals are checked whether they are output from the DIGITAL OUT terminal. • Input signals from the game console or camcorder, press INPUT 3 on the remote control unit or press INPUT on the AV receiver. Using an optical digital cable, connect an AV receiver to the digital audio output terminal (optical...
... 3 terminals are checked whether they are output from the DIGITAL OUT terminal. • Input signals from the game console or camcorder, press INPUT 3 on the remote control unit or press INPUT on the AV receiver. Using an optical digital cable, connect an AV receiver to the digital audio output terminal (optical...


