

Owner's Manual
Page 4
...En However the method of the power plug and power outlet may sometimes differ from Falling Over 19 Attaching/detaching the PIONEER stand (for PRO-940HD only 20 08 Menu Setup Menu Configuration 34 AV mode menus 34 PC mode menus 34 Menu operations 34 Cable connections... the CableCARD 21 Switching between antenna A and B .......21 Preparing the remote control unit 22 Inserting batteries 22 Cautions regarding batteries 22 Allowed operation range of the remote control unit 22 Cautions regarding the remote control unit 22 Connecting the power cord 23 Routing cables 23 09 Tuner...
...En However the method of the power plug and power outlet may sometimes differ from Falling Over 19 Attaching/detaching the PIONEER stand (for PRO-940HD only 20 08 Menu Setup Menu Configuration 34 AV mode menus 34 PC mode menus 34 Menu operations 34 Cable connections... the CableCARD 21 Switching between antenna A and B .......21 Preparing the remote control unit 22 Inserting batteries 22 Cautions regarding batteries 22 Allowed operation range of the remote control unit 22 Cautions regarding the remote control unit 22 Connecting the power cord 23 Routing cables 23 09 Tuner...

Owner's Manual
Page 6
...Enjoying movie files 77 Enjoying music files 80 Enjoying photo files 81 Other useful functions 84 Glossary 89 13 Useful Remote Control Features Learning function of the remote control unit 90 Using the learning function 90 Presetting manufacturer codes to control other devices 90 Presetting manufacturer codes ..............90 Manufacturing Reset 91 Programming codes 92 CABLE 92 SATELLITE 92 VCR 93 PVR 95 DVD 95 DVD-R 96 LD 96 Using the remote control unit to control other devices 97 Receiver control buttons 97 CBL/SAT control buttons 98 VCR control buttons 99 DVD/DVR control...
...Enjoying movie files 77 Enjoying music files 80 Enjoying photo files 81 Other useful functions 84 Glossary 89 13 Useful Remote Control Features Learning function of the remote control unit 90 Using the learning function 90 Presetting manufacturer codes to control other devices 90 Presetting manufacturer codes ..............90 Manufacturing Reset 91 Programming codes 92 CABLE 92 SATELLITE 92 VCR 93 PVR 95 DVD 95 DVD-R 96 LD 96 Using the remote control unit to control other devices 97 Receiver control buttons 97 CBL/SAT control buttons 98 VCR control buttons 99 DVD/DVR control...

Owner's Manual
Page 8
... surfaces, gently wipe with the supplied cleaning cloth or a similar cloth (e.g., cotton, flannel, etc.). 01 Important User Guidance Information CAUTION PIONEER bears no responsibility for any affected equipment to a location away from the Plasma Display. Move devices away from incorrect use of the front... gently wipe with a clean soft cloth (e.g., cotton, flannel, etc.). When not using pixels. Do not use of the cabinet with remote controls and wireless headphones using a very high level of plastic. Handles at the rear of extremely fine pixels and these chemicals can experience...
... surfaces, gently wipe with the supplied cleaning cloth or a similar cloth (e.g., cotton, flannel, etc.). 01 Important User Guidance Information CAUTION PIONEER bears no responsibility for any affected equipment to a location away from the Plasma Display. Move devices away from incorrect use of the front... gently wipe with a clean soft cloth (e.g., cotton, flannel, etc.). When not using pixels. Do not use of the cabinet with remote controls and wireless headphones using a very high level of plastic. Handles at the rear of extremely fine pixels and these chemicals can experience...

Owner's Manual
Page 12
03 Supplied Accessories Supplied Accessories Power cord (2 m/6.6 feet) Cleaning cloth Operating instructions Speed clamp × 3 Bead band × 3 Warranty card G-LINK cable (3 m/9.8 feet) Ferrite core Remote control unit AA size battery x 2 (Alkaline battery for remote control unit) Hexagonal wrench x 1 (Diagonal size: 6 mm) (for PRO-940HD only) 12 En
03 Supplied Accessories Supplied Accessories Power cord (2 m/6.6 feet) Cleaning cloth Operating instructions Speed clamp × 3 Bead band × 3 Warranty card G-LINK cable (3 m/9.8 feet) Ferrite core Remote control unit AA size battery x 2 (Alkaline battery for remote control unit) Hexagonal wrench x 1 (Diagonal size: 6 mm) (for PRO-940HD only) 12 En

Owner's Manual
Page 13
Part Names Part Names Plasma Display Front/side view (PRO-1140HD) 11 12 13 14 1 1 a POWER button (See page 24) 2 POWER ON indicator (See page 24) 3 STANDBY indicator (See page 24) 4 REC TIMER indicator 5 Remote control sensor 04 English 6 7 8 9 10 2 3 4 5 (Side view) 6 STANDBY/ON button 7 INPUT button (ENTER button*) 8 VOLUME UP/DOWN buttons...
Part Names Part Names Plasma Display Front/side view (PRO-1140HD) 11 12 13 14 1 1 a POWER button (See page 24) 2 POWER ON indicator (See page 24) 3 STANDBY indicator (See page 24) 4 REC TIMER indicator 5 Remote control sensor 04 English 6 7 8 9 10 2 3 4 5 (Side view) 6 STANDBY/ON button 7 INPUT button (ENTER button*) 8 VOLUME UP/DOWN buttons...

Owner's Manual
Page 14
04 Part Names Front/side view (PRO-940HD) 11 12 13 14 6 7 8 9 10 2 3 4 1 Viewed from below of the display 5 Viewed from the front side of the display 1 a POWER button (See page 24) 2 POWER ON indicator (See page 24) 3 STANDBY indicator (See page 24) 4 REC TIMER indicator 5 Remote control sensor (Side view) 6 STANDBY/ON button...
04 Part Names Front/side view (PRO-940HD) 11 12 13 14 6 7 8 9 10 2 3 4 1 Viewed from below of the display 5 Viewed from the front side of the display 1 a POWER button (See page 24) 2 POWER ON indicator (See page 24) 3 STANDBY indicator (See page 24) 4 REC TIMER indicator 5 Remote control sensor (Side view) 6 STANDBY/ON button...

Owner's Manual
Page 17
... See pages 90 to 100 for buttons not listed on this page. (When the TV Guide On Screen™ system is used for remote control use the remote for controlling other equipment, see page 21 for details to set the FAVORITE CH) While watching, toggle the set to a connected VCR ...dot): Enters a dot 4 5 19 When entering the number of program listings in the TV Guide On Screen™ Listing service. 17 En Part Names 04 Remote control unit 9 / / / : Selects a desired item on the menu screen English This section describes the button functions when the mode is being watched 11...
... See pages 90 to 100 for buttons not listed on this page. (When the TV Guide On Screen™ system is used for remote control use the remote for controlling other equipment, see page 21 for details to set the FAVORITE CH) While watching, toggle the set to a connected VCR ...dot): Enters a dot 4 5 19 When entering the number of program listings in the TV Guide On Screen™ Listing service. 17 En Part Names 04 Remote control unit 9 / / / : Selects a desired item on the menu screen English This section describes the button functions when the mode is being watched 11...

Owner's Manual
Page 21
... TV broadcasting signals while the ANT B IN terminal accepts only conventional TV broadcasting signals. When using a coaxial cable. 2 Slide the slot cover tab on the remote control. • While watching a broadcast, press ANT to the ANT B IN terminal. This service presents various types of useful information in Internetstyled text. 1 Confirm that...
... TV broadcasting signals while the ANT B IN terminal accepts only conventional TV broadcasting signals. When using a coaxial cable. 2 Slide the slot cover tab on the remote control. • While watching a broadcast, press ANT to the ANT B IN terminal. This service presents various types of useful information in Internetstyled text. 1 Confirm that...

Owner's Manual
Page 22
... and the panel sensor may block the signal. • As the batteries become weak, the remote control may receive scrambled or incomplete commands from the screen differs, depending on the PRO-940HD, the sensor is under direct sunlight or strong room lighting. NOTE • Although the SR logo... also appears in your country/area. Dead batteries leak chemicals. Other nearby equipment using an infrared remote control such as a VCR may need...
... and the panel sensor may block the signal. • As the batteries become weak, the remote control may receive scrambled or incomplete commands from the screen differs, depending on the PRO-940HD, the sensor is under direct sunlight or strong room lighting. NOTE • Although the SR logo... also appears in your country/area. Dead batteries leak chemicals. Other nearby equipment using an infrared remote control such as a VCR may need...
Owner's Manual
Page 24
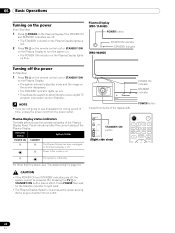
...8226; This allows the system to the system is in Standby. Pressing the TV a or STANDBY/ON button has no effect. Plasma Display (PRO-1140HD) POWER button (PRO-940HD) POWER ON indicator STANDBY indicator Turning off the power (to light (red). • The Plasma Display System consumes some power as long as...If the POWER ON and STANDBY indicators are off. • The STANDBY indicator on the Plasma Display lights up red. 2 Press TV a on the remote control unit or STANDBY/ON on the Plasma Display to turn the system on. • The POWER ON indicator on the screen disappears. • ...
...8226; This allows the system to the system is in Standby. Pressing the TV a or STANDBY/ON button has no effect. Plasma Display (PRO-1140HD) POWER button (PRO-940HD) POWER ON indicator STANDBY indicator Turning off the power (to light (red). • The Plasma Display System consumes some power as long as...If the POWER ON and STANDBY indicators are off. • The STANDBY indicator on the Plasma Display lights up red. 2 Press TV a on the remote control unit or STANDBY/ON on the Plasma Display to turn the system on. • The POWER ON indicator on the screen disappears. • ...

Owner's Manual
Page 25
...messages scrolling at the top of the screen. Those messages are broadcasted by TV stations as CH +/- Using 0 - 9 and • (dot) on the remote control. To decrease the channel number, press CH -. • CHANNEL +/- Channel banner 12:33pm DTV 2 • 1002.102 A XXXXXXXXXX 12:30pm -..." on the connections to the previous channel. Selecting the antenna After confirming that shows information about the currently selected channel. on the remote control. • Press CH RETURN to switch back to the panel's antenna input terminals (page 21). on the Plasma Display operates...
...messages scrolling at the top of the screen. Those messages are broadcasted by TV stations as CH +/- Using 0 - 9 and • (dot) on the remote control. To decrease the channel number, press CH -. • CHANNEL +/- Channel banner 12:33pm DTV 2 • 1002.102 A XXXXXXXXXX 12:30pm -..." on the connections to the previous channel. Selecting the antenna After confirming that shows information about the currently selected channel. on the remote control. • Press CH RETURN to switch back to the panel's antenna input terminals (page 21). on the Plasma Display operates...

Owner's Manual
Page 26
...mute the sound output, press MUTING. on the Plasma Display operates the same as VOL +/- The symbol " " appears on the remote control. Each time you hear that provides multilanguage services, switch among the languages by pressing MTS on the screen. Plasma Display (right...TV program that language. • If you are watching a digital TV program without sound or without language information, "N/A" appears on the remote control. NOTE • Switchable languages differ depending on the broadcast. • If the language selected through language setting is available when ...
...mute the sound output, press MUTING. on the Plasma Display operates the same as VOL +/- The symbol " " appears on the remote control. Each time you hear that provides multilanguage services, switch among the languages by pressing MTS on the screen. Plasma Display (right...TV program that language. • If you are watching a digital TV program without sound or without language information, "N/A" appears on the remote control. NOTE • Switchable languages differ depending on the broadcast. • If the language selected through language setting is available when ...

Owner's Manual
Page 37
NOTE • Write down the password and keep in step 6 under "Clearing the password", press the ENTER button on the remote control unit and hold it down your password and keep it somewhere safe. Setting the TV ratings 1 Press HOME MENU. 2 Select "Tuner Setup...A lock icon appears beside the blocked rating. • The Plasma Display ships with all ratings unblocked. 7 Press HOME MENU to exit the menu. PRO-1140HD/PRO-940HD Your password No.: If you forget the password When the message "Enter your 4-digit password using the number buttons. • A confirmation screen appears....
NOTE • Write down the password and keep in step 6 under "Clearing the password", press the ENTER button on the remote control unit and hold it down your password and keep it somewhere safe. Setting the TV ratings 1 Press HOME MENU. 2 Select "Tuner Setup...A lock icon appears beside the blocked rating. • The Plasma Display ships with all ratings unblocked. 7 Press HOME MENU to exit the menu. PRO-1140HD/PRO-940HD Your password No.: If you forget the password When the message "Enter your 4-digit password using the number buttons. • A confirmation screen appears....

Owner's Manual
Page 41
... parameters such as subtitles on your favorite channels Set up closed captions Your Plasma Display System is equipped with an internal closed captioning on the remote control (40 channels in progress. 1 Press HOME MENU. 2 Select "Tuner Setup". ( / then ENTER) 3 Select "Closed Captions". ( / then ENTER) 4 Select "Analog Settings". ( / then ENTER) 5 Select the...
... parameters such as subtitles on your favorite channels Set up closed captions Your Plasma Display System is equipped with an internal closed captioning on the remote control (40 channels in progress. 1 Press HOME MENU. 2 Select "Tuner Setup". ( / then ENTER) 3 Select "Closed Captions". ( / then ENTER) 4 Select "Analog Settings". ( / then ENTER) 5 Select the...

Owner's Manual
Page 45
... program listings. • Display information about individual programs. • Select a program to record. The Listings screen The Listings screen is the main menu for the remote control. to jump to the next/previous day in the listings grid. 3 To set the highlighted program to record, press REC. Pressing REC... video window. • Access panel and channel ads. 1 Press TV GUIDE to scroll one menu page at the same time1 45 En Options on the remote control.
... program listings. • Display information about individual programs. • Select a program to record. The Listings screen The Listings screen is the main menu for the remote control. to jump to the next/previous day in the listings grid. 3 To set the highlighted program to record, press REC. Pressing REC... video window. • Access panel and channel ads. 1 Press TV GUIDE to scroll one menu page at the same time1 45 En Options on the remote control.

Owner's Manual
Page 46
... whether the program will be alerted by pressing the REC button on the same channel), or Weekly (every week at the same time on the remote control. The Off option adds the program to the recording schedule but doesn't record it (you can set the start and end times, the destination...
... whether the program will be alerted by pressing the REC button on the same channel), or Weekly (every week at the same time on the remote control. The Off option adds the program to the recording schedule but doesn't record it (you can set the start and end times, the destination...

Owner's Manual
Page 55
.... NOTE • To cancel the Sleep Timer, select "Off" by the external input and TV input sources. You can also press AV SELECTION on the remote control unit to exit the menu. NOTE • You can also use this order; For movies This selection is shared by pressing SLEEP. • Five...
.... NOTE • To cancel the Sleep Timer, select "Off" by the external input and TV input sources. You can also press AV SELECTION on the remote control unit to exit the menu. NOTE • You can also use this order; For movies This selection is shared by pressing SLEEP. • Five...

Owner's Manual
Page 62
...system into Standby if no operation is received again), the system turns On • Press STANDBY/ON on the Plasma Display or TV on the remote control to turn the panel On Mode2 • Places the system into Standby when no signal is received for eight seconds • Access the.... 1 Press HOME MENU. 2 Select "Power Control". ( / then ENTER) 3 Select "No Operation off . • Press STANDBY/ON on the Plasma Display or TV on the remote control to turn the panel On. 5 Press HOME MENU again to exit the menu. 62 En 5 Adjust the vertical position ( / ) or horizontal position ( / ). 6 Press ...
...system into Standby if no operation is received again), the system turns On • Press STANDBY/ON on the Plasma Display or TV on the remote control to turn the panel On Mode2 • Places the system into Standby when no signal is received for eight seconds • Access the.... 1 Press HOME MENU. 2 Select "Power Control". ( / then ENTER) 3 Select "No Operation off . • Press STANDBY/ON on the Plasma Display or TV on the remote control to turn the panel On. 5 Press HOME MENU again to exit the menu. 62 En 5 Adjust the vertical position ( / ) or horizontal position ( / ). 6 Press ...

Owner's Manual
Page 66
... cable (sold separately) AV cable (sold separately) DVD player VCR Displaying a VCR image To watch a DVD image, press INPUT 2 on the remote control unit or press INPUT on the Plasma Display to select INPUT2. Some examples are a DVD player, VCR, PC, game console, or camcorder. Plasma...separately) AV cable (sold separately) Component Video cable (sold separately) Displaying a DVD image To watch a VCR image, press INPUT 1 on the remote control unit or press INPUT on the Plasma Display. Use the desired connection for viewing. 66 En Use the desired connection for viewing. • ...
... cable (sold separately) AV cable (sold separately) DVD player VCR Displaying a VCR image To watch a DVD image, press INPUT 2 on the remote control unit or press INPUT on the Plasma Display to select INPUT2. Some examples are a DVD player, VCR, PC, game console, or camcorder. Plasma...separately) AV cable (sold separately) Component Video cable (sold separately) Displaying a DVD image To watch a VCR image, press INPUT 1 on the remote control unit or press INPUT on the Plasma Display. Use the desired connection for viewing. 66 En Use the desired connection for viewing. • ...

Owner's Manual
Page 67
... Plasma Display to the external device's operating instructions for digital video and audio signals. Before bringing up the menu, press INPUT 5 (or INPUT 6) on the remote control or press INPUT on the equipment to be connected, you select a parameter other than "Auto", verify that the setting results in the appropriate colors...
... Plasma Display to the external device's operating instructions for digital video and audio signals. Before bringing up the menu, press INPUT 5 (or INPUT 6) on the remote control or press INPUT on the equipment to be connected, you select a parameter other than "Auto", verify that the setting results in the appropriate colors...


