

Owner's Manual
Page 2
...as newspapers, table-cloths, curtains) or by your outlet, consult an electrician for long periods of the obsolete outlet. 10) Protect the power cord from being walked on or pinched particularly at plugs, convenience receptacles, and the point where they exit from overheating. 1) Read these ... by direct connection to rain or moisture, does not operate normally, or has been dropped. This plug only fits a grounding-type power outlet. D3-4-2-1-7a_A_En 11) Only use of receiving analog basic, digital basic and digital premium cable television programming by the manufacturer, or...
...as newspapers, table-cloths, curtains) or by your outlet, consult an electrician for long periods of the obsolete outlet. 10) Protect the power cord from being walked on or pinched particularly at plugs, convenience receptacles, and the point where they exit from overheating. 1) Read these ... by direct connection to rain or moisture, does not operate normally, or has been dropped. This plug only fits a grounding-type power outlet. D3-4-2-1-7a_A_En 11) Only use of receiving analog basic, digital basic and digital premium cable television programming by the manufacturer, or...

Owner's Manual
Page 3
... OF CONFORMITY This device complies with Canadian ICES-003. Product Name: Plasma Display System Model Number: PRO-1140HD/PRO-940HD Product Category: Class B Personal Computers & Peripherals Responsible Party Name: PIONEER ELECTRONICS SERVICE, INC. Reorient or relocate the receiving antenna. - D8-10-1-2_En CAUTION: This product... PLEASE WRITE THIS SERIAL NUMBER ON YOUR ENCLOSED WARRANTY CARD AND KEEP IN A SECURE AREA. STANDBY: When placed into the power outlet. No operation can be performed when the indicator is no guarantee that to correct the interference by one or more of ...
... OF CONFORMITY This device complies with Canadian ICES-003. Product Name: Plasma Display System Model Number: PRO-1140HD/PRO-940HD Product Category: Class B Personal Computers & Peripherals Responsible Party Name: PIONEER ELECTRONICS SERVICE, INC. Reorient or relocate the receiving antenna. - D8-10-1-2_En CAUTION: This product... PLEASE WRITE THIS SERIAL NUMBER ON YOUR ENCLOSED WARRANTY CARD AND KEEP IN A SECURE AREA. STANDBY: When placed into the power outlet. No operation can be performed when the indicator is no guarantee that to correct the interference by one or more of ...

Owner's Manual
Page 4
.... In some countries or regions, the shape of the power plug and power outlet may sometimes differ from Falling Over 19 Attaching/detaching the PIONEER stand (for PRO-940HD only 20 08 Menu Setup Menu Configuration 34 AV mode menus 34 PC mode menus 34 Menu operations 34 Cable connections ... Control 37 Setting the voluntary movie rating system (MPAA 37 Setting the TV ratings 37 06 Basic Operations Turning on the power 24 Turning off the power 24 Watching TV channels 25 Selecting the antenna 25 Changing channels 25 Changing the volume and sound .........26 Changing the language...
.... In some countries or regions, the shape of the power plug and power outlet may sometimes differ from Falling Over 19 Attaching/detaching the PIONEER stand (for PRO-940HD only 20 08 Menu Setup Menu Configuration 34 AV mode menus 34 PC mode menus 34 Menu operations 34 Cable connections ... Control 37 Setting the voluntary movie rating system (MPAA 37 Setting the TV ratings 37 06 Basic Operations Turning on the power 24 Turning off the power 24 Watching TV channels 25 Selecting the antenna 25 Changing channels 25 Changing the volume and sound .........26 Changing the language...

Owner's Manual
Page 5
... type of conventional No Signal off (AV mode only 61 closed captions 41 No Operation off (AV mode only) ......... 62 Selecting digital closed captions ........ 42 Power Management Selecting digital closed caption (PC mode only 62 parameters 42 Image position adjustment Clock Setting 42 (AV mode only 62 10 TV Guide On...
... type of conventional No Signal off (AV mode only 61 closed captions 41 No Operation off (AV mode only) ......... 62 Selecting digital closed captions ........ 42 Power Management Selecting digital closed caption (PC mode only 62 parameters 42 Image position adjustment Clock Setting 42 (AV mode only 62 10 TV Guide On...

Owner's Manual
Page 7
... Important User Guidance Information English In order to obtain maximum enjoyment from this Pioneer PureVision PRO-1140HD/PRO-940HD Plasma Display Panel, please first read and follow the usage guidelines below. With the Pioneer PureVision PRO-1140HD/PRO-940HD, you can be avoided by side should be layered in possible malfunction..... • Do not invert the product. When the surrounding or internal temperature exceeds a certain degree, the display automatically powers OFF in color filter technology - NOTE The following points are typical effects and characteristics of time.
... Important User Guidance Information English In order to obtain maximum enjoyment from this Pioneer PureVision PRO-1140HD/PRO-940HD Plasma Display Panel, please first read and follow the usage guidelines below. With the Pioneer PureVision PRO-1140HD/PRO-940HD, you can be avoided by side should be layered in possible malfunction..... • Do not invert the product. When the surrounding or internal temperature exceeds a certain degree, the display automatically powers OFF in color filter technology - NOTE The following points are typical effects and characteristics of time.
Owner's Manual
Page 9
... time. A PRODUCT AND CART COMBINATION SHOULD BE MOVED WITH CARE. Image Retention When a static image is shown on or the input changed slightly when the power is automatically changed . NOTE • When a program menu, TV Guide screen or frozen image is displayed for 5 to 10 minutes, the system automatically turns the...
... time. A PRODUCT AND CART COMBINATION SHOULD BE MOVED WITH CARE. Image Retention When a static image is shown on or the input changed slightly when the power is automatically changed . NOTE • When a program menu, TV Guide screen or frozen image is displayed for 5 to 10 minutes, the system automatically turns the...

Owner's Manual
Page 10
...; Do not use can cause damage, which often requires correction by the manufacturer. Use of picture • Replacement parts must operate on a power source as follows: - To ensure your safety and prolong the service life of the Plasma Display Panel to perform as a bookcase or rack ... electrical shock and/or short internal parts. Use of each Plasma Display Panel is broken, avoid contact with caution. • Openings in installations. PRO-940HD - 31.7 kg (69.9 lbs.) (with the unit. Do not cover or block these vents and openings since material can cause overheating and...
...; Do not use can cause damage, which often requires correction by the manufacturer. Use of picture • Replacement parts must operate on a power source as follows: - To ensure your safety and prolong the service life of the Plasma Display Panel to perform as a bookcase or rack ... electrical shock and/or short internal parts. Use of each Plasma Display Panel is broken, avoid contact with caution. • Openings in installations. PRO-940HD - 31.7 kg (69.9 lbs.) (with the unit. Do not cover or block these vents and openings since material can cause overheating and...

Owner's Manual
Page 12
03 Supplied Accessories Supplied Accessories Power cord (2 m/6.6 feet) Cleaning cloth Operating instructions Speed clamp × 3 Bead band × 3 Warranty card G-LINK cable (3 m/9.8 feet) Ferrite core Remote control unit AA size battery x 2 (Alkaline battery for remote control unit) Hexagonal wrench x 1 (Diagonal size: 6 mm) (for PRO-940HD only) 12 En
03 Supplied Accessories Supplied Accessories Power cord (2 m/6.6 feet) Cleaning cloth Operating instructions Speed clamp × 3 Bead band × 3 Warranty card G-LINK cable (3 m/9.8 feet) Ferrite core Remote control unit AA size battery x 2 (Alkaline battery for remote control unit) Hexagonal wrench x 1 (Diagonal size: 6 mm) (for PRO-940HD only) 12 En

Owner's Manual
Page 13
Part Names Part Names Plasma Display Front/side view (PRO-1140HD) 11 12 13 14 1 1 a POWER button (See page 24) 2 POWER ON indicator (See page 24) 3 STANDBY indicator (See page 24) 4 REC TIMER indicator 5 Remote control sensor 04 English 6 7 8 9 10 2 3 4 5 (Side view) 6 STANDBY/ON button 7 INPUT ...
Part Names Part Names Plasma Display Front/side view (PRO-1140HD) 11 12 13 14 1 1 a POWER button (See page 24) 2 POWER ON indicator (See page 24) 3 STANDBY indicator (See page 24) 4 REC TIMER indicator 5 Remote control sensor 04 English 6 7 8 9 10 2 3 4 5 (Side view) 6 STANDBY/ON button 7 INPUT ...

Owner's Manual
Page 14
04 Part Names Front/side view (PRO-940HD) 11 12 13 14 6 7 8 9 10 2 3 4 1 Viewed from below of the display 5 Viewed from the front side of the display 1 a POWER button (See page 24) 2 POWER ON indicator (See page 24) 3 STANDBY indicator (See page 24) 4 REC TIMER indicator 5 Remote control sensor (Side view) 6 STANDBY/ON button 7 INPUT...
04 Part Names Front/side view (PRO-940HD) 11 12 13 14 6 7 8 9 10 2 3 4 1 Viewed from below of the display 5 Viewed from the front side of the display 1 a POWER button (See page 24) 2 POWER ON indicator (See page 24) 3 STANDBY indicator (See page 24) 4 REC TIMER indicator 5 Remote control sensor (Side view) 6 STANDBY/ON button 7 INPUT...

Owner's Manual
Page 23
...the 3 holes (42 inches: 2 holes) marked with a ground terminal is located on the upper edge of the compartment. Please attach them carefully. for PRO-1140HD for safety reasons. The clamp may deteriorate over time and become damaged if removed. 2 1 NOTE • Use the supplied speed clamps as necessary....so that the cord is not going to be difficult to twist the clamp 90º, pulling outward. Always connect the power cord to be used for PRO-940HD Speed clamp Speaker cable Attaching and removing speed clamps Insert [1] into an appropriate hole on the rear of the Plasma ...
...the 3 holes (42 inches: 2 holes) marked with a ground terminal is located on the upper edge of the compartment. Please attach them carefully. for PRO-1140HD for safety reasons. The clamp may deteriorate over time and become damaged if removed. 2 1 NOTE • Use the supplied speed clamps as necessary....so that the cord is not going to be difficult to twist the clamp 90º, pulling outward. Always connect the power cord to be used for PRO-940HD Speed clamp Speaker cable Attaching and removing speed clamps Insert [1] into an appropriate hole on the rear of the Plasma ...
Owner's Manual
Page 24
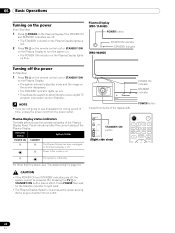
... indicators reflect the current status of the display (left). For other than the above, see "Troubleshooting"on . Plasma Display (PRO-1140HD) POWER button (PRO-940HD) POWER ON indicator STANDBY indicator Turning off the power (to Standby) 1 Press TV a on the remote control unit or STANDBY/ON on the Plasma Display. • The... screen disappears. • The STANDBY indicator lights up red. • This allows the system to turn the system on. • The POWER ON indicator on the Plasma Display lights up red. 2 Press TV a on the remote control unit or STANDBY/ON on the Plasma Display ...
... indicators reflect the current status of the display (left). For other than the above, see "Troubleshooting"on . Plasma Display (PRO-1140HD) POWER button (PRO-940HD) POWER ON indicator STANDBY indicator Turning off the power (to Standby) 1 Press TV a on the remote control unit or STANDBY/ON on the Plasma Display. • The... screen disappears. • The STANDBY indicator lights up red. • This allows the system to turn the system on. • The POWER ON indicator on the Plasma Display lights up red. 2 Press TV a on the remote control unit or STANDBY/ON on the Plasma Display ...

Owner's Manual
Page 30
... recording, reminders and more. As content providers move to the previous screens. Access the TV Guide On Screen™ setup menu from appearing upon power On. Welcome Screen Panel setup includes the TV Guide On Screen™ Welcome screen. NOTE • If you decide not to set up later...• Depending on right now or during the coming week. If you realize you to watching TV. • "Don't remind me again" is powered On for the location of Transcontinental, Inc. It also allows you entered incorrect information, continue with setup. It does not provide listings for the first...
... recording, reminders and more. As content providers move to the previous screens. Access the TV Guide On Screen™ setup menu from appearing upon power On. Welcome Screen Panel setup includes the TV Guide On Screen™ Welcome screen. NOTE • If you decide not to set up later...• Depending on right now or during the coming week. If you realize you to watching TV. • "Don't remind me again" is powered On for the location of Transcontinental, Inc. It also allows you entered incorrect information, continue with setup. It does not provide listings for the first...

Owner's Manual
Page 34
...Setup Menu Setup Menu Configuration AV mode menus Home Menu Picture Item AV Selection Contrast Brightness Color Tint Sharpness Pro Adjust Reset Sound Treble Bass Balance Reset FOCUS Front Surround Power Control Energy Save No Signal off No Operation off Sleep Timer Option Position Auto Size 4:3 Mode Side Mask...Page 55 56 56 56 56 56 56 Sound Treble 60 Bass 60 Balance 60 Reset 60 FOCUS 61 Front Surround 61 Power Control Energy Save 61 Power Management 62 Sleep Timer 55 Option Auto Setup 62 Manual Setup 63 Home Media Gallery 73 - 89 Menu operations The ...
...Setup Menu Setup Menu Configuration AV mode menus Home Menu Picture Item AV Selection Contrast Brightness Color Tint Sharpness Pro Adjust Reset Sound Treble Bass Balance Reset FOCUS Front Surround Power Control Energy Save No Signal off No Operation off Sleep Timer Option Position Auto Size 4:3 Mode Side Mask...Page 55 56 56 56 56 56 56 Sound Treble 60 Bass 60 Balance 60 Reset 60 FOCUS 61 Front Surround 61 Power Control Energy Save 61 Power Management 62 Sleep Timer 55 Option Auto Setup 62 Manual Setup 63 Home Media Gallery 73 - 89 Menu operations The ...

Owner's Manual
Page 42
... Service Digital Service Service 1 Service 2 Service 3 Service 4 Service 5 xxxxxxxxxxxxxxxxxxxxx xxxxxxxxxxxxxxxxxxxxx xxxxxxxxxxxxxxxxxxxxx Home Menu Exit • The factory default is lost (unplugged or power outage), the set the time. If power is "Service 1". 7 Press HOME MENU to exit the menu. If not specified by the provider are used . You can also manually set...
... Service Digital Service Service 1 Service 2 Service 3 Service 4 Service 5 xxxxxxxxxxxxxxxxxxxxx xxxxxxxxxxxxxxxxxxxxx xxxxxxxxxxxxxxxxxxxxx Home Menu Exit • The factory default is lost (unplugged or power outage), the set the time. If power is "Service 1". 7 Press HOME MENU to exit the menu. If not specified by the provider are used . You can also manually set...

Owner's Manual
Page 61
...ENTER) 3 Select "No Signal off (AV mode only) The system automatically enters Standby if no signal is received for most uses Save2 Lowest power consumption; To restore the screen display, press any button other than VOL +/- No Signal off ". ( / then ENTER) 4 Select "Enable...Press HOME MENU again to exit the menu. Energy Save There are three Energy Save modes to save power. slightly decreased brightness Picture Off Deactivates the screen to reduce power consumption. 1 Press HOME MENU. 2 Select "Power Control". ( / then ENTER) 3 Select "Energy Save". ( / then ENTER) 4 Select "Save1...
...ENTER) 3 Select "No Signal off (AV mode only) The system automatically enters Standby if no signal is received for most uses Save2 Lowest power consumption; To restore the screen display, press any button other than VOL +/- No Signal off ". ( / then ENTER) 4 Select "Enable...Press HOME MENU again to exit the menu. Energy Save There are three Energy Save modes to save power. slightly decreased brightness Picture Off Deactivates the screen to reduce power consumption. 1 Press HOME MENU. 2 Select "Power Control". ( / then ENTER) 3 Select "Energy Save". ( / then ENTER) 4 Select "Save1...

Owner's Manual
Page 62
... place the system into Standby (factory default) Enable Places the system into Standby if no signal is received for each minute counts down. Power Management (PC mode only) The system automatically enters Standby when no signal is received from the PC. 1 Press HOME MENU. 2 Select... and Settings No Operation off (AV mode only) The system automatically enters Standby when no operation is performed for three hours. 1 Press HOME MENU. 2 Select "Power Control". ( / then ENTER) 3 Select "No Operation off . • Press STANDBY/ON on the Plasma Display or TV on the remote control to turn ...
... place the system into Standby (factory default) Enable Places the system into Standby if no signal is received for each minute counts down. Power Management (PC mode only) The system automatically enters Standby when no signal is received from the PC. 1 Press HOME MENU. 2 Select... and Settings No Operation off (AV mode only) The system automatically enters Standby when no operation is performed for three hours. 1 Press HOME MENU. 2 Select "Power Control". ( / then ENTER) 3 Select "No Operation off . • Press STANDBY/ON on the Plasma Display or TV on the remote control to turn ...

Owner's Manual
Page 66
... connect many types of devices to the device's operating instructions (DVD player, PC, etc.) before adding to select INPUT1. To view images coming from the power outlet before connecting the equipment. NOTE • Refer to your DVD player instruction manual for viewing. • Connect external equipment to only terminals that are...
... connect many types of devices to the device's operating instructions (DVD player, PC, etc.) before adding to select INPUT1. To view images coming from the power outlet before connecting the equipment. NOTE • Refer to your DVD player instruction manual for viewing. • Connect external equipment to only terminals that are...

Owner's Manual
Page 72
...sure that the power is lowered temporarily. CONTROL IN OUT CONTROL IN OUT When SR+ is used : Use mono sound control cables with a PIONEER AV receiver. 12 Using External Equipment Connecting control cables Connect control cables between the Plasma Display and other equipment between the Pioneer units. &#...En NOTE • When connecting control cables, use the SR+ cable. • When connecting one or more information, see the Pioneer AV receiver's operating instructions regarding SR+ support. Point the remote control at the remote control sensor on the Plasma Display to the remote...
...sure that the power is lowered temporarily. CONTROL IN OUT CONTROL IN OUT When SR+ is used : Use mono sound control cables with a PIONEER AV receiver. 12 Using External Equipment Connecting control cables Connect control cables between the Plasma Display and other equipment between the Pioneer units. &#...En NOTE • When connecting control cables, use the SR+ cable. • When connecting one or more information, see the Pioneer AV receiver's operating instructions regarding SR+ support. Point the remote control at the remote control sensor on the Plasma Display to the remote...

Owner's Manual
Page 85
... Address" and "Subnet mask". • No need to enter "Default Gateway" and "DNS Server". 4 Enter the figures using buttons 0 to turn the last accessed server's power on if the server is WOL-compliant and is displayed on the dialog screen. • The setup finishes. • The system restarts then the Home...
... Address" and "Subnet mask". • No need to enter "Default Gateway" and "DNS Server". 4 Enter the figures using buttons 0 to turn the last accessed server's power on if the server is WOL-compliant and is displayed on the dialog screen. • The setup finishes. • The system restarts then the Home...

