

Owner's Manual
Page 3
...which can radiate radio frequency energy and, if not installed and used to connect the unit to radio communications. However, the Plasma Display System will not occur in a particular installation. CAUTION: Operating Environment Operating environment temperature and humidity: +0 ˚C to ...or direct sunlight (or strong artificial light) DOMINGUEZ ST. Product Name: Plasma Display System Model Number: PRO-1140HD/PRO-940HD Product Category: Class B Personal Computers & Peripherals Responsible Party Name: PIONEER ELECTRONICS SERVICE, INC. Phone: 800-421-1625 For Business Customer URL...
...which can radiate radio frequency energy and, if not installed and used to connect the unit to radio communications. However, the Plasma Display System will not occur in a particular installation. CAUTION: Operating Environment Operating environment temperature and humidity: +0 ˚C to ...or direct sunlight (or strong artificial light) DOMINGUEZ ST. Product Name: Plasma Display System Model Number: PRO-1140HD/PRO-940HD Product Category: Class B Personal Computers & Peripherals Responsible Party Name: PIONEER ELECTRONICS SERVICE, INC. Phone: 800-421-1625 For Business Customer URL...

Owner's Manual
Page 4
...countries or regions, the shape of the power plug and power outlet may sometimes differ from Falling Over 19 Attaching/detaching the PIONEER stand (for PRO-940HD only 20 08 Menu Setup Menu Configuration 34 AV mode menus 34 PC mode menus 34 Menu operations 34 Cable connections for... for skipping unwanted channels 35 Setting up the TV Guide On Screen™ 05 Preparation system 30 Installing the Plasma Display 18 Moving the Plasma Display 18 Preventing the Plasma Display from that shown in a safe place for future reference. Contents Contents Thank you for buying this manual...
...countries or regions, the shape of the power plug and power outlet may sometimes differ from Falling Over 19 Attaching/detaching the PIONEER stand (for PRO-940HD only 20 08 Menu Setup Menu Configuration 34 AV mode menus 34 PC mode menus 34 Menu operations 34 Cable connections for... for skipping unwanted channels 35 Setting up the TV Guide On Screen™ 05 Preparation system 30 Installing the Plasma Display 18 Moving the Plasma Display 18 Preventing the Plasma Display from that shown in a safe place for future reference. Contents Contents Thank you for buying this manual...

Owner's Manual
Page 7
... also eliminates the need for a glass panel to be layered in color filter technology - This feature which furthers Pioneer's goal of the Pioneer PRO-1140HD/PRO-940HD Plasma Display System will diminish very slowly, which happens to all other components). • Do not leave the same... circuit humming, glass panel buzzing, etc.) 7 En To ensure proper venting: • Distance the unit slightly from this Pioneer PureVision PRO-1140HD/PRO-940HD Plasma Display Panel, please first read and follow the usage guidelines below. NOTE The following points are typical effects and characteristics of ...
... also eliminates the need for a glass panel to be layered in color filter technology - This feature which furthers Pioneer's goal of the Pioneer PRO-1140HD/PRO-940HD Plasma Display System will diminish very slowly, which happens to all other components). • Do not leave the same... circuit humming, glass panel buzzing, etc.) 7 En To ensure proper venting: • Distance the unit slightly from this Pioneer PureVision PRO-1140HD/PRO-940HD Plasma Display Panel, please first read and follow the usage guidelines below. NOTE The following points are typical effects and characteristics of ...

Owner's Manual
Page 8
... cabinet of this product meets required specifications, the panel emits a small amount of time. Do not move the Plasma Display by holding only a single handle. Pioneer plasma display panels contain a very large number of ultra-precision technology and undergo individual quality control. Surrounding equipment with ...The screen is condensation can experience interference. All Pioneer plasma panels are visible at the rear of the Plasma Display • Do not remove the handles from the rear of the Plasma Display. • When moving the Plasma Display, ask another person for help and ...
... cabinet of this product meets required specifications, the panel emits a small amount of time. Do not move the Plasma Display by holding only a single handle. Pioneer plasma display panels contain a very large number of ultra-precision technology and undergo individual quality control. Surrounding equipment with ...The screen is condensation can experience interference. All Pioneer plasma panels are visible at the rear of the Plasma Display • Do not remove the handles from the rear of the Plasma Display. • When moving the Plasma Display, ask another person for help and ...
Owner's Manual
Page 9
... indicator or channel logo display for a long time may cause image retention. FOLLOW THE MANUFACTURER'S INSTRUCTIONS WHEN INSTALLING THE PRODUCT. This Plasma Display is automatically changed . If this happens, the menu will return to prevent damage from PC or TV game equipment, and/or... fill the entire screen with multiple wide-screen viewing modes; In most cases, the image retention can occur in all display technologies, including plasma and LCD. Warning: Displaying a still image on the broadcast content, some parts of a worry. The afterimages remaining on all phosphor-based...
... indicator or channel logo display for a long time may cause image retention. FOLLOW THE MANUFACTURER'S INSTRUCTIONS WHEN INSTALLING THE PRODUCT. This Plasma Display is automatically changed . If this happens, the menu will return to prevent damage from PC or TV game equipment, and/or... fill the entire screen with multiple wide-screen viewing modes; In most cases, the image retention can occur in all display technologies, including plasma and LCD. Warning: Displaying a still image on the broadcast content, some parts of a worry. The afterimages remaining on all phosphor-based...

Owner's Manual
Page 10
... product on an unstable cart, stand, tripod or table. If you to high voltage and other danger. • Upon completion of each Plasma Display Panel is not designed for repairs with qualified service personnel. • power cord or plug is broken, avoid contact with the glass shards...Improper adjustments can result in accidents. • Do not use the supplied cleaning cloth or other similar surface since insufficient ventilation can block the vents. PRO-940HD - 31.7 kg (69.9 lbs.) (with the unit. When mounting the product on safety. This product is as stated on a cart to fall...
... product on an unstable cart, stand, tripod or table. If you to high voltage and other danger. • Upon completion of each Plasma Display Panel is not designed for repairs with qualified service personnel. • power cord or plug is broken, avoid contact with the glass shards...Improper adjustments can result in accidents. • Do not use the supplied cleaning cloth or other similar surface since insufficient ventilation can block the vents. PRO-940HD - 31.7 kg (69.9 lbs.) (with the unit. When mounting the product on safety. This product is as stated on a cart to fall...

Owner's Manual
Page 11
.... • PIONEER shall not be liable for the installation: Rear view (PRO-1140HD) Side view Mounting surface Mounting hole Mounting hole Median line Plasma Display Mounting bracket (or equivalent item) M8 screw 12 mm to 18 mm (0.5 inches to 0.7 inches) Median line Rear view (PRO-940HD) Mounting hole ...8226; Consult your dealer to avoid warping the glass. • The diagrams above show the location of the Plasma Display. When using mounting items other than the optional PIONEER products. 11 En Holes other than those shown above . • Be careful not to block rear vents ...
.... • PIONEER shall not be liable for the installation: Rear view (PRO-1140HD) Side view Mounting surface Mounting hole Mounting hole Median line Plasma Display Mounting bracket (or equivalent item) M8 screw 12 mm to 18 mm (0.5 inches to 0.7 inches) Median line Rear view (PRO-940HD) Mounting hole ...8226; Consult your dealer to avoid warping the glass. • The diagrams above show the location of the Plasma Display. When using mounting items other than the optional PIONEER products. 11 En Holes other than those shown above . • Be careful not to block rear vents ...

Owner's Manual
Page 13
Part Names Part Names Plasma Display Front/side view (PRO-1140HD) 11 12 13 14 1 1 a POWER button (See page 24) 2 POWER ON indicator (See page 24) 3 STANDBY indicator (See page 24) 4 REC TIMER indicator 5 Remote ...
Part Names Part Names Plasma Display Front/side view (PRO-1140HD) 11 12 13 14 1 1 a POWER button (See page 24) 2 POWER ON indicator (See page 24) 3 STANDBY indicator (See page 24) 4 REC TIMER indicator 5 Remote ...

Owner's Manual
Page 17
..." starting on page 97. 10 REC: When using the remote control, aim it in Standby. 2 Transmission confirmation LED 3 INPUT: Selects an input source for the Plasma Display Panel. (INPUT 1, INPUT 2, INPUT 3, INPUT 4, INPUT 5, INPUT 6 and PC) 29 VOL +/-: Sets the volume 30 M MUTING: Mutes the sound 31 SHIFT: Moves ...the previous channel This button is disabled while the TV Guide On Screen™ system is displayed. 1 TV a: Turns ON the Plasma Display Panel or places it at the Plasma Display. • See pages 90 to 100 for buttons not listed on this page. (When the TV Guide On Screen™...
..." starting on page 97. 10 REC: When using the remote control, aim it in Standby. 2 Transmission confirmation LED 3 INPUT: Selects an input source for the Plasma Display Panel. (INPUT 1, INPUT 2, INPUT 3, INPUT 4, INPUT 5, INPUT 6 and PC) 29 VOL +/-: Sets the volume 30 M MUTING: Mutes the sound 31 SHIFT: Moves ...the previous channel This button is disabled while the TV Guide On Screen™ system is displayed. 1 TV a: Turns ON the Plasma Display Panel or places it at the Plasma Display. • See pages 90 to 100 for buttons not listed on this page. (When the TV Guide On Screen™...

Owner's Manual
Page 18
... thin and can be unstable when held upright. NOTE • Allow enough space around the installed Plasma Display Panel to avoid warping the glass components. (PRO-940HD) CAUTION When installing on a rack, etc., someone must move and install these panels. (PRO-1140HD) Location • Avoid direct sunlight. • Maintain adequate ventilation. • Because the...
... thin and can be unstable when held upright. NOTE • Allow enough space around the installed Plasma Display Panel to avoid warping the glass components. (PRO-940HD) CAUTION When installing on a rack, etc., someone must move and install these panels. (PRO-1140HD) Location • Avoid direct sunlight. • Maintain adequate ventilation. • Because the...

Owner's Manual
Page 19
... A weak installation site could fall -prevention bolts (hooks) to the composition and thickness of the panel. Please take these precautions, the Plasma Display could result in the diagram using screws that are 6 mm (1/4 inch) and at all times. consult a professional installer if necessary.... 19 En Inspect the mounting surface carefully to 5/8 inch) 6 mm (1/4 inch) M 8 Preventing the Plasma Display from your dealer or other hardware sources). 20 mm min. (13/16 inch min.) Using a wall for the other side of the surface ...
... A weak installation site could fall -prevention bolts (hooks) to the composition and thickness of the panel. Please take these precautions, the Plasma Display could result in the diagram using screws that are 6 mm (1/4 inch) and at all times. consult a professional installer if necessary.... 19 En Inspect the mounting surface carefully to 5/8 inch) 6 mm (1/4 inch) M 8 Preventing the Plasma Display from your dealer or other hardware sources). 20 mm min. (13/16 inch min.) Using a wall for the other side of the surface ...

Owner's Manual
Page 20
...and ➁ for reattaching the stand to avoid warping the glass components. 05 Preparation Attaching/detaching the PIONEER stand (for PRO-940HD only) The PRO-940HD comes with the bottom of the Plasma Display other than necessary. CAUTION • If mounting the panel on a flat, stable location to... the Plasma Display at the points indicated by detaching the stand. Detaching the stand 1 Loosen the two ...
...and ➁ for reattaching the stand to avoid warping the glass components. 05 Preparation Attaching/detaching the PIONEER stand (for PRO-940HD only) The PRO-940HD comes with the bottom of the Plasma Display other than necessary. CAUTION • If mounting the panel on a flat, stable location to... the Plasma Display at the points indicated by detaching the stand. Detaching the stand 1 Loosen the two ...

Owner's Manual
Page 21
...watching in the 2-screen mode (TV image and video image) with TV selected, press ANT to view the feed from below of the Tab Plasma Display) U/Vmixer 1 2 Coaxial 3 Insert the specified CableCARD™ completely into the antenna terminal at the rear of useful information in the... B To watch digital and/or conventional TV channels, connect to the ANT/CABLE A IN terminal as shown above. ANT/ CABLE A IN Plasma Display (rear) Cable TV Coaxial NOTE • Connect coaxial cables as shown. Preparation 05 English Cable connections for watching digital and/or conventional TV...
...watching in the 2-screen mode (TV image and video image) with TV selected, press ANT to view the feed from below of the Tab Plasma Display) U/Vmixer 1 2 Coaxial 3 Insert the specified CableCARD™ completely into the antenna terminal at the rear of useful information in the... B To watch digital and/or conventional TV channels, connect to the ANT/CABLE A IN terminal as shown above. ANT/ CABLE A IN Plasma Display (rear) Cable TV Coaxial NOTE • Connect coaxial cables as shown. Preparation 05 English Cable connections for watching digital and/or conventional TV...

Owner's Manual
Page 22
...Although the SR logo also appears in the lower right corner on the PRO-940HD, the sensor is under direct sunlight, the unit may deform. •...thoroughly with a clean cloth. • The batteries supplied with new ones if necessary. • The Plasma Display emits very weak infrared rays from its remote control. Dead batteries leak chemicals. If the remote ...dead batteries in a bright environment, try changing the signal angle or move the equipment away from the Plasma Display. • Depending on the image being displayed. 22 En 05 Preparation Preparing the remote control unit...
...Although the SR logo also appears in the lower right corner on the PRO-940HD, the sensor is under direct sunlight, the unit may deform. •...thoroughly with a clean cloth. • The batteries supplied with new ones if necessary. • The Plasma Display emits very weak infrared rays from its remote control. Dead batteries leak chemicals. If the remote ...dead batteries in a bright environment, try changing the signal angle or move the equipment away from the Plasma Display. • Depending on the image being displayed. 22 En 05 Preparation Preparing the remote control unit...

Owner's Manual
Page 23
... noise caused by the power source. neglecting this can result in place. for PRO-1140HD for PRO-940HD Speed clamp Speaker cable Attaching and removing speed clamps Insert [1] into an appropriate hole on the rear of the Plasma Display then snap [2] into the back of [1] to release once in fire ...or electric shock. • For the Plasma Display System, a three-core power cord with a ground...
... noise caused by the power source. neglecting this can result in place. for PRO-1140HD for PRO-940HD Speed clamp Speaker cable Attaching and removing speed clamps Insert [1] into an appropriate hole on the rear of the Plasma Display then snap [2] into the back of [1] to release once in fire ...or electric shock. • For the Plasma Display System, a three-core power cord with a ground...
Owner's Manual
Page 24
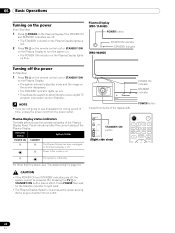
...NOTE • If you are off . Power to Standby) 1 Press TV a on the remote control unit or STANDBY/ON on the Plasma Display. • The system enters the standby mode and the image on the screen disappears. • The STANDBY indicator lights up blue. ... 24 En Panel indicators reflect the current status of the Plasma Display Panel. For other than the above, see "Troubleshooting"on . Viewed from below shows the operational status of the Plasma Display. Plasma Display (PRO-1140HD) POWER button (PRO-940HD) POWER ON indicator STANDBY indicator Turning off the power ...
...NOTE • If you are off . Power to Standby) 1 Press TV a on the remote control unit or STANDBY/ON on the Plasma Display. • The system enters the standby mode and the image on the screen disappears. • The STANDBY indicator lights up blue. ... 24 En Panel indicators reflect the current status of the Plasma Display Panel. For other than the above, see "Troubleshooting"on . Viewed from below shows the operational status of the Plasma Display. Plasma Display (PRO-1140HD) POWER button (PRO-940HD) POWER ON indicator STANDBY indicator Turning off the power ...

Owner's Manual
Page 25
on the Plasma Display operates the same as necessary when in the channel more quickly. • Each time you do not activate the TV Guide On Screen™ ... RETURN to switch back to the current channel. NOTE • When watching a digital TV program, you may not display certain types of program information. 06 Plasma Display (right side view) CHANNEL +/- To clear the channel banner, press INFO. • If you change a channel, a channel banner appears that the Mode switch on...
on the Plasma Display operates the same as necessary when in the channel more quickly. • Each time you do not activate the TV Guide On Screen™ ... RETURN to switch back to the current channel. NOTE • When watching a digital TV program, you may not display certain types of program information. 06 Plasma Display (right side view) CHANNEL +/- To clear the channel banner, press INFO. • If you change a channel, a channel banner appears that the Mode switch on...

Owner's Manual
Page 26
... press MTS, the language switches. 06 Basic Operations Changing the volume and sound To increase the volume, press VOL + on the screen. Plasma Display (right side view) VOLUME +/- Each time you hear that provides multilanguage services, switch among the languages by pressing MTS on the... Plasma Display operates the same as VOL +/- NOTE • Switchable languages differ depending on the broadcast. • If the language selected through ...
... press MTS, the language switches. 06 Basic Operations Changing the volume and sound To increase the volume, press VOL + on the screen. Plasma Display (right side view) VOLUME +/- Each time you hear that provides multilanguage services, switch among the languages by pressing MTS on the... Plasma Display operates the same as VOL +/- NOTE • Switchable languages differ depending on the broadcast. • If the language selected through ...

Owner's Manual
Page 27
... (STEREO) In SAP mode STEREO SAP MONO NOTE • The MTS button is disabled while the TV Guide On Screen™ system is selected, the Plasma Display sound remains mono even if the system receives a stereo broadcast. Basic Operations 06 English Setting MTS/SAP mode When watching conventional TV programs, use...
... (STEREO) In SAP mode STEREO SAP MONO NOTE • The MTS button is disabled while the TV Guide On Screen™ system is selected, the Plasma Display sound remains mono even if the system receives a stereo broadcast. Basic Operations 06 English Setting MTS/SAP mode When watching conventional TV programs, use...

Owner's Manual
Page 30
... return to automatically set up the TV Guide On Screen™ system it up . Setting up the TV Guide On Screen™ system When the Plasma Display is a registered mark of its affiliates. Listings can use the TV Guide On Screen™ system, you to the previous screens. NOTE • Once...
... return to automatically set up the TV Guide On Screen™ system it up . Setting up the TV Guide On Screen™ system When the Plasma Display is a registered mark of its affiliates. Listings can use the TV Guide On Screen™ system, you to the previous screens. NOTE • Once...


