Owner's Manual
Page 3
...: Get to Know Your Flat Panel Display 7 1.2.1 Control Buttons and More on the Flat Panel Display 7 1.2.2 Operating the Remote Control ...8 1.2.3 Buttons on purchasing a Pioneer Elite KURO monitor. This exclusive series of Elite KURO monitors does just that make the Elite KURO monitor one of the finest ...Save to change the way people feel about the many features and benefits that . The result of the best entertainment experiences possible. At Pioneer, everything we do is designed to alter perceptions, to shatter expectations, to Reduce Power Usage...29 4.2.7 Turn On the Sleep Timer......
...: Get to Know Your Flat Panel Display 7 1.2.1 Control Buttons and More on the Flat Panel Display 7 1.2.2 Operating the Remote Control ...8 1.2.3 Buttons on purchasing a Pioneer Elite KURO monitor. This exclusive series of Elite KURO monitors does just that make the Elite KURO monitor one of the finest ...Save to change the way people feel about the many features and benefits that . The result of the best entertainment experiences possible. At Pioneer, everything we do is designed to alter perceptions, to shatter expectations, to Reduce Power Usage...29 4.2.7 Turn On the Sleep Timer......
Owner's Manual
Page 4
... 46 6.1.1 Use the Learning Function ...46 6.1.2 Assign a Manufacturing Code to the Remote Control 47 6.1.3 Issue a Library Search for a Manufacturer Code 47 6.1.4 Clear Added Manufacturer Codes from the Remote Control 48 6.1.5 Control a Pioneer Receiver ...48 6.1.6 Control a Cable (CBL) or Satellite (SAT) System 49 ...Input Name...54 6.3.2 Specify the HDMI Input Type ...55 6.3.3 Specify a Digital HDMI Signal Type ...55 6.4 Control Equipment with the Panel's Remote Through HDMI 56 6.4.1 Control an AV System...58 6.4.2 Control a Recorder ...59 6.4.3 Control a Player...59 6.4.4 Add an AV Amp ...
... 46 6.1.1 Use the Learning Function ...46 6.1.2 Assign a Manufacturing Code to the Remote Control 47 6.1.3 Issue a Library Search for a Manufacturer Code 47 6.1.4 Clear Added Manufacturer Codes from the Remote Control 48 6.1.5 Control a Pioneer Receiver ...48 6.1.6 Control a Cable (CBL) or Satellite (SAT) System 49 ...Input Name...54 6.3.2 Specify the HDMI Input Type ...55 6.3.3 Specify a Digital HDMI Signal Type ...55 6.4 Control Equipment with the Panel's Remote Through HDMI 56 6.4.1 Control an AV System...58 6.4.2 Control a Recorder ...59 6.4.3 Control a Player...59 6.4.4 Add an AV Amp ...

Owner's Manual
Page 5
...-Image Lag 81 8.7 Prevent Burning ...82 8.8 Safety Precautions...83 8.9 Legal Notices...83 8.9.1 Safety...83 8.9.2 Radio Interference...84 9 Appendix ...85 9.1 Manufacturer Codes to Program into the Remote Control 85 9.1.1 Cable...85 9.1.2 Satellite...86 9.1.3 VCR ...88 9.1.4 BDP (Blu-ray) ...91 9.1.5 DVD-R ...92 9.1.6 DVD...93 9.1.7 LD...95 9.2 Video/PC Signals (HDMI/DVI/Component/min...
...-Image Lag 81 8.7 Prevent Burning ...82 8.8 Safety Precautions...83 8.9 Legal Notices...83 8.9.1 Safety...83 8.9.2 Radio Interference...84 9 Appendix ...85 9.1 Manufacturer Codes to Program into the Remote Control 85 9.1.1 Cable...85 9.1.2 Satellite...86 9.1.3 VCR ...88 9.1.4 BDP (Blu-ray) ...91 9.1.5 DVD-R ...92 9.1.6 DVD...93 9.1.7 LD...95 9.2 Video/PC Signals (HDMI/DVI/Component/min...

Owner's Manual
Page 6
...organization immediately. Identify the accessories from the appropriate list below. If an item is a list of all accessories shipped with both models Remote Control Batteries for Remote (2) Cleaning Cloth Power Cord (2 m/6.6 feet) Cable Clamps (4) Operating Instructions Certificate of this manual. 1.1 Flat Panel Display Shipment ..., please contact your panel. 01 Introduction to the Flat Panel Displays 1 Introduction to the Flat Panel Displays The Pioneer Flat Panel Display models include the 60-inch PRO-141FD and the 50-inch PRO-101FD (screen sizes measured diagonally).
...organization immediately. Identify the accessories from the appropriate list below. If an item is a list of all accessories shipped with both models Remote Control Batteries for Remote (2) Cleaning Cloth Power Cord (2 m/6.6 feet) Cable Clamps (4) Operating Instructions Certificate of this manual. 1.1 Flat Panel Display Shipment ..., please contact your panel. 01 Introduction to the Flat Panel Displays 1 Introduction to the Flat Panel Displays The Pioneer Flat Panel Display models include the 60-inch PRO-141FD and the 50-inch PRO-101FD (screen sizes measured diagonally).
Owner's Manual
Page 7
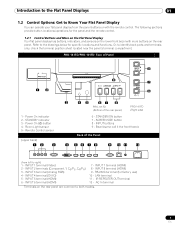
... the drawings below for factory use) 10 - Room Light sensor 5 - INPUT 8 terminal (HDMI) 9 - PRO-141FD/PRO-101FD: Face of the rear panel) PRO-141FD (Right side) 6 - STANDBY/ON button 7 - INPUT 1 terminal (Video) 2 - INPUT 4 terminal (DVI-D) 5 - Remote Control sensor (upper bank) 12 3 8 9 7 6 3 45 67 8 PRO-101FD (Bottom of Panel 1 2 1 - INPUT 5 terminal (HDMI) 6 - RS-232C terminal (for specific locations...
... the drawings below for factory use) 10 - Room Light sensor 5 - INPUT 8 terminal (HDMI) 9 - PRO-141FD/PRO-101FD: Face of the rear panel) PRO-141FD (Right side) 6 - STANDBY/ON button 7 - INPUT 1 terminal (Video) 2 - INPUT 4 terminal (DVI-D) 5 - Remote Control sensor (upper bank) 12 3 8 9 7 6 3 45 67 8 PRO-101FD (Bottom of Panel 1 2 1 - INPUT 5 terminal (HDMI) 6 - RS-232C terminal (for specific locations...

Owner's Manual
Page 8
...provided batteries with new alkaline batteries. The batteries supplied with governmental regulations or environmental public institution's rules that apply in your remote control while later sections explore more advanced operations. When disposing of used batteries, please comply with this product may have ...the flat panel display is a powerful tool. This section provides a brief introduction to the Flat Panel Displays 1.2.2 Operating the Remote Control The remote control for an extended length of the arrows. 01 Introduction to your country/area. 8 En Load the supplied two AA...
...provided batteries with new alkaline batteries. The batteries supplied with governmental regulations or environmental public institution's rules that apply in your remote control while later sections explore more advanced operations. When disposing of used batteries, please comply with this product may have ...the flat panel display is a powerful tool. This section provides a brief introduction to the Flat Panel Displays 1.2.2 Operating the Remote Control The remote control for an extended length of the arrows. 01 Introduction to your country/area. 8 En Load the supplied two AA...
Owner's Manual
Page 9
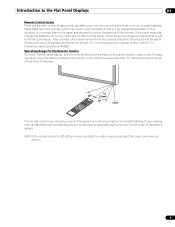
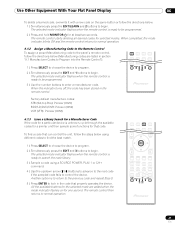
... closer to the panel and attempt to control the panel with your viewing room is weak batteries. For easy operation, keep the distance between the remote control and the sensor less than 7 m (23 feet) and at an angle of issues that can cause communication to fail or only operate ...sporadically. In this situation, try moving closer has no effect on the panel, check the surroundings for the Remote Control To control the flat panel display, point the remote towards the sensor on the panel's bottom right corner. Introduction to the Flat Panel Displays 01...
... closer to the panel and attempt to control the panel with your viewing room is weak batteries. For easy operation, keep the distance between the remote control and the sensor less than 7 m (23 feet) and at an angle of issues that can cause communication to fail or only operate ...sporadically. In this situation, try moving closer has no effect on the panel, check the surroundings for the Remote Control To control the flat panel display, point the remote towards the sensor on the panel's bottom right corner. Introduction to the Flat Panel Displays 01...
Owner's Manual
Page 10
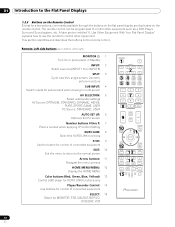
.... Use Other Equipment With Your Flat Panel Display" explains how to use the remote to control other equipment such as a DVD Player, Surround Sound system, etc. A later section entitled "6. Remote: Left side buttons (top to bottom, left to right) MONITOR : 1 Turn On or place panel in Standby INPUT: 2 Select a... FAVORITE 14 SOURCE RETURN DVD/HDD RECEIVER VOL INPUT SELECT BDP EDIT/LEARN 15MONITOR STB LD VCR CBL DVD SAT DVR 10 En The remote control can be programmed to the normal screen Arrow buttons: 11 Navigate the menu screens HOME MENU/MENU: 12 Display the HOME MENU ...
.... Use Other Equipment With Your Flat Panel Display" explains how to use the remote to control other equipment such as a DVD Player, Surround Sound system, etc. A later section entitled "6. Remote: Left side buttons (top to bottom, left to right) MONITOR : 1 Turn On or place panel in Standby INPUT: 2 Select a... FAVORITE 14 SOURCE RETURN DVD/HDD RECEIVER VOL INPUT SELECT BDP EDIT/LEARN 15MONITOR STB LD VCR CBL DVD SAT DVR 10 En The remote control can be programmed to the normal screen Arrow buttons: 11 Navigate the menu screens HOME MENU/MENU: 12 Display the HOME MENU ...
Owner's Manual
Page 11
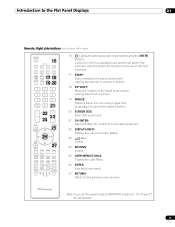
Use this button for remote control use in dimly lit locations. 17 SWAP: Switch between the two screens when viewing as 2-screen or picture-in-picture 18 PIP SHIFT: Move ... (except arrow buttons and the ENTER button) Lights turn off if no operations are performed within five seconds. Introduction to the Flat Panel Displays 01 Remote: Right side buttons (top to bottom, left to MONITOR, buttons 9, 13, 14 and 21 do not operate. 11 En
Use this button for remote control use in dimly lit locations. 17 SWAP: Switch between the two screens when viewing as 2-screen or picture-in-picture 18 PIP SHIFT: Move ... (except arrow buttons and the ENTER button) Lights turn off if no operations are performed within five seconds. Introduction to the Flat Panel Displays 01 Remote: Right side buttons (top to bottom, left to MONITOR, buttons 9, 13, 14 and 21 do not operate. 11 En
Owner's Manual
Page 21
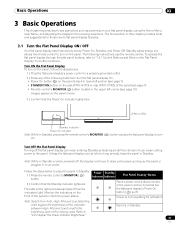
... steps below . 1 ) Plug the flat panel display's power cord in to a properly grounded outlet. 2 ) Press any of the following instructions use the remote control. Power Standby Indicator Indicator Flat Panel Display Status Panel's power cord is disconnected or the power cord is connected but waiting for the viewing...sit idle for long periods, leave the panel in the upper left section (see page 7) • STANDBY/ON button on the side (PRO-141FD) or rear (PRO-101FD) of the panel to check the power status. The table to the right provides samples of the viewing area. Basic Operations 03 3...
... steps below . 1 ) Plug the flat panel display's power cord in to a properly grounded outlet. 2 ) Press any of the following instructions use the remote control. Power Standby Indicator Indicator Flat Panel Display Status Panel's power cord is disconnected or the power cord is connected but waiting for the viewing...sit idle for long periods, leave the panel in the upper left section (see page 7) • STANDBY/ON button on the side (PRO-141FD) or rear (PRO-101FD) of the panel to check the power status. The table to the right provides samples of the viewing area. Basic Operations 03 3...
Owner's Manual
Page 22
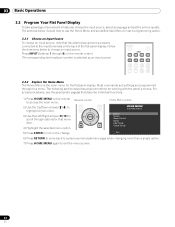
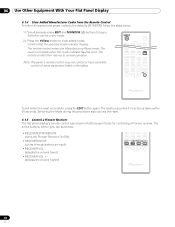
...The sections below to exit the menu screen. 22 En Most commands and settings are programmed through 8) on the remote control. MENU 5) Press ENTER to the input terminals on the remote to access the main menu. 2) Use the Up/Down arrows (/) to highlight a menu item. ...61548;) to scroll through options for each programming option. 3.2.1 Choose an Input Source To choose an input source, note that menu item. Remote control EXIT TOP MENU GUIDE HOME MENU ENTER 4) Highlight the selected menu option. Press INPUT (buttons 1 through this menu. Follow the directions...
...The sections below to exit the menu screen. 22 En Most commands and settings are programmed through 8) on the remote control. MENU 5) Press ENTER to the input terminals on the remote to access the main menu. 2) Use the Up/Down arrows (/) to highlight a menu item. ...61548;) to scroll through options for each programming option. 3.2.1 Choose an Input Source To choose an input source, note that menu item. Remote control EXIT TOP MENU GUIDE HOME MENU ENTER 4) Highlight the selected menu option. Press INPUT (buttons 1 through this menu. Follow the directions...
Owner's Manual
Page 23
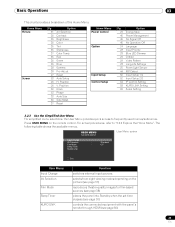
... 38 38 27 53 26 26 53 53 33 36 37 Option AV Selection Contrast Brightness Color Tint Sharpness Color Temp Red Green Blue Gamma Pro Adjust Reset Auto Setup H. Position Clock Phase Auto Size Side Mask Reset Home Menu Power Control Option Input Setup Control Setup Pg 29 45 ... User Menu Input Change AV Selection Film Mode Sleep Timer KURO LINK Function switches external input sources selects from eight viewing modes depending on the remote control. Position V. Press USER MENU on the picture (see page 31) reproduces theatre-quality images for film-based sources (see page 38) places the ...
... 38 38 27 53 26 26 53 53 33 36 37 Option AV Selection Contrast Brightness Color Tint Sharpness Color Temp Red Green Blue Gamma Pro Adjust Reset Auto Setup H. Position Clock Phase Auto Size Side Mask Reset Home Menu Power Control Option Input Setup Control Setup Pg 29 45 ... User Menu Input Change AV Selection Film Mode Sleep Timer KURO LINK Function switches external input sources selects from eight viewing modes depending on the remote control. Position V. Press USER MENU on the picture (see page 31) reproduces theatre-quality images for film-based sources (see page 38) places the ...

Owner's Manual
Page 29
... -image ghosts or burnin. Basic Picture Adjustment 04 4.2.4 Turn On the Image Orbiter A built-in feature to protect against burn-in is on, only the remote's MONITOR (a) button and the panel's STANDBY/ON button are available. To cancel the Video Pattern screen, press the...
... -image ghosts or burnin. Basic Picture Adjustment 04 4.2.4 Turn On the Image Orbiter A built-in feature to protect against burn-in is on, only the remote's MONITOR (a) button and the panel's STANDBY/ON button are available. To cancel the Video Pattern screen, press the...
Owner's Manual
Page 31
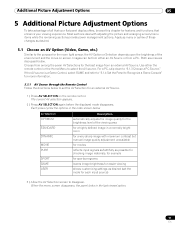
...MOVIE PURE SPORT GAME USER Description automatically adjusts the image quality for the brightness level of the environment and the movie on the remote control. Most sections deal with maximum contrast but manual image quality adjustment unavailable for movies reflects input signals as faithfully as possible...a Game Control, select GAME and refer to "5.1.4 Set the Panel to Recognize a Game Console" for more information. 5.1.1 AV Source through the Remote Control Follow the directions below to set the mode for each input source) 3 ) Allow the AV Selection screen to the purpose for the room...
...MOVIE PURE SPORT GAME USER Description automatically adjusts the image quality for the brightness level of the environment and the movie on the remote control. Most sections deal with maximum contrast but manual image quality adjustment unavailable for movies reflects input signals as faithfully as possible...a Game Control, select GAME and refer to "5.1.4 Set the Panel to Recognize a Game Console" for more information. 5.1.1 AV Source through the Remote Control Follow the directions below to set the mode for each input source) 3 ) Allow the AV Selection screen to the purpose for the room...
Owner's Manual
Page 34
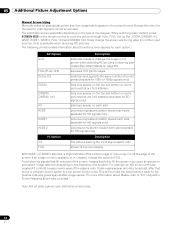
... program is available when receiving HD pictures. If side masks appear around a broadcast, after -image issues. While watching video content, press SCREEN SIZE on the remote control to a full screen motion video. This action helps the panel balance wear for the plasma cells and guard against after that fail to FULL...
... program is available when receiving HD pictures. If side masks appear around a broadcast, after -image issues. While watching video content, press SCREEN SIZE on the remote control to a full screen motion video. This action helps the panel balance wear for the plasma cells and guard against after that fail to FULL...

Owner's Manual
Page 43
... display can show multiple screens at the same time; The pictures may be reversed (in 2-screen and P-in-P) or moved to various locations on the remote control. To move the Picture-In-Picture (P-in -picture, and single-screen views. Each press of the button cycles the screen through two-screen, picture...
... display can show multiple screens at the same time; The pictures may be reversed (in 2-screen and P-in-P) or moved to various locations on the remote control. To move the Picture-In-Picture (P-in -picture, and single-screen views. Each press of the button cycles the screen through two-screen, picture...
Owner's Manual
Page 45
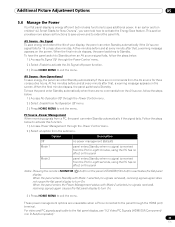
At five minutes before and at every minute after that , a warning message appears on the panel Notes: Pressing the remote's MONITOR (a) button or the panel's STANDBY/ON button reactivates the flat panel display. Non-Operational To save additional power. No Signal To save power and ...
At five minutes before and at every minute after that , a warning message appears on the panel Notes: Pressing the remote's MONITOR (a) button or the panel's STANDBY/ON button reactivates the flat panel display. Non-Operational To save additional power. No Signal To save power and ...

Owner's Manual
Page 46
... code. When you press SELECT 2 cm to 5 cm (0.8 inches to 2.0 inches) Code transmission finishes in approximately two seconds. Remote control (Supplied accessory) Remote control of the receiver buttons (a, INPUT, or VOL+/-), the learned manufacturer code remains the same. The mode indicator lights up. These... codes are available in the section entitled "Manufacturer Codes to Program into the Remote Control" in 30 seconds and the indicator begins blinking again. To set the Learning function to On, follow the directions below....
... code. When you press SELECT 2 cm to 5 cm (0.8 inches to 2.0 inches) Code transmission finishes in approximately two seconds. Remote control (Supplied accessory) Remote control of the receiver buttons (a, INPUT, or VOL+/-), the learned manufacturer code remains the same. The mode indicator lights up. These... codes are available in the section entitled "Manufacturer Codes to Program into the Remote Control" in 30 seconds and the indicator begins blinking again. To set the Learning function to On, follow the directions below....
Owner's Manual
Page 47
... buttons for the selected mode are listed in the remote control. 1 2 3 4 5 6 7 8 SUB PIP INPUT SELECT BDP EDIT/LEARN MONITOR STB LD VCR CBL DVD SAT DVR Factory default manufacture codes: STB (Set-top Box): Pioneer (0329) BDP/LD/DVD/DVR: Pioneer (2052) VCR (VTR): Pioneer (0058) 6.1.3 Issue a Library Search for a Manufacturer Code If the...
... buttons for the selected mode are listed in the remote control. 1 2 3 4 5 6 7 8 SUB PIP INPUT SELECT BDP EDIT/LEARN MONITOR STB LD VCR CBL DVD SAT DVR Factory default manufacture codes: STB (Set-top Box): Pioneer (0329) BDP/LD/DVD/DVR: Pioneer (2052) VCR (VTR): Pioneer (0058) 6.1.3 Issue a Library Search for a Manufacturer Code If the...
Owner's Manual
Page 48
...codes. The reset is taken within 60 seconds. Switching the Mode during this procedure also cancels the reset. 6.1.5 Control a Pioneer Receiver The flat panel display's remote control has a bank of some equipment listed in any mode. 2 ) Press the Yellow button to normal operation. Selection... Reset mode. 06 Use Other Equipment With Your Flat Panel Display 6.1.4 Clear Added Manufacturer Codes from the Remote Control To return all learned and preset codes to the defaults (PIONEER), follow the steps below. 1 ) Simultaneously press EDIT and MONITOR () buttons to right, are ...
...codes. The reset is taken within 60 seconds. Switching the Mode during this procedure also cancels the reset. 6.1.5 Control a Pioneer Receiver The flat panel display's remote control has a bank of some equipment listed in any mode. 2 ) Press the Yellow button to normal operation. Selection... Reset mode. 06 Use Other Equipment With Your Flat Panel Display 6.1.4 Clear Added Manufacturer Codes from the Remote Control To return all learned and preset codes to the defaults (PIONEER), follow the steps below. 1 ) Simultaneously press EDIT and MONITOR () buttons to right, are ...


