Owner's Manual
Page 3
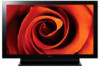
... designed to excel under the most demanding situations, to be fully customizable to the most particular tastes and to learn about sight and sound. TABLE OF CONTENTS 1 Introduction to the Flat Panel Displays 6 1.1 Flat Panel Display Shipment Checklist ...6 1.2 Control Options: Get to... Flat Panel Display 7 1.2.1 Control Buttons and More on the Flat Panel Display 7 1.2.2 Operating the Remote Control ...8 1.2.3 Buttons on purchasing a Pioneer Elite KURO monitor. This exclusive series of seeing and hearing like never before. The result of a special limited run created for New Owners ...28...
... designed to excel under the most demanding situations, to be fully customizable to the most particular tastes and to learn about sight and sound. TABLE OF CONTENTS 1 Introduction to the Flat Panel Displays 6 1.1 Flat Panel Display Shipment Checklist ...6 1.2 Control Options: Get to... Flat Panel Display 7 1.2.1 Control Buttons and More on the Flat Panel Display 7 1.2.2 Operating the Remote Control ...8 1.2.3 Buttons on purchasing a Pioneer Elite KURO monitor. This exclusive series of seeing and hearing like never before. The result of a special limited run created for New Owners ...28...
Owner's Manual
Page 4
... Code to the Remote Control 47 6.1.3 Issue a Library Search for a Manufacturer Code 47 6.1.4 Clear Added Manufacturer Codes from the Remote Control 48 6.1.5 Control a Pioneer Receiver ...48 6.1.6 Control a Cable (CBL) or Satellite (SAT) System 49 6.1.7 Control a Video Cassette Recorder (VCR) ...50 6.1.8 Control a DVD Player/......59 6.4.3 Control a Player...59 6.4.4 Add an AV Amp or a BD Player...60 6.5 Specific KURO LINK Commands ...61 6.5.1 Play Source Sound Using an HDMI Command 61 6.5.2 Turn OFF the Power With an HDMI Command 61 6.5.3 Turn ON the Power With an HDMI Command...61 6.5.4...
... Code to the Remote Control 47 6.1.3 Issue a Library Search for a Manufacturer Code 47 6.1.4 Clear Added Manufacturer Codes from the Remote Control 48 6.1.5 Control a Pioneer Receiver ...48 6.1.6 Control a Cable (CBL) or Satellite (SAT) System 49 6.1.7 Control a Video Cassette Recorder (VCR) ...50 6.1.8 Control a DVD Player/......59 6.4.3 Control a Player...59 6.4.4 Add an AV Amp or a BD Player...60 6.5 Specific KURO LINK Commands ...61 6.5.1 Play Source Sound Using an HDMI Command 61 6.5.2 Turn OFF the Power With an HDMI Command 61 6.5.3 Turn ON the Power With an HDMI Command...61 6.5.4...
Owner's Manual
Page 10
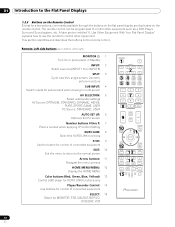
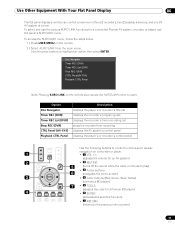
... section entitled "6. Use Other Equipment With Your Flat Panel Display" explains how to use the remote to control other equipment such as a DVD Player, Surround Sound system, etc. Remote: Left side buttons (top to bottom, left to right) MONITOR : 1 Turn On or place panel in Standby INPUT: 2 Select a source (INPUT...
... section entitled "6. Use Other Equipment With Your Flat Panel Display" explains how to use the remote to control other equipment such as a DVD Player, Surround Sound system, etc. Remote: Left side buttons (top to bottom, left to right) MONITOR : 1 Turn On or place panel in Standby INPUT: 2 Select a source (INPUT...
Owner's Manual
Page 57
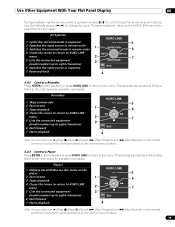
... ) Press USER MENU on a recorder or player. 1 • 1 VOL +/- (adjusts the volume for an AV system) 2 • 2 MUTING 5 (turns off the sound while the video continues to play) • 3 Arrow buttons 6 (navigates the menu screen) 3 • 4 Color buttons (Red, Green, Blue, Yellow) (controls a BD... player) 7 • 5 TOOLS (assigns the code for a connected Pioneer AV system, recorder, or player, use the panel's KURO LINK menu. Disc Navigator Timer REC (DVR) Timer REC List (DVR) Stop REC (DVR) CTRL ...
... ) Press USER MENU on a recorder or player. 1 • 1 VOL +/- (adjusts the volume for an AV system) 2 • 2 MUTING 5 (turns off the sound while the video continues to play) • 3 Arrow buttons 6 (navigates the menu screen) 3 • 4 Color buttons (Red, Green, Blue, Yellow) (controls a BD... player) 7 • 5 TOOLS (assigns the code for a connected Pioneer AV system, recorder, or player, use the panel's KURO LINK menu. Disc Navigator Timer REC (DVR) Timer REC List (DVR) Stop REC (DVR) CTRL ...
Owner's Manual
Page 58
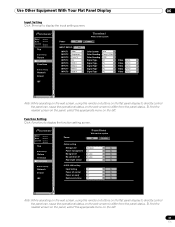
... set for KURO LINK. 4 ) Check that selected in Input Setting, the system malfunctions. KURO LINK Setting Input Setting : Power Off Control : Power On Ready : Hold Sound Status : INPUT 5 Off Off Off Power On Test Power Off Test 3 ) Select the desired Input (INPUT 5, INPUT 6, INPUT 7, or INPUT 8). 4 ) Press EXIT to suit the...
... set for KURO LINK. 4 ) Check that selected in Input Setting, the system malfunctions. KURO LINK Setting Input Setting : Power Off Control : Power On Ready : Hold Sound Status : INPUT 5 Off Off Off Power On Test Power Off Test 3 ) Select the desired Input (INPUT 5, INPUT 6, INPUT 7, or INPUT 8). 4 ) Press EXIT to suit the...
Owner's Manual
Page 59
... 4 Closes the screen to return to KURO LINK menu 5 Lists the connected equipment (model number/up /down arrows (/) to cycle through the surround sound options. Refer to Players.
... 4 Closes the screen to return to KURO LINK menu 5 Lists the connected equipment (model number/up /down arrows (/) to cycle through the surround sound options. Refer to Players.
Owner's Manual
Page 61
.... This section provides steps for the devices connected to exit the menu. 6.5.3 Turn ON the Power With an HDMI Command The panel ships from a Pioneer AV System through the flat panel display, placing the panel in error, it can be reactivated. To power on the panel. 4 ) Press EXIT ...to stop. To power off in Standby causes the sound to exit the menu. 61 En To have another device power-on the flat panel display automatically when a connected Pioneer recorder or player is coming from the factory with your flat panel display, some options include...
.... This section provides steps for the devices connected to exit the menu. 6.5.3 Turn ON the Power With an HDMI Command The panel ships from a Pioneer AV System through the flat panel display, placing the panel in error, it can be reactivated. To power on the panel. 4 ) Press EXIT ...to stop. To power off in Standby causes the sound to exit the menu. 61 En To have another device power-on the flat panel display automatically when a connected Pioneer recorder or player is coming from the factory with your flat panel display, some options include...

Owner's Manual
Page 64
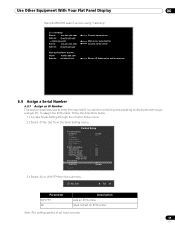
... Setting IP Control DHCP IP Address Subnet Mask Default Gateway MAC Address LED KURO LINK Setting Input Setting Power Off Control Power On Ready Hold Sound Status Power On Test Power Off Test Serial Setting ID No. Confirm the IP Address Enter DHCP, IP Address, Subnet Mask, Default Gateway and LED...
... Setting IP Control DHCP IP Address Subnet Mask Default Gateway MAC Address LED KURO LINK Setting Input Setting Power Off Control Power On Ready Hold Sound Status Power On Test Power Off Test Serial Setting ID No. Confirm the IP Address Enter DHCP, IP Address, Subnet Mask, Default Gateway and LED...
Owner's Manual
Page 67
... : Disable Set Room light sensor : Off Set KURO LINK setting Input Setting : Off Set Power off control : Off Set Power on ready : Off Set Hold sound status : Off Set Note: While operating on the web screen, using the remote or buttons on the flat panel display to directly control the panel...
... : Disable Set Room light sensor : Off Set KURO LINK setting Input Setting : Off Set Power off control : Off Set Power on ready : Off Set Hold sound status : Off Set Note: While operating on the web screen, using the remote or buttons on the flat panel display to directly control the panel...
Owner's Manual
Page 69
... Setting IP Control : DHCP : IP Address Subnet Mask Default Gateway MAC Address LED : KURO LINK Setting Input Setting : Power Off Control : Power On Ready : Hold Sound Status : Power On Test Power Off Test Serial Setting ID No.Set : Baud Rate : Disable On On Off Off Off Off All 9600bps Exit 3 ) Select...
... Setting IP Control : DHCP : IP Address Subnet Mask Default Gateway MAC Address LED : KURO LINK Setting Input Setting : Power Off Control : Power On Ready : Hold Sound Status : Power On Test Power Off Test Serial Setting ID No.Set : Baud Rate : Disable On On Off Off Off Off All 9600bps Exit 3 ) Select...
Owner's Manual
Page 78
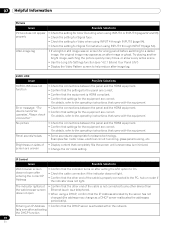
... -image lag. No picture • Check the connections between the panel and the HDMI equipment. • Confirm that came with the equipment. Panel sounds/noises • Some sounds are correct. The indicator lights but the web browser screen does not open after entering the correct IP Address • Confirm that the indicator...
... -image lag. No picture • Check the connections between the panel and the HDMI equipment. • Confirm that came with the equipment. Panel sounds/noises • Some sounds are correct. The indicator lights but the web browser screen does not open after entering the correct IP Address • Confirm that the indicator...
Owner's Manual
Page 81
... small quantity • Noises generated by a cooling fan motor speeding up when the panel's ambient temperature rises. This principle may hear the sound of seconds. This is three times as long as the game or PC image was on the screen. • View full-motion video ... bars). The size of the panel determines the number of pixels. With the PRO-141FD/PRO-101FD, there are typical effects and characteristics of ultra-precision technology and undergo individual quality control. 81 En All Pioneer display panels are not covered by many different situations. Extensive viewing of the panel...
... small quantity • Noises generated by a cooling fan motor speeding up when the panel's ambient temperature rises. This principle may hear the sound of seconds. This is three times as long as the game or PC image was on the screen. • View full-motion video ... bars). The size of the panel determines the number of pixels. With the PRO-141FD/PRO-101FD, there are typical effects and characteristics of ultra-precision technology and undergo individual quality control. 81 En All Pioneer display panels are not covered by many different situations. Extensive viewing of the panel...


