Owner's Manual
Page 4
... for a Manufacturer Code 47 6.1.4 Clear Added Manufacturer Codes from the Remote Control 48 6.1.5 Control a Pioneer Receiver ...48 6.1.6 Control a Cable (CBL) or Satellite (SAT) System 49 6.1.7 Control a Video Cassette Recorder (VCR) ...50 6.1.8 Control a DVD Player/DVR Recorder/BD Player 51 6.2 Apply Settings for Other ... HDMI Command...61 6.5.4 Test the Power Control (On/Off) ...62 6.6 Connect a Game Console or Camcorder ...62 6.7 Use the IR REPEATER OUT ...62 6.8 Connect to a Network ...63 6.8.1 IP Control Setting ...64 6.8.2 Use the Web Control System...65 6.9 Assign a Serial Number......
... for a Manufacturer Code 47 6.1.4 Clear Added Manufacturer Codes from the Remote Control 48 6.1.5 Control a Pioneer Receiver ...48 6.1.6 Control a Cable (CBL) or Satellite (SAT) System 49 6.1.7 Control a Video Cassette Recorder (VCR) ...50 6.1.8 Control a DVD Player/DVR Recorder/BD Player 51 6.2 Apply Settings for Other ... HDMI Command...61 6.5.4 Test the Power Control (On/Off) ...62 6.6 Connect a Game Console or Camcorder ...62 6.7 Use the IR REPEATER OUT ...62 6.8 Connect to a Network ...63 6.8.1 IP Control Setting ...64 6.8.2 Use the Web Control System...65 6.9 Assign a Serial Number......
Owner's Manual
Page 10
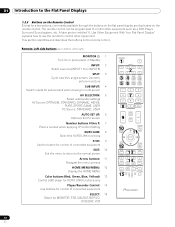
... equipment such as a DVD Player, Surround Sound system, etc. This section identifies and describes the buttons on the remote control. The remote control can be programmed to control other equipment. Remote: Left side buttons (top to bottom, left to right) MONITOR : 1 Turn On or place panel in...SET UP: 6 Optimize the PC screen Number buttons 0 thru 9: 7 Enter a number when applying IP Control Setting KURO LINK: 8 Select the KURO LINK functions P/CH: 9 Use the button for control of connected equipment EXIT: 10 Exit the menu to return to the normal screen Arrow buttons: 11 ...
... equipment such as a DVD Player, Surround Sound system, etc. This section identifies and describes the buttons on the remote control. The remote control can be programmed to control other equipment. Remote: Left side buttons (top to bottom, left to right) MONITOR : 1 Turn On or place panel in...SET UP: 6 Optimize the PC screen Number buttons 0 thru 9: 7 Enter a number when applying IP Control Setting KURO LINK: 8 Select the KURO LINK functions P/CH: 9 Use the button for control of connected equipment EXIT: 10 Exit the menu to return to the normal screen Arrow buttons: 11 ...
Owner's Manual
Page 23
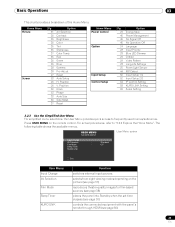
... Off Language Input Priority Blue LED Dimmer Orbiter Video Pattern Long Life Settings Room Light Sensor PIP Detect Input Setup 1/2 Input Setup 2/2 IP Control Setting KURO LINK Setting Serial Setting 3.2.3 Use the Simplified User Menu For simplified menu selections, the User Menu provides quick access to "3.2.2...38 27 53 26 26 53 53 33 36 37 Option AV Selection Contrast Brightness Color Tint Sharpness Color Temp Red Green Blue Gamma Pro Adjust Reset Auto Setup H. For actual procedures, refer to frequently used menus/submenus. Basic Operations 03 This chart provides a breakdown of...
... Off Language Input Priority Blue LED Dimmer Orbiter Video Pattern Long Life Settings Room Light Sensor PIP Detect Input Setup 1/2 Input Setup 2/2 IP Control Setting KURO LINK Setting Serial Setting 3.2.3 Use the Simplified User Menu For simplified menu selections, the User Menu provides quick access to "3.2.2...38 27 53 26 26 53 53 33 36 37 Option AV Selection Contrast Brightness Color Tint Sharpness Color Temp Red Green Blue Gamma Pro Adjust Reset Auto Setup H. For actual procedures, refer to frequently used menus/submenus. Basic Operations 03 This chart provides a breakdown of...

Owner's Manual
Page 64
...in use. 7 ) Press EXIT to make your selection. 5 ) Select LED from the IP Control Setting menu. 6 ) Select On or Off from the IP Control menu. Note: The default IP Control menu is automatically acquired. Selecting On causes the LAN terminal indicator to light while in Step...Disable : Off : On : Off : Off : Off : Off : Off : Off : All : 9600bps Exit 2 ) Select IP Control from the IP Control Setting menu. 3 ) Select Enable from the submenu. Control Setup IP Control Setting IP Control DHCP IP Address Subnet Mask Default Gateway MAC Address LED KURO LINK Setting Input Setting Power Off...
...in use. 7 ) Press EXIT to make your selection. 5 ) Select LED from the IP Control Setting menu. 6 ) Select On or Off from the IP Control menu. Note: The default IP Control menu is automatically acquired. Selecting On causes the LAN terminal indicator to light while in Step...Disable : Off : On : Off : Off : Off : Off : Off : Off : All : 9600bps Exit 2 ) Select IP Control from the IP Control Setting menu. 3 ) Select Enable from the submenu. Control Setup IP Control Setting IP Control DHCP IP Address Subnet Mask Default Gateway MAC Address LED KURO LINK Setting Input Setting Power Off...

Owner's Manual
Page 65
...select "Every time you start Internet Explorer" under "Check for IP Address, Subnet Mask or Default Gateway, close the browser, change entries other web browser can access and control the panel from the list on the password entry screen. ...Location : ****** ****** To p Detail Settings Picture Terminal Functions Network Settings Network E-mail Network Web control system NAME : Location : Installation date : DHCP : ON OFF IP address : Sub net mask : Default gateway : TCP Control Port : UDP Control Port : TCP Connection limit : OFF ON ... 5 LED : ON OFF MAC address :...
...select "Every time you start Internet Explorer" under "Check for IP Address, Subnet Mask or Default Gateway, close the browser, change entries other web browser can access and control the panel from the list on the password entry screen. ...Location : ****** ****** To p Detail Settings Picture Terminal Functions Network Settings Network E-mail Network Web control system NAME : Location : Installation date : DHCP : ON OFF IP address : Sub net mask : Default gateway : TCP Control Port : UDP Control Port : TCP Connection limit : OFF ON ... 5 LED : ON OFF MAC address :...
Owner's Manual
Page 66
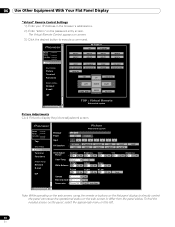
... on the password entry screen. 06 Use Other Equipment With Your Flat Panel Display "Virtual" Remote Control Settings 1 ) Enter your IP Address in the browser's address box. 2 ) Enter "admin" on screen. 3 ) Click the desired button to execute a command. Model : ****** Name : ****** Location : ****** ****** To p Detail Settings Picture Terminal ...
... on the password entry screen. 06 Use Other Equipment With Your Flat Panel Display "Virtual" Remote Control Settings 1 ) Enter your IP Address in the browser's address box. 2 ) Enter "admin" on screen. 3 ) Click the desired button to execute a command. Model : ****** Name : ****** Location : ****** ****** To p Detail Settings Picture Terminal ...
Owner's Manual
Page 68
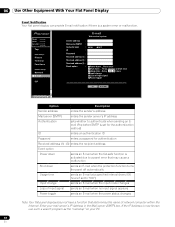
...toggle Set TEST MAIL Option Description Sender address enters the sender's address Mail server (SMTP) enters the sender server's IP address Authentication sets whether to "500") Input change Loss of network computer within the Internet. Model : ****** Name... : ****** Location : ****** ****** To p Detail Settings Picture Terminal Functions Network Settings Network E-mail ISF E-mail Web control system Sender address : Mail server(SMTP) : Authentication : ID : Password : Received address (1) : Received address (2) : Received address (3) : ...
...toggle Set TEST MAIL Option Description Sender address enters the sender's address Mail server (SMTP) enters the sender server's IP address Authentication sets whether to "500") Input change Loss of network computer within the Internet. Model : ****** Name... : ****** Location : ****** ****** To p Detail Settings Picture Terminal Functions Network Settings Network E-mail ISF E-mail Web control system Sender address : Mail server(SMTP) : Authentication : ID : Password : Received address (1) : Received address (2) : Received address (3) : ...
Owner's Manual
Page 69
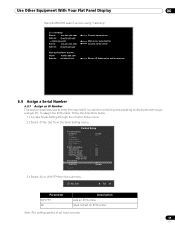
Control Setup IP Control Setting IP Control : DHCP : IP Address Subnet Mask Default Gateway MAC Address LED : KURO LINK Setting Input Setting : Power Off Control : Power On Ready : Hold Sound Status : Power On Test Power Off Test Serial Setting ID No.Set : Baud Rate : Disable On On Off Off Off ....yyy.yyy Non-aurthoritative answer: Name: mailsv.aaa.com Adress: zzz.zzz.zzz.zzz Current name server Mail server searched for Current name server Server: IP Address for controlling and adjusting multiple panels through the Control Setup menu. 2 ) Select ID No.
Control Setup IP Control Setting IP Control : DHCP : IP Address Subnet Mask Default Gateway MAC Address LED : KURO LINK Setting Input Setting : Power Off Control : Power On Ready : Hold Sound Status : Power On Test Power Off Test Serial Setting ID No.Set : Baud Rate : Disable On On Off Off Off ....yyy.yyy Non-aurthoritative answer: Name: mailsv.aaa.com Adress: zzz.zzz.zzz.zzz Current name server Mail server searched for Current name server Server: IP Address for controlling and adjusting multiple panels through the Control Setup menu. 2 ) Select ID No.

Owner's Manual
Page 71
... Menu. INTEGRATOR MENU Picture Picture Preset Studio Mode : Monotone Mode : Drive Mode : FRC Mode : Option Fan Control : OSD Display : Power On Mode Input : Power On Mode (Input) Mirror Mode : Banner PIP Translucent : Banner PIP : IP Control Look : Network ID Beacon : Factory Default Off Off 1 Default Auto On Last Off Off Off Off Off...
... Menu. INTEGRATOR MENU Picture Picture Preset Studio Mode : Monotone Mode : Drive Mode : FRC Mode : Option Fan Control : OSD Display : Power On Mode Input : Power On Mode (Input) Mirror Mode : Banner PIP Translucent : Banner PIP : IP Control Look : Network ID Beacon : Factory Default Off Off 1 Default Auto On Last Off Off Off Off Off...
Owner's Manual
Page 74
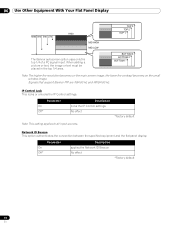
... locks or unlocks the IP Control settings. Network ID Beacon This option authenticates the connection between the specified equipment and the flat panel display. 06 Use Other Equipment With Your Flat ... becomes on the small window image. Signals that support Banner PIP are XGA 60 Hz and WXGA 60 Hz. Parameter On Off* Description locks the IP Control settings No effect *Factory default Note: This setting applies to all input sources. When adding a picture or text, the image or text must be placed...
... locks or unlocks the IP Control settings. Network ID Beacon This option authenticates the connection between the specified equipment and the flat panel display. 06 Use Other Equipment With Your Flat ... becomes on the small window image. Signals that support Banner PIP are XGA 60 Hz and WXGA 60 Hz. Parameter On Off* Description locks the IP Control settings No effect *Factory default Note: This setting applies to all input sources. When adding a picture or text, the image or text must be placed...
Owner's Manual
Page 78
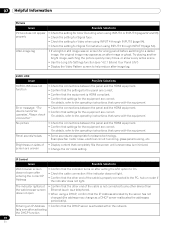
...not light. • Confirm that settings for the equipment are correct. For details, refer to the operating instructions that the IP Address allocated by the server has not changed (the address may appear as a DHCP server reallocates the addresses periodically). For ...through INPUT 8 (page 54). • Check the setting for Signal Format when using a DHCP, confirm that came with the equipment. IP Control Issue Possible Solutions Web browser screen does not open • Confirm that completely fills the screen until unevenness is properly connected to the operating...
...not light. • Confirm that settings for the equipment are correct. For details, refer to the operating instructions that the IP Address allocated by the server has not changed (the address may appear as a DHCP server reallocates the addresses periodically). For ...through INPUT 8 (page 54). • Check the setting for Signal Format when using a DHCP, confirm that came with the equipment. IP Control Issue Possible Solutions Web browser screen does not open • Confirm that completely fills the screen until unevenness is properly connected to the operating...
Owner's Manual
Page 79
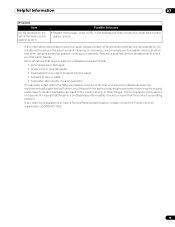
...• Restart the browser, enter a URL in the address bar then re-open the initial Web control system screen. Some situations that your warranty. Helpful Information 07 IP Control Issue No list appears on the left of unauthorized parts can result in fire, electric shock, or ... completion of any service or repair work, request that the service professional perform safety checks to solve the issue, please contact a Pioneer-authorized service representative. If the information above fails to ensure that the product is operating properly. Opening or removing covers exposes you ...
...• Restart the browser, enter a URL in the address bar then re-open the initial Web control system screen. Some situations that your warranty. Helpful Information 07 IP Control Issue No list appears on the left of unauthorized parts can result in fire, electric shock, or ... completion of any service or repair work, request that the service professional perform safety checks to solve the issue, please contact a Pioneer-authorized service representative. If the information above fails to ensure that the product is operating properly. Opening or removing covers exposes you ...


