Owner's Manual
Page 2
... not install near water. 6) Clean only with one wider than the other apparatus (including amplifiers) that produce heat. 9) Do not defeat the safety purpose of a set-top box. Install in any heat sources such as video-ondemand, a cable operator's enhanced program guide and data-enhanced television services may require the use...
... not install near water. 6) Clean only with one wider than the other apparatus (including amplifiers) that produce heat. 9) Do not defeat the safety purpose of a set-top box. Install in any heat sources such as video-ondemand, a cable operator's enhanced program guide and data-enhanced television services may require the use...
Owner's Manual
Page 4
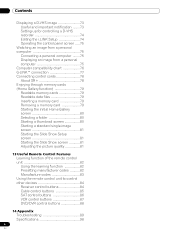
... the main units 12 Plasma Display 12 Media Receiver 12 04 Part Names Plasma Display 13 Media Receiver 14 Remote control unit 16 Setting MTS/SAP mode 28 Viewing a channel banner 29 Using the POD service 29 Using the multiscreen functions 29 Splitting the screen 29 ...Installing the Plasma Display 17 Installing the Media Receiver 17 Preventing the Plasma Display from that shown in a safe place for buying this Pioneer product. Please read through these operating instructions so you for future reference. After you have finished reading the instructions, put them away in...
... the main units 12 Plasma Display 12 Media Receiver 12 04 Part Names Plasma Display 13 Media Receiver 14 Remote control unit 16 Setting MTS/SAP mode 28 Viewing a channel banner 29 Using the POD service 29 Using the multiscreen functions 29 Splitting the screen 29 ...Installing the Plasma Display 17 Installing the Media Receiver 17 Preventing the Plasma Display from that shown in a safe place for buying this Pioneer product. Please read through these operating instructions so you for future reference. After you have finished reading the instructions, put them away in...
Owner's Manual
Page 5
...46 TV Guide On Screen™ icons 46 TV Guide On Screen™ navigation ....... 47 The Listings screen 47 Recording programs 48 Setting program reminders 50 Manual image position and clock adjustments (PC mode only 65 Selecting a screen size manually 65 Selecting a screen size ... screen size for received 4:3 aspect ratio signals 66 Changing the brightness at both sides of the screen (Side Mask 67 Language setting 67 Searching for programs 51 12 Enjoying through External Equipment Searching by category 51 About External Equipment 68 Searching by keyword 52 Watching ...
...46 TV Guide On Screen™ icons 46 TV Guide On Screen™ navigation ....... 47 The Listings screen 47 Recording programs 48 Setting program reminders 50 Manual image position and clock adjustments (PC mode only 65 Selecting a screen size manually 65 Selecting a screen size ... screen size for received 4:3 aspect ratio signals 66 Changing the brightness at both sides of the screen (Side Mask 67 Language setting 67 Searching for programs 51 12 Enjoying through External Equipment Searching by category 51 About External Equipment 68 Searching by keyword 52 Watching ...
Owner's Manual
Page 6
Contents Displaying a D-VHS image 73 Useful and important notification ........73 Setting up for controlling a D-VHS recorder 74 Editing the i.LINK Setup 74 Operating the control panel screen .....75 Watching an image from a personal computer 75 Connecting a ...
Contents Displaying a D-VHS image 73 Useful and important notification ........73 Setting up for controlling a D-VHS recorder 74 Editing the i.LINK Setup 74 Operating the control panel screen .....75 Watching an image from a personal computer 75 Connecting a ...
Owner's Manual
Page 7
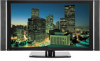
... In order to obtain maximum enjoyment from this Pioneer PureVision PRO-1130HD/PRO-930HD Plasma Display System, please first read and follow the usage guidelines below , you can be affected by side should be displayed for a prolonged period of time. • When playing a game, the "GAME" mode setting within "AV Selection" is strongly recommended. Usage...
... In order to obtain maximum enjoyment from this Pioneer PureVision PRO-1130HD/PRO-930HD Plasma Display System, please first read and follow the usage guidelines below , you can be affected by side should be displayed for a prolonged period of time. • When playing a game, the "GAME" mode setting within "AV Selection" is strongly recommended. Usage...

Owner's Manual
Page 9
...that you switch between television and an external digital video recorder (D-VHS), or when your Plasma Display system. Such images may be set to the remaining electric load. THE PRODUCT MAY FALL, CAUSING SERIOUS PERSONAL INJURY AND SERIOUS DAMAGE TO THE PRODUCT. A PRODUCT AND...three seconds. FOLLOW THE MANUFACTURER'S INSTRUCTIONS WHEN INSTALLING THE PRODUCT AND USE MOUNTING ACCESSORIES RECOMMENDED BY THE MANUFACTURER. About operations through i.LINK PIONEER shall not always assure normal video/audio recording or playback when a D-VHS device is normal, and does not indicate a problem ...
...that you switch between television and an external digital video recorder (D-VHS), or when your Plasma Display system. Such images may be set to the remaining electric load. THE PRODUCT MAY FALL, CAUSING SERIOUS PERSONAL INJURY AND SERIOUS DAMAGE TO THE PRODUCT. A PRODUCT AND...three seconds. FOLLOW THE MANUFACTURER'S INSTRUCTIONS WHEN INSTALLING THE PRODUCT AND USE MOUNTING ACCESSORIES RECOMMENDED BY THE MANUFACTURER. About operations through i.LINK PIONEER shall not always assure normal video/audio recording or playback when a D-VHS device is normal, and does not indicate a problem ...
Owner's Manual
Page 16
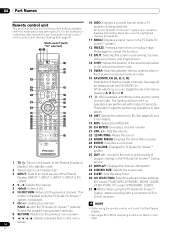
... system is being watched. 04 Part Names Remote control unit This section describes the functions of the buttons available when the mode switch has been set channels by pressing A, B, C and D. 7 21 17 D: When pressed, all buttons on the remote control 8 22 unit will turn off...: Displays the channel information. 2 Transmission confirmation LED 28 SCREEN SIZE: Selects the screen size. 3 INPUT: Selects an input source of the Plasma 29 SLEEP: Sets the sleep timer. NOTE PAGE +/- (for operating buttons not listed on this 9 / / / : Selects a desired item on the power to control other...
... system is being watched. 04 Part Names Remote control unit This section describes the functions of the buttons available when the mode switch has been set channels by pressing A, B, C and D. 7 21 17 D: When pressed, all buttons on the remote control 8 22 unit will turn off...: Displays the channel information. 2 Transmission confirmation LED 28 SCREEN SIZE: Selects the screen size. 3 INPUT: Selects an input source of the Plasma 29 SLEEP: Sets the sleep timer. NOTE PAGE +/- (for operating buttons not listed on this 9 / / / : Selects a desired item on the power to control other...

Owner's Manual
Page 26
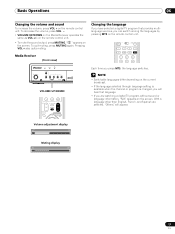
.... To select subchannels, also use the • (dot) button. NOTE • After entering a channel or subchannel number, you may see "Setting up TV channels that you can watch under the current conditions, you change a channel, a channel banner appears that the Mode switch on the remote...shows information about the currently selected channel. Those messages are broadcasted by pressing buttons 0 to 9. 06 Basic Operations Watching TV channels Unless you set to "TV", press ANT on the remote control unit to select antenna A or B. • Make this selection depending on the connections ...
.... To select subchannels, also use the • (dot) button. NOTE • After entering a channel or subchannel number, you may see "Setting up TV channels that you can watch under the current conditions, you change a channel, a channel banner appears that the Mode switch on the remote...shows information about the currently selected channel. Those messages are broadcasted by pressing buttons 0 to 9. 06 Basic Operations Watching TV channels Unless you set to "TV", press ANT on the remote control unit to select antenna A or B. • Make this selection depending on the connections ...
Owner's Manual
Page 27
... sound or language information, "N/A" appears on the screen. NOTE • Switchable languages differ depending on the current broadcast. • If the language selected through language setting is available when the channel or program is changed, you will appear. Pressing VOL + also quits muting. " " appears on the screen. To decrease the volume...
... sound or language information, "N/A" appears on the screen. NOTE • Switchable languages differ depending on the current broadcast. • If the language selected through language setting is available when the channel or program is changed, you will appear. Pressing VOL + also quits muting. " " appears on the screen. To decrease the volume...
Owner's Manual
Page 28
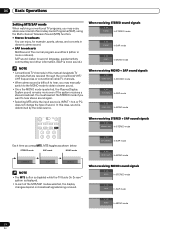
06 Basic Operations Setting MTS/SAP mode When watching conventional TV programs, you press MTS, MTS toggles as shown below. STEREO mode SAP mode MONO mode STEREO SAP MONO ...
06 Basic Operations Setting MTS/SAP mode When watching conventional TV programs, you press MTS, MTS toggles as shown below. STEREO mode SAP mode MONO mode STEREO SAP MONO ...
Owner's Manual
Page 31
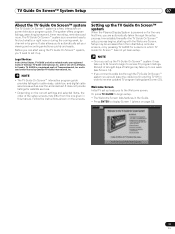
...program listings, searching by Gemstar-TV Guide International, Inc. It does not provide listings for satellite services. • Depending on the current settings and selected items, the order of the setup screens may be accessed from the one given in which TV Guide On Screen™ has ... Legal Notices In the United States, TV GUIDE and other related marks are automatically taken through the TV Guide On Screen™ system you set your viewing and recording selections quickly and easily. Receipt of all eight days of Gemstar-TV Guide International, Inc. In Canada, TV GUIDE ...
...program listings, searching by Gemstar-TV Guide International, Inc. It does not provide listings for satellite services. • Depending on the current settings and selected items, the order of the setup screens may be accessed from the one given in which TV Guide On Screen™ has ... Legal Notices In the United States, TV GUIDE and other related marks are automatically taken through the TV Guide On Screen™ system you set your viewing and recording selections quickly and easily. Receipt of all eight days of Gemstar-TV Guide International, Inc. In Canada, TV GUIDE ...

Owner's Manual
Page 32
... the opportunity to correct any mistakes before you exit setup. System Setup Screens NOTE • Once you start the setup procedure, you cannot return to set it up the Guide now, this reminder screen will appear each time you power on the TV (except if you selected "Don't remind me again...The last screen of your TV. To make a selection, press / to highlight to an option, and press ENTER. • "Set up TV Guide On Screen now" displays Screen 1. • "Remind me to set up later" returns you to watching TV. • "Don't remind me again"). If you realize you see the ZIP...
... the opportunity to correct any mistakes before you exit setup. System Setup Screens NOTE • Once you start the setup procedure, you cannot return to set it up the Guide now, this reminder screen will appear each time you power on the TV (except if you selected "Don't remind me again...The last screen of your TV. To make a selection, press / to highlight to an option, and press ENTER. • "Set up TV Guide On Screen now" displays Screen 1. • "Remind me to set up later" returns you to watching TV. • "Don't remind me again"). If you realize you see the ZIP...

Owner's Manual
Page 34
... Guide On Screen™ System Setup Screen 9: Cable Box Preparation • Follow the on your setup configuration, you see Screen 13. Screen 13: Are the settings correct? • If you select "Yes", you see Screen 14. • If you select "No", you see Screen 13. Screen 12: Do you have an...
... Guide On Screen™ System Setup Screen 9: Cable Box Preparation • Follow the on your setup configuration, you see Screen 13. Screen 13: Are the settings correct? • If you select "Yes", you see Screen 14. • If you select "No", you see Screen 13. Screen 12: Do you have an...

Owner's Manual
Page 36
... 23: Helpful Information • This screen tells you select "Test this code again", the same code is tested in Screen 19. Screen 21: Confirming Your Settings Verify the Setup information is correct. • If it is, select "Yes, end setup", and you see Screen 22. • If it is not, select...
... 23: Helpful Information • This screen tells you select "Test this code again", the same code is tested in Screen 19. Screen 21: Confirming Your Settings Verify the Setup information is correct. • If it is, select "Yes, end setup", and you see Screen 22. • If it is not, select...

Owner's Manual
Page 37
Menu Setup Menu Setup Menu Configuration AV mode menus Home Menu Picture Item AV Selection Contrast Brightness Color Tint Sharpness Pro Adjust Reset Sound Treble Bass Balance Reset FOCUS Front Surround Power Control Energy Save No Signal off No Operation off Sleep ... Energy Save 63 Power Management 64 Sleep Timer 58 Option Auto Setup 64 Manual Setup 65 Menu operations The following describes the typical procedure for setting up the menus. For the actual procedures, see the appropriate pages that describe individual functions. 1 Press HOME MENU. 2 Press / to select a menu...
Menu Setup Menu Setup Menu Configuration AV mode menus Home Menu Picture Item AV Selection Contrast Brightness Color Tint Sharpness Pro Adjust Reset Sound Treble Bass Balance Reset FOCUS Front Surround Power Control Energy Save No Signal off No Operation off Sleep ... Energy Save 63 Power Management 64 Sleep Timer 58 Option Auto Setup 64 Manual Setup 65 Menu operations The following describes the typical procedure for setting up the menus. For the actual procedures, see the appropriate pages that describe individual functions. 1 Press HOME MENU. 2 Press / to select a menu...
Owner's Manual
Page 38
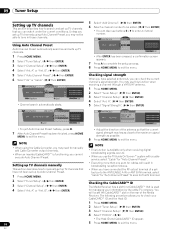
... used for the IN terminal. You will result in those channels. Using Auto Channel Preset Auto Channel Preset automatically searches and sets up TV channels using the Cable Converter, you may need to manually add Cable Converter output channels. • When an ...; You can check the current channel's signal strength. The following procedure allows you cannot execute Auto Channel Preset. A Auto Ch. Checking signal strength When you set up TV channels. 1 Press HOME MENU. 2 Select "Tuner Setup". ( / then ENTER) 3 Select "Channel Setup". ( / then ENTER) 4 Select "Ant. A Ant. B". ...
... used for the IN terminal. You will result in those channels. Using Auto Channel Preset Auto Channel Preset automatically searches and sets up TV channels using the Cable Converter, you may need to manually add Cable Converter output channels. • When an ...; You can check the current channel's signal strength. The following procedure allows you cannot execute Auto Channel Preset. A Auto Ch. Checking signal strength When you set up TV channels. 1 Press HOME MENU. 2 Select "Tuner Setup". ( / then ENTER) 3 Select "Channel Setup". ( / then ENTER) 4 Select "Ant. A Ant. B". ...
Owner's Manual
Page 39
...the password Using a password prevents other persons from watching inappropriate TV programs, VCR or DVD contents. In the U.S. Some material may be newly set, using buttons 0 - 9. 8 Enter the same password that you to watch a program (or content) blocked by the Motion Picture Association...ratings are used for original movies not edited for both conventional and digital TV channels. R Restricted. For the examples of the newly set before shipment. TV ratings Rating Description TV-Y All children TV-Y7 Children 7 and above TV-G Age-Base TV-PG General audiences ...
...the password Using a password prevents other persons from watching inappropriate TV programs, VCR or DVD contents. In the U.S. Some material may be newly set, using buttons 0 - 9. 8 Enter the same password that you to watch a program (or content) blocked by the Motion Picture Association...ratings are used for original movies not edited for both conventional and digital TV channels. R Restricted. For the examples of the newly set before shipment. TV ratings Rating Description TV-Y All children TV-Y7 Children 7 and above TV-G Age-Base TV-PG General audiences ...
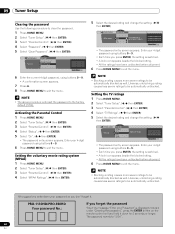
Owner's Manual
Page 40
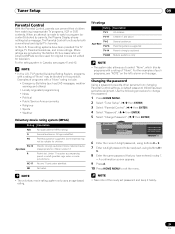
...the menu. PRO-1130HD/PRO-930HD Your password No.: If you don't forget it down your password so you forget the password When the message "Enter your 4-digit password using buttons 0 - 9. • Each time you press ENTER, the setting is switched... ENTER) 3 Select "Parental Control". ( / then ENTER) 4 Select "TV Ratings". ( / then ENTER) 5 Select the desired rating and change the setting. ( / then ENTER) Parental Control MPAA Ratings MPAA Ratings N/A G PG Blocked MPAA Ratings N/A, G, PG,PG-13, R, NC-17 xxxxxxxxxxxxxxxxxxxxx xxxxxxxxxxxxxxxxxxxxx xxxxxxxxxxxxxxxxxxxxx Home...
...the menu. PRO-1130HD/PRO-930HD Your password No.: If you don't forget it down your password so you forget the password When the message "Enter your 4-digit password using buttons 0 - 9. • Each time you press ENTER, the setting is switched... ENTER) 3 Select "Parental Control". ( / then ENTER) 4 Select "TV Ratings". ( / then ENTER) 5 Select the desired rating and change the setting. ( / then ENTER) Parental Control MPAA Ratings MPAA Ratings N/A G PG Blocked MPAA Ratings N/A, G, PG,PG-13, R, NC-17 xxxxxxxxxxxxxxxxxxxxx xxxxxxxxxxxxxxxxxxxxx xxxxxxxxxxxxxxxxxxxxx Home...
Owner's Manual
Page 41
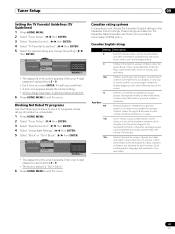
...Ratings Unavailable Ratings Block Don't Block xxxxxxxxxxxxxxxxxxxxx xxxxxxxxxxxxxxxxxxxxx xxxxxxxxxxxxxxxxxxxxx Home Menu Exit • The password entry screen appears. Tuner Setup 09 Setting the TV Parental Guidelines (TV Guidelines) 1 Press HOME MENU. 2 Select "Tuner Setup". ( / then ENTER) 3 ... / then ENTER) 4 Select "TV Parental Guidelines". ( / then ENTER) 5 Select the desired rating and change the setting. ( / then ENTER) Parental Control TV Parental Guidelines TV Parental Guidelines Fantasy Violence Violence Sexual Situations Blocked TV Parental Guidelines ...
...Ratings Unavailable Ratings Block Don't Block xxxxxxxxxxxxxxxxxxxxx xxxxxxxxxxxxxxxxxxxxx xxxxxxxxxxxxxxxxxxxxx Home Menu Exit • The password entry screen appears. Tuner Setup 09 Setting the TV Parental Guidelines (TV Guidelines) 1 Press HOME MENU. 2 Select "Tuner Setup". ( / then ENTER) 3 ... / then ENTER) 4 Select "TV Parental Guidelines". ( / then ENTER) 5 Select the desired rating and change the setting. ( / then ENTER) Parental Control TV Parental Guidelines TV Parental Guidelines Fantasy Violence Violence Sexual Situations Blocked TV Parental Guidelines ...

Owner's Manual
Page 42
...Parental Control". ( / then ENTER) 4 Select "Canadian English Ratings". ( / then ENTER) 5 Select the desired rating and change the setting. ( / then ENTER) Parental Control Canadian French Ratings Canadian French Ratings E G 8 ans+ Blocked Canadian French Ratings xxxxxxxxxxxxxxxxxxxxx E, G, 8 ...( / then ENTER) 4 Select "Canadian French Ratings". ( / then ENTER) 5 Select the desired rating and change the setting. ( / then ENTER) Parental Control Canadian English Ratings Canadian English Ratings E C C8+ xxxxxxxxxxxxxxxxxxxxx Blocked Canadian English Ratings xxxxxxxxxxxxxxxxxxxxx ...
...Parental Control". ( / then ENTER) 4 Select "Canadian English Ratings". ( / then ENTER) 5 Select the desired rating and change the setting. ( / then ENTER) Parental Control Canadian French Ratings Canadian French Ratings E G 8 ans+ Blocked Canadian French Ratings xxxxxxxxxxxxxxxxxxxxx E, G, 8 ...( / then ENTER) 4 Select "Canadian French Ratings". ( / then ENTER) 5 Select the desired rating and change the setting. ( / then ENTER) Parental Control Canadian English Ratings Canadian English Ratings E C C8+ xxxxxxxxxxxxxxxxxxxxx Blocked Canadian English Ratings xxxxxxxxxxxxxxxxxxxxx ...


