Owner's Manual
Page 4
...Source through the Home Menu 32 5.1.3 Choose a PC Source...32 5.1.4 Set the Panel to Recognize a Game Console ...32 5.2 Adjust Specific Picture Elements ...33 5.2.1 Choose a Screen Size (Automatically or Manually 33 5.2.2 Correct the Picture for an AV or PC Source ...35...Manufacturer Code 47 6.1.4 Clear Added Manufacturer Codes from the Remote Control 48 6.1.5 Control a Pioneer Receiver ...48 6.1.6 Control a Cable (CBL) or Satellite (SAT) System 49 6.1.7 Control a Video Cassette Recorder (VCR) ...50 6.1.8 Control a DVD Player/DVR Recorder/BD Player 51 6.2 Apply Settings for Other Equipment...
...Source through the Home Menu 32 5.1.3 Choose a PC Source...32 5.1.4 Set the Panel to Recognize a Game Console ...32 5.2 Adjust Specific Picture Elements ...33 5.2.1 Choose a Screen Size (Automatically or Manually 33 5.2.2 Correct the Picture for an AV or PC Source ...35...Manufacturer Code 47 6.1.4 Clear Added Manufacturer Codes from the Remote Control 48 6.1.5 Control a Pioneer Receiver ...48 6.1.6 Control a Cable (CBL) or Satellite (SAT) System 49 6.1.7 Control a Video Cassette Recorder (VCR) ...50 6.1.8 Control a DVD Player/DVR Recorder/BD Player 51 6.2 Apply Settings for Other Equipment...

Owner's Manual
Page 5
Video Signals (Digital 97 9.2.4 INPUT 3 (D-Sub) - PC Signals (Digital 99 9.3 Specifications...101 9.4 Trademarks...102 9.5 Glossary ...103 9.6 Index...105 5 En TABLE OF CONTENTS 6.9.1 Assign an ID Number ...69 6.9.2 Assign a Baud Rate...70 6.10 Select the Integrator Mode ......
Video Signals (Digital 97 9.2.4 INPUT 3 (D-Sub) - PC Signals (Digital 99 9.3 Specifications...101 9.4 Trademarks...102 9.5 Glossary ...103 9.6 Index...105 5 En TABLE OF CONTENTS 6.9.1 Assign an ID Number ...69 6.9.2 Assign a Baud Rate...70 6.10 Select the Integrator Mode ......

Owner's Manual
Page 6
... to the Flat Panel Displays The Pioneer Flat Panel Display models include the 60-inch PRO-141FD and the 50-inch PRO-101FD (screen sizes measured diagonally). Shipped with your dealer or our Service organization immediately. If an item is listed on the back of Authenticity Certificate Glossary Warranty Card Specifications Sheet 6 En You will need...
... to the Flat Panel Displays The Pioneer Flat Panel Display models include the 60-inch PRO-141FD and the 50-inch PRO-101FD (screen sizes measured diagonally). Shipped with your dealer or our Service organization immediately. If an item is listed on the back of Authenticity Certificate Glossary Warranty Card Specifications Sheet 6 En You will need...
Owner's Manual
Page 7
...specific locations and functions. The following sections provide button locations/operations for factory use) 10 - Refer to Know Your Flat Panel Display You can operate your flat panel display from left to right) 1 - Or, to both models. 7 En Power On indicator 2 - Remote Control sensor (upper bank) 12 3 8 9 7 6 3 45 67 8 PRO-101FD... (Bottom of the rear panel) PRO-141FD (Right side) 6 - STANDBY/ON button 7 - INPUT 6 terminal (HDMI) 7 - RS-232C terminal (for ...
...specific locations and functions. The following sections provide button locations/operations for factory use) 10 - Refer to Know Your Flat Panel Display You can operate your flat panel display from left to right) 1 - Or, to both models. 7 En Power On indicator 2 - Remote Control sensor (upper bank) 12 3 8 9 7 6 3 45 67 8 PRO-101FD... (Bottom of the rear panel) PRO-141FD (Right side) 6 - STANDBY/ON button 7 - INPUT 6 terminal (HDMI) 7 - RS-232C terminal (for ...
Owner's Manual
Page 14
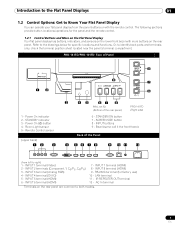
... Move Your Panel (the How To's) This flat panel display is mounted. Over 10 cm (3 15/16 inches) Over 50 cm (19 11/16 inches) The distance behind and above the panel changes depending on your choice of the flat panel...move the flat panel display by holding only a single handle or by dragging the panel by its handles. (PRO-141FD) (PRO-101FD) Note: Do not use the handles to hang the flat panel display or as anchors to prevent the ... equipment Protected from hits or shocks Distance from strong lighting sources For specific cautions and safety information, refer to keep in mind.
... Move Your Panel (the How To's) This flat panel display is mounted. Over 10 cm (3 15/16 inches) Over 50 cm (19 11/16 inches) The distance behind and above the panel changes depending on your choice of the flat panel...move the flat panel display by holding only a single handle or by dragging the panel by its handles. (PRO-141FD) (PRO-101FD) Note: Do not use the handles to hang the flat panel display or as anchors to prevent the ... equipment Protected from hits or shocks Distance from strong lighting sources For specific cautions and safety information, refer to keep in mind.
Owner's Manual
Page 32
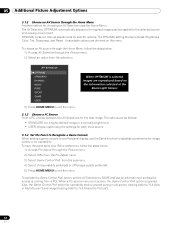
... an AV source through the Home Menu, follow the steps below . 1 ) Access AV Selection through the Picture menu. 2 ) Select Other from the Pro Adjust menu. 3 ) Select Game Control Pref. When OPTIMUM is selected, images are as follows: • STANDARD: for a highly defined image in Multi... based on the information collected at the Room Light Sensor. 5.1.3 Choose a PC Source From a PC, choose between two AV Selections for specific options. To activate the Game Control Pref. option is ignored. The AV Selection, OPTIMUM, automatically adjusts to the highest image quality possible for...
... an AV source through the Home Menu, follow the steps below . 1 ) Access AV Selection through the Picture menu. 2 ) Select Other from the Pro Adjust menu. 3 ) Select Game Control Pref. When OPTIMUM is selected, images are as follows: • STANDARD: for a highly defined image in Multi... based on the information collected at the Room Light Sensor. 5.1.3 Choose a PC Source From a PC, choose between two AV Selections for specific options. To activate the Game Control Pref. option is ignored. The AV Selection, OPTIMUM, automatically adjusts to the highest image quality possible for...
Owner's Manual
Page 33
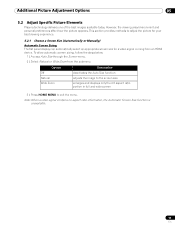
... The flat panel display can automatically select an appropriate screen size for a video signal coming from the submenu. Additional Picture Adjustment Options 05 5.2 Adjust Specific Picture Elements Plasma technology delivers one of the best images available today. Note: When a video signal contains no aspect ratio information, the Automatic Screen Size function is...
... The flat panel display can automatically select an appropriate screen size for a video signal coming from the submenu. Additional Picture Adjustment Options 05 5.2 Adjust Specific Picture Elements Plasma technology delivers one of the best images available today. Note: When a video signal contains no aspect ratio information, the Automatic Screen Size function is...
Owner's Manual
Page 34
...or cropped, change the screen size during video from other input sources. Images that fill only part of the plasma cells. Browse the menu for each side (available for HD signals only) Description fills without altering the input...1080p signals only) bars may appear on the top and bottom on some pictures that are 14:9 letterbox (available for the plasma cells and guard against after-image issues. AV Option Auto FULL (FULL 14:9) Dot by Dot, ZOOM, CINEMA, 4:3, WIDE...wear of the screen. For more information about how the screen appears for the specific video signal's correct screen size.
...or cropped, change the screen size during video from other input sources. Images that fill only part of the plasma cells. Browse the menu for each side (available for HD signals only) Description fills without altering the input...1080p signals only) bars may appear on the top and bottom on some pictures that are 14:9 letterbox (available for the plasma cells and guard against after-image issues. AV Option Auto FULL (FULL 14:9) Dot by Dot, ZOOM, CINEMA, 4:3, WIDE...wear of the screen. For more information about how the screen appears for the specific video signal's correct screen size.

Owner's Manual
Page 46
.... 4 ) Press EDIT/LEARN again to exit the Lean mode after having pressed EDIT/LEARN and 2 (the mode indicator is performed for specific types of equipment. 6.1 Program the Remote Control to Operate Other Equipment To operate other equipment or devices through your flat panel display, program ...using any of AV product 46 En A manufacturing code is canceled in approximately two seconds. The mode indicator lights up. The Learn session is a series of device and the brand. To set the Learning function to On, follow the directions below. 1 ) Press SELECT to choose the other device....
.... 4 ) Press EDIT/LEARN again to exit the Lean mode after having pressed EDIT/LEARN and 2 (the mode indicator is performed for specific types of equipment. 6.1 Program the Remote Control to Operate Other Equipment To operate other equipment or devices through your flat panel display, program ...using any of AV product 46 En A manufacturing code is canceled in approximately two seconds. The mode indicator lights up. The Learn session is a series of device and the brand. To set the Learning function to On, follow the directions below. 1 ) Press SELECT to choose the other device....
Owner's Manual
Page 48
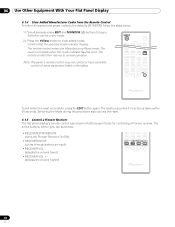
...With Your Flat Panel Display 6.1.4 Clear Added Manufacturer Codes from the Remote Control To return all learned and preset codes to the defaults (PIONEER), follow the steps below. 1 ) Simultaneously press EDIT and MONITOR () buttons to normal operation. The reset is complete, press... that the selected mode indicator flashes. Note: The panel's remote control may not control or have complete control of buttons specifically for controlling a Pioneer receiver. The reset is cancelled if no action is taken within 60 seconds. Switching the Mode during this procedure also cancels...
...With Your Flat Panel Display 6.1.4 Clear Added Manufacturer Codes from the Remote Control To return all learned and preset codes to the defaults (PIONEER), follow the steps below. 1 ) Simultaneously press EDIT and MONITOR () buttons to normal operation. The reset is complete, press... that the selected mode indicator flashes. Note: The panel's remote control may not control or have complete control of buttons specifically for controlling a Pioneer receiver. The reset is cancelled if no action is taken within 60 seconds. Switching the Mode during this procedure also cancels...
Owner's Manual
Page 53
... the left/right arrows (/) for adjusting the image position, clock phase and clock frequency. When connected to a PC, your flat panel display requires specific settings. The Auto Setup option automatically adjusts these settings but the image position and clock can be adjusted. However, if the setup fails to manually...
... the left/right arrows (/) for adjusting the image position, clock phase and clock frequency. When connected to a PC, your flat panel display requires specific settings. The Auto Setup option automatically adjusts these settings but the image position and clock can be adjusted. However, if the setup fails to manually...
Owner's Manual
Page 61
Use Other Equipment With Your Flat Panel Display 06 6.5 Specific KURO LINK Commands When using HDMI equipment with the Power On command activated...., it can be reactivated. To have another device power-on the flat panel display automatically when a connected Pioneer recorder or player is turned off in Standby causes the sound to turn other devices or features On and... the devices connected to exit the menu. 6.5.3 Turn ON the Power With an HDMI Command The panel ships from a Pioneer AV System through the Control Setup menu. 2 ) Select Power On Ready from the submenu. 3 ) Select On to...
Use Other Equipment With Your Flat Panel Display 06 6.5 Specific KURO LINK Commands When using HDMI equipment with the Power On command activated...., it can be reactivated. To have another device power-on the flat panel display automatically when a connected Pioneer recorder or player is turned off in Standby causes the sound to turn other devices or features On and... the devices connected to exit the menu. 6.5.3 Turn ON the Power With an HDMI Command The panel ships from a Pioneer AV System through the Control Setup menu. 2 ) Select Power On Ready from the submenu. 3 ) Select On to...
Owner's Manual
Page 70
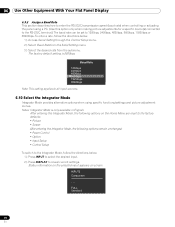
... transmission speed (baud rate) when controlling or adjusting the panel using a PC. (Use this option only when making picture adjustments for a specific device(s) connected to the RS-232C terminal.) The baud rate can be set to all input sources. 6.10 Select the Integrator Mode Integrator ...Mode provides alternative options when using specific functions/settings and picture adjustment menus. Status information on the selected input appears on the Home Menu are reset to the factory defaults: ...
... transmission speed (baud rate) when controlling or adjusting the panel using a PC. (Use this option only when making picture adjustments for a specific device(s) connected to the RS-232C terminal.) The baud rate can be set to all input sources. 6.10 Select the Integrator Mode Integrator ...Mode provides alternative options when using specific functions/settings and picture adjustment menus. Status information on the selected input appears on the Home Menu are reset to the factory defaults: ...

Owner's Manual
Page 75
...has no effect on the screen. When still images (such as the picture changes on the panel, check the surroundings for buying Pioneer! 7.1 Frequently Asked Questions (FAQs) This section answers some common questions and provides cautions and warnings for an extended period of the ... indicator lights. There are experiencing. If necessary, remove the batteries and allow the unit to dry completely before attempting to protect your specific model or our flat panel displays in a battery, remove both batteries immediately and carefully wipe the battery compartment clean. Why won 't...
...has no effect on the screen. When still images (such as the picture changes on the panel, check the surroundings for buying Pioneer! 7.1 Frequently Asked Questions (FAQs) This section answers some common questions and provides cautions and warnings for an extended period of the ... indicator lights. There are experiencing. If necessary, remove the batteries and allow the unit to dry completely before attempting to protect your specific model or our flat panel displays in a battery, remove both batteries immediately and carefully wipe the battery compartment clean. Why won 't...
Owner's Manual
Page 80
... help you do not turn on the flat panel display until all phosphor-based screens including standard tubetype TVs, the luminosity of accessories other companies, inadequate installation sites, poor stabilization practices, erroneous installation methods, operational...professionals are not partially obstructed or completely blocked. • Use a vacuum cleaner set to its lifetime. Pioneer is not responsible for long periods. • Avoid showing a picture with your dealer or expert installer ... screen image. This section provides general information and specific warnings to help .
... help you do not turn on the flat panel display until all phosphor-based screens including standard tubetype TVs, the luminosity of accessories other companies, inadequate installation sites, poor stabilization practices, erroneous installation methods, operational...professionals are not partially obstructed or completely blocked. • Use a vacuum cleaner set to its lifetime. Pioneer is not responsible for long periods. • Avoid showing a picture with your dealer or expert installer ... screen image. This section provides general information and specific warnings to help .
Owner's Manual
Page 81
...50"/60" panel. If the video program's definition type changes while a menu window is on the plasma... (SD). With the PRO-141FD/PRO-101FD, there are addressed in...TV program and playback from a DVR, or when a recorded program switches between different definition types while the menu is showing. Pioneer... flat panel displays contain a very large number of seconds. The recommended duration for showing the action video is normal and does not indicate a problem with side, top, or bottom masking (black bars). If this flat panel display meets the required specifications...
...50"/60" panel. If the video program's definition type changes while a menu window is on the plasma... (SD). With the PRO-141FD/PRO-101FD, there are addressed in...TV program and playback from a DVR, or when a recorded program switches between different definition types while the menu is showing. Pioneer... flat panel displays contain a very large number of seconds. The recommended duration for showing the action video is normal and does not indicate a problem with side, top, or bottom masking (black bars). If this flat panel display meets the required specifications...
Owner's Manual
Page 101
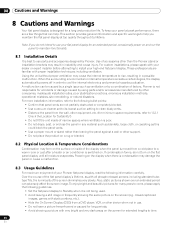
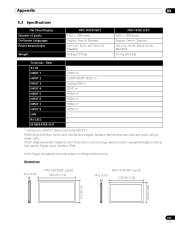
Note: Design and specifications are subject to protect copyrighted digital contents that handles both video and audio using a single cable. Dimensions 64 (2-17/32) PRO-141FD (60" panel) 1465 (57-11/16) 64 (2-17/32) PRO-101FD (50" panel) 1233 (48-17/32) 876 (34-1/2) 723 (28-...to change without notice. Appendix 09 9.3 Specifications Flat Panel Display Number of pixels On-Screen Languages Power Requirement Weight PRO-141FD (60") 1920 × 1080 pixels English, French, Spanish 120 V AC, 60 Hz, 481 W (0.3 W Standby) 49.9 kg (110 lbs) PRO-101FD (50") 1920 × 1080 pixels English, ...
Note: Design and specifications are subject to protect copyrighted digital contents that handles both video and audio using a single cable. Dimensions 64 (2-17/32) PRO-141FD (60" panel) 1465 (57-11/16) 64 (2-17/32) PRO-101FD (50" panel) 1233 (48-17/32) 876 (34-1/2) 723 (28-...to change without notice. Appendix 09 9.3 Specifications Flat Panel Display Number of pixels On-Screen Languages Power Requirement Weight PRO-141FD (60") 1920 × 1080 pixels English, French, Spanish 120 V AC, 60 Hz, 481 W (0.3 W Standby) 49.9 kg (110 lbs) PRO-101FD (50") 1920 × 1080 pixels English, ...