
Owner's Manual
Page 2
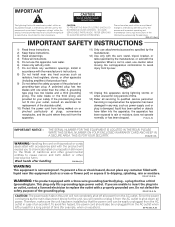
... it from the AC outlet to shut down all instructions. 5) Do not use attachments/accessories specified by the manufacturer. 12) Use only with the cart, stand, tripod, bracket, or table specified by the manufacturer, or sold with the apparatus. The exclamation point within the product's enclosure that the power cord can...
... it from the AC outlet to shut down all instructions. 5) Do not use attachments/accessories specified by the manufacturer. 12) Use only with the cart, stand, tripod, bracket, or table specified by the manufacturer, or sold with the apparatus. The exclamation point within the product's enclosure that the power cord can...
Owner's Manual
Page 3
... OF CONTENTS Congratulations on the Remote Control ...10 2 Install Your Flat Panel Display ...12 2.1 Use the Optional Table Top Stand (Stand) or Equivalent Items 12 2.2 Use the Optional Brackets or Equivalent Items ...13 2.2.1 Check the Location for Suitability ...14 ... 1.2.1 Control Buttons and More on the Flat Panel Display 7 1.2.2 Operating the Remote Control ...8 1.2.3 Buttons on purchasing a Pioneer Elite KURO monitor. This exclusive series of the best entertainment experiences possible. We are proud to incorporate this philosophy of exceptional quality, state-of-the-art design and...
... OF CONTENTS Congratulations on the Remote Control ...10 2 Install Your Flat Panel Display ...12 2.1 Use the Optional Table Top Stand (Stand) or Equivalent Items 12 2.2 Use the Optional Brackets or Equivalent Items ...13 2.2.1 Check the Location for Suitability ...14 ... 1.2.1 Control Buttons and More on the Flat Panel Display 7 1.2.2 Operating the Remote Control ...8 1.2.3 Buttons on purchasing a Pioneer Elite KURO monitor. This exclusive series of the best entertainment experiences possible. We are proud to incorporate this philosophy of exceptional quality, state-of-the-art design and...

Owner's Manual
Page 6
... Flat Panel Displays The Pioneer Flat Panel Display models include the 60-inch PRO-141FD and the 50-inch PRO-101FD (screen sizes measured diagonally). Shipped with your dealer or our Service organization immediately. Identify the accessories from the appropriate list below. You will need a Philips screwdriver if removing or attaching the stand. Below is missing...
... Flat Panel Displays The Pioneer Flat Panel Display models include the 60-inch PRO-141FD and the 50-inch PRO-101FD (screen sizes measured diagonally). Shipped with your dealer or our Service organization immediately. Identify the accessories from the appropriate list below. You will need a Philips screwdriver if removing or attaching the stand. Below is missing...
Owner's Manual
Page 12
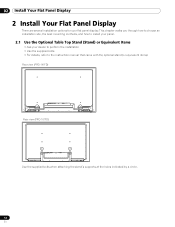
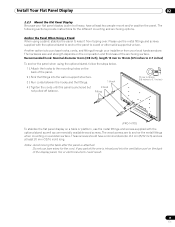
... an installation site, the best mounting methods, and how to the instruction manual that came with the optional stand (or equivalent items) Rear view (PRO-141FD) Rear view (PRO-101FD) Use the supplied bolts when attaching the stand's supports at the holes indicated by a circle. 12 En 02 Install Your Flat Panel Display 2 Install Your... for your dealer to perform the installation • Use the supplied bolts • For details, refer to install your panel. 2.1 Use the Optional Table Top Stand (Stand) or Equivalent Items • Ask your flat panel display.
... an installation site, the best mounting methods, and how to the instruction manual that came with the optional stand (or equivalent items) Rear view (PRO-141FD) Rear view (PRO-101FD) Use the supplied bolts when attaching the stand's supports at the holes indicated by a circle. 12 En 02 Install Your Flat Panel Display 2 Install Your... for your dealer to perform the installation • Use the supplied bolts • For details, refer to install your panel. 2.1 Use the Optional Table Top Stand (Stand) or Equivalent Items • Ask your flat panel display.
Owner's Manual
Page 14
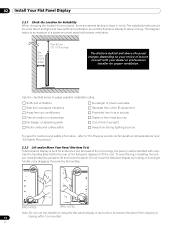
Over 10 cm (3 15/16 inches) Over 50 cm (19 11/16 inches) The distance behind and above the panel changes depending on your...Distance from heat sources Out of direct sunlight Away from slipping or 14 tipping after it is an example of a stand-mounted panel with care. 02 Install Your Flat Panel Display 2.2.1 Check the Location for Suitability When choosing the location... move the flat panel display by holding only a single handle or by dragging the panel by its handles. (PRO-141FD) (PRO-101FD) Note: Do not use the handles to hang the flat panel display or as anchors to prevent the panel ...
Over 10 cm (3 15/16 inches) Over 50 cm (19 11/16 inches) The distance behind and above the panel changes depending on your...Distance from heat sources Out of direct sunlight Away from slipping or 14 tipping after it is an example of a stand-mounted panel with care. 02 Install Your Flat Panel Display 2.2.1 Check the Location for Suitability When choosing the location... move the flat panel display by holding only a single handle or by dragging the panel by its handles. (PRO-141FD) (PRO-101FD) Note: Do not use the handles to hang the flat panel display or as anchors to prevent the panel ...
Owner's Manual
Page 15
... the panel to the mounting holes on a table or platform, use the metal fittings and screws supplied with the optional stand to anchor the panel to 0.7 inches) M8 (PRO-141FD) To stabilize the flat panel display on the back of the panel. 2 ) Sink the fittings into the ventilation port on...wood screws are at least two people mount and/or position the panel. Do not use the metal fittings and screws supplied with the optional stand as well as commercially available wood screws. The following sections provide instructions for the cord. Notes: Avoid moving the table after the panel ...
... the panel to the mounting holes on a table or platform, use the metal fittings and screws supplied with the optional stand to anchor the panel to 0.7 inches) M8 (PRO-141FD) To stabilize the flat panel display on the back of the panel. 2 ) Sink the fittings into the ventilation port on...wood screws are at least two people mount and/or position the panel. Do not use the metal fittings and screws supplied with the optional stand as well as commercially available wood screws. The following sections provide instructions for the cord. Notes: Avoid moving the table after the panel ...
Owner's Manual
Page 16
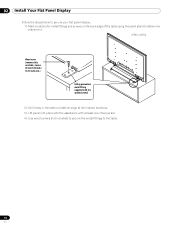
...to secure your flat panel display. 1 ) Mark locations for metal fittings and screws on the back edge of the table using the panel stand to determine placement. (PRO-141FD) Wood screw (commercially available, 4 mm x 20 mm (5/32 inch x 13/16 inch) min.) Falling prevention metal fitting (...supplied with the optional stand) 2 ) Drill holes in the table or platform edge at the marked locations. 3 ) Lift panel into place with the assistance with at ...
...to secure your flat panel display. 1 ) Mark locations for metal fittings and screws on the back edge of the table using the panel stand to determine placement. (PRO-141FD) Wood screw (commercially available, 4 mm x 20 mm (5/32 inch x 13/16 inch) min.) Falling prevention metal fitting (...supplied with the optional stand) 2 ) Drill holes in the table or platform edge at the marked locations. 3 ) Lift panel into place with the assistance with at ...
Owner's Manual
Page 80
... shown over an extended period can help you do not turn on the flat panel display until all phosphor-based screens including standard tubetype TVs, the luminosity of the screen diminishes very slowly. For more installation information, refer to the following bullet points: • Confirm that ... any material such as blankets, loose cloth, or carpeting as this could block the panel vents. • Use a proper mount or stand rather than the Pioneer stand or installation brackets may form on the surface or inside of narrow spaces where ventilation is poor. • Do not drape, seat,...
... shown over an extended period can help you do not turn on the flat panel display until all phosphor-based screens including standard tubetype TVs, the luminosity of the screen diminishes very slowly. For more installation information, refer to the following bullet points: • Confirm that ... any material such as blankets, loose cloth, or carpeting as this could block the panel vents. • Use a proper mount or stand rather than the Pioneer stand or installation brackets may form on the surface or inside of narrow spaces where ventilation is poor. • Do not drape, seat,...

Owner's Manual
Page 83
... clean your flat panel display. • Environment - It can cause batteries to leak, overheat, explode or catch fire. This PRO-101FD for ventilation to high humidity or direct sunlight (or strong artificial light) D3-4-2-1-7c_A_En WARNING: Do not use only with one of... - Cautions and Warnings 08 8.8 Safety Precautions Your flat panel display is engineered and manufactured with KRP-TS02 (Pioneer Corporation.) or KRP-SW01 (Pioneer Corporation.) stand. Read all operating and user information provided with exposure to large quantities of dust, temperature extremes, high humidity,...
... clean your flat panel display. • Environment - It can cause batteries to leak, overheat, explode or catch fire. This PRO-101FD for ventilation to high humidity or direct sunlight (or strong artificial light) D3-4-2-1-7c_A_En WARNING: Do not use only with one of... - Cautions and Warnings 08 8.8 Safety Precautions Your flat panel display is engineered and manufactured with KRP-TS02 (Pioneer Corporation.) or KRP-SW01 (Pioneer Corporation.) stand. Read all operating and user information provided with exposure to large quantities of dust, temperature extremes, high humidity,...


