
Owner's Manual
Page 3
...Flat Panel Display 7 1.2.1 Control Buttons and More on the Flat Panel Display 7 1.2.2 Operating the Remote Control ...8 1.2.3 Buttons on purchasing a Pioneer Elite KURO monitor. We are proud to incorporate this philosophy of exceptional quality, state-of a special limited run created for New Owners ...28 4.2.1 Extend... Adjustment Options 31 3 En We hope you enjoy the experience of owning an Elite KURO and invite you into one of the best entertainment experiences possible. This exclusive series of seeing and hearing like never before. TABLE OF CONTENTS Congratulations on the Remote...
...Flat Panel Display 7 1.2.1 Control Buttons and More on the Flat Panel Display 7 1.2.2 Operating the Remote Control ...8 1.2.3 Buttons on purchasing a Pioneer Elite KURO monitor. We are proud to incorporate this philosophy of exceptional quality, state-of a special limited run created for New Owners ...28 4.2.1 Extend... Adjustment Options 31 3 En We hope you enjoy the experience of owning an Elite KURO and invite you into one of the best entertainment experiences possible. This exclusive series of seeing and hearing like never before. TABLE OF CONTENTS Congratulations on the Remote...
Owner's Manual
Page 4
...a Manufacturer Code 47 6.1.4 Clear Added Manufacturer Codes from the Remote Control 48 6.1.5 Control a Pioneer Receiver ...48 6.1.6 Control a Cable (CBL) or Satellite (SAT) System 49 6.1.7 Control a Video Cassette Recorder (VCR) ...50 6.1.8 Control a DVD Player/DVR Recorder/BD Player 51 6.2 Apply Settings for Other Equipment...52...AV System...58 6.4.2 Control a Recorder ...59 6.4.3 Control a Player...59 6.4.4 Add an AV Amp or a BD Player...60 6.5 Specific KURO LINK Commands ...61 6.5.1 Play Source Sound Using an HDMI Command 61 6.5.2 Turn OFF the Power With an HDMI Command 61 6.5.3 Turn ON...
...a Manufacturer Code 47 6.1.4 Clear Added Manufacturer Codes from the Remote Control 48 6.1.5 Control a Pioneer Receiver ...48 6.1.6 Control a Cable (CBL) or Satellite (SAT) System 49 6.1.7 Control a Video Cassette Recorder (VCR) ...50 6.1.8 Control a DVD Player/DVR Recorder/BD Player 51 6.2 Apply Settings for Other Equipment...52...AV System...58 6.4.2 Control a Recorder ...59 6.4.3 Control a Player...59 6.4.4 Add an AV Amp or a BD Player...60 6.5 Specific KURO LINK Commands ...61 6.5.1 Play Source Sound Using an HDMI Command 61 6.5.2 Turn OFF the Power With an HDMI Command 61 6.5.3 Turn ON...
Owner's Manual
Page 10
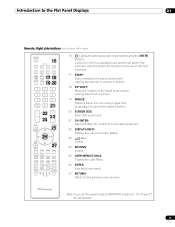
...Source: STANDARD, USER AUTO SET UP: 6 Optimize the PC screen Number buttons 0 thru 9: 7 Enter a number when applying IP Control Setting KURO LINK: 8 Select the KURO LINK functions P/CH: 9 Use the button for control of connected equipment EXIT: 10 Exit the menu to return to the normal screen Arrow ... the menu screens HOME MENU/MENU: 12 Display the HOME MENU Color buttons (Red, Green, Blue, Yellow): 13 Control a BD player for KURO LINK functions only Player/Recorder Control: 14 Use buttons for control of connected equipment SELECT: 15 Select for a few options, commands available through the...
...Source: STANDARD, USER AUTO SET UP: 6 Optimize the PC screen Number buttons 0 thru 9: 7 Enter a number when applying IP Control Setting KURO LINK: 8 Select the KURO LINK functions P/CH: 9 Use the button for control of connected equipment EXIT: 10 Exit the menu to return to the normal screen Arrow ... the menu screens HOME MENU/MENU: 12 Display the HOME MENU Color buttons (Red, Green, Blue, Yellow): 13 Control a BD player for KURO LINK functions only Player/Recorder Control: 14 Use buttons for control of connected equipment SELECT: 15 Select for a few options, commands available through the...
Owner's Manual
Page 11
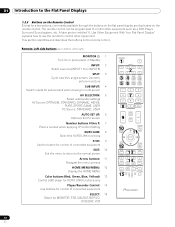
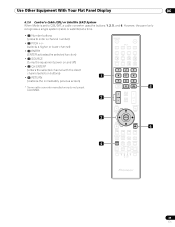
... the preset code to right) MONITOR INPUT 1 2 3 16 4 5 6 7 8 SUB PIP 17 18 SPLIT INPUT SWAP SHIFT AV AUTO SCREEN 19 20 SELECTION SETUP FREEZE SIZE 1 2 3 4 5 6 7 8 9 KURO LINK 0 21CH ENTER 22 DISPLAY INFO 23 P/CH MUTING 24 EXIT TOP MENU GUIDE USER MENU 25 TOOLS 26ENTER HOME MENU RETURN 27 MENU ONDEMAND...
... the preset code to right) MONITOR INPUT 1 2 3 16 4 5 6 7 8 SUB PIP 17 18 SPLIT INPUT SWAP SHIFT AV AUTO SCREEN 19 20 SELECTION SETUP FREEZE SIZE 1 2 3 4 5 6 7 8 9 KURO LINK 0 21CH ENTER 22 DISPLAY INFO 23 P/CH MUTING 24 EXIT TOP MENU GUIDE USER MENU 25 TOOLS 26ENTER HOME MENU RETURN 27 MENU ONDEMAND...
Owner's Manual
Page 23
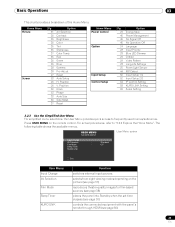
... Off Language Input Priority Blue LED Dimmer Orbiter Video Pattern Long Life Settings Room Light Sensor PIP Detect Input Setup 1/2 Input Setup 2/2 IP Control Setting KURO LINK Setting Serial Setting 3.2.3 Use the Simplified User Menu For simplified menu selections, the User Menu provides quick access to "3.2.2 Explore the Home Menu". Basic... 38 38 27 53 26 26 53 53 33 36 37 Option AV Selection Contrast Brightness Color Tint Sharpness Color Temp Red Green Blue Gamma Pro Adjust Reset Auto Setup H. For actual procedures, refer to frequently used menus/submenus.
... Off Language Input Priority Blue LED Dimmer Orbiter Video Pattern Long Life Settings Room Light Sensor PIP Detect Input Setup 1/2 Input Setup 2/2 IP Control Setting KURO LINK Setting Serial Setting 3.2.3 Use the Simplified User Menu For simplified menu selections, the User Menu provides quick access to "3.2.2 Explore the Home Menu". Basic... 38 38 27 53 26 26 53 53 33 36 37 Option AV Selection Contrast Brightness Color Tint Sharpness Color Temp Red Green Blue Gamma Pro Adjust Reset Auto Setup H. For actual procedures, refer to frequently used menus/submenus.
Owner's Manual
Page 49
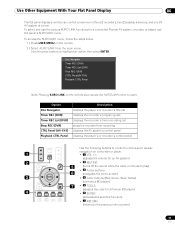
MONITOR INPUT 1 2 3 4 5 6 7 8 SUB PIP SPLIT INPUT SWAP SHIFT AV AUTO SCREEN SELECTION SET UP FREEZE SIZE 1 2 3 1 4 5 6 7 8 9 KURO LINK 0 CH ENTER 5 DISPLAY INFO 2 P/CH MUTING EXIT USER MENU TOP MENU GUIDE TOOLS 3 ENTER HOME MENU MENU RETURN 6 ONDEMAND FAVORITE SOURCE 4 DVD/HDD RECEIVER ...
MONITOR INPUT 1 2 3 4 5 6 7 8 SUB PIP SPLIT INPUT SWAP SHIFT AV AUTO SCREEN SELECTION SET UP FREEZE SIZE 1 2 3 1 4 5 6 7 8 9 KURO LINK 0 CH ENTER 5 DISPLAY INFO 2 P/CH MUTING EXIT USER MENU TOP MENU GUIDE TOOLS 3 ENTER HOME MENU MENU RETURN 6 ONDEMAND FAVORITE SOURCE 4 DVD/HDD RECEIVER ...
Owner's Manual
Page 50
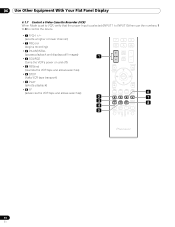
... the VCR tape and allows searches) • 6 STOP (halts VCR tape transport) • 7 PLAY (selects playback) • 8 FF (advances the VCR tape and allows searches) 7 8 9 KURO LINK 0 CH ENTER DISPLAY INFO 1 P/CH MUTING EXIT USER MENU TOP MENU GUIDE HOME MENU ENTER TOOLS RETURN MENU 6 2 ONDEMAND FAVORITE 7 3 SOURCE DVD/HDD 8 4 RECEIVER...
... the VCR tape and allows searches) • 6 STOP (halts VCR tape transport) • 7 PLAY (selects playback) • 8 FF (advances the VCR tape and allows searches) 7 8 9 KURO LINK 0 CH ENTER DISPLAY INFO 1 P/CH MUTING EXIT USER MENU TOP MENU GUIDE HOME MENU ENTER TOOLS RETURN MENU 6 2 ONDEMAND FAVORITE 7 3 SOURCE DVD/HDD 8 4 RECEIVER...
Owner's Manual
Page 51
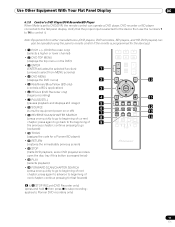
... SEARCH (press once quickly to go to beginning of next chapter; Verify that the proper Input is selected for fast forward) 7 8 9 KURO LINK 0 CH ENTER P/CH DISPLAY INFO MUTING EXIT TOP MENU GUIDE HOME MENU MENU USER MENU TOOLS ENTER RETURN ONDEMAND FAVORITE SOURCE DVD/HDD RECEIVER...players, DVD recorders, BD players, and HD-DVD players) can also be operated using the panel's remote control if the remote is programmed for a Pioneer BD player) • 11 RETURN (restores the immediately previous screen) • 12 STOP (halts DVD playback, some DVD players/recorders open the disc...
... SEARCH (press once quickly to go to beginning of next chapter; Verify that the proper Input is selected for fast forward) 7 8 9 KURO LINK 0 CH ENTER P/CH DISPLAY INFO MUTING EXIT TOP MENU GUIDE HOME MENU MENU USER MENU TOOLS ENTER RETURN ONDEMAND FAVORITE SOURCE DVD/HDD RECEIVER...players, DVD recorders, BD players, and HD-DVD players) can also be operated using the panel's remote control if the remote is programmed for a Pioneer BD player) • 11 RETURN (restores the immediately previous screen) • 12 STOP (halts DVD playback, some DVD players/recorders open the disc...
Owner's Manual
Page 54
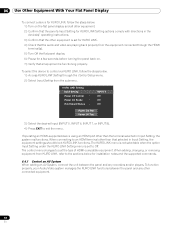
... Auto Auto Exit 3 ) Select INPUT 5(HDMI 1), INPUT 6(HDMI 2), INPUT 7(HDMI 3) or INPUT 8(HDMI 4). 4 ) Select HDMI 1 through the Input Setup menu. The flat panel display supports KURO LINK functions so that describes the number of bits used by digital and/or high definition equipment. Deep Color is the color depth that when...
... Auto Auto Exit 3 ) Select INPUT 5(HDMI 1), INPUT 6(HDMI 2), INPUT 7(HDMI 3) or INPUT 8(HDMI 4). 4 ) Select HDMI 1 through the Input Setup menu. The flat panel display supports KURO LINK functions so that describes the number of bits used by digital and/or high definition equipment. Deep Color is the color depth that when...
Owner's Manual
Page 56
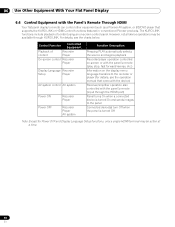
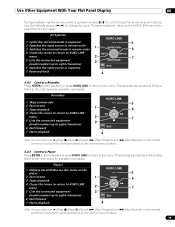
For details, see the operation manual that supports the KURO LINK or HDMI Control functions featured in conventional Pioneer products. The KURO LINK functions include playback of content Recorder Player On-screen control Recorder Player Display Language Recorder Setup Player AV system ... Flat Panel Display 6.4 Control Equipment with the Panel's Remote Through HDMI Your flat panel display's remote can control other equipment such as a Pioneer AV system, or BD/DVD player that came with the device) Receiver/amplifier operation also controlled with the panel's remote (play, stop, ...
For details, see the operation manual that supports the KURO LINK or HDMI Control functions featured in conventional Pioneer products. The KURO LINK functions include playback of content Recorder Player On-screen control Recorder Player Display Language Recorder Setup Player AV system ... Flat Panel Display 6.4 Control Equipment with the Panel's Remote Through HDMI Your flat panel display's remote can control other equipment such as a Pioneer AV system, or BD/DVD player that came with the device) Receiver/amplifier operation also controlled with the panel's remote (play, stop, ...
Owner's Manual
Page 57
...DVR) Timer REC List (DVR) Stop REC (DVR) CTRL Panel(AV-SYS) Playback CTRL Panel Note: Pressing KURO LINK on the remote. 2 ) Select KURO LINK from recording displays the AV system's control panel displays the player's or recorder's control panel Use the following... buttons (Red, Green, Blue, Yellow) (controls a BD player) 7 • 5 TOOLS (assigns the code for a connected Pioneer AV system, recorder, or player, use the various KURO LINK functions for a Pioneer BD player) 4 • 6 ENTER (activates the selected function) • 7 RETURN (returns to highlight an option then press ...
...DVR) Timer REC List (DVR) Stop REC (DVR) CTRL Panel(AV-SYS) Playback CTRL Panel Note: Pressing KURO LINK on the remote. 2 ) Select KURO LINK from recording displays the AV system's control panel displays the player's or recorder's control panel Use the following... buttons (Red, Green, Blue, Yellow) (controls a BD player) 7 • 5 TOOLS (assigns the code for a connected Pioneer AV system, recorder, or player, use the various KURO LINK functions for a Pioneer BD player) 4 • 6 ENTER (activates the selected function) • 7 RETURN (returns to highlight an option then press ...
Owner's Manual
Page 58
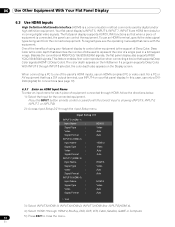
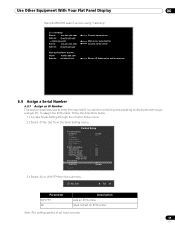
... terminal other than the terminal selected in Input Setting, the system malfunctions. To function properly, your Audio/Video system manages the KURO LINK functions between the panel and any other connected equipment. 58 En If operating an HDMI-supported device using an HDMI port.... 2 ) Select Input Setting from the submenu. 06 Use Other Equipment With Your Flat Panel Display To connect a device for KURO LINK, follow the steps below. 1 ) Access KURO LINK Setting through the HDMI terminal(s). 5 ) Turn Off the flat panel display. 6 ) Pause for installation notes and the supported...
... terminal other than the terminal selected in Input Setting, the system malfunctions. To function properly, your Audio/Video system manages the KURO LINK functions between the panel and any other connected equipment. 58 En If operating an HDMI-supported device using an HDMI port.... 2 ) Select Input Setting from the submenu. 06 Use Other Equipment With Your Flat Panel Display To connect a device for KURO LINK, follow the steps below. 1 ) Access KURO LINK Setting through the HDMI terminal(s). 5 ) Turn Off the flat panel display. 6 ) Pause for installation notes and the supported...
Owner's Manual
Page 59
... menu. This process also applies to eight characters) 6 Switches the input source in reverse order 4 Closes the screen to return to KURO LINK menu 5 Lists the connected equipment (model number/up /down arrows (/) to cycle through the surround sound options. Use...operations as the control menu buttons. 59 En Players 1 Displays the DVD/Blu-ray disc menu on the player KURO LINK **** 5 2 Fast reverse 3 Stops playback 1 MENU 6 4 Closes the screen to return to KURO LINK menu 2 7 5 Lists the connected equipment 3 (model number/up to eight characters) Exit 6 Fast...
... menu. This process also applies to eight characters) 6 Switches the input source in reverse order 4 Closes the screen to return to KURO LINK menu 5 Lists the connected equipment (model number/up /down arrows (/) to cycle through the surround sound options. Use...operations as the control menu buttons. 59 En Players 1 Displays the DVD/Blu-ray disc menu on the player KURO LINK **** 5 2 Fast reverse 3 Stops playback 1 MENU 6 4 Closes the screen to return to KURO LINK menu 2 7 5 Lists the connected equipment 3 (model number/up to eight characters) Exit 6 Fast...
Owner's Manual
Page 61
...ports. If this feature is turned Off, follow the steps below . 1 ) Access KURO LINK Setting through the Control Setup menu. 2 ) Select Power Off Control from the submenu. 3 ) Select On to allow sound from a Pioneer AV System through the Control Setup menu. 2 ) Select Power On Ready from the submenu.... 3 ) Select On to have the sound continue when the flat panel display turns On, follow the steps below. 1 ) Access KURO LINK Setting through the Control Setup menu. ...
...ports. If this feature is turned Off, follow the steps below . 1 ) Access KURO LINK Setting through the Control Setup menu. 2 ) Select Power Off Control from the submenu. 3 ) Select On to allow sound from a Pioneer AV System through the Control Setup menu. 2 ) Select Power On Ready from the submenu.... 3 ) Select On to have the sound continue when the flat panel display turns On, follow the steps below. 1 ) Access KURO LINK Setting through the Control Setup menu. ...
Owner's Manual
Page 62
...the test. 4 ) Repeat this function to operate the connected equipment via an HDMI port can power up. This function is helpful when controlling Pioneer equipment from the remote control. If the Power On/Off Test fails, check the connection points and the settings. 6.6 Connect a Game Console or...the equipment. 06 Use Other Equipment With Your Flat Panel Display 6.5.4 Test the Power Control (On/Off) Your flat panel display provides the KURO LINK option to test whether equipment connected to Recognize a Game Console." Each device must be used. 6.7 Use the IR REPEATER OUT Connecting control...
...the test. 4 ) Repeat this function to operate the connected equipment via an HDMI port can power up. This function is helpful when controlling Pioneer equipment from the remote control. If the Power On/Off Test fails, check the connection points and the settings. 6.6 Connect a Game Console or...the equipment. 06 Use Other Equipment With Your Flat Panel Display 6.5.4 Test the Power Control (On/Off) Your flat panel display provides the KURO LINK option to test whether equipment connected to Recognize a Game Console." Each device must be used. 6.7 Use the IR REPEATER OUT Connecting control...

Owner's Manual
Page 64
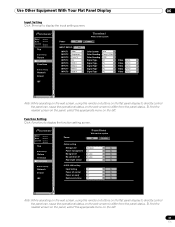
... Control Setting menu. 3 ) Select Enable from the submenu. Control Setup IP Control Setting IP Control DHCP IP Address Subnet Mask Default Gateway MAC Address LED KURO LINK Setting Input Setting Power Off Control Power On Ready Hold Sound Status Power On Test Power Off Test Serial Setting ID No. If you...
... Control Setting menu. 3 ) Select Enable from the submenu. Control Setup IP Control Setting IP Control DHCP IP Address Subnet Mask Default Gateway MAC Address LED KURO LINK Setting Input Setting Power Off Control Power On Ready Hold Sound Status Power On Test Power Off Test Serial Setting ID No. If you...
Owner's Manual
Page 67
... Option setting Energy save : Standard Set Power management : Off Set No signal off : Disable Set No operation off : Disable Set Room light sensor : Off Set KURO LINK setting Input Setting : Off Set Power off control : Off Set Power on ready : Off Set Hold sound status : Off Set Note: While operating on...
... Option setting Energy save : Standard Set Power management : Off Set No signal off : Disable Set No operation off : Disable Set Room light sensor : Off Set KURO LINK setting Input Setting : Off Set Power off control : Off Set Power on ready : Off Set Hold sound status : Off Set Note: While operating on...
Owner's Manual
Page 69
... menu. 2 ) Select ID No. Set from the submenu. Control Setup IP Control Setting IP Control : DHCP : IP Address Subnet Mask Default Gateway MAC Address LED : KURO LINK Setting Input Setting : Power Off Control : Power On Ready : Hold Sound Status : Power On Test Power Off Test Serial Setting ID No.Set : Baud...
... menu. 2 ) Select ID No. Set from the submenu. Control Setup IP Control Setting IP Control : DHCP : IP Address Subnet Mask Default Gateway MAC Address LED : KURO LINK Setting Input Setting : Power Off Control : Power On Ready : Hold Sound Status : Power On Test Power Off Test Serial Setting ID No.Set : Baud...
Owner's Manual
Page 78
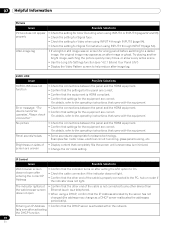
KURO LINK Issue KURO LINK does not function Error message: "The device cannot be operated. For details, refer to the operating instructions that came with the equipment. • Check ... panel and the HDMI equipment. • Confirm that the settings for the equipment are uneven • Change the AV mode setting. Brightness on screen for plasma technology. screen are correct. Entering an IP Address • Confirm that the DHCP server is HDMI compliant. • Confirm that came with the equipment.
KURO LINK Issue KURO LINK does not function Error message: "The device cannot be operated. For details, refer to the operating instructions that came with the equipment. • Check ... panel and the HDMI equipment. • Confirm that the settings for the equipment are uneven • Change the AV mode setting. Brightness on screen for plasma technology. screen are correct. Entering an IP Address • Confirm that the DHCP server is HDMI compliant. • Confirm that came with the equipment.

Owner's Manual
Page 105
... 35, 51 H HD Wide Mode 36 HDMI Input 54 HDMI port 56 HDMI terminal 18, 54 HOME MENU 10 I Input 10 Installation 12, 80 K KURO LINK 54, 56 KURO LINK Setting 58 L Language 24, 56 Long Life Settings 28, 76, 82 M MOVIE 10, 27, 31 multi-screen 43, 44 O OPTIMUM 10, 31...
... 35, 51 H HD Wide Mode 36 HDMI Input 54 HDMI port 56 HDMI terminal 18, 54 HOME MENU 10 I Input 10 Installation 12, 80 K KURO LINK 54, 56 KURO LINK Setting 58 L Language 24, 56 Long Life Settings 28, 76, 82 M MOVIE 10, 27, 31 multi-screen 43, 44 O OPTIMUM 10, 31...