Owners Manual
Page 2
NO USER-SERVICEABLE PARTS INSIDE. Install in accordance with the manufacturer's instructions. 8) Do not install near any ventilation openings. A grounding type plug has two blades and a third grounding prong. less than 85 %RH (cooling vents not blocked) Do not install this unit in a poorly ventilated area, or in locations exposed to operate the equipment. Therefore, make sure to leave space...
NO USER-SERVICEABLE PARTS INSIDE. Install in accordance with the manufacturer's instructions. 8) Do not install near any ventilation openings. A grounding type plug has two blades and a third grounding prong. less than 85 %RH (cooling vents not blocked) Do not install this unit in a poorly ventilated area, or in locations exposed to operate the equipment. Therefore, make sure to leave space...

Owners Manual
Page 3
... use headphones while operating a motorized vehicle; The power cords should be routed such that they are wet as this by tugging the cord and never touch the power cord when your hearing adapts. S002*_A1_En 3 Over time, your hearing "comfort level" adapts to your dealer for a replacement. BE SURE TO OBSERVE THE FOLLOWING GUIDELINES: • Do not turn up the volume so...
... use headphones while operating a motorized vehicle; The power cords should be routed such that they are wet as this by tugging the cord and never touch the power cord when your hearing adapts. S002*_A1_En 3 Over time, your hearing "comfort level" adapts to your dealer for a replacement. BE SURE TO OBSERVE THE FOLLOWING GUIDELINES: • Do not turn up the volume so...
Owners Manual
Page 4
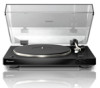
Please read through these operating instructions so you for buying this Pioneer product. Thank you will know how to operate your equipment...8 Playback...9 Pausing playback...9 Finishing playback...9 Additional information...9 03 Others Troubleshooting...11 Cautions on use...11 Maintenance of each part...11 About trademarks and registered trademarks...11 Specifications...12 4 Contents 01 Before you start Features...5 Checking what's in the box...5 Assembly...5 02 Operation Part names and functions...7 Adjustment...7 Connecting your model properly.
Please read through these operating instructions so you for buying this Pioneer product. Thank you will know how to operate your equipment...8 Playback...9 Pausing playback...9 Finishing playback...9 Additional information...9 03 Others Troubleshooting...11 Cautions on use...11 Maintenance of each part...11 About trademarks and registered trademarks...11 Specifications...12 4 Contents 01 Before you start Features...5 Checking what's in the box...5 Assembly...5 02 Operation Part names and functions...7 Adjustment...7 Connecting your model properly.
Owners Manual
Page 5
... check that can be turned off. Headshell with removable hinges ! Spare lead wires ! Comes with its position. Turntable sheet ! Operating instructions (this function can use , fully automatic record player Once you select the record size, all the connections between the record and the turntable-for EP record ! Connect the power cord after player assembly and all you can be connected directly to amps that the roller...
... check that can be turned off. Headshell with removable hinges ! Spare lead wires ! Comes with its position. Turntable sheet ! Operating instructions (this function can use , fully automatic record player Once you select the record size, all the connections between the record and the turntable-for EP record ! Connect the power cord after player assembly and all you can be connected directly to amps that the roller...
Owners Manual
Page 6
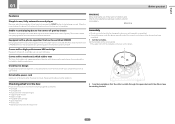
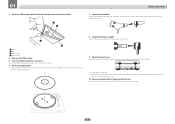
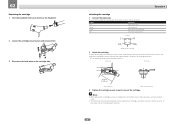
... the center of the roller. 1 2 Before you start 7 Attach the headshell. Attach the balance weight to the rear shaft of the turntable. Next, while keeping the headshell horizontal, tighten the lock nut. 3 4 1 Roller 2 Belt 3 Ribbon tape 4 Square hole 4 Remove the ribbon tape. 5 Turn turntable slowly five or six turns. The turntable mat has a top and a bottom side. PHONO...
... the center of the roller. 1 2 Before you start 7 Attach the headshell. Attach the balance weight to the rear shaft of the turntable. Next, while keeping the headshell horizontal, tighten the lock nut. 3 4 1 Roller 2 Belt 3 Ribbon tape 4 Square hole 4 Remove the ribbon tape. 5 Turn turntable slowly five or six turns. The turntable mat has a top and a bottom side. PHONO...

Owners Manual
Page 7
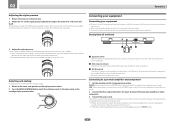
... played. 5 Headshell Used with removable stylus covers, remove the stylus cover. ! e Adapter for the tone arm. It is pushed down. When moving the tone arm, make sure that power is power to balance the tone arm and adjust the stylus pressure. b ANTI-SKATING dial When a record is played, there is eliminated. Push down . English NG 02 Part names and functions Top panel e 1 1 SPEED button Changes...
... played. 5 Headshell Used with removable stylus covers, remove the stylus cover. ! e Adapter for the tone arm. It is pushed down. When moving the tone arm, make sure that power is power to balance the tone arm and adjust the stylus pressure. b ANTI-SKATING dial When a record is played, there is eliminated. Push down . English NG 02 Part names and functions Top panel e 1 1 SPEED button Changes...
Owners Manual
Page 8
... black center line of the tone arm rear shaft. Turn the balance weight to adjust to the appropriate stylus pressure value for the included cartridge is used.) 2 Connect the RCA output terminal to the input terminal of the pre-main amplifier or other component. 3 AC IN terminal Connects to a power outlet using the included power cord. NTI-SKATIN A G 1 23 1 Equalizer switch Move this switch to appropriate position according to the audio input terminal...
... black center line of the tone arm rear shaft. Turn the balance weight to adjust to the appropriate stylus pressure value for the included cartridge is used.) 2 Connect the RCA output terminal to the input terminal of the pre-main amplifier or other component. 3 AC IN terminal Connects to a power outlet using the included power cord. NTI-SKATIN A G 1 23 1 Equalizer switch Move this switch to appropriate position according to the audio input terminal...
Owners Manual
Page 9
... is playing. ! To play system cannot be activated before replacing the stylus, and unplug the player's power cord. ! for 25 cm records. Pausing playback Pull up to this point, the auto return function may be used for 30 cm records, set the record size. Do not touch the tone arm or turntable or turn off the amplifier's power before playback is heard. Turn off the power while...
... is playing. ! To play system cannot be activated before replacing the stylus, and unplug the player's power cord. ! for 25 cm records. Pausing playback Pull up to this point, the auto return function may be used for 30 cm records, set the record size. Do not touch the tone arm or turntable or turn off the amplifier's power before playback is heard. Turn off the power while...
Owners Manual
Page 10
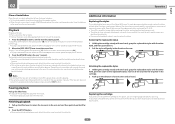
..., use the included spare lead wire. 10 Notes ! Operation Attaching the cartridge 1 Connect the lead wires. To achieve the required overhang, mount in .) Mount parallel. After replacing the cartridge, be 19 mm. Mount perpendicular. 3 Tighten the cartridge mount screws to readjust the horizontal balance, stylus pressure, and anti-skating value. ! They are color-coded as shown on the diagram...
..., use the included spare lead wire. 10 Notes ! Operation Attaching the cartridge 1 Connect the lead wires. To achieve the required overhang, mount in .) Mount parallel. After replacing the cartridge, be 19 mm. Mount perpendicular. 3 Tighten the cartridge mount screws to readjust the horizontal balance, stylus pressure, and anti-skating value. ! They are color-coded as shown on the diagram...
Owners Manual
Page 11
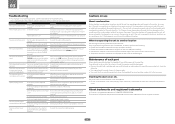
... your sales outlet. Properly connect the included power cord to clean the dust cover and cabinet. ! Check the belt and roller. When connected to the AUX terminal, put the equalizer switch in which the unit is moved from a cold place into contact with cartridge and use tape to the appropriate stylus pressure value for the cartridge type (output)? headshell part. Turn the balance weight...
... your sales outlet. Properly connect the included power cord to clean the dust cover and cabinet. ! Check the belt and roller. When connected to the AUX terminal, put the equalizer switch in which the unit is moved from a cold place into contact with cartridge and use tape to the appropriate stylus pressure value for the cartridge type (output)? headshell part. Turn the balance weight...
Owners Manual
Page 12
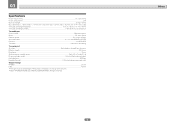
...Specifications Power requirements...AC 120 V, 60 Hz Power consumption...2 W Main unit weight...5.6 kg (12.3 lb) Max. All rights reserved. 12 Others The specifications and design of this product are subject to 9.5 g (single cartridge) Cartridge type...MM type Headshell weight...10.0 g (including screws and nuts) Output voltage PHONO...casting Tone arm part Arm type...Static balance straight type tone arm Effective length...221.5 mm Overhang...19 mm Stylus pressure variable range 0 g to 4.0 g (1 scale 0.1 g) Proper cartridge weight...4.5 g to change without notice. ! © 2014 PIONEER HOME ...
...Specifications Power requirements...AC 120 V, 60 Hz Power consumption...2 W Main unit weight...5.6 kg (12.3 lb) Max. All rights reserved. 12 Others The specifications and design of this product are subject to 9.5 g (single cartridge) Cartridge type...MM type Headshell weight...10.0 g (including screws and nuts) Output voltage PHONO...casting Tone arm part Arm type...Static balance straight type tone arm Effective length...221.5 mm Overhang...19 mm Stylus pressure variable range 0 g to 4.0 g (1 scale 0.1 g) Proper cartridge weight...4.5 g to change without notice. ! © 2014 PIONEER HOME ...
Owners Manual
Page 13
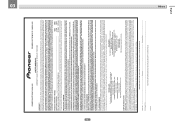
... period. YOU WILL BE RESPONSIBLE FOR REMOVAL AND INSTALLATION OF THE PRODUCT. PRODUCT WARRANTY PERIOD Parts Labor Home Audio and Video ...Microphones, Headphones, Phono Cartridges and Styluses ... 1 Year 1 Year 90 Days 90 Days Shorter limited warranty periods apply to you and Pioneer, Pioneer makes available its Complaint Resolution Program to have appointed a number of PUSA or POC, without charge. THIS WARRANTY...
... period. YOU WILL BE RESPONSIBLE FOR REMOVAL AND INSTALLATION OF THE PRODUCT. PRODUCT WARRANTY PERIOD Parts Labor Home Audio and Video ...Microphones, Headphones, Phono Cartridges and Styluses ... 1 Year 1 Year 90 Days 90 Days Shorter limited warranty periods apply to you and Pioneer, Pioneer makes available its Complaint Resolution Program to have appointed a number of PUSA or POC, without charge. THIS WARRANTY...
Owners Manual
Page 36
...55-9178-4270 K002_B3_En © 2014 PIONEER HOME ELECTRONICS CORPORATION. Printed in China / Imprimé en Chine LTD. 5 Arco Lane, Heatherton, Victoria, 3202, Australia, TEL: (03) 9586-6300 PIONEER ELECTRONICS DE MEXICO S.A. BOX 1540,...service location, to purchase replacement parts, operating instructions, or accessories, please go to one of following URLs : Pour enregistrer votre produit, trouver le service après-vente agréé le plus proche et pour acheter des pièces de rechange, des modes d'emploi ou des accessoires, reportez-vous aux URL suivantes : In the USA/Aux...
...55-9178-4270 K002_B3_En © 2014 PIONEER HOME ELECTRONICS CORPORATION. Printed in China / Imprimé en Chine LTD. 5 Arco Lane, Heatherton, Victoria, 3202, Australia, TEL: (03) 9586-6300 PIONEER ELECTRONICS DE MEXICO S.A. BOX 1540,...service location, to purchase replacement parts, operating instructions, or accessories, please go to one of following URLs : Pour enregistrer votre produit, trouver le service après-vente agréé le plus proche et pour acheter des pièces de rechange, des modes d'emploi ou des accessoires, reportez-vous aux URL suivantes : In the USA/Aux...


