Owner's Manual
Page 4
... Information 02 Safety Precautions 03 Supplied Accessories Speaker accessories 12 04 Part Names Plasma Display 13 Remote control unit 19 05 Preparation Installing the Plasma Display 20 Moving the Plasma Display 20 Installing the PIONEER speaker (PDP-5072HD/PDP-5071HD/ PDP-5070HD 21 When using the hung on wall unit: .....24 Preventing the Plasma Display from...
... Information 02 Safety Precautions 03 Supplied Accessories Speaker accessories 12 04 Part Names Plasma Display 13 Remote control unit 19 05 Preparation Installing the Plasma Display 20 Moving the Plasma Display 20 Installing the PIONEER speaker (PDP-5072HD/PDP-5071HD/ PDP-5070HD 21 When using the hung on wall unit: .....24 Preventing the Plasma Display from...
Owner's Manual
Page 6
...single-image screen 80 Starting the Slide Show Setup screen 80 Starting the Slide Show screen 80 13 Useful Remote Control Features Presetting manufacturer codes to control other devices 81 Presetting manufacturer codes ...........81 Library Search 81 Manufacturing Reset 81 Programming codes 82 CABLE 82 ...SATELLITE 82 VCR 83 PVR 85 DVD 85 DVD-R 86 LD 86 Using the remote control unit to control other devices 87 Receiver control buttons 87 CBL/SAT control buttons 88 VCR control buttons 89 DVD/DVR control buttons 90 14 Appendix Troubleshooting 91 Specifications 101 6 En
...single-image screen 80 Starting the Slide Show Setup screen 80 Starting the Slide Show screen 80 13 Useful Remote Control Features Presetting manufacturer codes to control other devices 81 Presetting manufacturer codes ...........81 Library Search 81 Manufacturing Reset 81 Programming codes 82 CABLE 82 ...SATELLITE 82 VCR 83 PVR 85 DVD 85 DVD-R 86 LD 86 Using the remote control unit to control other devices 87 Receiver control buttons 87 CBL/SAT control buttons 88 VCR control buttons 89 DVD/DVR control buttons 90 14 Appendix Troubleshooting 91 Specifications 101 6 En

Owner's Manual
Page 8
... you use chemicals such as labels and tape to hang the product when installing or carrying the product, for the purpose of its remote control sensor is composed of pixel defect Plasma screens display information using a very high level of time. If you use the handles attached to... or electrical hum coming from tilting over 3.1 million pixels in malfunction. not a test card, still image or single color display) please contact Pioneer Customer Support Div. (USA) or Customer Satisfaction Dept. (CANADA). See back cover. If you do not switch on and run the product ...
... you use chemicals such as labels and tape to hang the product when installing or carrying the product, for the purpose of its remote control sensor is composed of pixel defect Plasma screens display information using a very high level of time. If you use the handles attached to... or electrical hum coming from tilting over 3.1 million pixels in malfunction. not a test card, still image or single color display) please contact Pioneer Customer Support Div. (USA) or Customer Satisfaction Dept. (CANADA). See back cover. If you do not switch on and run the product ...

Owner's Manual
Page 12
... Remote control unit Simplified remote control unit* (for PDP-6071HD/PDP-5071HD/ PDP-4271HD only) Hexagonal wrench x 1 (Diagonal size: 6 mm) (except 60-inch models) AA size battery x 2 (Alkaline battery for remote control unit) AAA size battery x 2 (Manganese battery for simplified remote control unit) (for PDP-6071HD/PDP-5071HD/ PDP-4271HD only) Warranty card Terminal position sheet (for only basic operations are provided on the wall) (PDP-6072HD/PDP-6071HD/PDP...
... Remote control unit Simplified remote control unit* (for PDP-6071HD/PDP-5071HD/ PDP-4271HD only) Hexagonal wrench x 1 (Diagonal size: 6 mm) (except 60-inch models) AA size battery x 2 (Alkaline battery for remote control unit) AAA size battery x 2 (Manganese battery for simplified remote control unit) (for PDP-6071HD/PDP-5071HD/ PDP-4271HD only) Warranty card Terminal position sheet (for only basic operations are provided on the wall) (PDP-6072HD/PDP-6071HD/PDP...
Owner's Manual
Page 13
...side view (PDP-6072HD/PDP-6071HD/PDP-6070HD) 11 12 13 14 POWER ON STANDBY REC TIMER 04 6 7 8 9 10 English 2 3 15 1 4 POWER ON STANDBY REC TIMER 16 5 1 a POWER button (See page 32.) 2 POWER ON indicator (See page 32.) 3 STANDBY indicator (See page 32.) 4 REC TIMER indicator 5 Remote control sensor (Side ...PB, CR/PR) 13 INPUT 4 terminal (VIDEO) 14 INPUT 4 terminals (AUDIO) 15 Stand: PDK-TS15 for the PDP-6072HD PDK-TS15U for the PDP-6071HD/ PDP-6070HD 16 Speaker: PDP-S41 For details, refer to the operation manual that came with asterisks (*) can operate the TV Guide On Screen™ ...
...side view (PDP-6072HD/PDP-6071HD/PDP-6070HD) 11 12 13 14 POWER ON STANDBY REC TIMER 04 6 7 8 9 10 English 2 3 15 1 4 POWER ON STANDBY REC TIMER 16 5 1 a POWER button (See page 32.) 2 POWER ON indicator (See page 32.) 3 STANDBY indicator (See page 32.) 4 REC TIMER indicator 5 Remote control sensor (Side ...PB, CR/PR) 13 INPUT 4 terminal (VIDEO) 14 INPUT 4 terminals (AUDIO) 15 Stand: PDK-TS15 for the PDP-6072HD PDK-TS15U for the PDP-6071HD/ PDP-6070HD 16 Speaker: PDP-S41 For details, refer to the operation manual that came with asterisks (*) can operate the TV Guide On Screen™ ...

Owner's Manual
Page 14
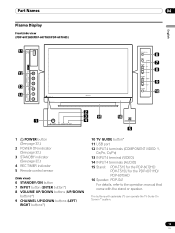
04 Part Names Front/side view (PDP-5072HD/PDP-5071HD/PDP-5070HD) 11 12 13 14 1 2 3 POWER ON STANDBY 6 7 8 9 10 REC TIMER 4 5 1 a POWER button (See page 32.) 2 POWER ON indicator (See page 32.) 3 STANDBY indicator (See page 32.) 4 REC TIMER indicator 5 Remote control sensor (Side view) 6 STANDBY/ON button 7 INPUT button (ENTER button*) 8 VOLUME UP/DOWN...
04 Part Names Front/side view (PDP-5072HD/PDP-5071HD/PDP-5070HD) 11 12 13 14 1 2 3 POWER ON STANDBY 6 7 8 9 10 REC TIMER 4 5 1 a POWER button (See page 32.) 2 POWER ON indicator (See page 32.) 3 STANDBY indicator (See page 32.) 4 REC TIMER indicator 5 Remote control sensor (Side view) 6 STANDBY/ON button 7 INPUT button (ENTER button*) 8 VOLUME UP/DOWN...

Owner's Manual
Page 15
... view (PDP-4272HD/PDP-4271HD/PDP-4270HD) 11 12 13 14 04 6 7 8 9 10 English 2 3 4 POWER ON STANDBY REC TIMER 1 Viewed from below of the display 5 Viewed from the front side of the display 1 a POWER button (See page 32.) 2 POWER ON indicator (See page 32.) 3 STANDBY indicator (See page 32.) 4 REC TIMER indicator 5 Remote control sensor...
... view (PDP-4272HD/PDP-4271HD/PDP-4270HD) 11 12 13 14 04 6 7 8 9 10 English 2 3 4 POWER ON STANDBY REC TIMER 1 Viewed from below of the display 5 Viewed from the front side of the display 1 a POWER button (See page 32.) 2 POWER ON indicator (See page 32.) 3 STANDBY indicator (See page 32.) 4 REC TIMER indicator 5 Remote control sensor...

Owner's Manual
Page 19
.... 26 CH ENTER: Executes a channel number. 27 CH RETURN: Returns to control other equipment, see "Using the remote control unit to the previous channel. NOTE • When using the TV Guide On Screen™ System, starts recording with "TV" selected) Simplified remote control unit (PDP-6071HD/PDP-5071HD/PDP-4271HD only) 14 1 19 29 4 28 3 22 27 20 12...
.... 26 CH ENTER: Executes a channel number. 27 CH RETURN: Returns to control other equipment, see "Using the remote control unit to the previous channel. NOTE • When using the TV Guide On Screen™ System, starts recording with "TV" selected) Simplified remote control unit (PDP-6071HD/PDP-5071HD/PDP-4271HD only) 14 1 19 29 4 28 3 22 27 20 12...
Owner's Manual
Page 29
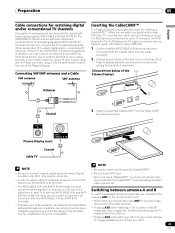
.../CABLE A IN terminal has been connected with the coaxial cable from the Cable Converter. 2 Hold and push the tab of the slot cover on the remote control unit. • While watching a broadcast, press ANT to connect coaxial cables as shown; Similarly, do not connect a cable from an antenna to both the ANT...
.../CABLE A IN terminal has been connected with the coaxial cable from the Cable Converter. 2 Hold and push the tab of the slot cover on the remote control unit. • While watching a broadcast, press ANT to connect coaxial cables as shown; Similarly, do not connect a cable from an antenna to both the ANT...
Owner's Manual
Page 30
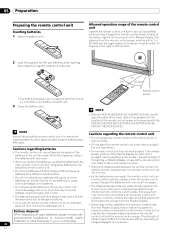
... can shorten the life of the lighting or Plasma Display, or operate the remote control unit closer to the remote sensor window. • When any chemical leakage, wipe thoroughly with a cloth. • The batteries supplied with the PDP-6072HD/PDP-6071HD/PDP-6070HD/PDP-5072HD/ PDP-5071HD/PDP-5070HD. If you will occur. Allowed operation range of the Plasma Display...
... can shorten the life of the lighting or Plasma Display, or operate the remote control unit closer to the remote sensor window. • When any chemical leakage, wipe thoroughly with a cloth. • The batteries supplied with the PDP-6072HD/PDP-6071HD/PDP-6070HD/PDP-5072HD/ PDP-5071HD/PDP-5070HD. If you will occur. Allowed operation range of the Plasma Display...
Owner's Manual
Page 32
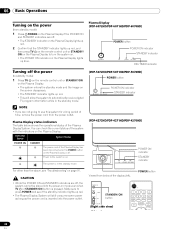
...status of the Plasma Display has been disconnected or the POWER button on the Plasma Display lights up red, and then press TV a on the remote control unit or STANDBY/ ON on the Plasma Display to use this system for a long period of the display (left). NOTE • If you...PDP-6071HD/PDP-6070HD) POWER button POWER ON indicator STANDBY indicator POWER ON STANDBY REC TIMER REC TIMER indicator Turning off . You can check the current status of the system with the indicators on mode even when TV a or STANDBY/ON button is off the power (to standby mode) 1 Press TV a on the remote control...
...status of the Plasma Display has been disconnected or the POWER button on the Plasma Display lights up red, and then press TV a on the remote control unit or STANDBY/ ON on the Plasma Display to use this system for a long period of the display (left). NOTE • If you...PDP-6071HD/PDP-6070HD) POWER button POWER ON indicator STANDBY indicator POWER ON STANDBY REC TIMER REC TIMER indicator Turning off . You can check the current status of the system with the indicators on mode even when TV a or STANDBY/ON button is off the power (to standby mode) 1 Press TV a on the remote control...

Owner's Manual
Page 33
...(dot) button. NOTE • After entering a channel or subchannel number, you may press CH ENTER to the previously tuned channel. on the remote control unit. • Press CH RETURN to switch the currently tuned channel to tune in the channel more quickly. • Each time you cannot ... at the top of program information. 06 Plasma Display (right side view) CHANNEL +/- Using 0 - 9 and • (dot) on the remote control unit Select channels directly by TV stations as CH +/- For the procedure, see emergency alert messages scrolling at the rear of the Plasma Display (page...
...(dot) button. NOTE • After entering a channel or subchannel number, you may press CH ENTER to the previously tuned channel. on the remote control unit. • Press CH RETURN to switch the currently tuned channel to tune in the channel more quickly. • Each time you cannot ... at the top of program information. 06 Plasma Display (right side view) CHANNEL +/- Using 0 - 9 and • (dot) on the remote control unit Select channels directly by TV stations as CH +/- For the procedure, see emergency alert messages scrolling at the rear of the Plasma Display (page...

Owner's Manual
Page 34
... available when the channel or program is changed, you press MTS, the language switches. NOTE • Switchable languages differ depending on the remote control unit. Pressing VOL + also quits muting. Volume adjustment display Muting display 34 En To decrease the volume, press VOL -. • ...VOLUME +/- on the screen. on the remote control unit. 06 Basic Operations Changing the volume and sound To increase the volume, press VOL + on the remote control unit. • To mute the sound output, press MUTING.
... available when the channel or program is changed, you press MTS, the language switches. NOTE • Switchable languages differ depending on the remote control unit. Pressing VOL + also quits muting. Volume adjustment display Muting display 34 En To decrease the volume, press VOL -. • ...VOLUME +/- on the screen. on the remote control unit. 06 Basic Operations Changing the volume and sound To increase the volume, press VOL + on the remote control unit. • To mute the sound output, press MUTING.

Owner's Manual
Page 45
...unblocked. Enter your Password" is displayed in step 6 under "Clearing the password", press the ENTER button on the remote control unit and hold it handy. Setting the voluntary movie rating system (MPAA) 1 Press HOME MENU. 2 Select "Tuner Setup". (... ENTER) Parental Control TV Ratings TV Ratings TV-None TV-Y TV-Y7 TV-G TV-PG Blocked TV Ratings xxxxxxxxxxxxxxxxxxxxx xxxxxxxxxxxxxxxxxxxxx xxxxxxxxxxxxxxxxxxxxx Home Menu Exit • The password entry screen appears. PDP-6072HD/PDP-6071HD/PDP-6070HD PDP-5072HD/PDP-5071HD/PDP-5070HD PDP-4272HD/PDP-4271HD/PDP-4270HD Your password...
...unblocked. Enter your Password" is displayed in step 6 under "Clearing the password", press the ENTER button on the remote control unit and hold it handy. Setting the voluntary movie rating system (MPAA) 1 Press HOME MENU. 2 Select "Tuner Setup". (... ENTER) Parental Control TV Ratings TV Ratings TV-None TV-Y TV-Y7 TV-G TV-PG Blocked TV Ratings xxxxxxxxxxxxxxxxxxxxx xxxxxxxxxxxxxxxxxxxxx xxxxxxxxxxxxxxxxxxxxx Home Menu Exit • The password entry screen appears. PDP-6072HD/PDP-6071HD/PDP-6070HD PDP-5072HD/PDP-5071HD/PDP-5070HD PDP-4272HD/PDP-4271HD/PDP-4270HD Your password...

Owner's Manual
Page 49
.... • "CC1", "CC2", "CC3", or "CC4" displays subtitles of TV dramas and news programs while allowing a full view of the four color buttons on the remote control unit (40 channels in progress. 1 Press HOME MENU. 2 Select "Tuner Setup". ( / then ENTER) 3 Select "Closed Captions". ( / then ENTER) 4 Select "Analog Settings". ( / then ENTER) 5 Select the...
.... • "CC1", "CC2", "CC3", or "CC4" displays subtitles of TV dramas and news programs while allowing a full view of the four color buttons on the remote control unit (40 channels in progress. 1 Press HOME MENU. 2 Select "Tuner Setup". ( / then ENTER) 3 Select "Closed Captions". ( / then ENTER) 4 Select "Analog Settings". ( / then ENTER) 5 Select the...

Owner's Manual
Page 53
... the panel menu when a future program is the screen you see when you press TV GUIDE. Key TV GUIDE What it airs on the remote control unit. Can also be used to display a panel menu. ENTER Press to the next/previous day of program listings (if applicable). PAGE +/-... DAY +/- TV Guide On Screen™ System Operation 10 English TV Guide On Screen™ navigation The table below shows a summary of the remote buttons you can: • View eight days of program listings. • Display information about individual programs. • Select a program to start watching. ...
... the panel menu when a future program is the screen you see when you press TV GUIDE. Key TV GUIDE What it airs on the remote control unit. Can also be used to display a panel menu. ENTER Press to the next/previous day of program listings (if applicable). PAGE +/-... DAY +/- TV Guide On Screen™ System Operation 10 English TV Guide On Screen™ navigation The table below shows a summary of the remote buttons you can: • View eight days of program listings. • Display information about individual programs. • Select a program to start watching. ...

Owner's Manual
Page 63
... current environment (e.g., room brightness), the type of the current TV program, or the type of images input from the five viewing options, depending on the remote control unit to switch the viewing option. • If you have selected "DYNAMIC", you to customize settings as desired. NOTE • To cancel the Sleep Timer...
... current environment (e.g., room brightness), the type of the current TV program, or the type of images input from the five viewing options, depending on the remote control unit to switch the viewing option. • If you have selected "DYNAMIC", you to customize settings as desired. NOTE • To cancel the Sleep Timer...

Owner's Manual
Page 67
...is performed for eight minutes. • Even when you start using the computer and a signal is received again, the system is switched on the remote control unit. Mode2 • Places the system into the standby mode if no signal is switched on again by pressing STANDBY/ON on the Plasma Display... or TV on the remote control unit. 5 Press HOME MENU to exit the menu. Save2 Lowest power consumption; may not be automatically placed into the standby mode when no ...
...is performed for eight minutes. • Even when you start using the computer and a signal is received again, the system is switched on the remote control unit. Mode2 • Places the system into the standby mode if no signal is switched on again by pressing STANDBY/ON on the Plasma Display... or TV on the remote control unit. 5 Press HOME MENU to exit the menu. Save2 Lowest power consumption; may not be automatically placed into the standby mode when no ...
Owner's Manual
Page 71
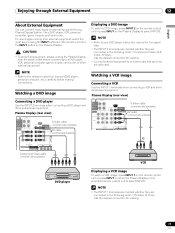
... Display (rear view) Displaying a DVD image To watch a VCR image, press INPUT 1 on the remote control unit or press INPUT on either the Plasma Display or the simplified remote control unit to select INPUT2. Use the desired connection for viewing. 71 En NOTE • The INPUT ...commercially available) Component Video cable (commercially available) DVD player VCR Displaying a VCR image To watch a DVD image, press INPUT 2 on the remote control unit or press INPUT on the Plasma Display. Watching a DVD image Connecting a DVD player Use the INPUT 2 terminals when connecting a DVD player...
... Display (rear view) Displaying a DVD image To watch a VCR image, press INPUT 1 on the remote control unit or press INPUT on either the Plasma Display or the simplified remote control unit to select INPUT2. Use the desired connection for viewing. 71 En NOTE • The INPUT ...commercially available) Component Video cable (commercially available) DVD player VCR Displaying a VCR image To watch a DVD image, press INPUT 2 on the remote control unit or press INPUT on the Plasma Display. Watching a DVD image Connecting a DVD player Use the INPUT 2 terminals when connecting a DVD player...
Owner's Manual
Page 72
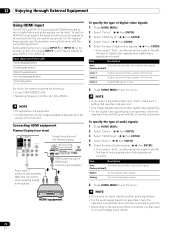
... Video signals (4:4:4) locked Color-3 Digital RGB signals locked 6 Press HOME MENU to exit the menu. Before starting the menu, press INPUT 5 (or INPUT 6) on the remote control unit or press INPUT on the equipment to be connected, you select "Auto", an attempt will be made to identify the type of these signals...
... Video signals (4:4:4) locked Color-3 Digital RGB signals locked 6 Press HOME MENU to exit the menu. Before starting the menu, press INPUT 5 (or INPUT 6) on the remote control unit or press INPUT on the equipment to be connected, you select "Auto", an attempt will be made to identify the type of these signals...


