Owner's Manual
Page 4
... up closed captions 43 Activating the closed caption 44 Changing the language 27 4 En However the method of the remote control unit 22 Cautions regarding the remote control unit 22 Connecting the power cord 23 Routing cables 24 09 Tuner Setup Setting up TV channels 38 Using Auto ... the Plasma Display 17 Installing the Media Receiver 17 Preventing the Plasma Display from that shown in a safe place for buying this Pioneer product. Please read through these operating instructions so you have finished reading the instructions, put them away in the explanatory drawings. Contents...
... up closed captions 43 Activating the closed caption 44 Changing the language 27 4 En However the method of the remote control unit 22 Cautions regarding the remote control unit 22 Connecting the power cord 23 Routing cables 24 09 Tuner Setup Setting up TV channels 38 Using Auto ... the Plasma Display 17 Installing the Media Receiver 17 Preventing the Plasma Display from that shown in a safe place for buying this Pioneer product. Please read through these operating instructions so you have finished reading the instructions, put them away in the explanatory drawings. Contents...

Owner's Manual
Page 6
... About SR 77 13 Useful Remote Control Features Learning function of the remote control unit 78 Using the learning function 78 Presetting manufacturer codes ...........78 Manufacture codes 79 Using the remote control unit to control other devices 80 Receiver control buttons 80 Cable control buttons 81 SAT control buttons 82 VCR control buttons 83 DVD/DVR control buttons 84 14 Appendix Troubleshooting...
... About SR 77 13 Useful Remote Control Features Learning function of the remote control unit 78 Using the learning function 78 Presetting manufacturer codes ...........78 Manufacture codes 79 Using the remote control unit to control other devices 80 Receiver control buttons 80 Cable control buttons 81 SAT control buttons 82 VCR control buttons 83 DVD/DVR control buttons 84 14 Appendix Troubleshooting...

Owner's Manual
Page 8
... and flannel). Use the handles as benzene or thinner to clean the Infrared rays The Plasma Display releases infrared rays because of its remote control sensor is the case, place that • Do not expose the product to volatile gas or fluid such as an AM radio... minutes. 01 Important User Guidance Information CAUTION PIONEER bears no responsibility for any damage arising from tilting over 3.1 million pixels in case of a 61 inch display). the supplied cleaning cloth or other product related problems, and use , the remote controls of nearby equipment may be scratched. •...
... and flannel). Use the handles as benzene or thinner to clean the Infrared rays The Plasma Display releases infrared rays because of its remote control sensor is the case, place that • Do not expose the product to volatile gas or fluid such as an AM radio... minutes. 01 Important User Guidance Information CAUTION PIONEER bears no responsibility for any damage arising from tilting over 3.1 million pixels in case of a 61 inch display). the supplied cleaning cloth or other product related problems, and use , the remote controls of nearby equipment may be scratched. •...
Owner's Manual
Page 12
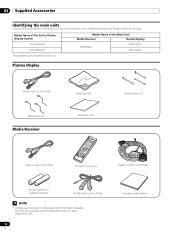
... Plasma Display PDP-R06U PDP-506PU PDP-436PU Plasma Display Power cord (2 m/6.6 feet) Bead band × 3 Media Receiver Cleaning cloth Warranty card Speed clamp × 3 Power cord (2 m/6.6 feet) Remote control unit System ...cable (3 m/9.8 feet) AA size battery × 2 (Alkaline battery) G-LINK cable (3 m/9.8 feet) NOTE • Always use the power cord supplied with the Plasma Display and the one supplied with the Media Receiver for each respective unit. 12 En Operating instructions Model Name of the Entire Plasma Display System PDP-5060HD PDP...
... Plasma Display PDP-R06U PDP-506PU PDP-436PU Plasma Display Power cord (2 m/6.6 feet) Bead band × 3 Media Receiver Cleaning cloth Warranty card Speed clamp × 3 Power cord (2 m/6.6 feet) Remote control unit System ...cable (3 m/9.8 feet) AA size battery × 2 (Alkaline battery) G-LINK cable (3 m/9.8 feet) NOTE • Always use the power cord supplied with the Plasma Display and the one supplied with the Media Receiver for each respective unit. 12 En Operating instructions Model Name of the Entire Plasma Display System PDP-5060HD PDP...
Owner's Manual
Page 13
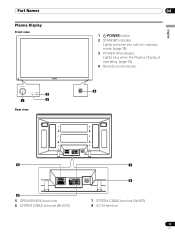
Part Names Part Names Plasma Display Front view 2 1 3 Rear view 04 1 a POWER button 2 STANDBY indicator Lights red when the unit is in standby mode. (page 25) 3 POWER ON indicator Lights blue when the Plasma Display is operating. (page 25) 4 Remote control sensor 4 English 5 SYSTEM CABLE WHITE BLACK SYSTEM CABLE WHITE BLACK 6 5 SPEAKER (R/L) terminals 6 SYSTEM CABLE terminal (BLACK) 7 8 7 SYSTEM CABLE terminal (WHITE) 8 AC IN terminal 13 En
Part Names Part Names Plasma Display Front view 2 1 3 Rear view 04 1 a POWER button 2 STANDBY indicator Lights red when the unit is in standby mode. (page 25) 3 POWER ON indicator Lights blue when the Plasma Display is operating. (page 25) 4 Remote control sensor 4 English 5 SYSTEM CABLE WHITE BLACK SYSTEM CABLE WHITE BLACK 6 5 SPEAKER (R/L) terminals 6 SYSTEM CABLE terminal (BLACK) 7 8 7 SYSTEM CABLE terminal (WHITE) 8 AC IN terminal 13 En
Owner's Manual
Page 16
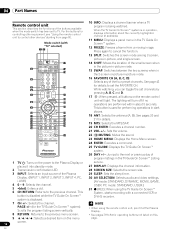
...-picture mode. 4 16 FAVORITE CH (A, B, C, D): Selects any of the Plasma 29 SLEEP: Sets the sleep timer. 04 Part Names Remote control unit This section describes the functions of program listings in the TV Guide On Screen™ Listing 1 TV a: Turns on the power to the... recording with "TV" selected) 12 10 INFO: Displays a channel banner when a TV program is displayed. 31 (REC): When using the remote control unit, point it into standby mode. 27 DISPLAY: Displays the channel information. 2 Transmission confirmation LED 28 SCREEN SIZE: Selects the screen size. 3 INPUT...
...-picture mode. 4 16 FAVORITE CH (A, B, C, D): Selects any of the Plasma 29 SLEEP: Sets the sleep timer. 04 Part Names Remote control unit This section describes the functions of program listings in the TV Guide On Screen™ Listing 1 TV a: Turns on the power to the... recording with "TV" selected) 12 10 INFO: Displays a channel banner when a TV program is displayed. 31 (REC): When using the remote control unit, point it into standby mode. 27 DISPLAY: Displays the channel information. 2 Transmission confirmation LED 28 SCREEN SIZE: Selects the screen size. 3 INPUT...

Owner's Manual
Page 21
... the Cable CARD slot as far as it by the cable TV company; See page 20. 2 Hold the tab of the slot cover on the remote control unit. • While watching a broadcast, press ANT to insert only the specified CableCARD™. • Do not insert a PC card. • When you need not...
... the Cable CARD slot as far as it by the cable TV company; See page 20. 2 Hold the tab of the slot cover on the remote control unit. • While watching a broadcast, press ANT to insert only the specified CableCARD™. • Do not insert a PC card. • When you need not...
Owner's Manual
Page 22
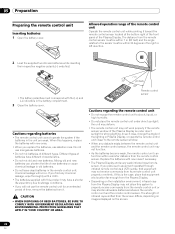
...differs, depending on images displayed on the installation environment, infrared rays from the remote control unit or may shorten allowable distances between the remote control unit and the remote control sensor, the remote control unit may have different characteristics. • Do not mix old and new ...from its screen. If you find any obstacle exists between the remote control unit and the remote control sensor. the unit may deform. • The remote control unit may not receive commands from the remote control sensor. The strength of the Plasma Display is the case, place...
...differs, depending on images displayed on the installation environment, infrared rays from the remote control unit or may shorten allowable distances between the remote control unit and the remote control sensor, the remote control unit may have different characteristics. • Do not mix old and new ...from its screen. If you find any obstacle exists between the remote control unit and the remote control sensor. the unit may deform. • The remote control unit may not receive commands from the remote control sensor. The strength of the Plasma Display is the case, place...
Owner's Manual
Page 25
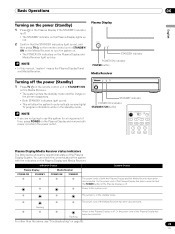
...and Media Receiver. Plasma Display STANDBY indicator POWER ON indicator POWER button Media Receiver Turning off the power (Standby) 1 Press TV a on the remote control unit or STANDBY/ON on the Media Receiver. • The system enters the standby mode and the image on page 85. 25 En Flashing Flashing... The STANDBY indicator on the Plasma Display lights up red. 2 Confirm that the STANDBY indicators light up red, and then press TV a on the remote control unit or STANDBY/ ON on the Media Receiver to turn the system on. • The POWER ON indicators on . STANDBY/ON REC ON STANDBY ...
...and Media Receiver. Plasma Display STANDBY indicator POWER ON indicator POWER button Media Receiver Turning off the power (Standby) 1 Press TV a on the remote control unit or STANDBY/ON on the Media Receiver. • The system enters the standby mode and the image on page 85. 25 En Flashing Flashing... The STANDBY indicator on the Plasma Display lights up red. 2 Confirm that the STANDBY indicators light up red, and then press TV a on the remote control unit or STANDBY/ ON on the Media Receiver to turn the system on. • The POWER ON indicators on . STANDBY/ON REC ON STANDBY ...

Owner's Manual
Page 26
... the Media Receiver operates the same as necessary when in emergency situations. To decrease the channel number, press CH -. • CHANNEL UP/DOWN on the remote control unit. EXAMPLE • To select channel 5 (1-digit channel), press 5. • To select channel 25 (2-digit channel), press 2 then 5. • ...cannot tune in the channel more quickly. • Each time you change a channel, a channel banner appears that the Mode switch on the remote control unit has been set up TV channels" on page 38. NOTE • After entering a channel or subchannel number, you may not display ...
... the Media Receiver operates the same as necessary when in emergency situations. To decrease the channel number, press CH -. • CHANNEL UP/DOWN on the remote control unit. EXAMPLE • To select channel 5 (1-digit channel), press 5. • To select channel 25 (2-digit channel), press 2 then 5. • ...cannot tune in the channel more quickly. • Each time you change a channel, a channel banner appears that the Mode switch on the remote control unit has been set up TV channels" on page 38. NOTE • After entering a channel or subchannel number, you may not display ...

Owner's Manual
Page 27
... and sound To increase the volume, press VOL + on the screen. Volume adjustment display Muting display 27 En " " appears on the remote control unit. Pressing VOL + also quits muting. With a language other than English, French, and Spanish are watching a digital TV program without ...sound or language information, "N/A" appears on the remote control unit. • To mute the sound output, press MUTING. To decrease the volume, press VOL -. • VOLUME UP/DOWN on the remote control unit. Changing the language If you have selected a digital TV program...
... and sound To increase the volume, press VOL + on the screen. Volume adjustment display Muting display 27 En " " appears on the remote control unit. Pressing VOL + also quits muting. With a language other than English, French, and Spanish are watching a digital TV program without ...sound or language information, "N/A" appears on the remote control unit. • To mute the sound output, press MUTING. To decrease the volume, press VOL -. • VOLUME UP/DOWN on the remote control unit. Changing the language If you have selected a digital TV program...
Owner's Manual
Page 40
...unblocked before shipment. 6 Press HOME MENU to exit the menu. NOTE • Blocking a rating causes more severe ratings to exit the menu. PDP-5060HD/PDP-4360HD Your password No.: If you forget the password When the message "Enter your 4-digit password using buttons 0 - 9. • Each time... blocked as well. We suggest you press ENTER, the setting is displayed in step 6 under "Clearing the password", press the ENTER button on the remote control unit and hold it down your 4-digit password using buttons 0 - 9. • A confirmation screen appears. 7 Press A. 8 Press HOME MENU ...
...unblocked before shipment. 6 Press HOME MENU to exit the menu. NOTE • Blocking a rating causes more severe ratings to exit the menu. PDP-5060HD/PDP-4360HD Your password No.: If you forget the password When the message "Enter your 4-digit password using buttons 0 - 9. • Each time... blocked as well. We suggest you press ENTER, the setting is displayed in step 6 under "Clearing the password", press the ENTER button on the remote control unit and hold it down your 4-digit password using buttons 0 - 9. • A confirmation screen appears. 7 Press A. 8 Press HOME MENU ...

Owner's Manual
Page 43
..., repeat steps 4 and 5. 6 Press HOME MENU to each of the four color buttons on the remote control unit (40 channels in total). Press ENTER. Parental Control EnxtexrxyxoxuxrxPxaxsxswxxoxrdxxxxxxxx xxxxxxxxxxxxxxxxxxxxx A Clear Entry D Cancel • The password entry screen stays only for one minute. Setting... an image. • The password entry screen stays only for one minute. Please look for temporarily deactivating the Parental Control differs, depending on your favorite channels Set up closed captions Your Plasma Display System is working and censors a blocked TV...
..., repeat steps 4 and 5. 6 Press HOME MENU to each of the four color buttons on the remote control unit (40 channels in total). Press ENTER. Parental Control EnxtexrxyxoxuxrxPxaxsxswxxoxrdxxxxxxxx xxxxxxxxxxxxxxxxxxxxx A Clear Entry D Cancel • The password entry screen stays only for one minute. Setting... an image. • The password entry screen stays only for one minute. Please look for temporarily deactivating the Parental Control differs, depending on your favorite channels Set up closed captions Your Plasma Display System is working and censors a blocked TV...

Owner's Manual
Page 47
...Screen™ navigation The table below shows a summary of the recording: • Once - Press REC repeatedly to change the frequency of the remote buttons you'll use to navigate screens (highlight an item). Just records the highlighted program. • Regularly - Can also be used to display a... to display the TV Guide On Screen™ system (also use the TV GUIDE, ENTER, UP/DOWN, and LEFT/ RIGHT buttons on the remote control unit. Records the same program any channel in the video window. • Access panel and channel ads. 1 Press TV GUIDE to select the...
...Screen™ navigation The table below shows a summary of the recording: • Once - Press REC repeatedly to change the frequency of the remote buttons you'll use to navigate screens (highlight an item). Just records the highlighted program. • Regularly - Can also be used to display a... to display the TV Guide On Screen™ system (also use the TV GUIDE, ENTER, UP/DOWN, and LEFT/ RIGHT buttons on the remote control unit. Records the same program any channel in the video window. • Access panel and channel ads. 1 Press TV GUIDE to select the...
Owner's Manual
Page 58
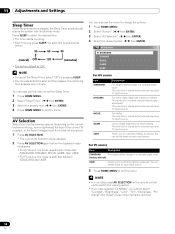
... current environment (e.g., room brightness), the type of the current TV program, or the type of images input from the five viewing options, depending on the remote control unit to switch the viewing option. • If you have selected "DYNAMIC", you to exit the menu. This selection is switched between STANDARD and USER...
... current environment (e.g., room brightness), the type of the current TV program, or the type of images input from the five viewing options, depending on the remote control unit to switch the viewing option. • If you have selected "DYNAMIC", you to exit the menu. This selection is switched between STANDARD and USER...
Owner's Manual
Page 63
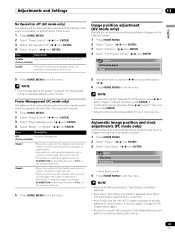
... A confirmation screen appears. NOTE • When Auto Setup is switched on again by pressing STANDBY/ON on the Media Receiver or TV on the remote control unit. Mode2 • Places the system into the standby mode when no signal is received from a personal computer. 1 Press HOME MENU. 2 Select... again, the system is switched on. • The system is switched on again by pressing STANDBY/ON on the Media Receiver or TV on the remote control unit. 5 Press HOME MENU to exit the menu. 5 Adjust the vertical position ( / ) or horizontal position ( / ). 6 Press HOME MENU to...
... A confirmation screen appears. NOTE • When Auto Setup is switched on again by pressing STANDBY/ON on the Media Receiver or TV on the remote control unit. Mode2 • Places the system into the standby mode when no signal is received from a personal computer. 1 Press HOME MENU. 2 Select... again, the system is switched on. • The system is switched on again by pressing STANDBY/ON on the Media Receiver or TV on the remote control unit. 5 Press HOME MENU to exit the menu. 5 Adjust the vertical position ( / ) or horizontal position ( / ). 6 Press HOME MENU to...

Owner's Manual
Page 67
...To protect all equipment, always unplug the Media Receiver from external equipment, select the input source using the INPUT buttons on the remote control or the INPUT button on the Media Receiver to select INPUT1. Use the desired connection for viewing. • Connect external ...INPUT 1 Y CB / PB COMPONENT VIDEO CR / PR INPUT 1 HD Displaying a DVD image To watch a VCR image, press INPUT 2 on the remote control unit or press INPUT on the Media Receiver to the relevant instruction manual (DVD player, personal computer, etc.) carefully before connecting to your Plasma Display...
...To protect all equipment, always unplug the Media Receiver from external equipment, select the input source using the INPUT buttons on the remote control or the INPUT button on the Media Receiver to select INPUT1. Use the desired connection for viewing. • Connect external ...INPUT 1 Y CB / PB COMPONENT VIDEO CR / PR INPUT 1 HD Displaying a DVD image To watch a VCR image, press INPUT 2 on the remote control unit or press INPUT on the Media Receiver to the relevant instruction manual (DVD player, personal computer, etc.) carefully before connecting to your Plasma Display...

Owner's Manual
Page 68
... cable (commercially available) Audio cable (commercially available) Make this connection when inputting analog audio signals. Before starting the menu, press INPUT 1 (or INPUT 3) on the remote control unit or press INPUT on the Media Receiver to exit the menu. HDMI equipment To activate the HDMI terminal: 1 Press HOME MENU. 2 Select "Option". ( / then...
... cable (commercially available) Audio cable (commercially available) Make this connection when inputting analog audio signals. Before starting the menu, press INPUT 1 (or INPUT 3) on the remote control unit or press INPUT on the Media Receiver to exit the menu. HDMI equipment To activate the HDMI terminal: 1 Press HOME MENU. 2 Select "Option". ( / then...

Owner's Manual
Page 69
... S-Video cable (commercially available) Avoiding unwanted feedback You can prevent unwanted feedback from the game console or camcorder, press INPUT 4 on the remote control unit or press INPUT on the rear of the Media Receiver, you also need to select INPUT4. Component Video cable (commercially available) Game ... affecting the quality of the Media Receiver and then position the G-LINK cable's wand so that its light emitting section faces the remote control sensor on the equipment to exit the menu. Connect the supplied GLINK cable to be connected, you can also record digital TV ...
... S-Video cable (commercially available) Avoiding unwanted feedback You can prevent unwanted feedback from the game console or camcorder, press INPUT 4 on the remote control unit or press INPUT on the rear of the Media Receiver, you also need to select INPUT4. Component Video cable (commercially available) Game ... affecting the quality of the Media Receiver and then position the G-LINK cable's wand so that its light emitting section faces the remote control sensor on the equipment to exit the menu. Connect the supplied GLINK cable to be connected, you can also record digital TV ...

Owner's Manual
Page 72
... STANDBY/ON REC ON STANDBY TIMER PULL OPEN D-VHS recorder Displaying a D-VHS image To watch a D-VHS image, press i.LINK on the remote control unit or press INPUT on or off . Check the instruction manual that came with your D-VHS recorder. 72 En Precautions • While one...not switch on the Media Receiver to display images and output sound. • To record digital TV programs using this system to control them through the control panel screen, or to select i.LINK. 12 Enjoying through External Equipment Precautions about i.LINK connections • Use S400 i.LINK cables...
... STANDBY/ON REC ON STANDBY TIMER PULL OPEN D-VHS recorder Displaying a D-VHS image To watch a D-VHS image, press i.LINK on the remote control unit or press INPUT on or off . Check the instruction manual that came with your D-VHS recorder. 72 En Precautions • While one...not switch on the Media Receiver to display images and output sound. • To record digital TV programs using this system to control them through the control panel screen, or to select i.LINK. 12 Enjoying through External Equipment Precautions about i.LINK connections • Use S400 i.LINK cables...


