Owner's Manual
Page 4
After you for buying this Pioneer product. However the method of connecting and operating the unit is the same. 01 Important User Guidance Information 02 Safety Precautions 03 Supplied Accessories 04 Part Names Plasma Display 10 Remote control unit 12 05 Preparation Installing the Plasma Display 14 Preventing the Plasma Display from that...
After you for buying this Pioneer product. However the method of connecting and operating the unit is the same. 01 Important User Guidance Information 02 Safety Precautions 03 Supplied Accessories 04 Part Names Plasma Display 10 Remote control unit 12 05 Preparation Installing the Plasma Display 14 Preventing the Plasma Display from that...
Owner's Manual
Page 5
...affected by taking some basic precautions. Direct Color Filter. Over the course of its lifetime, the luminosity of the Pioneer PDP-5016HD/PDP-4216HD Plasma Display System will diminish very slowly, such as compared to come, please carefully read this product. By... parts and accessories manufactured by PIONEER. After viewing masked content, view full screen motion video for a prolonged period. For the minimum space required around the unit, see page 14. • Do not fit the unit inside narrow spaces where ventilation is strongly recommended. The Pioneer PureVision PDP-5016HD/PDP-...
...affected by taking some basic precautions. Direct Color Filter. Over the course of its lifetime, the luminosity of the Pioneer PDP-5016HD/PDP-4216HD Plasma Display System will diminish very slowly, such as compared to come, please carefully read this product. By... parts and accessories manufactured by PIONEER. After viewing masked content, view full screen motion video for a prolonged period. For the minimum space required around the unit, see page 14. • Do not fit the unit inside narrow spaces where ventilation is strongly recommended. The Pioneer PureVision PDP-5016HD/PDP-...
Owner's Manual
Page 8
...mounting the product on a cart, it can cause the product to ensure that the service person uses replacement parts specified by a qualified technician. When relocating the product placed on a wall, be observed closely. 4. Sudden ...-Do not overload AC outlets or extension cords. Overloading can cause electric shock and/or short internal parts. Entering of the following instructions when installing, operating and cleaning the product. High voltage flows in ...Display weighs about 46.0 kg (101.2 lbs.) for the PDP-5016HD and 38.5 kg (84.7 lbs.) for example, by the manufacturer. 9.
...mounting the product on a cart, it can cause the product to ensure that the service person uses replacement parts specified by a qualified technician. When relocating the product placed on a wall, be observed closely. 4. Sudden ...-Do not overload AC outlets or extension cords. Overloading can cause electric shock and/or short internal parts. Entering of the following instructions when installing, operating and cleaning the product. High voltage flows in ...Display weighs about 46.0 kg (101.2 lbs.) for the PDP-5016HD and 38.5 kg (84.7 lbs.) for example, by the manufacturer. 9.
Owner's Manual
Page 10
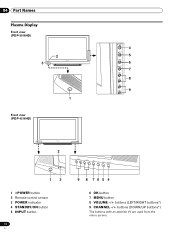
04 Part Names Plasma Display Front view (PDP-5016HD) 2 3 1 Front view (PDP-4216HD) STANDBY /ON 4 INPUT 5 OK 6 MENU 7 VOL+ VOL- 8 CH+ CH- 9 2 13 1 POWER button 2 Remote control sensor 3 POWER indicator 4 STANDBY/ON button 5 INPUT button 10 En - VOLUME + MENU OK INPUT STANDBY/ON STAND 9 8 765 4 6 OK button 7 MENU button 8 VOLUME -/+ buttons (LEFT/RIGHT buttons*) 9 CHANNEL -/+ buttons (DOWN/UP buttons*) The buttons with an asterisk (*) are used from the menu screen. CHANNEL + -
04 Part Names Plasma Display Front view (PDP-5016HD) 2 3 1 Front view (PDP-4216HD) STANDBY /ON 4 INPUT 5 OK 6 MENU 7 VOL+ VOL- 8 CH+ CH- 9 2 13 1 POWER button 2 Remote control sensor 3 POWER indicator 4 STANDBY/ON button 5 INPUT button 10 En - VOLUME + MENU OK INPUT STANDBY/ON STAND 9 8 765 4 6 OK button 7 MENU button 8 VOLUME -/+ buttons (LEFT/RIGHT buttons*) 9 CHANNEL -/+ buttons (DOWN/UP buttons*) The buttons with an asterisk (*) are used from the menu screen. CHANNEL + -
Owner's Manual
Page 11
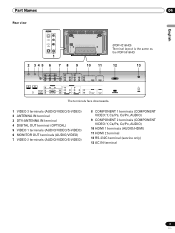
Part Names 04 Rear view English 1 2 345 6 7 8 9 10 11 (PDP-4216HD) Terminal layout is the same as the PDP-5016HD. 12 13 The terminals face downwards. 1 VIDEO 3 terminals (AUDIO/VIDEO/S-VIDEO) 2 ANTENNA IN terminal 3 DTV-ANTENNA IN terminal 4 DIGITAL OUT terminal (OPTICAL) 5 VIDEO 1 terminals (AUDIO/...
Part Names 04 Rear view English 1 2 345 6 7 8 9 10 11 (PDP-4216HD) Terminal layout is the same as the PDP-5016HD. 12 13 The terminals face downwards. 1 VIDEO 3 terminals (AUDIO/VIDEO/S-VIDEO) 2 ANTENNA IN terminal 3 DTV-ANTENNA IN terminal 4 DIGITAL OUT terminal (OPTICAL) 5 VIDEO 1 terminals (AUDIO/...
Owner's Manual
Page 12
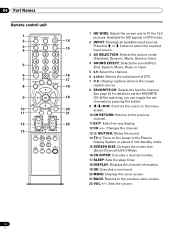
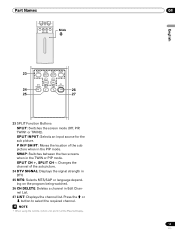
... or User). 5 0-9: Select the channel. 6 ÷ (dot): Selects the subchannel of DTV. 7 C.C.: Display captions while in DTV mode. 2 INPUT: Displays all available input sources. 04 Part Names Remote control unit 1 TV INPUT HD WIDE 2 14 AV SELECTION SOUND EFFECT SCREEN SIZE 3 4 15 123 456 5 789 6 0 CH ENTER 16 7 C.C. While watching, you...
... or User). 5 0-9: Select the channel. 6 ÷ (dot): Selects the subchannel of DTV. 7 C.C.: Display captions while in DTV mode. 2 INPUT: Displays all available input sources. 04 Part Names Remote control unit 1 TV INPUT HD WIDE 2 14 AV SELECTION SOUND EFFECT SCREEN SIZE 3 4 15 123 456 5 789 6 0 CH ENTER 16 7 C.C. While watching, you...
Owner's Manual
Page 13
... picture. Press the c or d button to select the required channel. • When using the remote control unit, point it at the Plasma Display. 13 En Part Names CH MUTING VOL SPLIT SPLIT INPUT P IN P SHIFT SWAP DTV SIGNAL SPLIT CH+ MTS SPLIT CH- SPLIT CH +, SPLIT CH -: Changes the channel of...
... picture. Press the c or d button to select the required channel. • When using the remote control unit, point it at the Plasma Display. 13 En Part Names CH MUTING VOL SPLIT SPLIT INPUT P IN P SHIFT SWAP DTV SIGNAL SPLIT CH+ MTS SPLIT CH- SPLIT CH +, SPLIT CH -: Changes the channel of...
Owner's Manual
Page 14
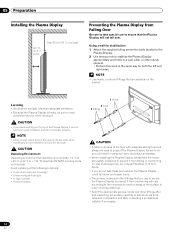
... right sides. • Use hooks, cords and fittings that the Plasma Display will not operate properly. • Allow enough space around the upper and back parts when installing to ensure ventilation around the backside. 05 Preparation Installing the Plasma Display Over 10 cm (3 /15 16 inches) Over 50 cm (19 /11...
... right sides. • Use hooks, cords and fittings that the Plasma Display will not operate properly. • Allow enough space around the upper and back parts when installing to ensure ventilation around the backside. 05 Preparation Installing the Plasma Display Over 10 cm (3 /15 16 inches) Over 50 cm (19 /11...


