Operating Instructions
Page 5
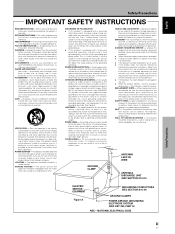
...that produce heat. Unauthorized substitutions may result in fire, electric shock, or other controls may touch dangerous voltage points or shortout parts that could result in a stable location. SAFETY CHECK - English Français Safety Precautions IMPORTANT SAFETY INSTRUCTIONS READ INSTRUCTIONS ... ÷ If the product has been exposed to your home, consult your product dealer or local power company. REPLACEMENT PARTS - When replacement parts are unable to insert the plug into such power lines or circuits. RETAIN INSTRUCTIONS - FOLLOW INSTRUCTIONS - and the like...
...that produce heat. Unauthorized substitutions may result in fire, electric shock, or other controls may touch dangerous voltage points or shortout parts that could result in a stable location. SAFETY CHECK - English Français Safety Precautions IMPORTANT SAFETY INSTRUCTIONS READ INSTRUCTIONS ... ÷ If the product has been exposed to your home, consult your product dealer or local power company. REPLACEMENT PARTS - When replacement parts are unable to insert the plug into such power lines or circuits. RETAIN INSTRUCTIONS - FOLLOW INSTRUCTIONS - and the like...
Operating Instructions
Page 6
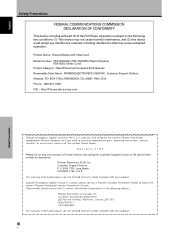
... P. Product Name: Plasma Display with part 15 of the FCC Rules. English Safety Precautions FEDERAL COMMUNICATIONS COMMISSION DECLARATION OF CONFORMITY This device complies with Video Card Model Number: PDP-503CMX / PDP-433CMX (Plasma Display) PDA-5002 (Video Card) Product Category: Class B Personal Computers & Peripherals Responsible Party Name: PIONEER ELECTRONICS (USA) INC. Pioneer Electronics (USA) Inc. iivi...
... P. Product Name: Plasma Display with part 15 of the FCC Rules. English Safety Precautions FEDERAL COMMUNICATIONS COMMISSION DECLARATION OF CONFORMITY This device complies with Video Card Model Number: PDP-503CMX / PDP-433CMX (Plasma Display) PDA-5002 (Video Card) Product Category: Class B Personal Computers & Peripherals Responsible Party Name: PIONEER ELECTRONICS (USA) INC. Pioneer Electronics (USA) Inc. iivi...

Operating Instructions
Page 7
English Contents Safety Precautions i Features 2 Before Proceeding 3 How to Use This Manual 3 Checking Supplied Accessories 5 Part Names and Functions 6 Main Unit 6 Remote Control Unit 7 Connection Panel 8 Installation and Connections 10 Installation of the Unit 10 Connection to INPUT1 and INPUT2 12 ...
English Contents Safety Precautions i Features 2 Before Proceeding 3 How to Use This Manual 3 Checking Supplied Accessories 5 Part Names and Functions 6 Main Unit 6 Remote Control Unit 7 Connection Panel 8 Installation and Connections 10 Installation of the Unit 10 Connection to INPUT1 and INPUT2 12 ...
Operating Instructions
Page 9
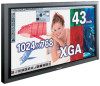
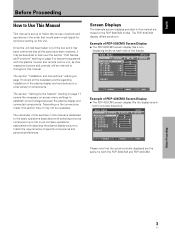
...on page 17 covers the necessary on-screen menu settings to a wide variety of PDP-433CMX Screen Display: ÷ The PDP-433CMX screen display fills the display area in this manual are the same for the PDP-503CMX model. The PDP-433CMX display differs as their respective buttons and controls will be necessary. L E V ... over the section "Part Names and Functions" starting on page 6 to become acquainted with the plasma monitor and remote control unit, as shown: Example of the display. Screen Displays The example screen displays provided in both the PDP-503CMX and PDP-433CMX. L EVEL G....
...on page 17 covers the necessary on-screen menu settings to a wide variety of PDP-433CMX Screen Display: ÷ The PDP-433CMX screen display fills the display area in this manual are the same for the PDP-503CMX model. The PDP-433CMX display differs as their respective buttons and controls will be necessary. L E V ... over the section "Part Names and Functions" starting on page 6 to become acquainted with the plasma monitor and remote control unit, as shown: Example of the display. Screen Displays The example screen displays provided in both the PDP-503CMX and PDP-433CMX. L EVEL G....

Operating Instructions
Page 12
... on the main unit 4 STANDBY/ON button Press to put the display in the operation mode (page 19). English Part Names and Functions Main Unit Main unit 3 Operation panel on the main unit 4 5 6 7 8 9 0 Part Names and Functions 1 2 Main unit 1 Display stand 2 Remote control sensor Point the remote control toward the remote sensor...
... on the main unit 4 STANDBY/ON button Press to put the display in the operation mode (page 19). English Part Names and Functions Main Unit Main unit 3 Operation panel on the main unit 4 5 6 7 8 9 0 Part Names and Functions 1 2 Main unit 1 Display stand 2 Remote control sensor Point the remote control toward the remote sensor...

Operating Instructions
Page 13
... put the unit in a place subject to excessive humidity. ¶ When the remote control unit's batteries begin to select and enlarge one part of the arrow. If battery liquid has leaked, thoroughly wipe the inside of battery fluid. H048 En 7 En When this occurs, replace... is removed, and then insert new batteries. ¶ Do not charge, short, disassemble or throw the provided batteries in your country or area. Part Names and Functions English Part Names and Functions Remote Control Unit 1 7 8 2 9 3 0 4 5 6 - When handling the remote control unit ¶ Do not drop or shake ...
... put the unit in a place subject to excessive humidity. ¶ When the remote control unit's batteries begin to select and enlarge one part of the arrow. If battery liquid has leaked, thoroughly wipe the inside of battery fluid. H048 En 7 En When this occurs, replace... is removed, and then insert new batteries. ¶ Do not charge, short, disassemble or throw the provided batteries in your country or area. Part Names and Functions English Part Names and Functions Remote Control Unit 1 7 8 2 9 3 0 4 5 6 - When handling the remote control unit ¶ Do not drop or shake ...

Operating Instructions
Page 14
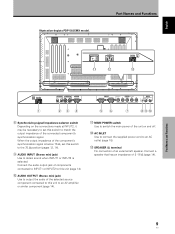
...16 Ω (page 14). 2 CONTROL IN/OUT (monaural mini jacks) For connection of PIONEER components that the connection made corresponds to the format of its rays or limiting its operational distance. Part Names and Functions 8 En replace weak batteries with a CONTROL IN/OUT connector for connecting to ... and within a 30 angle on each item. 1 SPEAKER (R) terminal For connection of a personal computer (PC) or similar component. English Part Names and Functions Operating range of the remote control unit When operating the remote control unit, point it at the remote sensor (Î) located...
...16 Ω (page 14). 2 CONTROL IN/OUT (monaural mini jacks) For connection of PIONEER components that the connection made corresponds to the format of its rays or limiting its operational distance. Part Names and Functions 8 En replace weak batteries with a CONTROL IN/OUT connector for connecting to ... and within a 30 angle on each item. 1 SPEAKER (R) terminal For connection of a personal computer (PC) or similar component. English Part Names and Functions Operating range of the remote control unit When operating the remote control unit, point it at the remote sensor (Î) located...
Operating Instructions
Page 15
... (pages 12, 14). 9 AUDIO INPUT (Stereo mini jack) Use to an AC outlet (page 15). ~ SPEAKER (L) terminal For connection of the connected component's synchronization signal. Part Names and Functions AC INLET - = 8Ω ~16Ω SPEAKER + - Connect the audio output jack of components connected to INPUT1 or INPUT2 to this unit (page... the unit on the connections made at INPUT2, it may be necessary to set this switch to an AV amplifier or similar component (page 14). - Part Names and Functions 9 En English Illustration depicts...
... (pages 12, 14). 9 AUDIO INPUT (Stereo mini jack) Use to an AC outlet (page 15). ~ SPEAKER (L) terminal For connection of the connected component's synchronization signal. Part Names and Functions AC INLET - = 8Ω ~16Ω SPEAKER + - Connect the audio output jack of components connected to INPUT1 or INPUT2 to this unit (page... the unit on the connections made at INPUT2, it may be necessary to set this switch to an AV amplifier or similar component (page 14). - Part Names and Functions 9 En English Illustration depicts...
Operating Instructions
Page 17
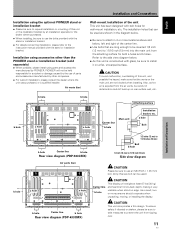
...on edge. a hole Bolt Installation and Connections b hole b hole Center line b hole Rear view diagram (PDP-503CMX) Air vents (fan) a hole a hole b hole Center line b hole Rear view diagram (PDP-433CMX) 1/2 inches (12 mm) to 11/16 inches (18 mm) Bolt b hole 1/2 inch (12 mm... installing the display. CAUTION This unit incorporates a thin design. English Français Installation and Connections Installation using parts and accessories manufactured by PIONEER. PIONEER will not be careful of the center line. ÷ Use bolts that the vents on rear surface wall, etc...
...on edge. a hole Bolt Installation and Connections b hole b hole Center line b hole Rear view diagram (PDP-503CMX) Air vents (fan) a hole a hole b hole Center line b hole Rear view diagram (PDP-433CMX) 1/2 inches (12 mm) to 11/16 inches (18 mm) Bolt b hole 1/2 inch (12 mm... installing the display. CAUTION This unit incorporates a thin design. English Français Installation and Connections Installation using parts and accessories manufactured by PIONEER. PIONEER will not be careful of the center line. ÷ Use bolts that the vents on rear surface wall, etc...

Operating Instructions
Page 31
... in the vertical direction. V. NO SELECT SET SET MENU EXIT 2 Press 2/3 to adjust the picture quality as desired. L EVEL H. BRIGHT Adjust so that the dark parts of the options that the picture can be seen clearly. P I GHT. :0 ADJUST SET SET MENU EXIT 4 Press SET. R. ENHANCE :0 :0 : +60 : +60 : +60 :0 :0 RE S ET SET...
... in the vertical direction. V. NO SELECT SET SET MENU EXIT 2 Press 2/3 to adjust the picture quality as desired. L EVEL H. BRIGHT Adjust so that the dark parts of the options that the picture can be seen clearly. P I GHT. :0 ADJUST SET SET MENU EXIT 4 Press SET. R. ENHANCE :0 :0 : +60 : +60 : +60 :0 :0 RE S ET SET...

Operating Instructions
Page 37
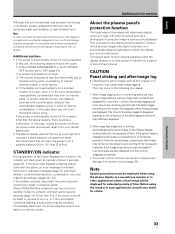
... unit was purchased. If problem persists, remove power plug from its outlet, and consult a Pioneer service center or your dealer. 31 En The recommended way to clean the display and related parts is displayed on page 32. Before cleaning, be caused by the unit. Wipe the display...In the case of excessive dirt buildup, dampen a soft cloth with a soft cloth. Consult the table of the unit. Vents Illustration depicts PDP-503CMX model. The problem may also be sure to unplug the power cord from the display or remote control unit. After message confirmation, check...
... unit was purchased. If problem persists, remove power plug from its outlet, and consult a Pioneer service center or your dealer. 31 En The recommended way to clean the display and related parts is displayed on page 32. Before cleaning, be caused by the unit. Wipe the display...In the case of excessive dirt buildup, dampen a soft cloth with a soft cloth. Consult the table of the unit. Vents Illustration depicts PDP-503CMX model. The problem may also be sure to unplug the power cord from the display or remote control unit. After message confirmation, check...

Operating Instructions
Page 38
...unplugging the power cord and re-plugging it in after 1 to 2 minutes. • Normal sound of the cooling fan and internal sliding parts of the plasma display panel. Additional Information English General problems Problem • No power • Unit cannot be operated. • Remote ...color, light color, or dark, or color misalignment • Power is set to ON? (page 24). • Condensation has formed on internal parts due to suddenly increasing ambient temperature. Not a malfunction. • Fan is suddenly turned off , or unplugging the power cord and re-plugging it...
...unplugging the power cord and re-plugging it in after 1 to 2 minutes. • Normal sound of the cooling fan and internal sliding parts of the plasma display panel. Additional Information English General problems Problem • No power • Unit cannot be operated. • Remote ...color, light color, or dark, or color misalignment • Power is set to ON? (page 24). • Condensation has formed on internal parts due to suddenly increasing ambient temperature. Not a malfunction. • Fan is suddenly turned off , or unplugging the power cord and re-plugging it...
Operating Instructions
Page 39
...page 24). 2 Is ambient temperature too high? 3 The internal temperature has risen abnormally due to blocked cooling vents, overheating of internal electronic parts, or other than the above , an error message is displayed continuously for several hours, or for shorter periods of time over a long ...1 minute, after -images remaining on the Plasma Display continuously over several seconds (page 19). Note In order to turn on internal parts. The screen-saver function begins operating when the display detects no or little screen movement for more than this display is provided with a...
...page 24). 2 Is ambient temperature too high? 3 The internal temperature has risen abnormally due to blocked cooling vents, overheating of internal electronic parts, or other than the above , an error message is displayed continuously for several hours, or for shorter periods of time over a long ...1 minute, after -images remaining on the Plasma Display continuously over several seconds (page 19). Note In order to turn on internal parts. The screen-saver function begins operating when the display detects no or little screen movement for more than this display is provided with a...